
Extension

OpenVINO Extension operation by SYCL program on CPU
In this blog, we will introduce the path that how OpenVINO support extensibility on CPU platform, and a sample of creating one custom operation by implement a SYCL program on CPU. oneAPI has two programming modes, one is through direct programming by SYCL which is C++ based language; another is based on acceleration libraries. In this sample we will use oneAPI DPC++ compiler to support SYCL program compiling in custom extension library, so that if users familiar with SYCL optimization can refer the OpenVINO extension mechanism to support and optimize their own operation kernel.
First of all, you should understand the interface and invoke scheduling of extension operations through OpenVINO core API. OpenVINO support to create a custom operation which is inherited from ov::op::Op and realize the member function “evaluate()” with SYCL implementation. Then, register this customer operation by “ov::OpExtension” to generate a runtime library of OpenVINO extensions. Finally, we will enable the custom extension library can be called by “add_extension()” function by Core API in runtime.
The next step is to create an IR model with this extension operation. We will introduce a method to create OV model by using OpenVINO opset and modify the layer version to extension make sure Core API can invoke operation registered in the extension library.
System requirement
Please make sure you already correctly install the OpenVINO C++ package from:
https://storage.openvinotoolkit.org/repositories/openvino/packages/
And setup environment variable for OpenVINO by:
Then, install the DPC++ compiler, and source the environment variable:
In this blog, we create a customized “SYCL_Add” operation, the folder and files structure like below:
Step 1: Create custom operation by SYCL kernel.
For example, we create a custom operation to realize the functionality of “Add” and named it as “SYCL_Add”. We define this operation with header “add.hpp”:
Then, we need to override the member functions of this new operation, especially the implementation of “evaluate()”.If this blog, we will show an example of SYCL kernel. To enable SYCL programming on CPU, you are required to install the DPC++ compiler and include the header <sycl/sycl.hpp>. Below is the code implementation of “add.cpp”:
As you can see, in this SYCL kernel implementation, there require creating buffer objects which can be managed on device and create accessors to control the accessing of these buffers. So, it remains buffer type conversion between C++ float pointer and SYCL float buffer. The idea of SYCL programming is like OpenCL for heterogeneous platform like GPU/NPU which remains buffer management and synchronization between host and device. This sample is just for CPU extension, there’s no use with device memory.
Step 2: Register custom operation as extension.
To register the customer operation by “ov::OpExtension”,refer below code of “ov_extension.cpp”:
Then, you can create “CMakeLists.txt” file like below. Make sure use the DPC++ compiler with option “-fsycl”.
Use cmake to compile the runtime library for the extension operation. If you have more operations, just add source files into “add_library()”. Then we can get the runtime library called “libcustom.so”.If you meet any problem about compiler icpx, please make sure you already correctly install the DPC++ compile, and source the environment variable.
Step 3: Create IR model by OpenVINO opset
Here introduces a hack method to create ancustom operation “SYCL_Add” by exist OpenVINO opset. Due to the parameter and nodeinput/output of custom op is same as “ov::op::v1::Add”, thus we can use thismethod.
Firstly, create a python program to build OpenVINO IR model with “ov::op::v1::Add”. You can also use OpenVINO C++ API to create model, here use Python code just for quick verification.
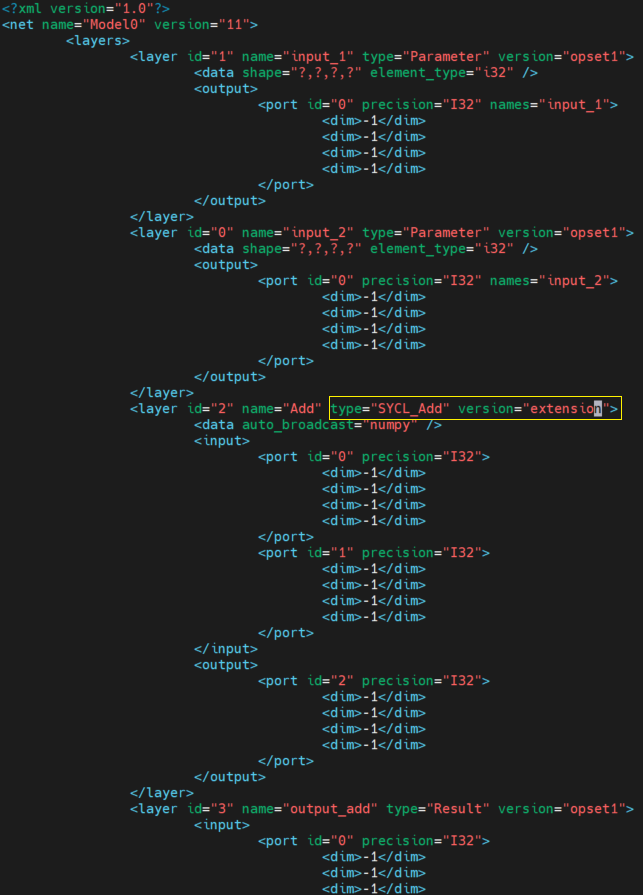
Now, you will get the IR model with OpenVINO “opset.Add”. We can directly modify the “.xml” like below, change the type of this layer to “SYCL_Add” and modify the version of the layer to “extension”.
Step 4: Run and profile the model execution with the SYCLextension library.
Now, you can quick check the workable and performance by OpenVINO benchmark_app sample:
You can check the execution time of yourSYCL kernel:
Please note, the “execType” is using the ref_xxx means your custom reference implementation kernel with the data type.
Summary
This blog just shows the capable way to enable SYCL kernel as the extension of CPU plugin, we will not focusing on guiding the user implement the SYCL kernel like above programming. There are a lot of technic skills of kernel optimization, if you already have an efficient SYCL kernel and want to enable as the CPU extension to workaround some customized operations. We hope this blog will be helpful to you.
OpenVINO Latent Consistency Model C++ pipeline with LoRA model support
Introduction
Latent Consistency Models (LCMs) is the next generation of generative models after Latent Diffusion Models (LDMs). While Latent Diffusion Models (LDMs) like Stable Diffusion are capable of achieving the outstanding quality of generation, they often suffer from the slowness of the iterative image denoising process. LCM is an optimized version of LDM. Inspired by Consistency Models (CM), Latent Consistency Models (LCMs) enabled swift inference with minimal steps on any pre-trained LDMs, including Stable Diffusion. The Consistency Models is a new family of generative models that enables one-step or few-step generation. More details about the proposed approach and models can be found using the following resources: project page, paper, original repository.
This article will demonstrate a C++ application of the LCM model with Intel’s OpenVINO™ C++ API on Linux systems. For model inference performance and accuracy, the C++ pipeline is well aligned with the Python implementation.
The full implementation of the LCM C++ demo described in this post is available on the GitHub: openvino.genai/lcm_dreamshaper_v7.
Model Conversion
To leverage efficient inference with OpenVINO™ runtime on Intel platforms, the original model should be converted to OpenVINO™ Intermediate Representation (IR).
LCM model
Optimum Intel can be used to load SimianLuo/LCM_Dreamshaper_v7 model from Hugging Face Hub and convert PyTorch checkpoint to the OpenVINO™ IR on-the-fly, by setting export=True when loading the model, like:
Tokenizer
OpenVINO Tokenizers is an extension that adds text processing operations to OpenVINO Inference Engine. In addition, the OpenVINO Tokenizers project has a tool to convert a HuggingFace tokenizer into OpenVINO IR model tokenizer and detokenizer: it provides the convert_tokenizer function that accepts a tokenizer Python object and returns an OpenVINO Model object:
Note: Currently OpenVINO Tokenizers can be inferred on CPU devices only.
Conversion step
You can find the full script for model conversion at the original repo.
Note: The tutorial assumes that the current working directory is and <openvino.genai repo>/image_generation/lcm_ dreamshaper_v7/cpp all paths are relative to this folder.
Let’s prepare a Python environment and install dependencies:
Now we can use the script scripts/convert_model.py to download and convert models:
C++ Pipeline
Pipeline flow
Let’s now talk about the logical structure of the LCM model pipeline.
Just like the classic Stable Diffusion pipeline, the LCM pipeline consists of three important parts:
- A text encoder to create a condition to generate an image from a text prompt.
- U-Net for step-by-step denoising the latent image representation.
- Autoencoder (VAE) for decoding the latent space to an image.
The pipeline takes a latent image representation and a text prompt transformed to text embedding via CLIP’s text encoder as an input. The initial latent image representation is generated using random noise generator. LCM uses a guidance scale for getting time step conditional embeddings as input for the diffusion process, while in Stable Diffusion, it used for scaling output latents.
Next, the U-Net iteratively denoises the random latent image representations while being conditioned on the text embeddings. The output of the U-Net, being the noise residual, is used to compute a denoised latent image representation via a scheduler algorithm. LCM introduces its own scheduling algorithm that extends the denoising procedure introduced by denoising diffusion probabilistic models (DDPMs) with non-Markovian guidance. The denoising process is repeated for a given number of times to step-by-step retrieve better latent image representations. When complete, the latent image representation is decoded by the decoder part of the variational auto encoder.
The C++ implementations of the scheduler algorithm and LCM pipeline are available at the following links: LCM Scheduler, LCM Pipeline.
LoRA support
LoRA (Low-Rank Adaptation) is a training technique for fine-tuning Stable Diffusion models. There are various LoRA models available on https://civitai.com/tag/lora.
The main idea for LoRA weights enabling, is to append weights onto the OpenVINO LCM models at runtime before compiling the Unet/text_encoder model. The method is to extract LoRA weights from safetensors file, find the corresponding weights in Unet/text_encoder model and insert the LoRA bias weights. The common approach to add LoRA weights looks like:

The original LoRA safetensor model is loaded via safetensors.h. The layer name and weight of LoRA are modified with Eigen Lib and inserted into Unet/text_encoder OpenVINO model using ov::pass::MatcherPass - you can see the implementation in the file common/diffusers/src/lora.cpp.
To run the LCM demo with the LoRA model, first download LoRA, for example: LoRa/Soulcard.
Build and Run LCM demo
Let’s start with the dependencies installation:
Now we can build the application:
And finally we’re ready to run the LCM demo. By default the positive prompt is set to: “a beautiful pink unicorn”.
Please note, that the quality of the resulting image depends on the quality of the random noise generator, so there is a difference for output images generated by the C++ noise generator and the PyTorch generator. Use oprion -r to read the PyTorch generated noise from the provided textfiles for the alignment with Python pipeline.
Note: Run ./lcm_dreamshaper -h to see all the available demo options
Let’s try to run the application in a few modes:
Read the numpy latent input and noise for scheduler instead of C++ std lib for the alignment with Python pipeline: ./lcm_dreamshaper -r

Generate image with C++ std lib generated latent and noise : ./lcm_dreamshaper

Generate image with Soulcard LoRa and C++ generated latent and noise: ./lcm_dreamshaper -r -l path/to/soulcard.safetensors

See Also
- Optimizing Latent Consistency Model for Image Generation with OpenVINO™ and NNCF
- Image generation with Latent Consistency Model and OpenVINO
- C++ Pipeline for Stable Diffusion v1.5 with Pybind for Lora Enabling
- Enable LoRA weights with Stable Diffusion Controlnet Pipeline
C++ Pipeline for Stable Diffusion v1.5 with Pybind for Lora Enabling
Authors: Fiona Zhao, Xiake Sun, Su Yang
The purpose is to demonstrate the use of C++ native OpenVINO API.
For model inference performance and accuracy, the pipelines of C++ and python are well aligned.
Source code github: OV_SD_CPP.
Step 1: Prepare Environment
Setup in Linux:
C++ pipeline loads the Lora safetensors via Pybind
C++ Dependencies:
- OpenVINO: Tested with OpenVINO 2023.1.0.dev20230811 pre-release
- Boost: Install with sudo apt-get install libboost-all-dev for LMSDiscreteScheduler's integration
- OpenCV: Install with sudo apt install libopencv-dev for image saving
Notice:
SD Preparation in two steps above could be auto implemented with build_dependencies.sh in the scripts directory.
Step 2: Prepare SD model and Tokenizer Model
- SD v1.5 model:
Refer this link to generate SD v1.5 model, reshape to (1,3,512,512) for best performance.
With downloaded models, the model conversion from PyTorch model to OpenVINO IR could be done with script convert_model.py in the scripts directory.
Lora enabling with safetensors, refer this blog.
SD model dreamlike-anime-1.0 and Lora soulcard are tested in this pipeline.
- Tokenizer model:
- The script convert_sd_tokenizer.py in the scripts dir could serialize the tokenizer model IR
- Build OpenVINO extension:
Refer to PR OpenVINO custom extension ( new feature still in experiments )
- read model with extension in the SD pipeline
Step 3: Build Pipeline
Step 4: Run Pipeline
Usage: OV_SD_CPP [OPTION...]
- -p, --posPrompt arg Initial positive prompt for SD (default: cyberpunk cityscape like Tokyo New York with tall buildings at dusk golden hour cinematic lighting)
- -n, --negPrompt arg Default negative prompt is empty with space (default: )
- -d, --device arg AUTO, CPU, or GPU (default: CPU)
- -s, --seed arg Number of random seed to generate latent (default: 42)
- --height arg height of output image (default: 512)
- --width arg width of output image (default: 512)
- --log arg Generate logging into log.txt for debug
- -c, --useCache Use model caching
- -e, --useOVExtension Use OpenVINO extension for tokenizer
- -r, --readNPLatent Read numpy generated latents from file
- -m, --modelPath arg Specify path of SD model IR (default: /YOUR_PATH/SD_ctrlnet/dreamlike-anime-1.0)
- -t, --type arg Specify precision of SD model IR (default: FP16_static)
- -l, --loraPath arg Specify path of lora file. (*.safetensors). (default: /YOUR_PATH/soulcard.safetensors)
- -a, --alpha arg alpha for lora (default: 0.75)
- -h, --help Print usage
Example:
Positive prompt: cyberpunk cityscape like Tokyo New York with tall buildings at dusk golden hour cinematic lighting.
Negative prompt: (empty, here couldn't use OV tokenizer, check the issues for details).
Read the numpy latent instead of C++ std lib for the alignment with Python pipeline.
- Generate image without lora

- Generate image with Soulcard Lora

- Generate the debug logging into log.txt
Benchmark:
The performance and image quality of C++ pipeline are aligned with Python.
To align the performance with Python SD pipeline, C++ pipeline will print the duration of each model inferencing only.
For the diffusion part, the duration is for all the steps of Unet inferencing, which is the bottleneck.
For the generation quality, be careful with the negative prompt and random latent generation.
Limitation:
- Pipeline features:
- Program optimization: now parallel optimization with std::for_each only and add_compile_options(-O3 -march=native -Wall) with CMake
- The pipeline with INT8 model IR not improve the performance
- Lora enabling only for FP16
- Random generation fails to align, C++ random with MT19937 results is differ from numpy.random.randn(). Hence, please use -r, --readNPLatent for the alignment with Python
- OV extension tokenizer cannot recognize the special character, like “.”, ”,”, “”, etc. When write prompt, need to use space to split words, and cannot accept empty negative prompt. So use default tokenizer without config -e, --useOVExtension, when negative prompt is empty
Setup in Windows 10 with VS2019:
1. Python env: Setup Conda env SD-CPP with the anaconda prompt terminal
2. C++ dependencies:
- OpenVINO and OpenCV:
Download and setup Environment Variable: add the path of bin and lib (System Properties -> System Properties -> Environment Variables -> System variables -> Path )
- Boost:
- Download from sourceforge
- Unzip
- Setup: bootstrap.bat
- Build: b2.exe
- Install: b2.exe install
Installed boost in the path C:/Boost, add CMakeList with "SET(BOOST_ROOT"C:/Boost")"
3. Setup of conda env SD-CPP and Setup OpenVINO with setupvars.bat
4. CMake with build.bat like:
5. Setup of Visual Studio with release and x64, and build: open .sln file in the build Dir
6. Run the SD_generate.exe
OpenVINO™ Frontend Extension Samples with ConversionExtension
Authors: Wenyi Zou, Su Yang
The OpenVINO™ Frontend extension API enables the mapping of custom operations from framework model representation to OpenVINO representation. In this blog, two samples focus on the mapping to multiple operations with the ConversionExtension in practice.
Sample One: grid_sampler
This sample explains how to use Frontend ConversionExtension classes to facilitate the mapping of custom operations from ONNX model representation to OpenVINO™ representation. It enables writing arbitrary code to replace a single framework operation with multiple connected OpenVINO™ operations constructing dependency graph of any complexity.
When convert the ONNX model BEVFormer tiny to OpenVINO IR, the following error will occur.

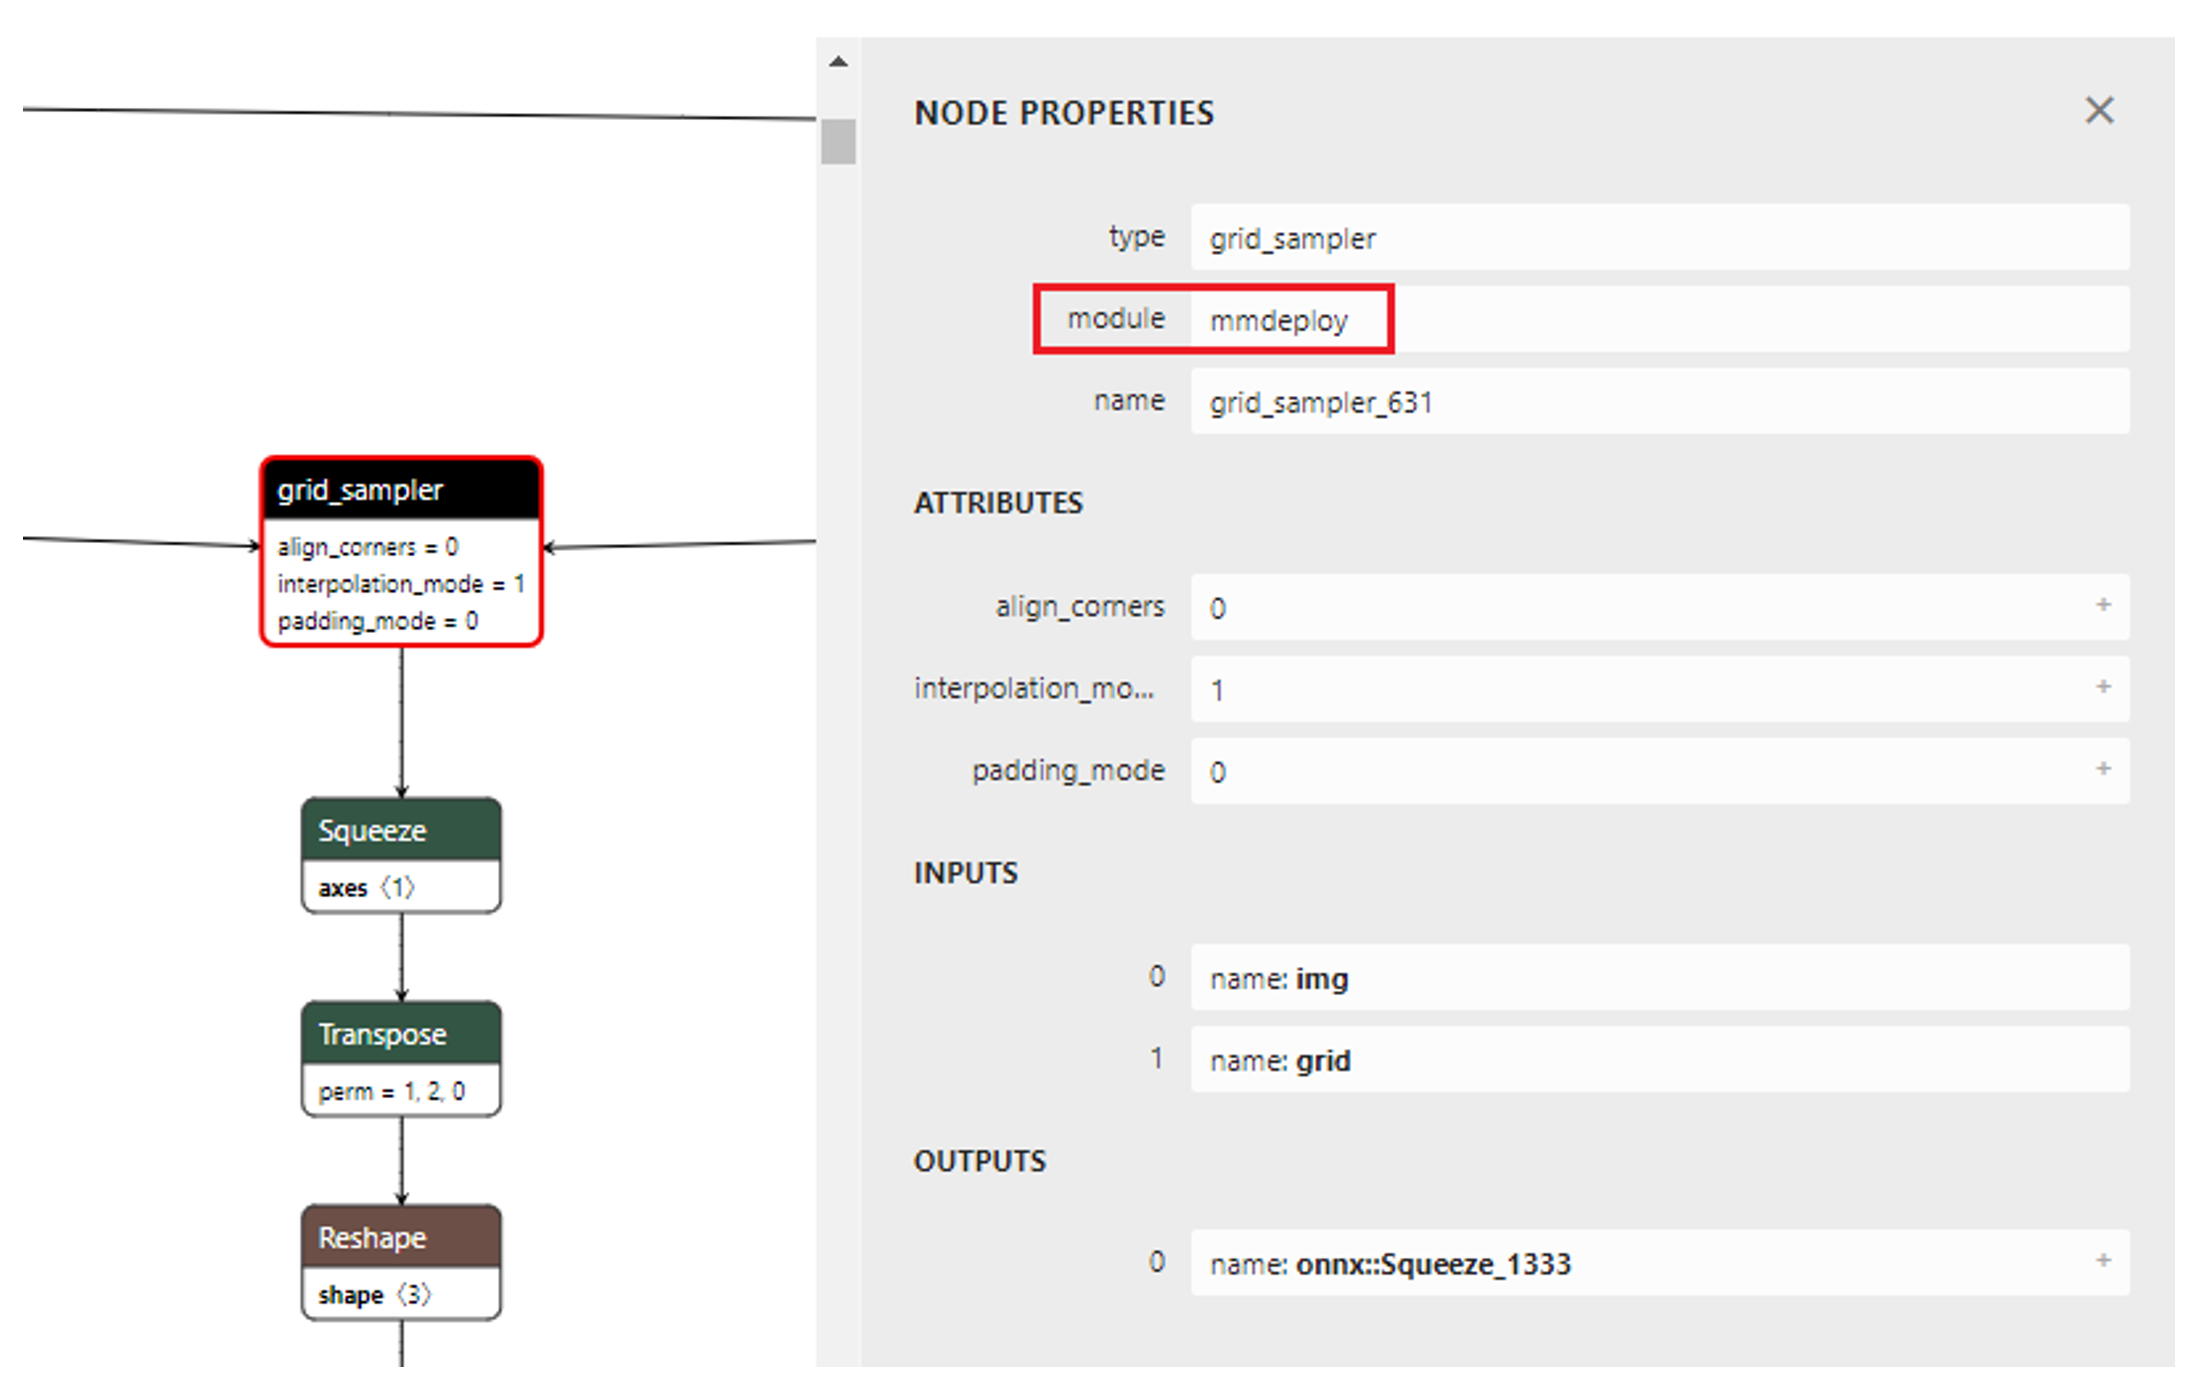
Network BEVFormer tiny viewing with Netron, we can see the node of grid_sampler. As shown in Figure 1.1.
ONNX Nodes
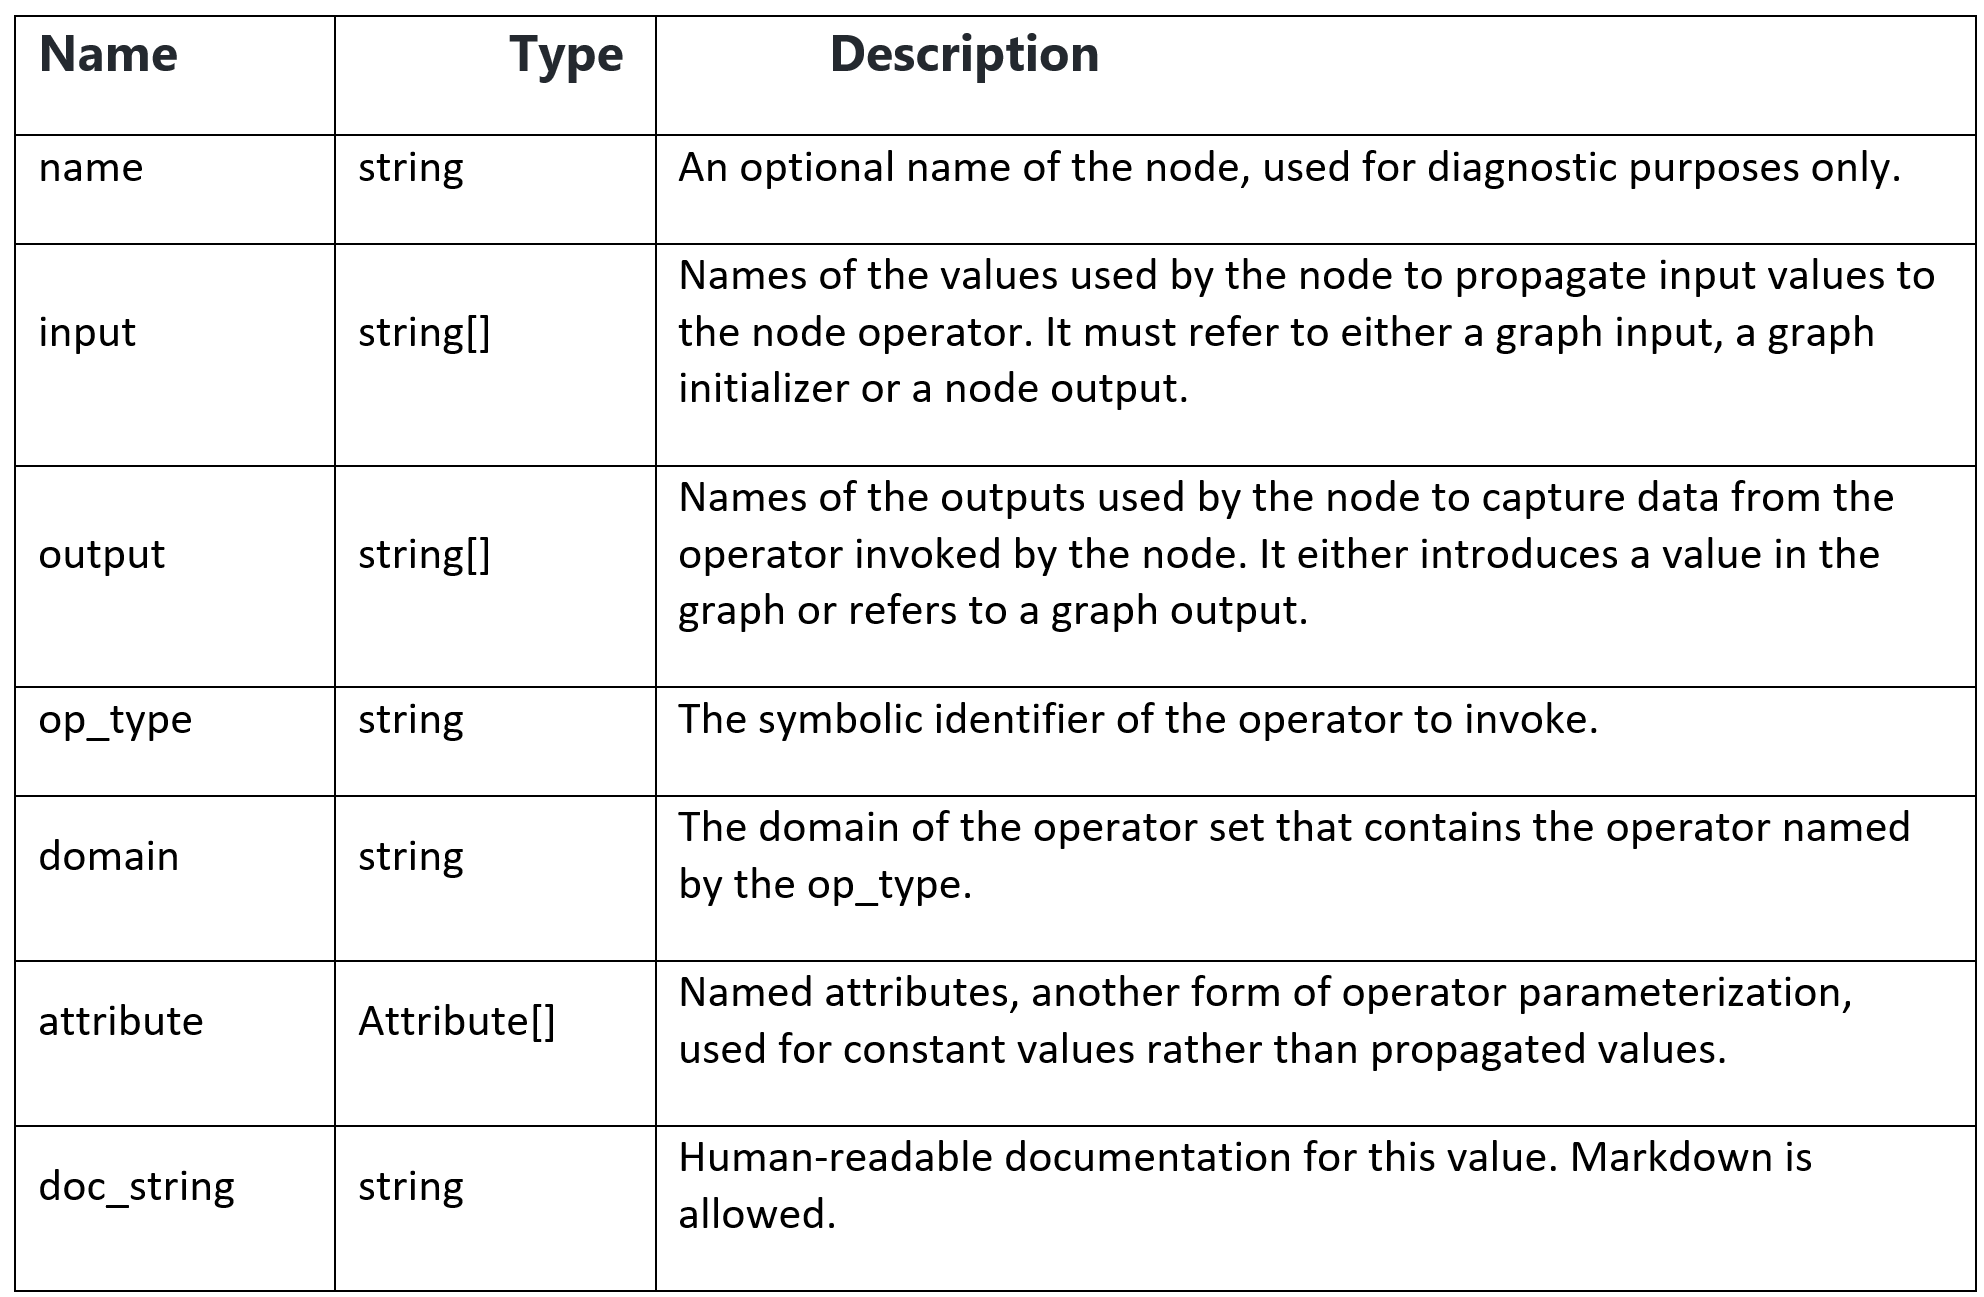
Computation nodes are comprised of a name, the name of an operator that it invokes, a list of named inputs, a list of named outputs, and a list of attributes.
Input and outputs are positionally associated with operator inputs and outputs. Attributes are associated with operator attributes by name.
They have the following properties:
According to the node properties of ONNX, the node grid_sampler_631 op_type is grid_sampler, the domain is mmdeploy. We can use ov::frontend::onnx::ConversionExtension to set the domain paramerter.
Sample Two: aten::uniform
In the OpenVINO™ documentation, the example illustrates basic knowledge of ConversionExtension, like node object of type NodeContext. Real mapping issues like different node modules(or domains), different input types, and missing attributes are under discussion and solved with the workaround.
To support the VectorNet model, try to export the ONNX model from PyTorch. Unfortunately, aten::uniform (ATen is PyTorch’s built-in tensor library) isn’t yet supported by onnx. But OpenVINO™ has RandomUniform operation. Comparing the PyTorch Uniform operation with the RandomUniform operation (generates random numbers from a uniform distribution in the range [minval, maxval)), it shows the same math task with the different input types. Therefore, It’s possible to use Frontend Extensions to map this uniform distribution operation with the onnx model if solving the potential mapping issues. As one-to-one mapping is impossible, decomposition to multiple operations (at least Op Convert additionally) should be considered.
Export Model with Fallback
Because support has not been added to convert a particular torch op to ONNX, we cannot export each ATen op (in the TorchScript namespace “aten”) as a regular ONNX op. So, we fall back to exporting an ATen op with OperatorExportTypes.ONNX_ATEN_FALLBACK.
To optimize the onnx model with OpenVINO™ , create a new sample based on the C++ hello_classification in Linux.
Error: Check 'unknown_operators.empty()' failed at src/frontends/onnx/frontend/src/core/graph.cpp:213: OpenVINO™ does not support the following ONNX operations: org.pytorch.aten.Aten.
Visualize Graph for Mapping
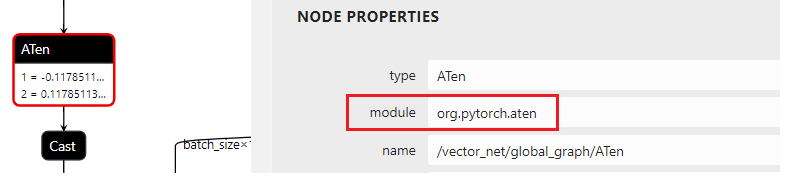
In Netron, we could find 6 ATen nodes with the same input values. The obvious mapping problem is that the attribute uniform of node aten should be the node type, while the additional node’s domain is org.pytorch.aten. So, we use ov::frontend::onnx::conversion to set domain parameter, which is similar to the sample one.
As below, real attributes of PyTorch uniform operation aren’t available in the ONNX. The needed attributes of OpenVINO™ RandomUniform operation are output_type, global_seed, and op_seed.
Note: Types are int32 or int64, while uniform op is float64 in the figure.
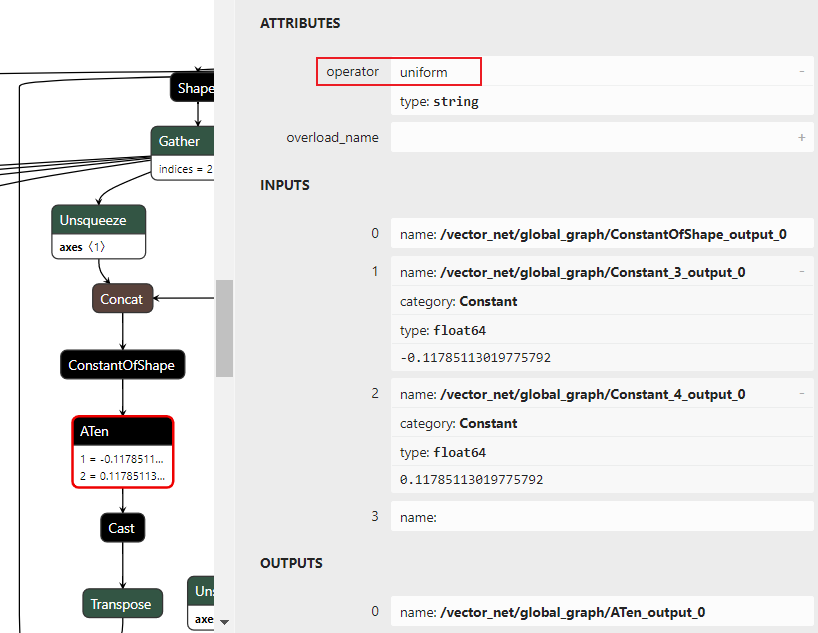
As a workaround, we set the seed of attributes as a constant because of the missing aten::uniform attributes.
To solve the difference between aten::uniform and RandomUniform, the mapping issue could be solved as below:
- Use Op ShapeOf to get the 1D tensor of the input shape.
- Use Op Convert to convert the input types from aten::uniform’s f64 to RandomUniform’s i64.
- Use Op Add the input with the Op Constant “117” and Op Multiply with the Op Constant “0.001”, because the output value of the upstream Op ConstantOfShape_output_0 is “0” and the real inputs of all six aten::uniform’s “minval” and “maxval” are “-0.11785113…” and “0.11785113…”.
Add Extension in Practice
Debug steps of the Frontend extension on Windows Visual Studio:
- Add add_extension code into C++ sample and build project
- Debug with onnx file path
Thanks to the NODE_VALIDATION_CHECK from random_uniform Op, the debug is friendly to the new user.
Code sample of the core.add_extension function
See Also