
Sample Code

OpenVINO Latent Consistency Model C++ pipeline with LoRA model support
Introduction
Latent Consistency Models (LCMs) is the next generation of generative models after Latent Diffusion Models (LDMs). While Latent Diffusion Models (LDMs) like Stable Diffusion are capable of achieving the outstanding quality of generation, they often suffer from the slowness of the iterative image denoising process. LCM is an optimized version of LDM. Inspired by Consistency Models (CM), Latent Consistency Models (LCMs) enabled swift inference with minimal steps on any pre-trained LDMs, including Stable Diffusion. The Consistency Models is a new family of generative models that enables one-step or few-step generation. More details about the proposed approach and models can be found using the following resources: project page, paper, original repository.
This article will demonstrate a C++ application of the LCM model with Intel’s OpenVINO™ C++ API on Linux systems. For model inference performance and accuracy, the C++ pipeline is well aligned with the Python implementation.
The full implementation of the LCM C++ demo described in this post is available on the GitHub: openvino.genai/lcm_dreamshaper_v7.
Model Conversion
To leverage efficient inference with OpenVINO™ runtime on Intel platforms, the original model should be converted to OpenVINO™ Intermediate Representation (IR).
LCM model
Optimum Intel can be used to load SimianLuo/LCM_Dreamshaper_v7 model from Hugging Face Hub and convert PyTorch checkpoint to the OpenVINO™ IR on-the-fly, by setting export=True when loading the model, like:
Tokenizer
OpenVINO Tokenizers is an extension that adds text processing operations to OpenVINO Inference Engine. In addition, the OpenVINO Tokenizers project has a tool to convert a HuggingFace tokenizer into OpenVINO IR model tokenizer and detokenizer: it provides the convert_tokenizer function that accepts a tokenizer Python object and returns an OpenVINO Model object:
Note: Currently OpenVINO Tokenizers can be inferred on CPU devices only.
Conversion step
You can find the full script for model conversion at the original repo.
Note: The tutorial assumes that the current working directory is and <openvino.genai repo>/image_generation/lcm_ dreamshaper_v7/cpp all paths are relative to this folder.
Let’s prepare a Python environment and install dependencies:
Now we can use the script scripts/convert_model.py to download and convert models:
C++ Pipeline
Pipeline flow
Let’s now talk about the logical structure of the LCM model pipeline.
Just like the classic Stable Diffusion pipeline, the LCM pipeline consists of three important parts:
- A text encoder to create a condition to generate an image from a text prompt.
- U-Net for step-by-step denoising the latent image representation.
- Autoencoder (VAE) for decoding the latent space to an image.
The pipeline takes a latent image representation and a text prompt transformed to text embedding via CLIP’s text encoder as an input. The initial latent image representation is generated using random noise generator. LCM uses a guidance scale for getting time step conditional embeddings as input for the diffusion process, while in Stable Diffusion, it used for scaling output latents.
Next, the U-Net iteratively denoises the random latent image representations while being conditioned on the text embeddings. The output of the U-Net, being the noise residual, is used to compute a denoised latent image representation via a scheduler algorithm. LCM introduces its own scheduling algorithm that extends the denoising procedure introduced by denoising diffusion probabilistic models (DDPMs) with non-Markovian guidance. The denoising process is repeated for a given number of times to step-by-step retrieve better latent image representations. When complete, the latent image representation is decoded by the decoder part of the variational auto encoder.
The C++ implementations of the scheduler algorithm and LCM pipeline are available at the following links: LCM Scheduler, LCM Pipeline.
LoRA support
LoRA (Low-Rank Adaptation) is a training technique for fine-tuning Stable Diffusion models. There are various LoRA models available on https://civitai.com/tag/lora.
The main idea for LoRA weights enabling, is to append weights onto the OpenVINO LCM models at runtime before compiling the Unet/text_encoder model. The method is to extract LoRA weights from safetensors file, find the corresponding weights in Unet/text_encoder model and insert the LoRA bias weights. The common approach to add LoRA weights looks like:

The original LoRA safetensor model is loaded via safetensors.h. The layer name and weight of LoRA are modified with Eigen Lib and inserted into Unet/text_encoder OpenVINO model using ov::pass::MatcherPass - you can see the implementation in the file common/diffusers/src/lora.cpp.
To run the LCM demo with the LoRA model, first download LoRA, for example: LoRa/Soulcard.
Build and Run LCM demo
Let’s start with the dependencies installation:
Now we can build the application:
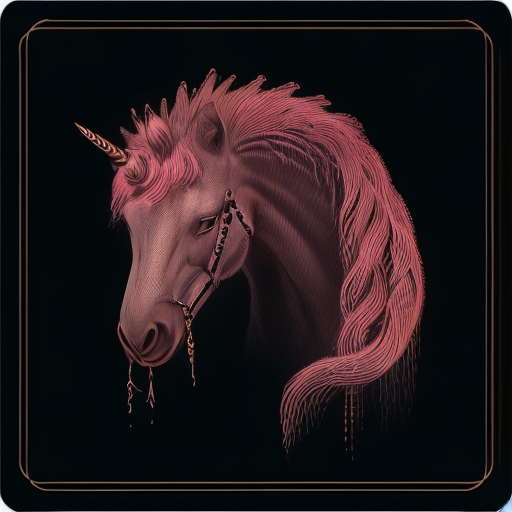
And finally we’re ready to run the LCM demo. By default the positive prompt is set to: “a beautiful pink unicorn”.
Please note, that the quality of the resulting image depends on the quality of the random noise generator, so there is a difference for output images generated by the C++ noise generator and the PyTorch generator. Use oprion -r to read the PyTorch generated noise from the provided textfiles for the alignment with Python pipeline.
Note: Run ./lcm_dreamshaper -h to see all the available demo options
Let’s try to run the application in a few modes:
Read the numpy latent input and noise for scheduler instead of C++ std lib for the alignment with Python pipeline: ./lcm_dreamshaper -r

Generate image with C++ std lib generated latent and noise : ./lcm_dreamshaper

Generate image with Soulcard LoRa and C++ generated latent and noise: ./lcm_dreamshaper -r -l path/to/soulcard.safetensors
See Also
- Optimizing Latent Consistency Model for Image Generation with OpenVINO™ and NNCF
- Image generation with Latent Consistency Model and OpenVINO
- C++ Pipeline for Stable Diffusion v1.5 with Pybind for Lora Enabling
- Enable LoRA weights with Stable Diffusion Controlnet Pipeline
Use Encrypted Model with OpenVINO
Deploying deep-learning capabilities to edge devices can present security challenges like ensuring inference integrity, or providing copyright protection of your deep-learning models. OpenVINO provide a simple method with crypto algorithm to protect model in disk. Model encryption, decryption and authentication are not provided by OpenVINO but can be implemented with third-party tools (i.e., OpenSSL). In this example, we use AES-128-cbc algorithm in OpenSSL to demonstrate the model cryptography.
As you can see the mechanism in below image, there are two part to process:
- First is to encrypt your plain IR model into encrypted model.
- The second part is to use the same password key and IV which used for encryption before to decrypt model at model loading runtime.

Step 1: Encrypt model
Make sure you install the OpenSSL and boost, for example in Ubuntu:
Then use command line to do model encryption by OpenSSL AES-128-CBC algorithm. In this simply example, I use same password for Key and IV, it is hexadecimal of string "openvino encrypt". You can use some online str2hex tool to generate hex representation of your string password.
Step 2: Decrypt model
Here provide the sample code to read encrypted model into buffer and decrypt to plain model binary. Then read and compile model.
CMakeLists.txt file like below for compiling:
This blog just provide an example of model encryption by OpenSSL. This method can only protect you model in disk, for total memory crypto, you can refer technologies like OpenVINO™ Security Add-on in virtual machine to provide an isolated environment for security sensitive operations, and use Intel® SGX (Software Guard Extensions) which allows developers to split a computer's memory into private, predefined, highly secure areas called enclaves, which better protect sensitive information.
Reference:
- OpenVINO model protection: https://docs.openvino.ai/2023.1/openvino_docs_OV_UG_protecting_model_guide.html
- OpenVINO™ Security Add-on: https://docs.openvino.ai/2023.1/ovsa_get_started.html
- OpenSSL official website: https://www.openssl.org/
How to build and run OpenVino™ C++ Benchmark Application for Linux
Introduction
The OpenVINO™ Benchmark Application estimates deep learning inference performance on supported devices for synchronous and asynchronous modes.
NOTE: This guide describes the usage of the C++ implementation of the Benchmark Tool. For the Python implementation, refer to the Benchmark Python Tool page. The Python version is recommended for benchmarking models used in Python applications, and the C++ version is recommended for benchmarking models used in C++ applications.
In this tutorial, we will guide you through building and running the C++ implementation of the Benchmark Tool on Ubuntu with OpenVINO™ 2023.1.0 release and demonstrate its usage by benchmarking the Inception (GoogleNet) V3 deep learning model. The following steps outline the process:
- Download and Convert the Model
- Install OpenVINO™ Runtime
- Build OpenVINO™ C++ Runtime Samples
- Run the Benchmark Application
The benchmark application works with models in the OpenVINO™ IR (.xml and .bin), ONNX (.onnx), TensorFlow (*.pb), TensorFlow Lite (*.tflite) and PaddlePaddle (*.pdmodel) formats. Make sure to convert your models if necessary (see "Model conversion to OpenVINO™ IR format" step below).
Requirements
Before getting started, ensure that you have the following requirements in place:
- Ubuntu 18.04 or higher
- CMake version 3.10 or higher
Step 1: Install OpenVINO™
To get started, first install OpenVINO™ Runtime C++ API.
Download and Setup OpenVINO™ Runtime archive file for Linux for your system. The following steps describe the installation process for Ubuntu 20.04 x86_64 system:
1. Download the archive file, extract the files, rename the extracted folder, and move it to the desired path:
2. Install required system dependencies on Linux. To do this, OpenVINO provides a script in the extracted installation directory. Run the following command:
3. For simplicity, it is useful to create a symbolic link as below:
4. Set OpenVINO™ environment variables. Open a terminal window and run the setupvars.sh script to temporarily set your environment variables. If your <INSTALL_DIR> is not /opt/intel/openvino_2023, use the correct one instead:
Step 2: Build OpenVINO™ C++ Runtime Samples
In the existing terminal window where the OpenVINO™ environment is set up, navigate to the /opt/intel/openvino_2023.1.0/samples/cpp directory and run the /build_samples.sh script:
As a result of a successful build, you'll get the message with a path to the sample binaries:
NOTE: You can also use the -b option to specify the sample build directory and -i to specify the sample install directory, for example:
NOTE: The build_samples.sh script will build all the samples in the /opt/intel/openvino_2023.1.0/samples/cpp folder. Remove the other samples from the folder if you want to build only a few samples or only the benchmark_app.
Step 3: Run the Benchmark Application
NOTE: You can use your model for benchmark running or if necessary download model for demo using the Model Downloader. You can find pre-trained models from either public models or Intel’s pre-trained modelsfrom the OpenVINO™ Open Model Zoo. Following are the steps to install the tools and obtain the IR for the Inception (GoogleNet) V3 PyTorch model:
The googlenet-v3-pytorch IR files will be located at: <CURRENT_DIRECTORY>/public/googlenet-v3-pytorch/FP32
Navigate to the samples binaries folder and run the benchmark_app with the following command:
By default, the application will load the specified model onto the CPU and perform inferencing on batches of randomly generated data inputs for 60 seconds. As it loads, it prints information about benchmark parameters. When benchmarking is completed, it reports the minimum, average, and maximum inferencing latency and average the throughput.
NOTE: You can use images from the media files collection available at test_data and infer with specific input data using the -i argument to benchmark_app.
You may be able to improve benchmark results beyond the default configuration by configuring some of the execution parameters for your model. Please find other options for configuring execution parameters here: Benchmark C++ Tool Configuration Options
Model conversion to OpenVINO™ IR format
You can use OpenVINO™ Model Converter to convert your model to Intermediate Representation (IR) when necessary:
1. Install OpenVINO™ for Python which includes the necessary components for utilizing the OpenVINO™ Model Converter.
NOTE: Ensure you install the same version of OpenVINO™ Runtime Package for Python as the OpenVINO™ Runtime C++ API in step 2.
2. To convert the model to IR, run Model Converter:
Related Articles
Install OpenVINO™ Runtime on Linux from an Archive File
Transition from Legacy Conversion API
Running OpenVINO™ C++ samples on Visual Studio
Enable LoRA weights with Stable Diffusion Controlnet Pipeline
Authors: Zhen Zhao(Fiona), Kunda Xu
Low-Rank Adaptation(LoRA) is a novel technique introduced to deal with the problem of fine-tuning Diffusers and Large Language Models (LLMs). In the case of Stable Diffusion fine-tuning, LoRA can be applied to the cross-attention layers for the image representations with the latent described. You can refer HuggingFace diffusers to understand the basic concept and method for model fine-tuning: https://huggingface.co/docs/diffusers/training/lora
In this blog, we aimed to introduce the method building up the pipeline for Stable Diffusion + ControlNet with OpenVINO™ optimization, and enable LoRA weights for Unet model of Stable Diffusion to generate images with different styles. The demo source code is based on: https://github.com/FionaZZ92/OpenVINO_sample/tree/master/SD_controlnet
Stable Diffusion ControlNet Pipeline
Step 1: Environment preparation
First, please follow below method to prepare your development environment, you can choose download model from HuggingFace for better runtime experience. In this case, we choose controlNet for canny image task.
* Please note, the diffusers start to use `torch.nn.functional.scaled_dot_product_attention` if your installed torch version is >= 2.0, and the ONNX does not support op conversion for “Aten:: scaled_dot_product_attention”. To avoid the error during the model conversion by “torch.onnx.export”, please make sure you are using torch==1.13.1.
Step 2: Model Conversion
The demo provides two programs, to convert model to OpenVINO™ IR, you should use “get_model.py”. Please check the options of this script by:
In this case, let us choose multiple batch size to generate multiple images. The common application of vison generation has two concepts of batch:
- `batch_size`: Specify the length of input prompt or negative prompt. This method is used for generating N images with N prompts.
- `num_images_per_prompt`: Specify the number of images that each prompt generates. This method is used to generate M images with 1 prompts.
Thus, for common user application, you can well use these two attributes in diffusers to generate N*M images by N prompts with increased random seed values. For example, if your basic seed is 42, to generate N(2)*M(2) images, the actual generation is like below:
- N=1, M=1: prompt_list[0], seed=42
- N=1, M=2: prompt_list[0], seed=43
- N=2, M=1: prompt_list[1], seed=42
- N=2, M=2: prompt_list[1], seed=43
In this case, let’s use N=2, M=1 as a quick example for demonstration, thus the use`--batch 2`. This script will generate static shape model by default. If you are using different value of N and M, please specify `--dynamic`.
Please check your current path, make sure you already generated below models currently. Other ONNX files can be deleted for saving space.
- controlnet-canny.<xml|bin>
- text_encoder.<xml|bin>
- unet_controlnet.<xml|bin>
- vae_decoder.<xml|bin>
* If your local path already exists ONNX or IR model, the script will jump tore-generate ONNX/IR. If you updated the pytorch model or want to generate model with different shape, please remember to delete existed ONNX and IR models.
Step 3: Runtime pipeline test
The provided demo program `run_pipe.py` is manually build-up the pipeline for StableDiffusionControlNet which refers to the original source of `diffusers.StableDiffusionControlNetPipeline`
The difference is we simplify the pipeline with 4 models’ inference by OpenVINO™ runtime API which can make sure the model inference can be accelerated on Intel® CPU and GPU platform.
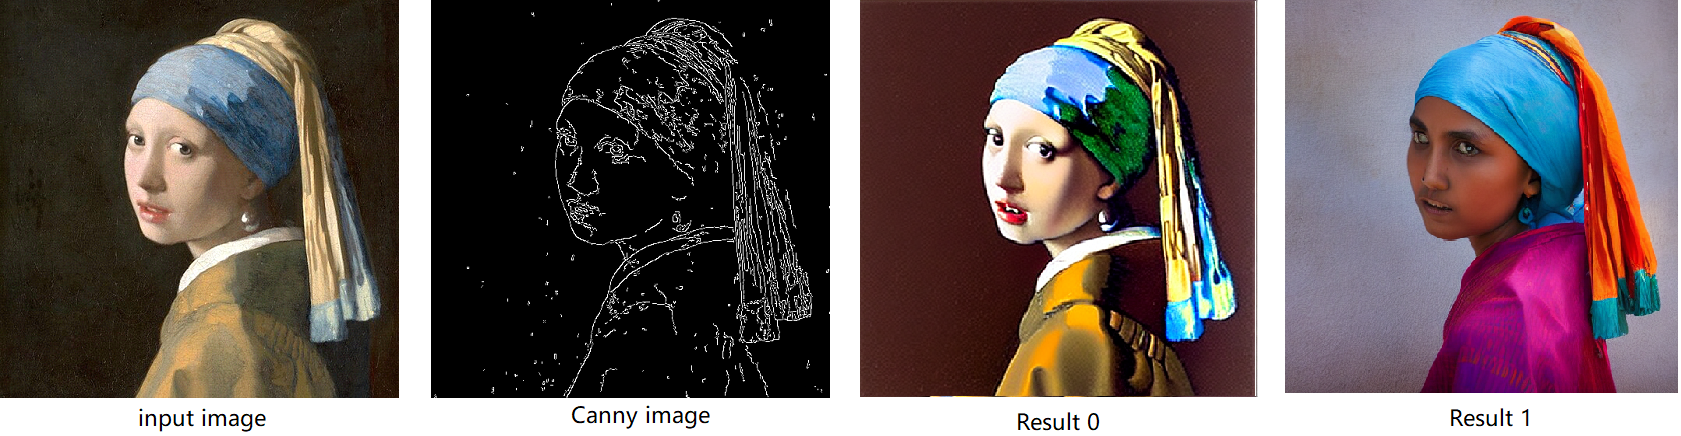
The default iteration is 20, image shape is 512*512, seed is 42, and the input image and prompt is for “Girl with Pearl Earring”. You can adjust or custom your own pipeline attributes for testing.
In the case with batch_size=2, the generated image is like below:
Enable LoRA weights for Stable Diffusion
Normal LoRA weights has two types, one is ` pytorch_lora_weights.bin`,the other is using safetensors. In this case, we introduce both methods for these two LoRA weights.
The main idea for LoRA weights enabling, is to append weights onto the original Unet model of Stable Diffusion, then export IR model of Unet which remains LoRA weights.
There are various LoRA models on https://civitai.com/tag/lora , we choose some public models on HuggingFace as an example, you can consider toreplace with your owns.
Step 4-1: Enable LoRA by pytorch_lora_weights.bin
This step introduces the method to add lora weights to Unet model of Stable Diffusion by `pipe.unet.load_attn_procs(...)` function. By using this way, the LoRA weights will be loaded into the attention layers of Unet model of Stable Diffusion.
* Remember to delete exist Unet model to generate the new IR with LoRA weights.
Then, run pipeline inference program to check results.
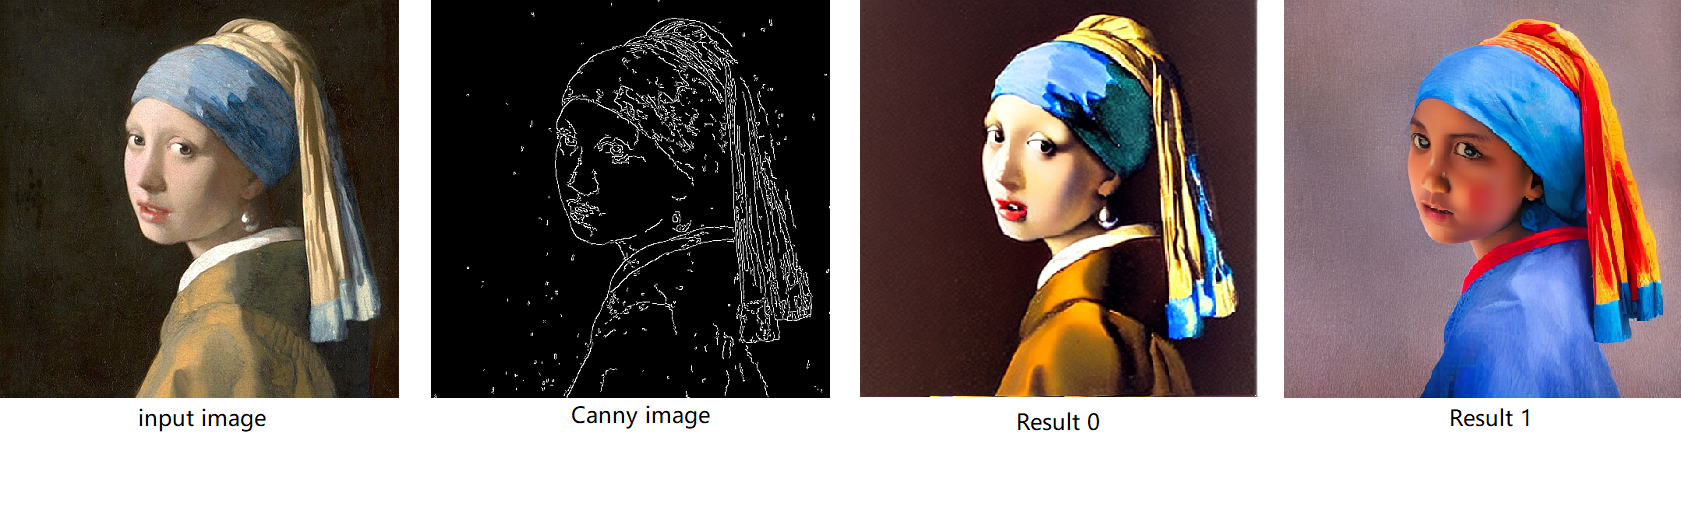
The LoRA weights appended Stable Diffusion model with controlNet pipeline can generate image like below:
Step 4-2: Enable LoRA by safetensors typed weights
This step introduces the method to add LoRA weights to Stable diffusion Unet model by `diffusers/scripts/convert_lora_safetensor_to_diffusers.py`. Diffusers provide the script to generate new Stable Diffusion model by enabling safetensors typed LoRA model. By this method, you will need to replace the weight path to new generated Stable Diffusion model with LoRA. You can adjust value of `alpha` option to change the merging ratio in `W = W0 + alpha * deltaW` for attention layers.
Then, run pipeline inference program to check results.
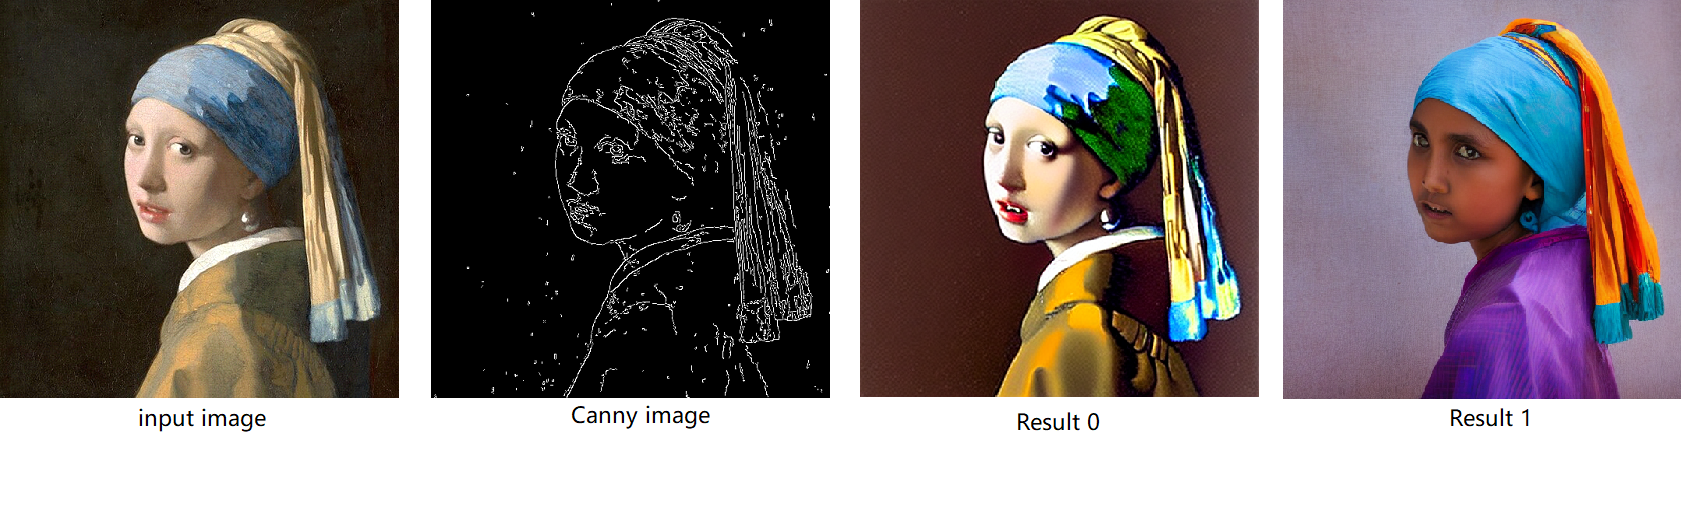
The LoRA weights appended SD model with controlnet pipeline can generate image like below:
Step 4-3: Enable runtime LoRA merging by MatcherPass
This step introduces the method to add lora weights in runtime before Unet or text_encoder model compiling. It will be helpful to client application usage with multiple different LoRA weights to change the image style by reusing the same Unet/text_encoder structure.
This method is to extract lora weights in safetensors file and find the corresponding weights in Unet model and insert lora weights bias. The common method to add lora weights is like:
W = W0 + W_bias(alpha * torch.mm(lora_up, lora_down))
I intend to insert Add operation for Unet's attentions' weights by OpenVINO™ `opset10.add(W0,W_bias)`. The original attention weights in Unet model is loaded by `Const` op, the common processing path is `Const->Convert->Matmul->...`, if we add the lora weights, we should insert the calculated lora weight bias as `Const->Convert->Add->Matmul->...`. In this function, we adopt `openvino.runtime.passes.MatcherPass` to insert `opset10.add()` with call_back() function iteratively.
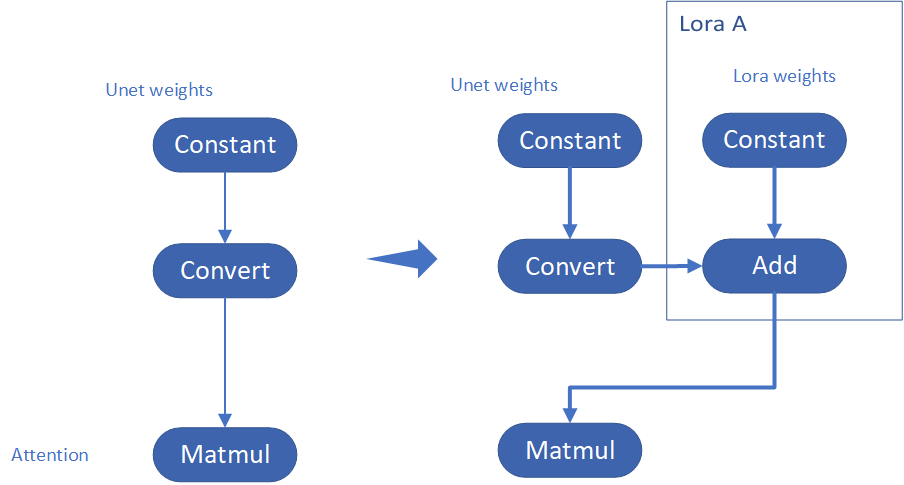
Your own transformation operations will insert opset.Add() firstly, then during the model compiling with device. The graph will do constant folding to combine the Add operation with following MatMul operation to optimize the model runtime inference. Thus, this is an effective method to merge LoRA weights onto original model.
You can check with the implementation source code, and find out the definition of the MatcherPass function called `InsertLoRA(MatcherPass)`:
The `InsertLoRA(MatcherPass)` function will be registered by `manager.register_pass(InsertLoRA(lora_dict_list))`, and invoked by `manager.run_passes(ov_unet)`. After this runtime MatcherPass operation, the graph compile with device plugin and ready for inference.
Run pipeline inference program to check the results. The result is same as Step 4-2.
The LoRA weights appended Stable Diffusion model with controlNet pipeline can generate image like below:
Step 4-4: Enable multiple LoRA weights
There are many different methods to add multiple LoRA weights. I list two methods here. Assume you have two LoRA weigths, LoRA A and LoRA B. You can simply follow the Step 4-3 to loop the MatcherPass function to insert between original Unet Convert layer and Add layer of LoRA A. It's easy to implement. However, it is not good at performance.
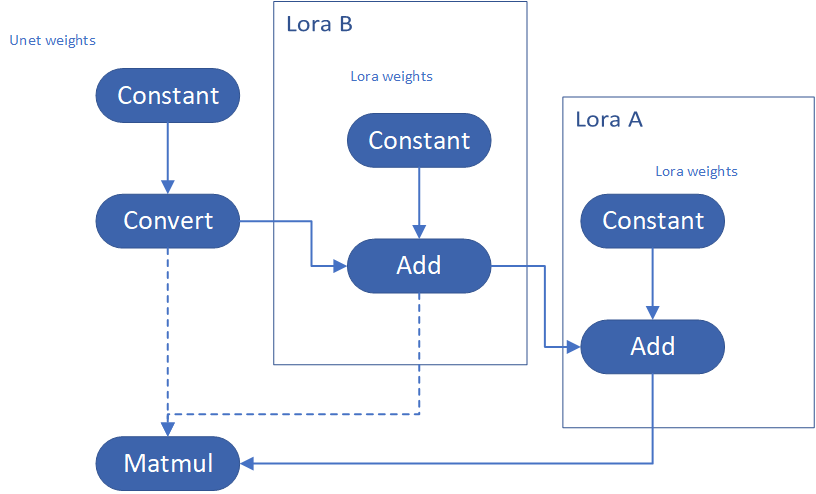
Please consider about the Logic of MatcherPass function. This fucntion required to filter out all layer with the Convert type, then through the condition judgement if each Convert layer connected by weights Constant has been fine-tuned and updated in LoRA weights file. The main costs of LoRA enabling is costed by InsertLoRA() function, thus the main idea is to just invoke InsertLoRA() function once, but append multiple LoRA files' weights.
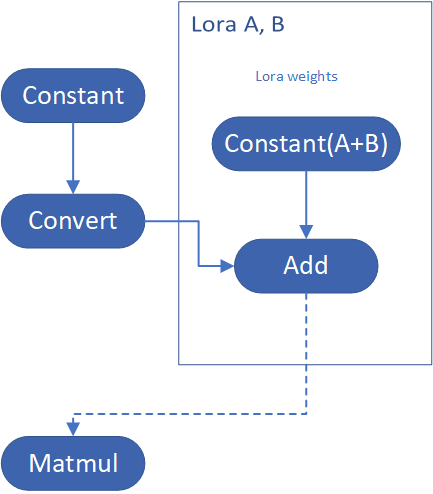
By above method to add multiple LoRA, the cost of appending 2 or more LoRA weights almost same as adding 1 LoRA weigths.
Now, let's change the Stable Diffusion with dreamlike-anime-1.0 to generate image with styles of animation. I pick two LoRA weights for SD 1.5 from https://civitai.com/tag/lora.
- soulcard: https://civitai.com/models/67927?modelVersionId=72591
- epi_noiseoffset: https://civitai.com/models/13941/epinoiseoffset
You probably need to do prompt engineering work to generate a useful prompt like below:
- prompt: "1girl, cute, beautiful face, portrait, cloudy mountain, outdoors, trees, rock, river, (soul card:1.2), highly intricate details, realistic light, trending on cgsociety,neon details, ultra realistic details, global illumination, shadows, octane render, 8k, ultra sharp"
- Negative prompt: "3d, cartoon, lowres, bad anatomy, bad hands, text, error"
- Seed: 0
- num_steps: 30
- canny low_threshold: 100
You can get a wonderful image which generate an animated girl with soulcard typical border like below:

Additional Resources
Provide Feedback & Report Issues
Notices & Disclaimers
Intel technologies may require enabled hardware, software, or service activation.
No product or component can be absolutely secure.
Your costs and results may vary.
Intel does not control or audit third-party data. You should consult other sources to evaluate accuracy.
Intel disclaims all express and implied warranties, including without limitation, the implied warranties of merchantability, fitness for a particular purpose, and non-infringement, as well as any warranty arising from course of performance, course of dealing, or usage in trade.
No license (express or implied, by estoppel or otherwise) to any intellectual property rights is granted by this document.
© Intel Corporation. Intel, the Intel logo, and other Intel marks are trademarks of Intel Corporation or its subsidiaries. Other names and brands may be claimed as the property of others.
Accelerate DIEN for Click-Through-Rate Prediction with OpenVINO™
Author: Xiake Sun, Cecilia Peng
Introduction
A click-through rate (CTR) prediction model is designed to estimate how likely a user will click on an advertisement or item. Deployment of a CTR model is considered one of the core tasks in e-commerce, as its performance not only affects platform revenue but also influences customers’ online shopping experience.
Deep Interest Evolution Network (DIEN) developed by Alibaba Group aims to better predict customer’s CTR to improve the effectiveness of advertisement display. DIEN proposes the following two modules:
- Temporally captures and extracts latent interests based on customer history behaviors.
- Models an evolving process of user interests using GRU with an attentional update gate (AUGRU)
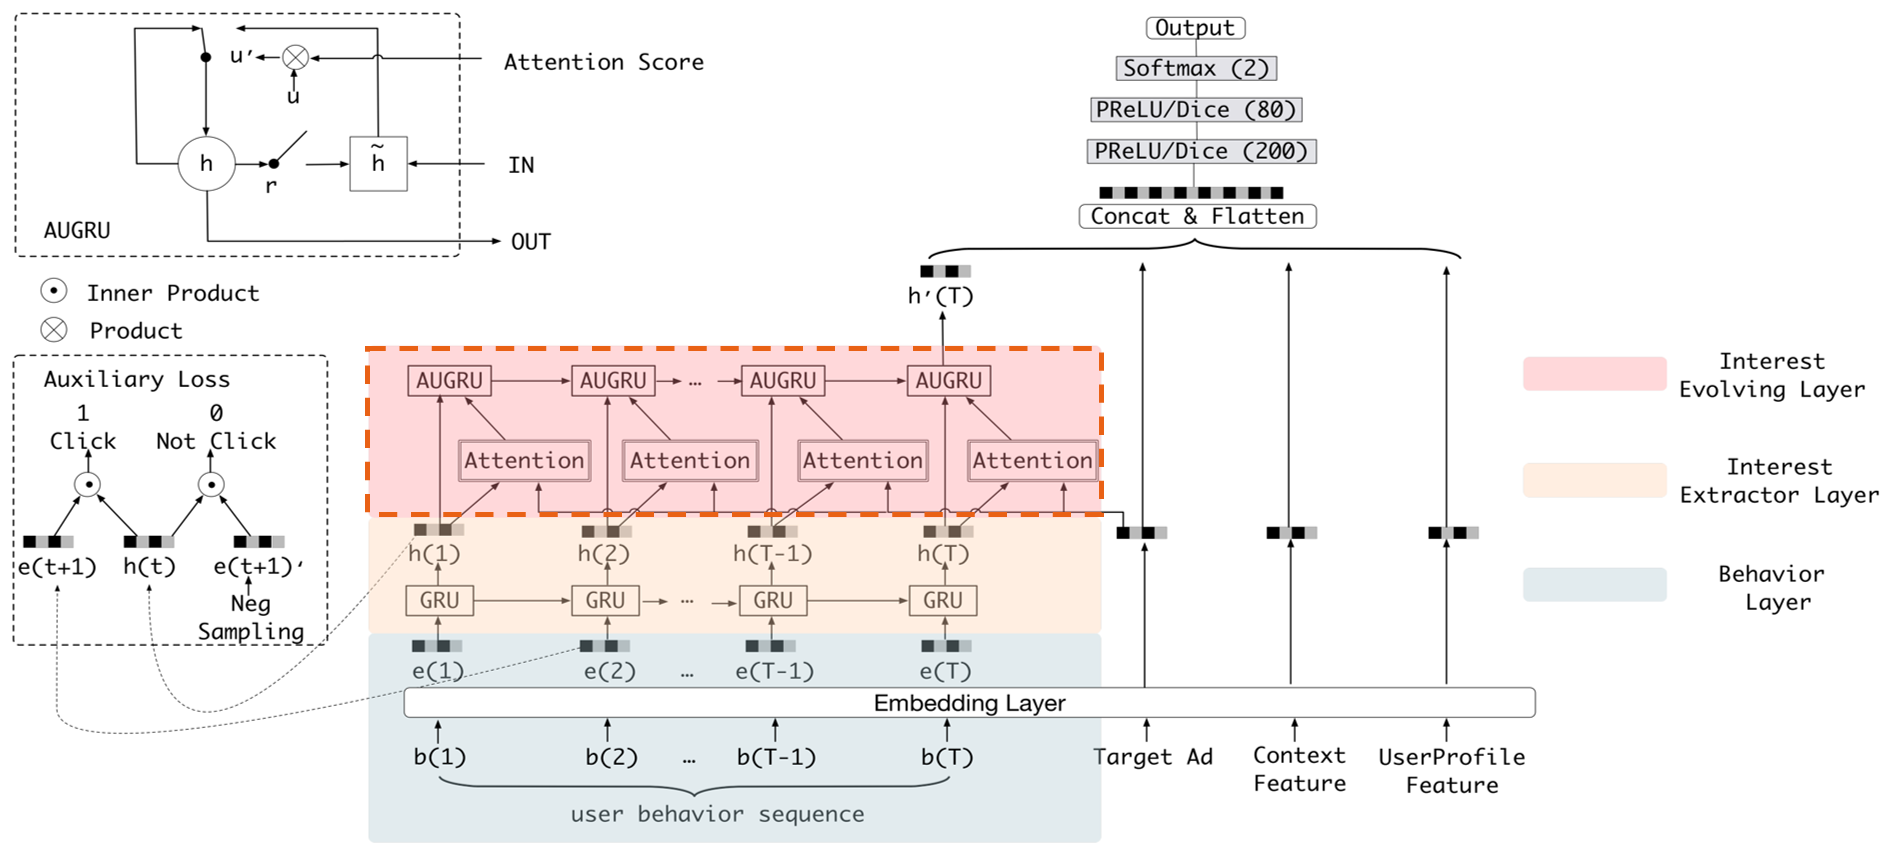
Figure 1 shows the structure of DIEN, with the help of AUGRU, DIEN can overcome the disturbance from interest drifting, which improves the performance of CTR prediction largely in online advertising system.
DIEN Optimization with OpenVINOTM
Here we introduce DIEN optimization with OpenVINOTM in two aspects: graph level and dynamism runtime optimization.
Graph Level Optimization
Figure 2 shows the AUGRU subgraph of DIEN visualized in Netron.

OpenVINOTM implements internal operations AUGRUCell and AUGRUSequence for better graph-level optimization. Each decomposed subgraph of GRU and AUGRU is fused into a corresponding cell operator respectively. What's more, in case of static sequence length, the group of consecutive cells are further fused into a sequence operator. In case of dynamic sequence length, however, the sequence is processed with a loop of cells due to the limitation of oneDNN RNN primitive. This loop of cells is TensorIterator and (AU)GRUCell. We will introduce the optimizations of TensorIterator in next session.
TensorIterator Runtime Optimization with Dynamic Shape
Before we dive into optimization details, let’s first checkout how OpenVINOTM TensorIterator operation works.
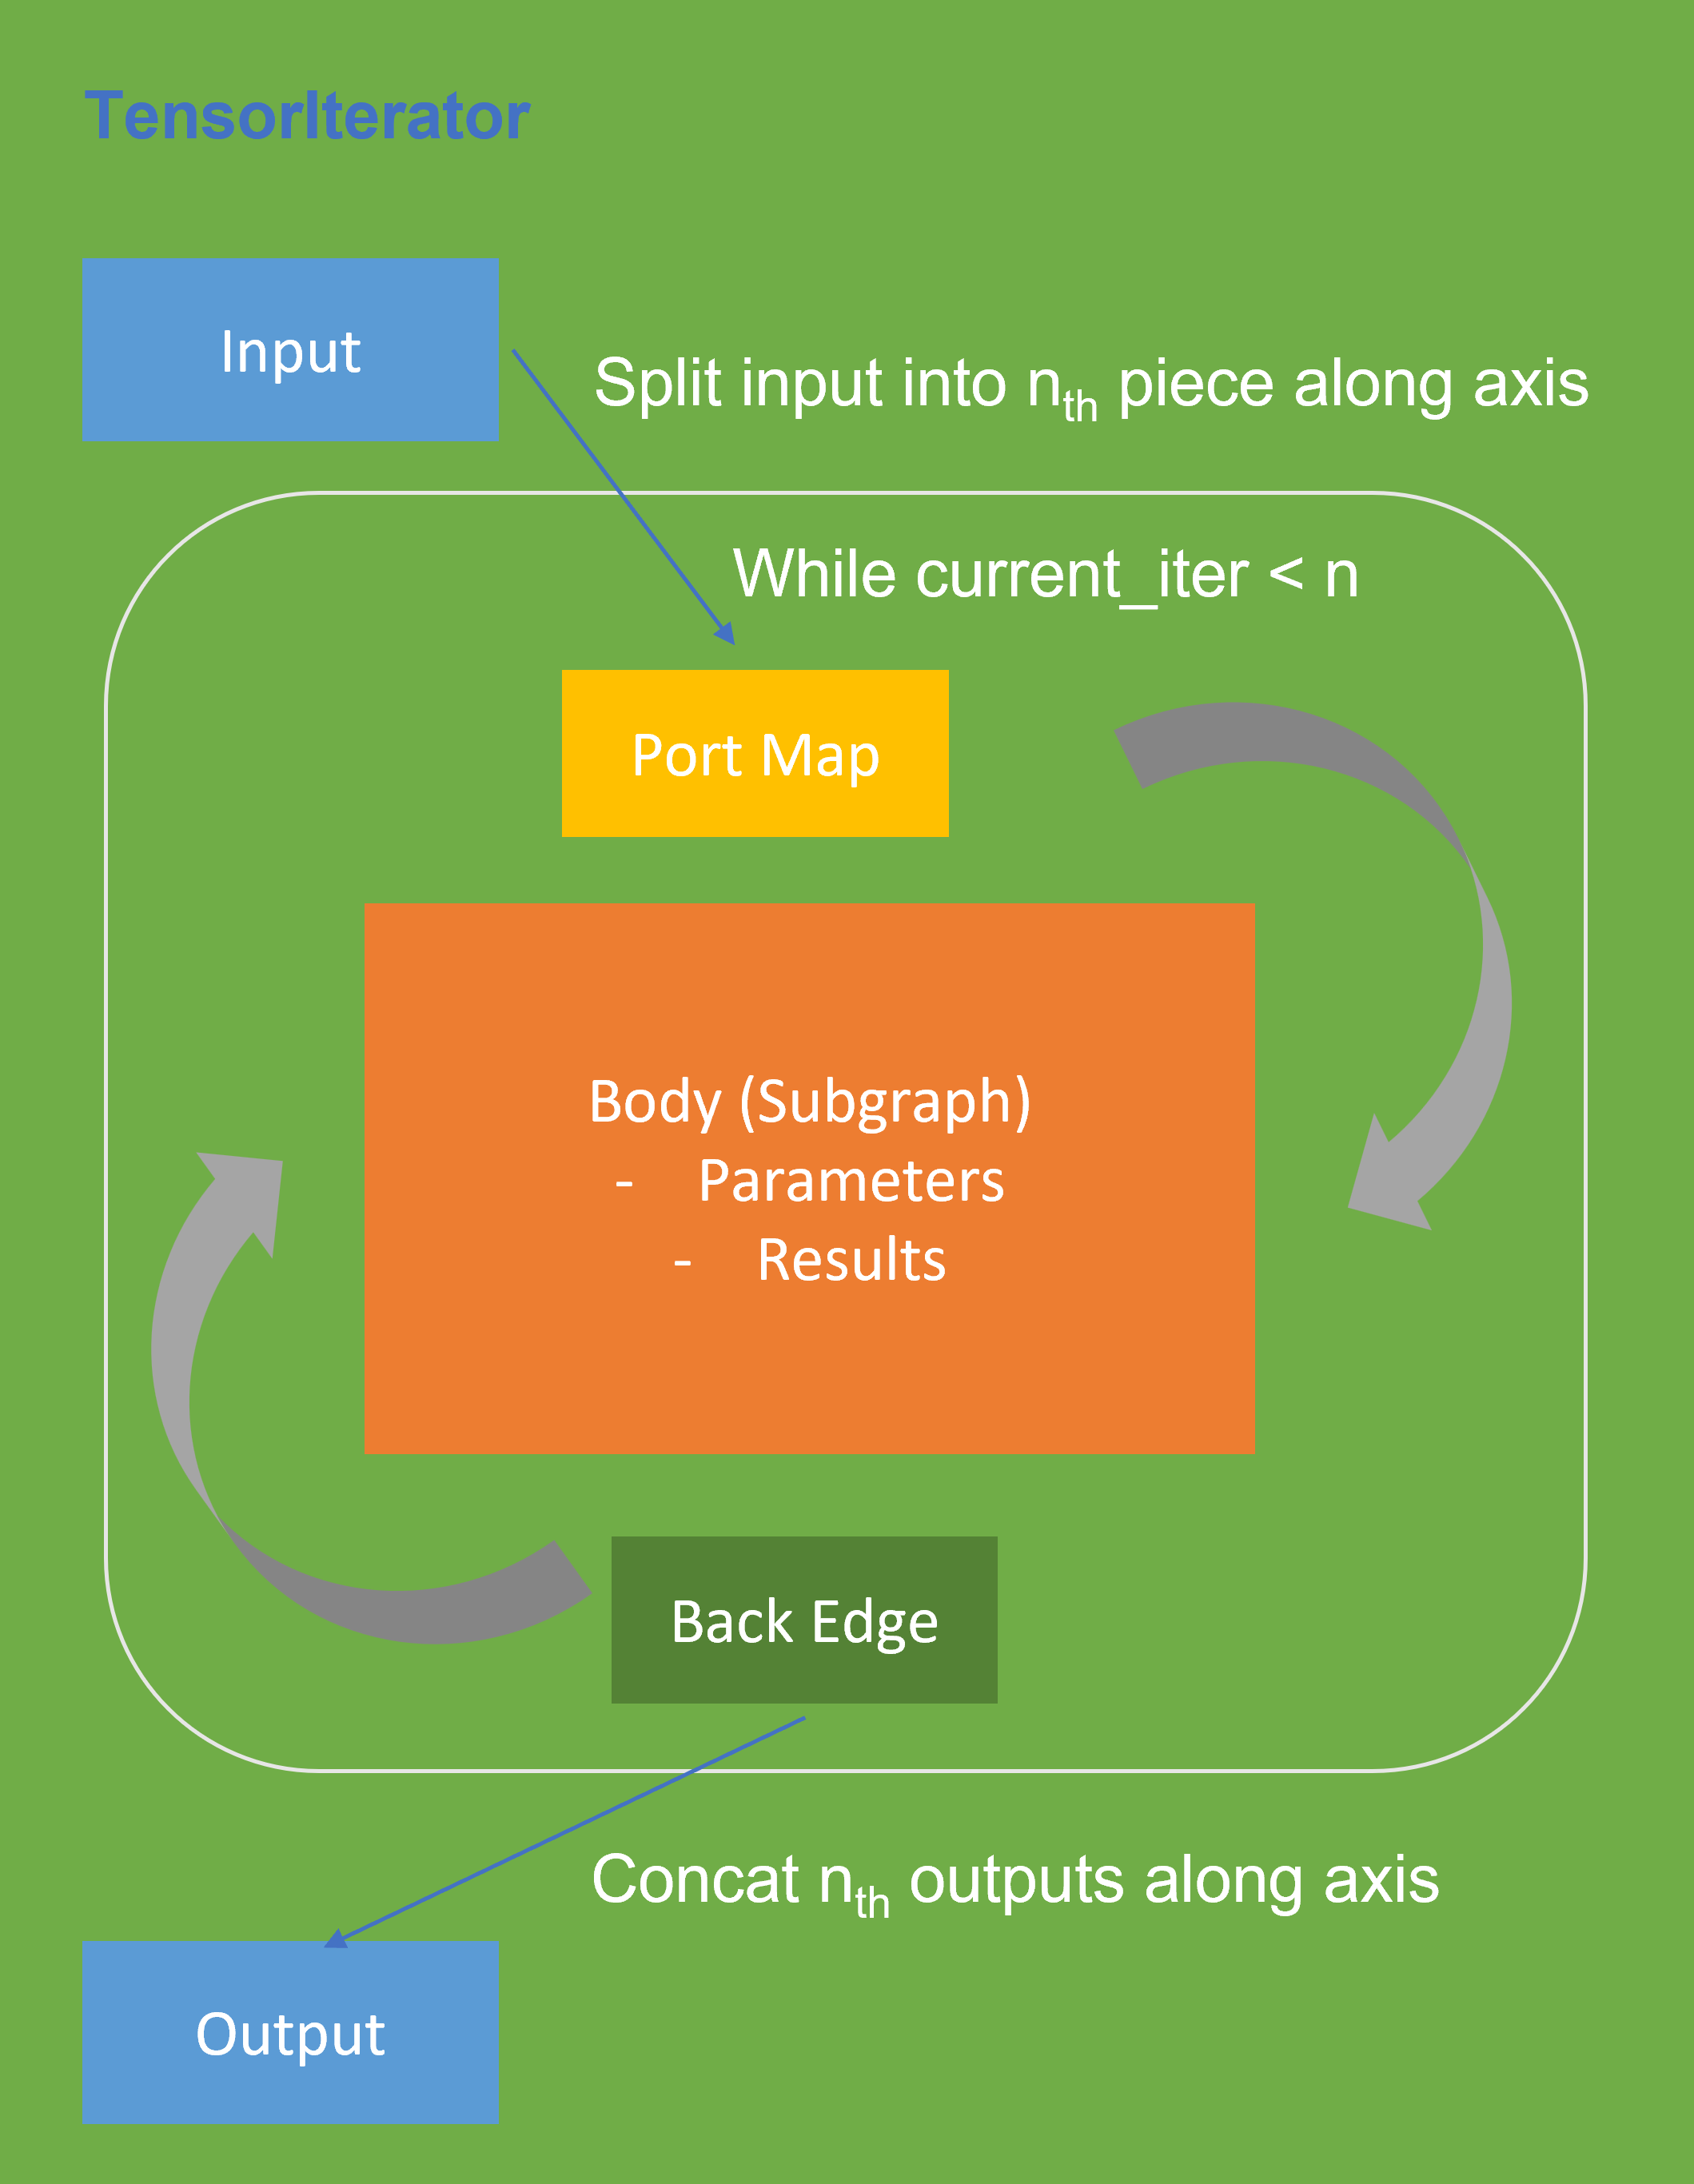
The TensorIterator layer performs recurrent execution of thenetwork, which is described in the body, iterating through the data. Figure 3 shows the workflow of OpenVINOTM Operation TensorIterator in a simplified view. For details, please refer to the specification.
Similar to other layers, TensorIterator has regular sections: input and output. It allows connecting TensorIterator to the rest of the IR. TensorIterator also has several special sections: body, port_map, back_edges. The principles of their work are described below.
- body is a network that will be recurrently executed. The network is described layer by layer as a typical IR network.
- port_map is a set of rules to map input or output data tensors of TensorIterator layer onto body data tensors. The port_map entries can be input and output. Each entry describes a corresponding mapping rule.
- back_edges is a set of rules to transfer tensor values from body outputs at one iteration to body parameters at the next iteration. Back edge connects some Result layers in body to Parameter layer in the same body.
If output entry in the Port map doesn’t have partitioning (axis, begin, end, strides) attributes, then the final value of output of TensorIterator is the value of Result node from the last iteration. Otherwise, the final value of output of TensorIterator is a concatenation of tensors in the Result node for all body iterations.
We use Intel® VTune™ Profiler to run benchmark_app with DIEN FP32 IR model on Intel® Xeon® Gold 6252N Processor for performance profiling.
Cache internal reorder primitives in TensorIterator
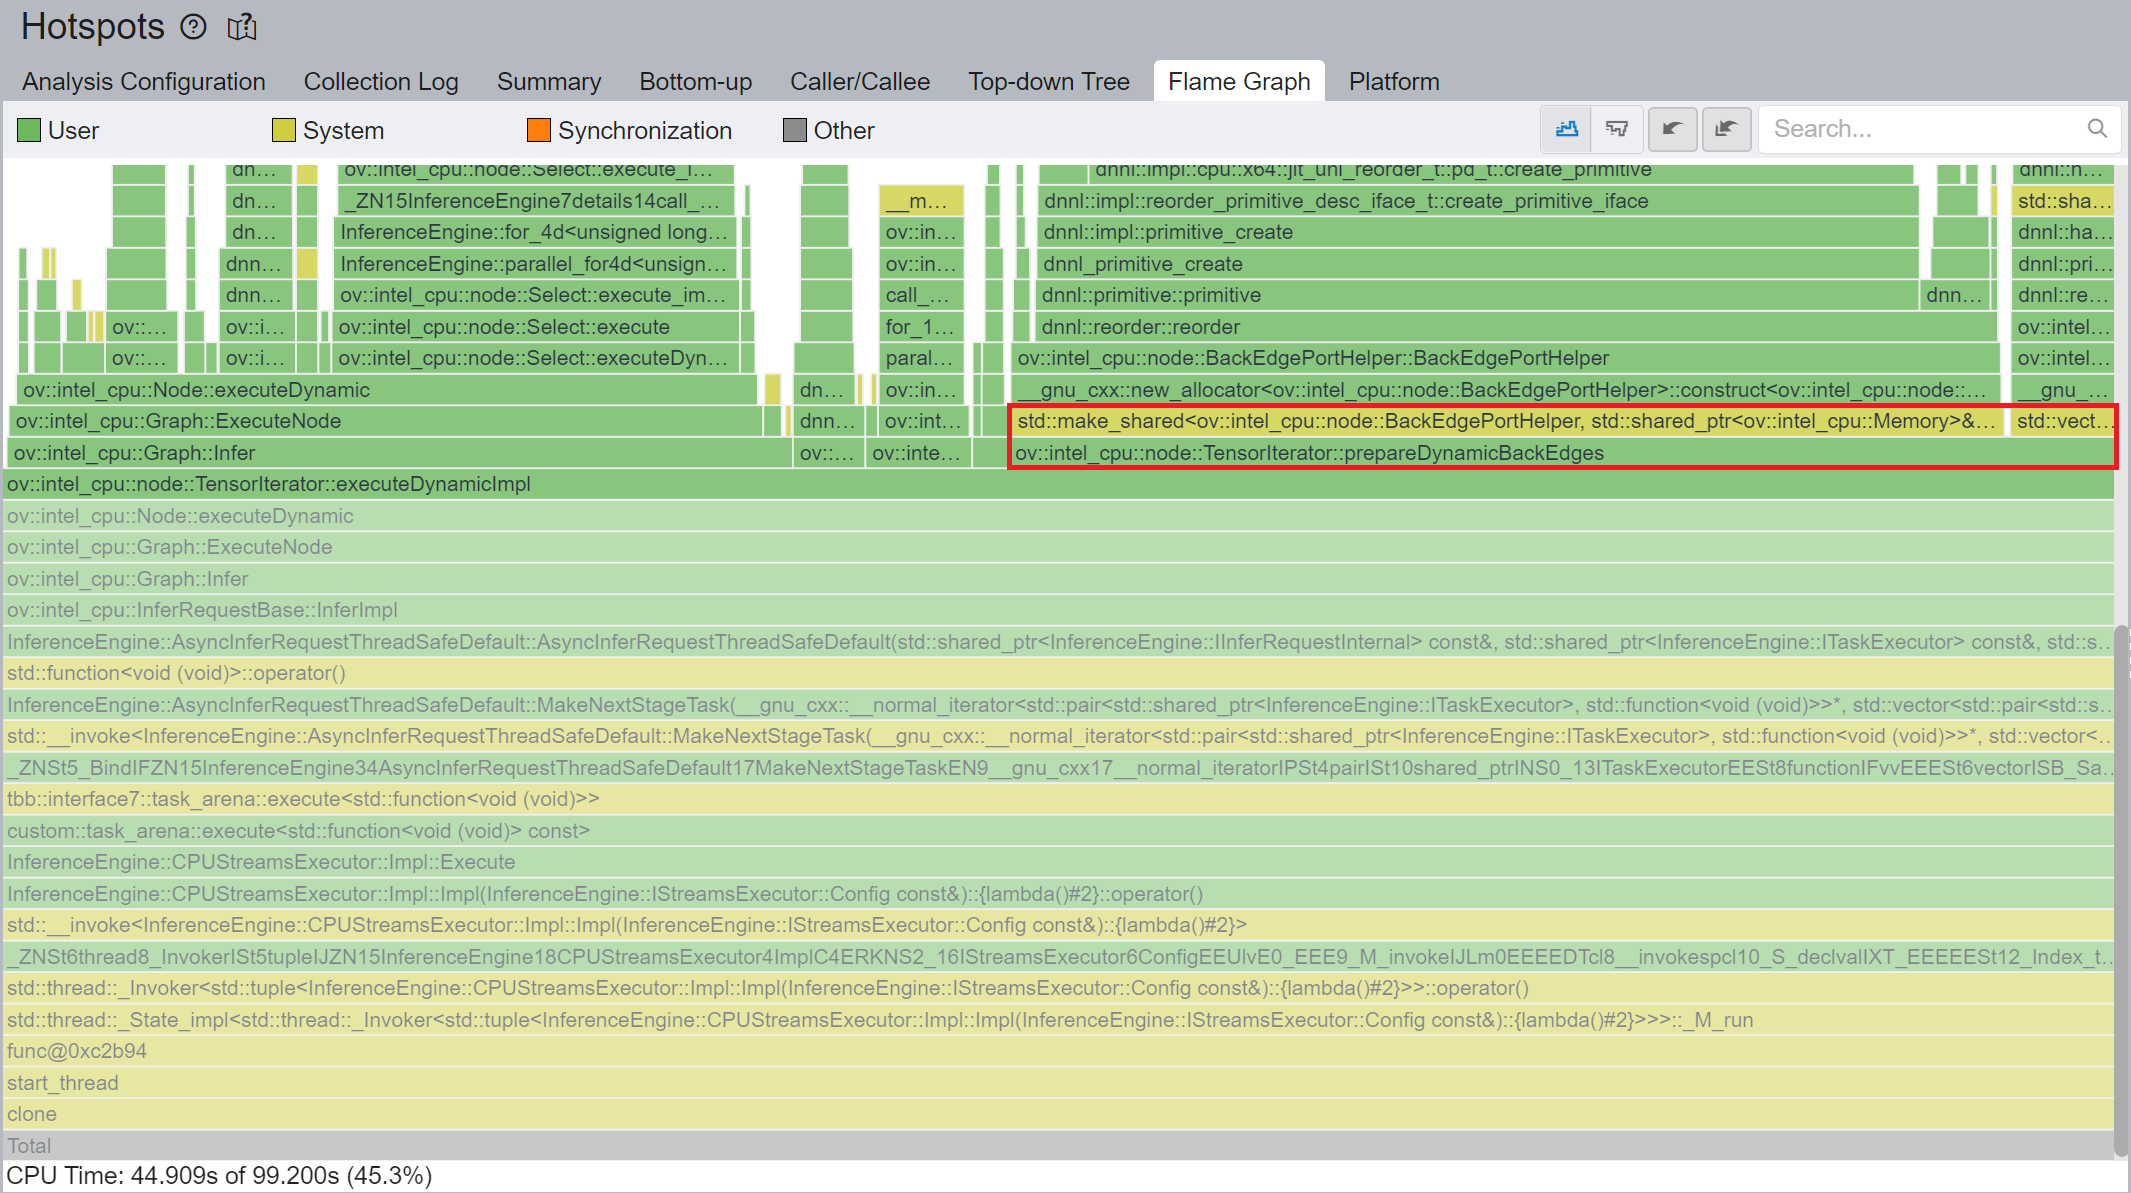
Figure 4 shows that TensorIterator::prepareDynamicBackEdges() spends nearly 45% CPU time to create the reorder primitives. DIEN FP32 model has 2 TensorIterator, eachTensorIterator runs 100 iterations in body with the same input/output shape regarding the current batch. Besides, each TensorIterator has 7 back edges, which means the reorder primitive are frequently created.
So, we propose to cache internal reorder primitive in TensorIterator to optimize back edge memory copy logic. With this optimization, the performance with dynamic shape can be improved by 8x times.
Memory allocation and reuse optimization in TensorIterator
As Figure 3 shows, if we have split input as nth piece to loop in body, at the end, the outputs of TensorIterator will be a concatenation of tensors in the Result node for all body iterations, which can lead to performance overhead. Based on previous optimization we re-run performance profiling using benchmark_app with DIEN FP32 IR model on Intel® Xeon® Gold 6252N Processor as showed in Figure 5.
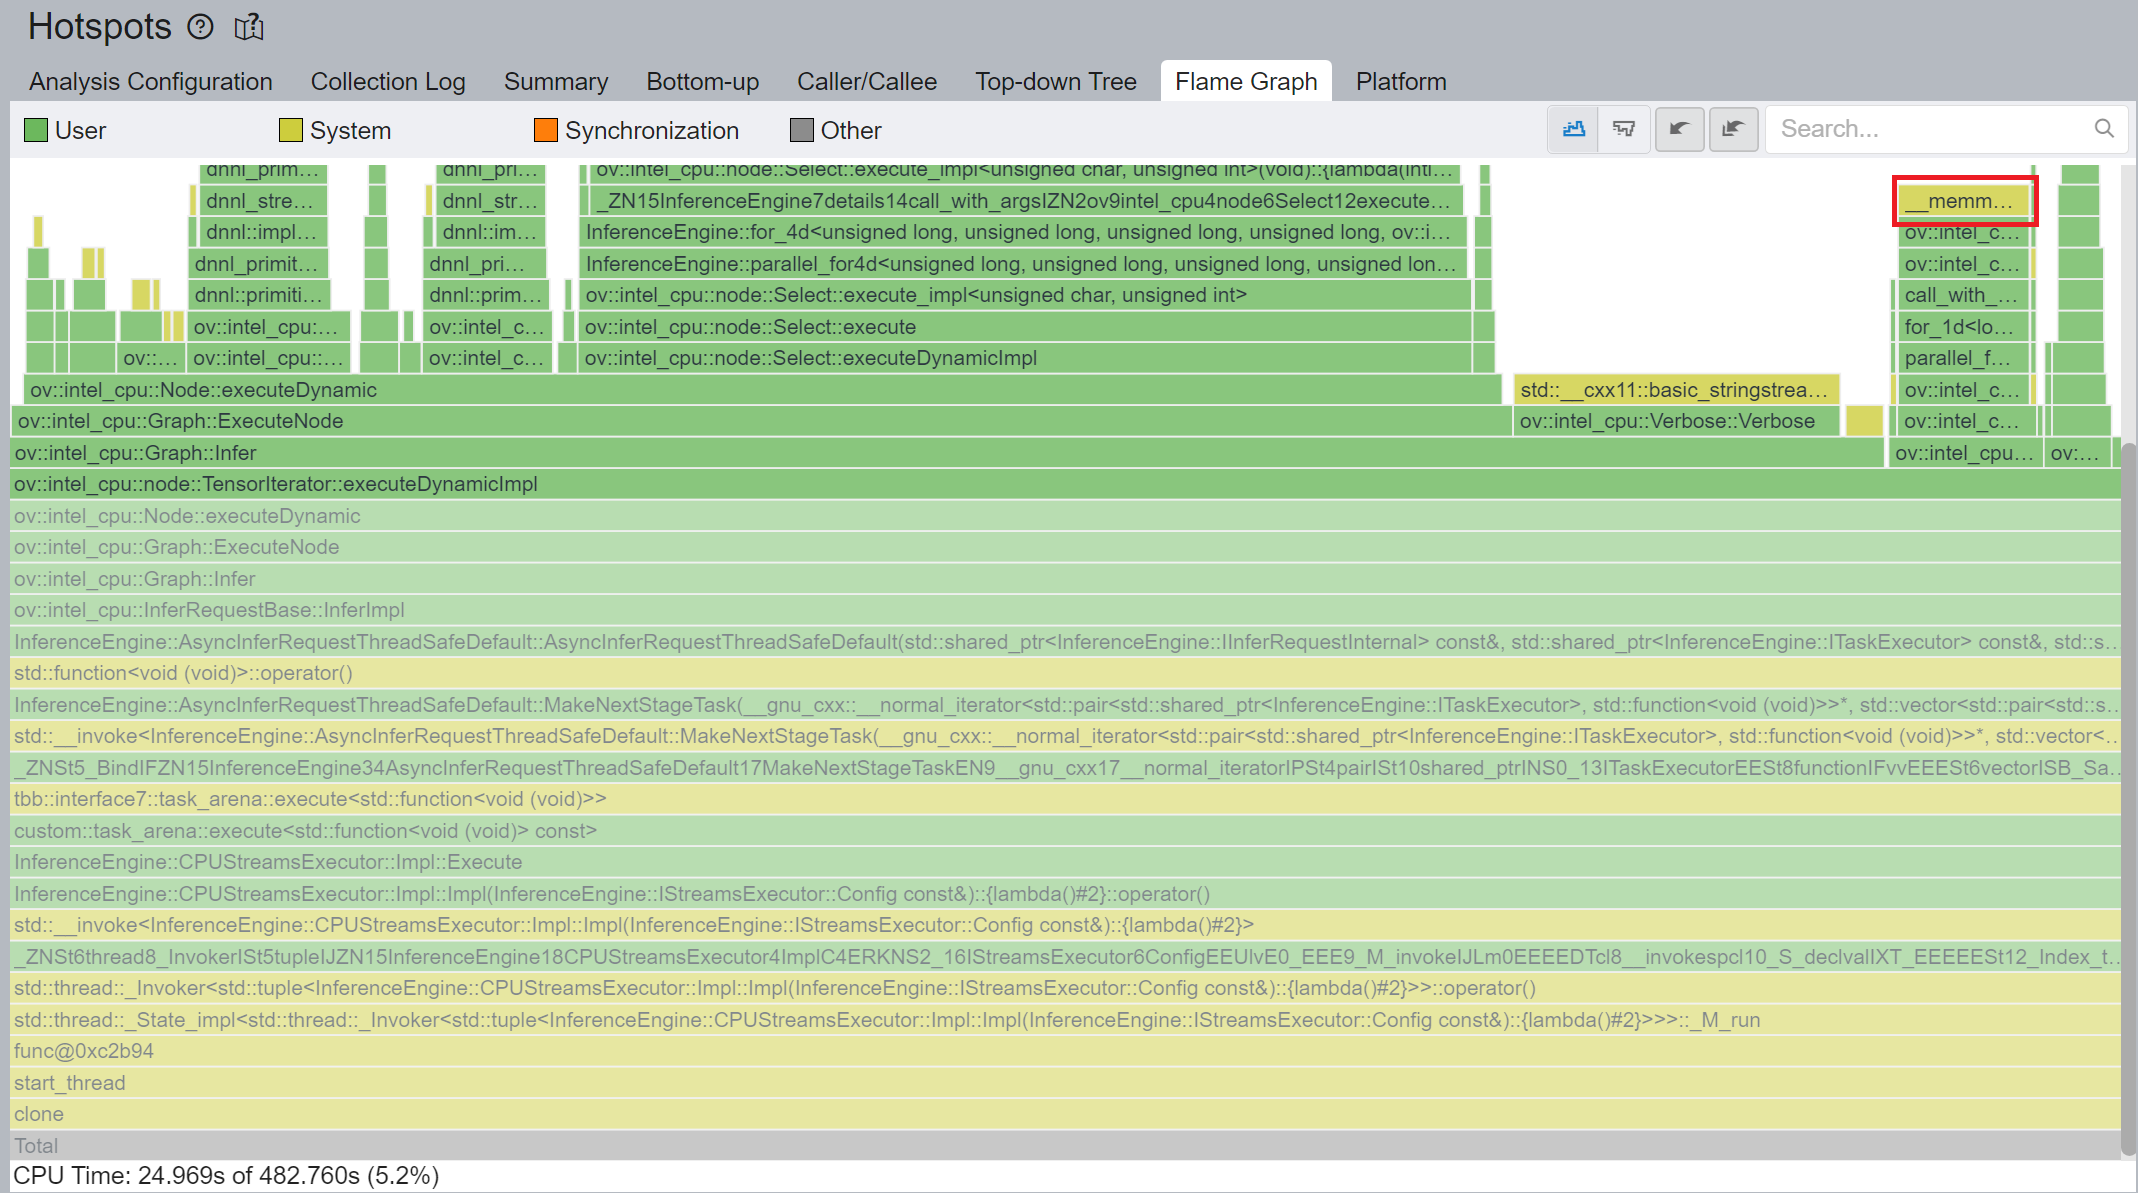
CPU plugin TensorIterator supports both two operators - TensorIterator and Loop. The outputs of each iteration could be concatenated and return to users. Since the output size is not always known before the execution, the legacy implementation is to dynamically allocate the concatenated output buffer.
We propose two points from the memory allocation standpoint:
- In the case of TensorIterator number of iterations is determined by the size of the axis we are slicing. So, if TensorIterator body one ach iteration will produce the same shape on output we can easily preallocate enough memory before the TI computation, The same for Loop with trip count input - we can just read the value from this input, make shape inference for the body and this determines the required amount of memory.
- More complicated story is when we don't know exact number of iterations before Loop inference (e.g., number of iterations is determined by ExecutionCondition input). In that case do the following: let’s have an output buffer where we put the Loop output. Once the buffer doesn't have enough space, we reallocate it on new size based on a simple and effective dynamic array algorithm.
OpenVINOTM implemented memory allocation and reuse optimization in TensorIterator to significantly reduce the number of reallocations and not to allocate to much memory at the same time. Experiments show that performance can be further improved by more than 20%.
DIEN OpenVINOTM Demo
Clone demo repository:
Prepare Amazon dataset:
Setup Python Environment:
Convert original TensorFlow model to OpenVINOTM FP32 IR:
Run the Benchmark with TensorFlow backend:
Run the Benchmark with OpenVINOTM backend using FP32 inference precision:
Run the Benchmark with OpenVINOTM backend using BF16 inference precision:
Please note, Xeon native supports BF16 infer precision since 4th Generation Intel® Xeon® Scalable Processors. Running BF16 on a legacy Xeon platform may lead to performance degradation.
Conclusion
In this blog, we introduce inference optimization of DIEN recommendation model with OpenVINOTM runtime as follows:
- For static input sequence length, AUGRU subgraph will be decomposed and fused as AUGRU and AUGRUSequence OpenVINOTM internal operation.
- For dynamic input sequence length, we propose cache internal reorder primitives and memory allocation and re-use optimization in TensorIterator.
- Provide a demo for model enabling and efficient inference of DIEN with OpenVINOTM runtime.
Reference
Deep Interest Evolution Network (DIEN)
Encrypt Your Dataset and Train Your Model with It Directly
Encrypt Your Dataset and Train Your Model with It Directly

Introduction
When we deal with dataset for creating AI models, we need to consider sensitive information managed and stored online in the cloud or on connected devices. Unsecured datasets can be vulnerable to unauthorized access, theft, and misuse, particularly when processed for machine learning workloads. Certain fields, such as industrial or medical sectors, face exceptionally high risks when their data is exposed to these potential threats. For example, if a dataset used to train a detection model for identifying factory process errors is leaked, it can expose sensitive factory process technology. This highlights the importance of safeguarding datasets at every stage, from data storage to model training.
Dataset Management Framework (Datumaro) offers a dataset encryption feature for AI model training. With Datumaro, you can encrypt datasets of any computer vision data format into the DatumaroBinary format. This encrypted dataset can remain encrypted as far as it is needed for decryption. By combining the encrypted dataset with OpenVINO training extensions™, you can use it directly for model training without decryption. Whenever needed, you can use Datumaro once again to decrypt the dataset and convert it back to any major computer vision data format, such as VOC, COCO, or YOLO. Please refer to another posting data_convert for data convert.
Encrypt Your Dataset Using Datumaro
Datumaro provides two ways to encrypt a dataset: CLI and Python API. First, you need to install Datumaro on your system. Please refer to the installation guide here for detailed instructions. Once you have completed the installation of Datumaro, let's first look at the CLI usage. You can encrypt a dataset using the datum convert CLI command as follows:
The necessary user inputs for this command are as follows:
- -i <input-dataset-path>: Enter the path to the dataset you want to encrypt in <input-dataset-path>.
- -o <output-dataset-path>: Enter the path where the encrypted dataset will be produced in <output-dataset-path>.
NOTE:: (Optional) You can additionally specify the data format of your input dataset by entering the -if <input-dataset-format> argument. In most cases, Datumaro can automatically infer the data format of the input dataset, but it might fail. In such cases, you can use the datum detect --show-rejections <input-dataset-path> command to identify the cause of the failure while inferring the data format.
NOTE:: The --save-media argument is a flag that allows you to convert your media files (e.g., images) as well. If this argument is not provided, the encrypted media will not be included in the output directory and only the encrypted annotations are included in the output directory.
Next, let's take a look at how to encrypt a dataset using the Python API. Please examine the following code snippet:
You import the dataset by specifying the path of the input dataset in the import_from function as path="<input-dataset-path>". Then, to export the dataset, you specify the path of the output dataset in the save_dir="<output-dataset-path>" of the export function. Similarly, you also need to provide the encryption=True and format="datumaro_binary" keyword arguments as in the CLI example. A more detailed end-to-end example for this can be found in a Jupyter notebook. Please refer to this link for more information.
So far, all the examples have used the datumaro_binary (DatumaroBinary) format for the exported dataset. Currently, the dataset encryption feature is only supported for the datumaro_binary format. DatumaroBinary is a Datumaro's own data format that stores annotation data in binary representation. It is much faster and storage efficient compared to string-based datasets such as COCO based on JSON. For more detailed information about DatumaroBinary, please refer to this link.
How Datumaro Encrypts Your Dataset?
Datumaro uses the Fernet symmetric encryption recipe provided by the cryptography library to encrypt the dataset. Fernet is built on top of a number of standard cryptographic primitives such as AES or HMAC, and hence Fernet guarantees that a message encrypted cannot be manipulated or read without the key. Please refer to this link for detailed information.
When encrypting the dataset, Datumaro generates a secret key through Fernet and saves it as a txt file at the following path: <output-dataset-path>/secret_key.txt. The secret key generated at this path is a 50-characters string, which consists of a randomly generated 32-bytes string encoded in base64, with the prefix datum- added.
If you have checked the secret key in this file, you must ensure that it is not in the same location with the dataset. If this secret key is uncovered, an attacker would be able to access the contents of the encrypted dataset. Additionally, this secret key is required when training models using OpenVINO training extensions™ with the encrypted dataset or when decrypting it later. Therefore, you should be careful not to lose this secret key.
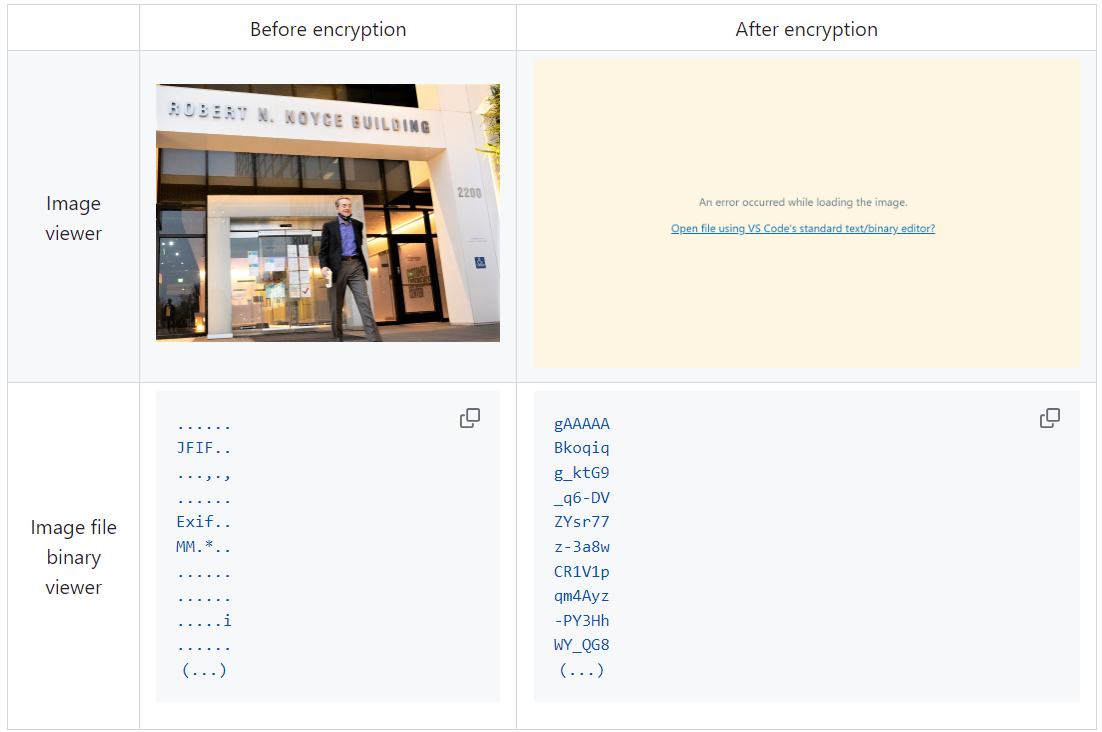
The following table briefly shows how the data is encrypted. The binary representation of the data is encrypted, so that the following image cannot be seen by the image viewer.
Train Your Model with the Encrypted Dataset Using OpenVINO Training Extensions™
OpenVINO training extensions™ is a tool that allows convenient training of computer vision models and accelerated inference on Intel® devices by exporting trained models to OpenVINO Intermediate Representation (IR) through a CLI. Within the OpenVINO ecosystem, Datumaro is integrated with OpenVINO training extensions™ as a dataset interface. Therefore, the encrypted dataset can be directly used for model training through OpenVINO training extensions™. For detailed installation instructions of OpenVINO training extensions™, please refer to the following link.
Next, let's explore how to use the encrypted dataset directly for model training through the CLI command.
The user inputs required for this command are as follows:
- --train-data-roots <encrypted-dataset-path> and --val-data-roots <encrypted-dataset-path>: Specify the path to the encrypted dataset by replacing <encrypted-dataset-path>. Since the DatumaroBinary format uses the same root directory for both the training and validation subsets, both arguments should have the same value.
- --encryption-key <secret-key>: Provide the secret key corresponding to the encrypted dataset in <secret-key>. This is the 50-character string with the datum- prefix described in the previous section.
NOTE:: <template> is the name of the model template provided by OpenVINO training extensions™. A model template is a recipe for a deep learning model for a specific computer vision task. To explore all the model templates supported by OpenVINO training extensions™, you can use the otx find CLI command or refer to this link.
Decrypt the Encrypted Dataset Using Datumaro
If you want to utilize the encrypted dataset in another AI workload, you need to decrypt the encrypted data. This process reverses the dataset encryption using Datumaro, and encryption-decryption preserves all the information without loss. Similar to the previous section, decryption can be done using the CLI or Python API. Let's first look at decryption using the CLI.
You can use the same datum convert command as before. However, specify the path to the encrypted dataset as the input dataset path (-i <encrypted-dataset-path>), and provide the secret key, which is a 50-character string with the datum- prefix described in the previous section, as the <secret-key> argument for --encryption-key <secret-key>. Additionally, you can choose any data format supported by Datumaro as the output data format. To learn more about the data formats supported by Datumaro, refer to this link.
Next, let's see how decryption can be done using Python API.
Similar to the CLI method, provide the path to the encrypted dataset and the secret key as arguments to the import_from function. For the export function, specify the output dataset path and the output data format.
Conclusion
This post introduced dataset encryption feature provided by Datumaro. It demonstrated how to encrypt a dataset using Datumaro and train a model with the encrypted dataset using OpenVINO training extensions™. Whenever needed you can decrypt it with Datumaro for other AI projects and training frameworks. You can refer to the end-to-end Jupyter notebook example provided on this blog post here for step-by-step guide. The features introduced in this post are available in Datumaro version 1.4.0 or higher and OpenVINO training extensions™ version 1.4.0 or higher.
Datumaro offers a range of useful features for managing datasets besides the dataset encryption feature. You can find examples of other Datumaro features, such as noisy label detection during training with OpenVINO training extensions™, in the Jupyter examples directory. For more information about Datumaro and its capabilities, you can visit the Datumaro documentation page. If you have any questions or requests about using Datumaro, feel free to open an issue here.
Efficient Inference and Quantization of CGD for Image Retrieval with OpenVINO™ and NNCF
Author:Xiake Sun, Wenyi Zou, Churkin Andrey
Introduction
With the advent of e-commerce and online websites, image retrieval applications have been increasing all along around our daily life. Top e-commerce platform such as Amazon and Alibaba have been heavily utilizing image retrieval to put forward what they think is the most suitable product based on what we have seen just now.
Image retrieval is the process of finding an image from a collection or database from the traits of a query image. The traits are usually visual similarities between the images. The top retrieved images can provide hypotheses about which parts of the scene are likely visible in the query image.
Since images in their original form don’t reflect these traits in their pixel-based data, we need to transform this pixel data into a latent space where the representation of the image will reflect the traits. Naver Corporation proposed Combination of Multiple Global Descriptors (CGD) for Image Retrieval task. The CGD framework exploits multiple global descriptors to get an ensemble effect when it can be trained in an end-to-end manner. Quantitative and qualitative analysis results show that exploiting multiple global descriptors led to higher performance over the single global descriptor.
Neural Network CompressionFramework (NNCF) provides a suite of post-training and training-time algorithms for neural network inference optimization in OpenVINO™ with minimal accuracy drop. NNCF is designed to work with models from PyTorch, TensorFlow, ONNX, and OpenVINO™. In this blog, we use NNCF Post-Training Quantization (PTQ) to quantize CGD model, which can further boost inference while keeping acceptable accuracy without fine-tuning.
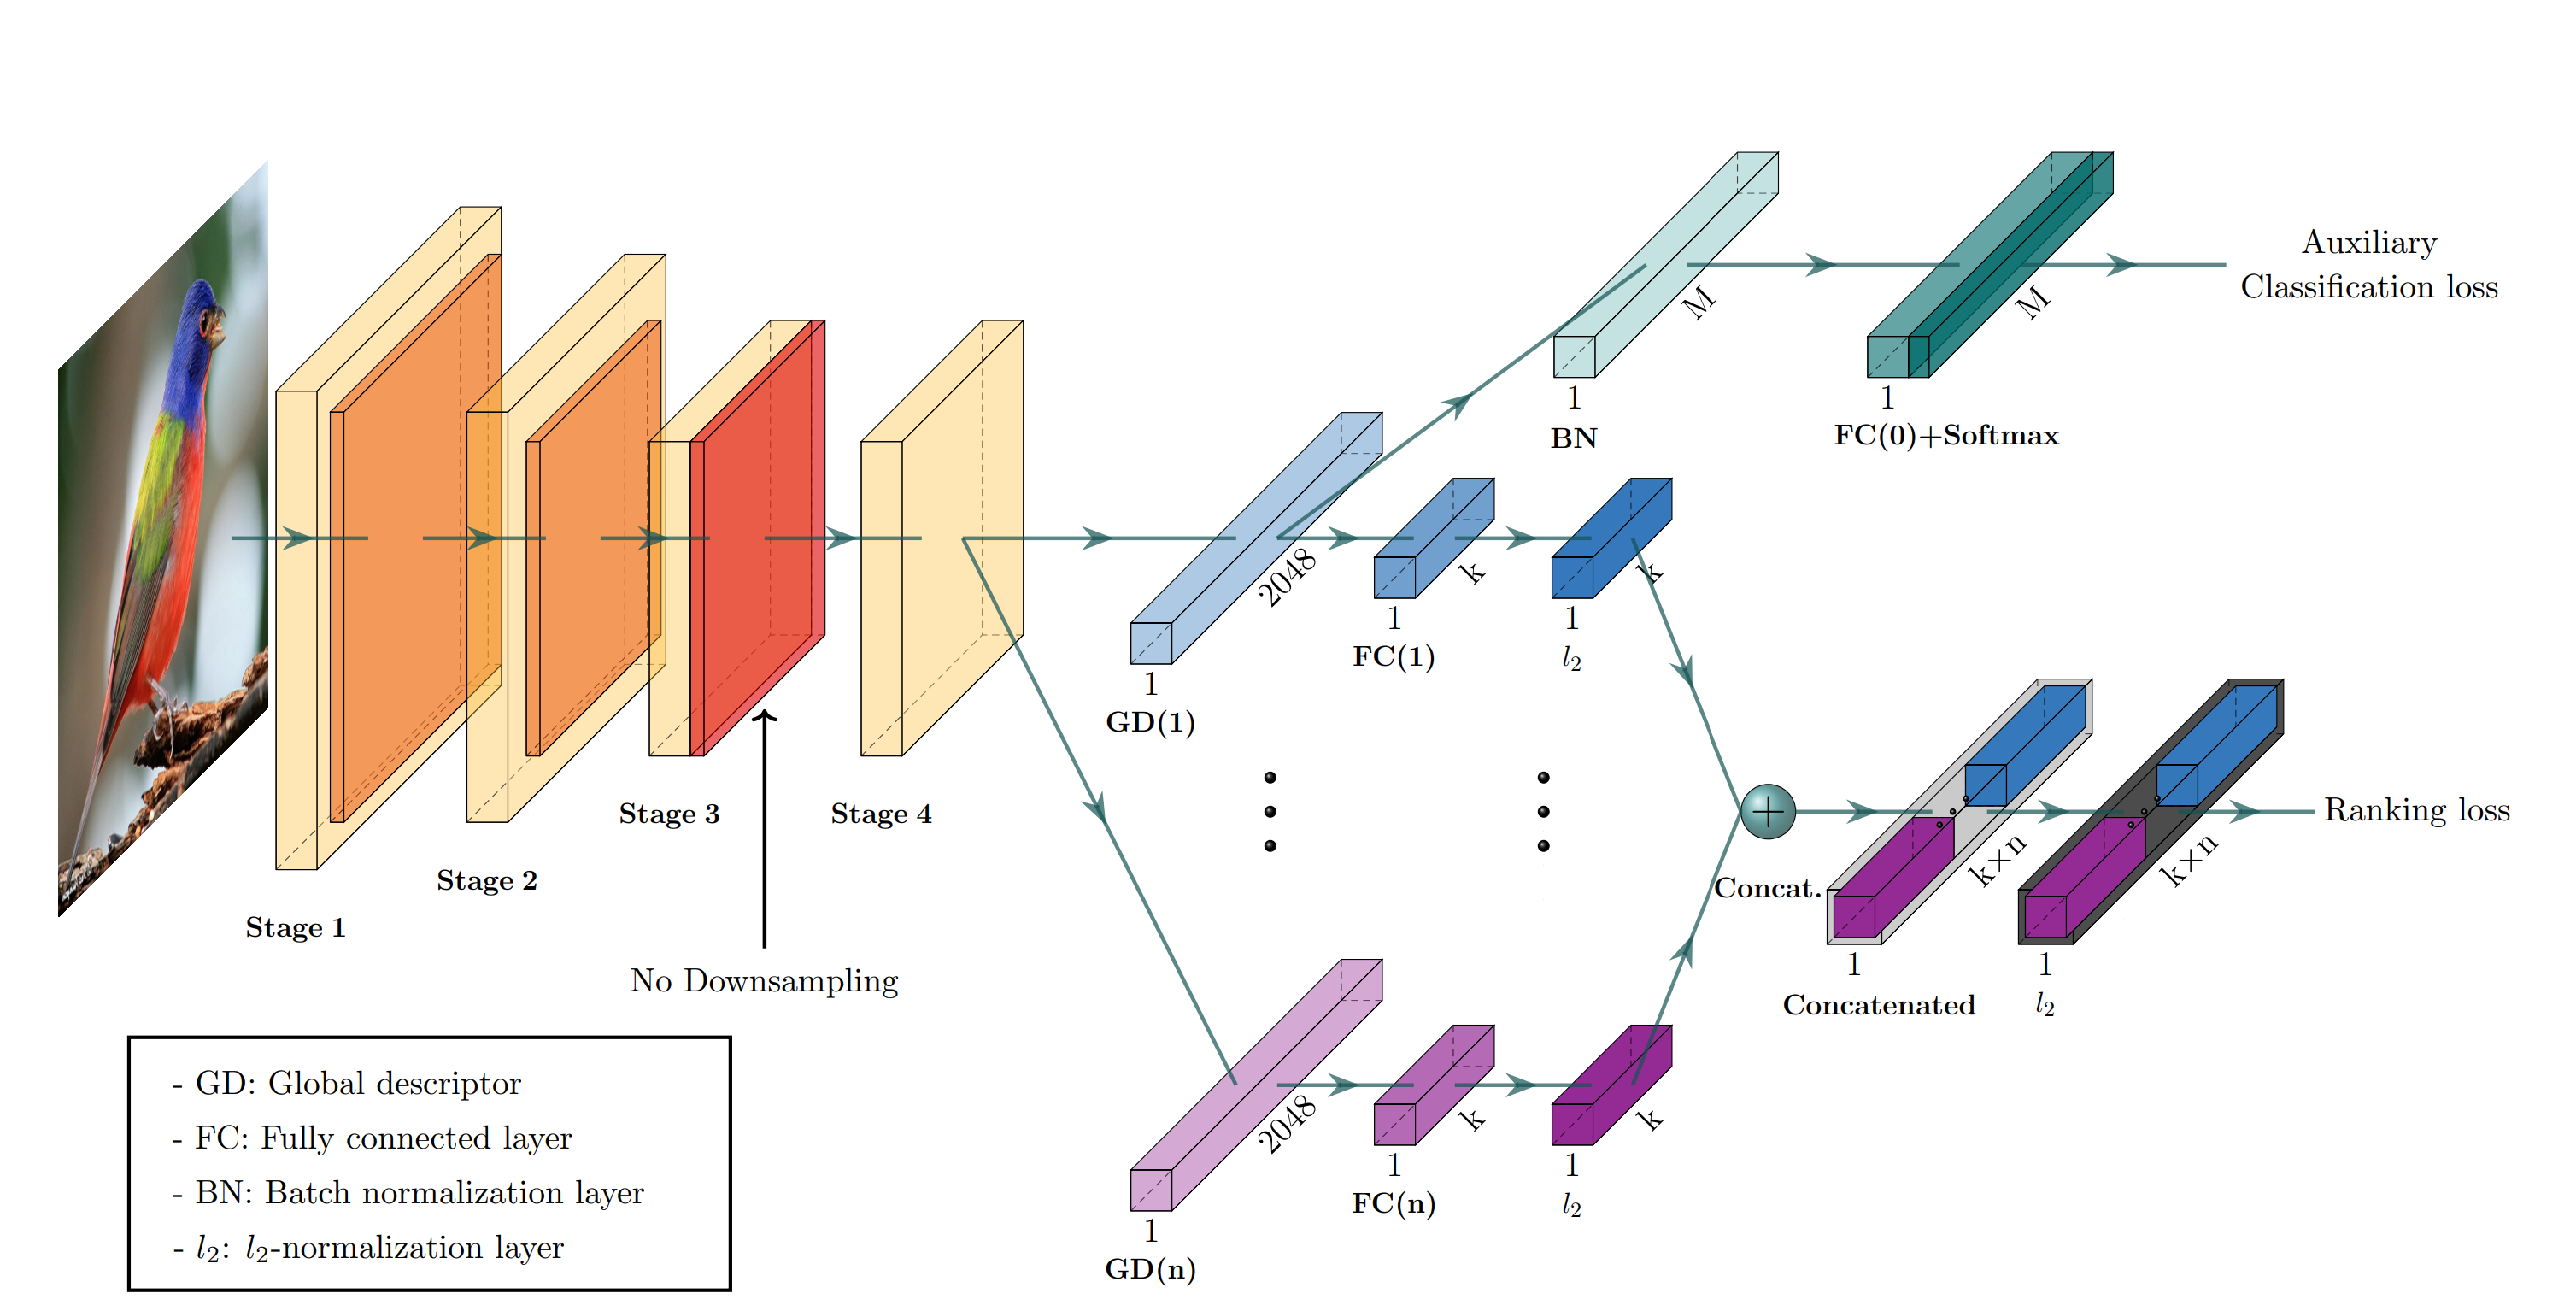
Figure1. shows the CGD framework. The framework is described with ResNet-50 backbone where Stage 3 down sampling is removed. From the last feature map, each of n global descriptor branches outputs a k-dimensional embedding vector, which is concatenated into the combined descriptor for ranking loss. Exclusively the first global descriptor is used for auxiliary classification loss where M denotes the number of classes.
CGD framework utilizes the following global descriptors with different focuses:
- Sum pooling of convolutions (SPoC): activates larger regions on the image representation.
- Generalized mean pooling (GeM): generalizes max and average pooling with a pooling parameter.
- Maximum activation of convolutions (MAC): activates more focused regions.
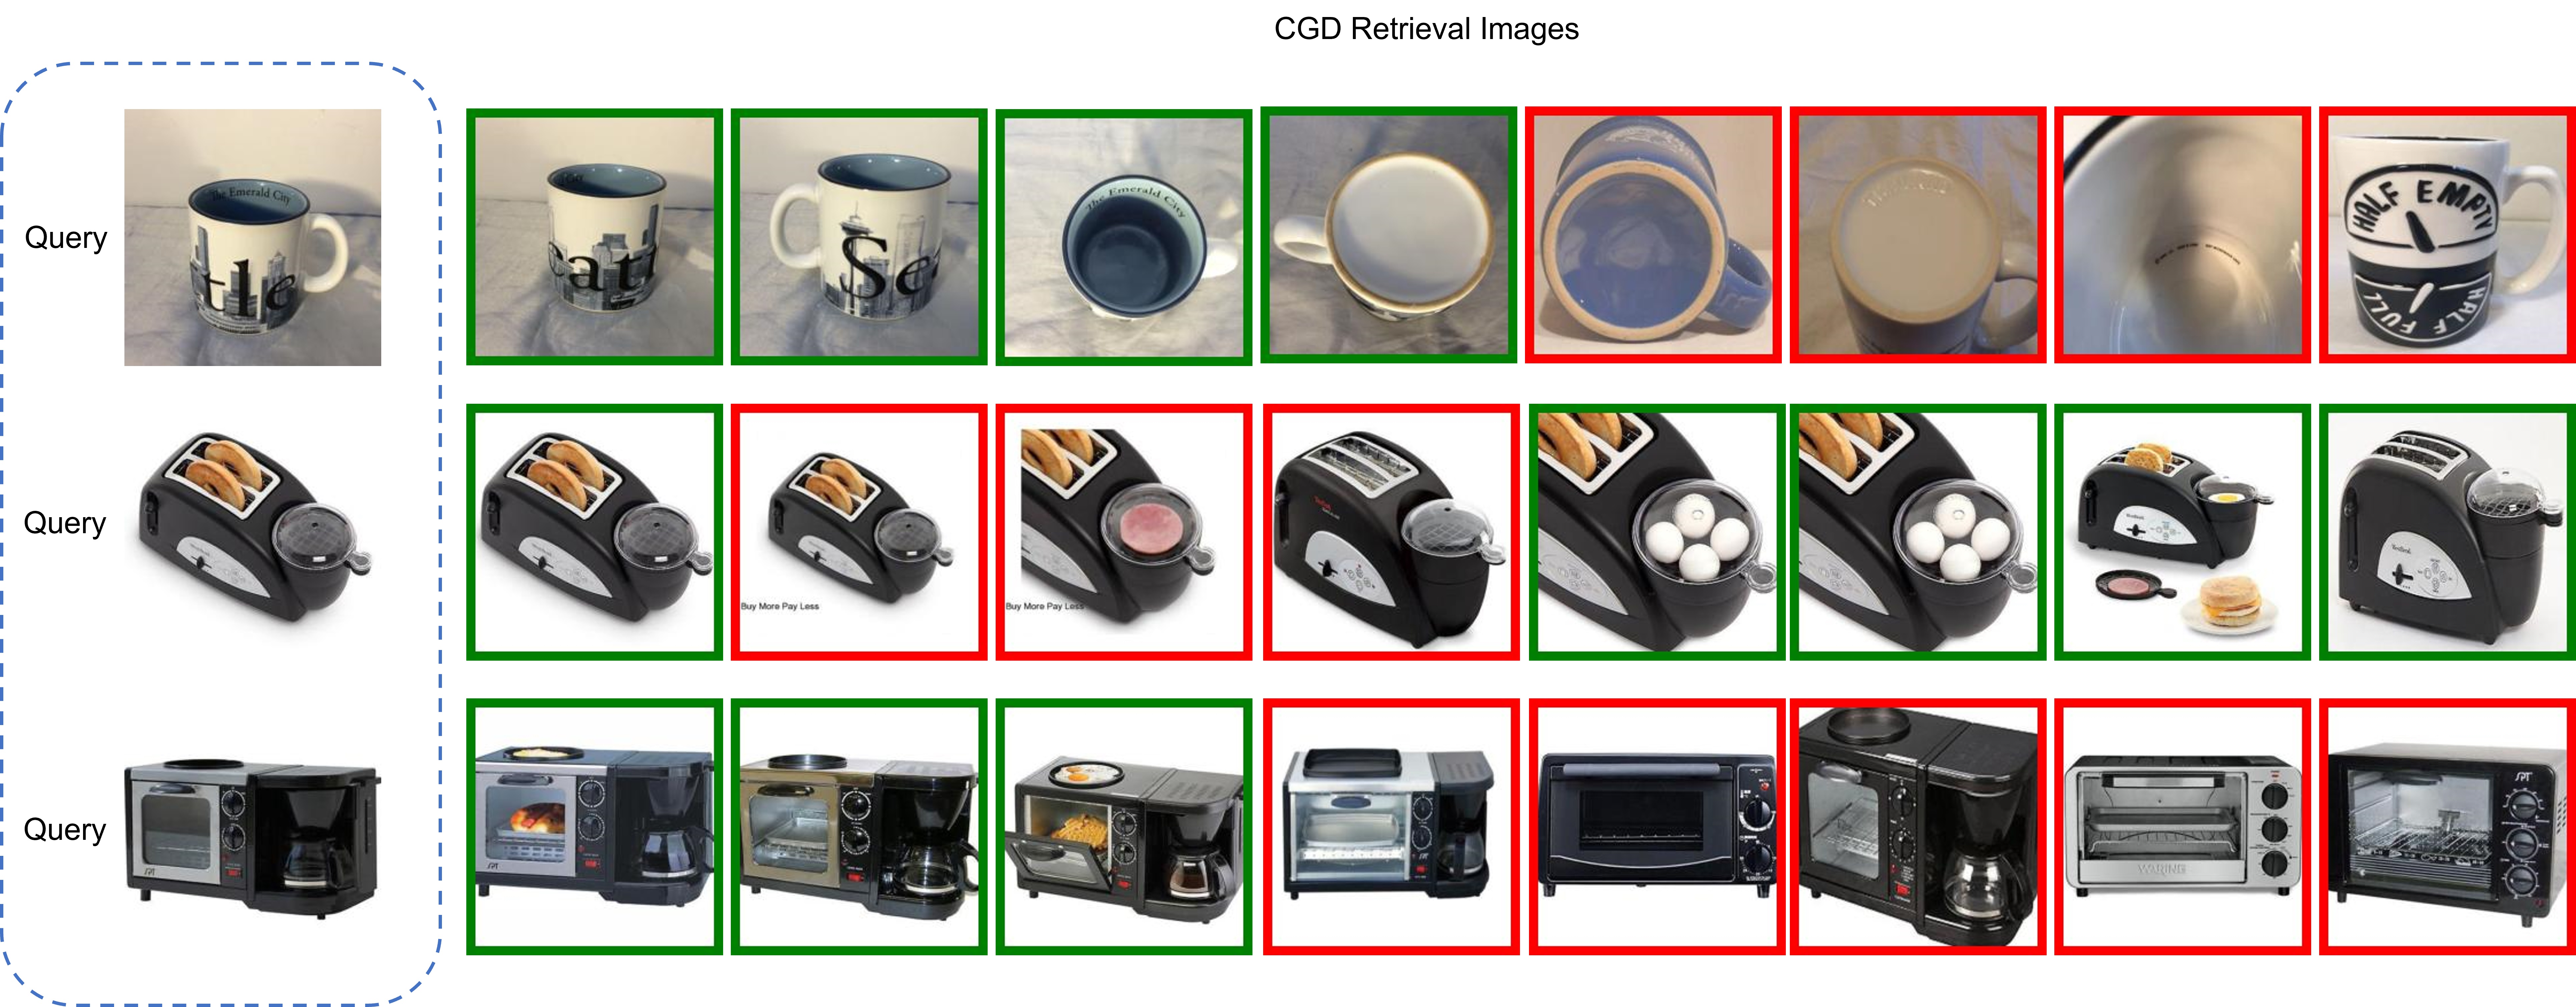
In this blog, we choose CGD ResNet50(SG) model with ResNet50 backbone that combines SPoC and GeM type of global descriptors. Figure 2 shows some retrieval results of CGD Pytorch model based on Standard Online Products (SOP) dataset. The left most query image serves as input to retrieve the 8 most similar image from the database, where the green bounding box means that the predicted class match the query image class, while the red bounding box means a mismatch of image class. Therefore, the retrieved image can be further filtered out with class information.
CGD Model Enabling and Quantization with OpenVINO™ and NNCF
To leverage efficient inference with OpenVINO™ runtime on the intel platform, we proposed the following workflow in Figure 3 for CGD model enabling and quantization with OpenVINO™ and NNCF PTQ, which is implemented in a single Python script run_quantize.py.

CGD model uses ResNet50 backbone extracted latent feature to create multiple global descriptors, then the global descriptors will be normalized and concatenated as output.
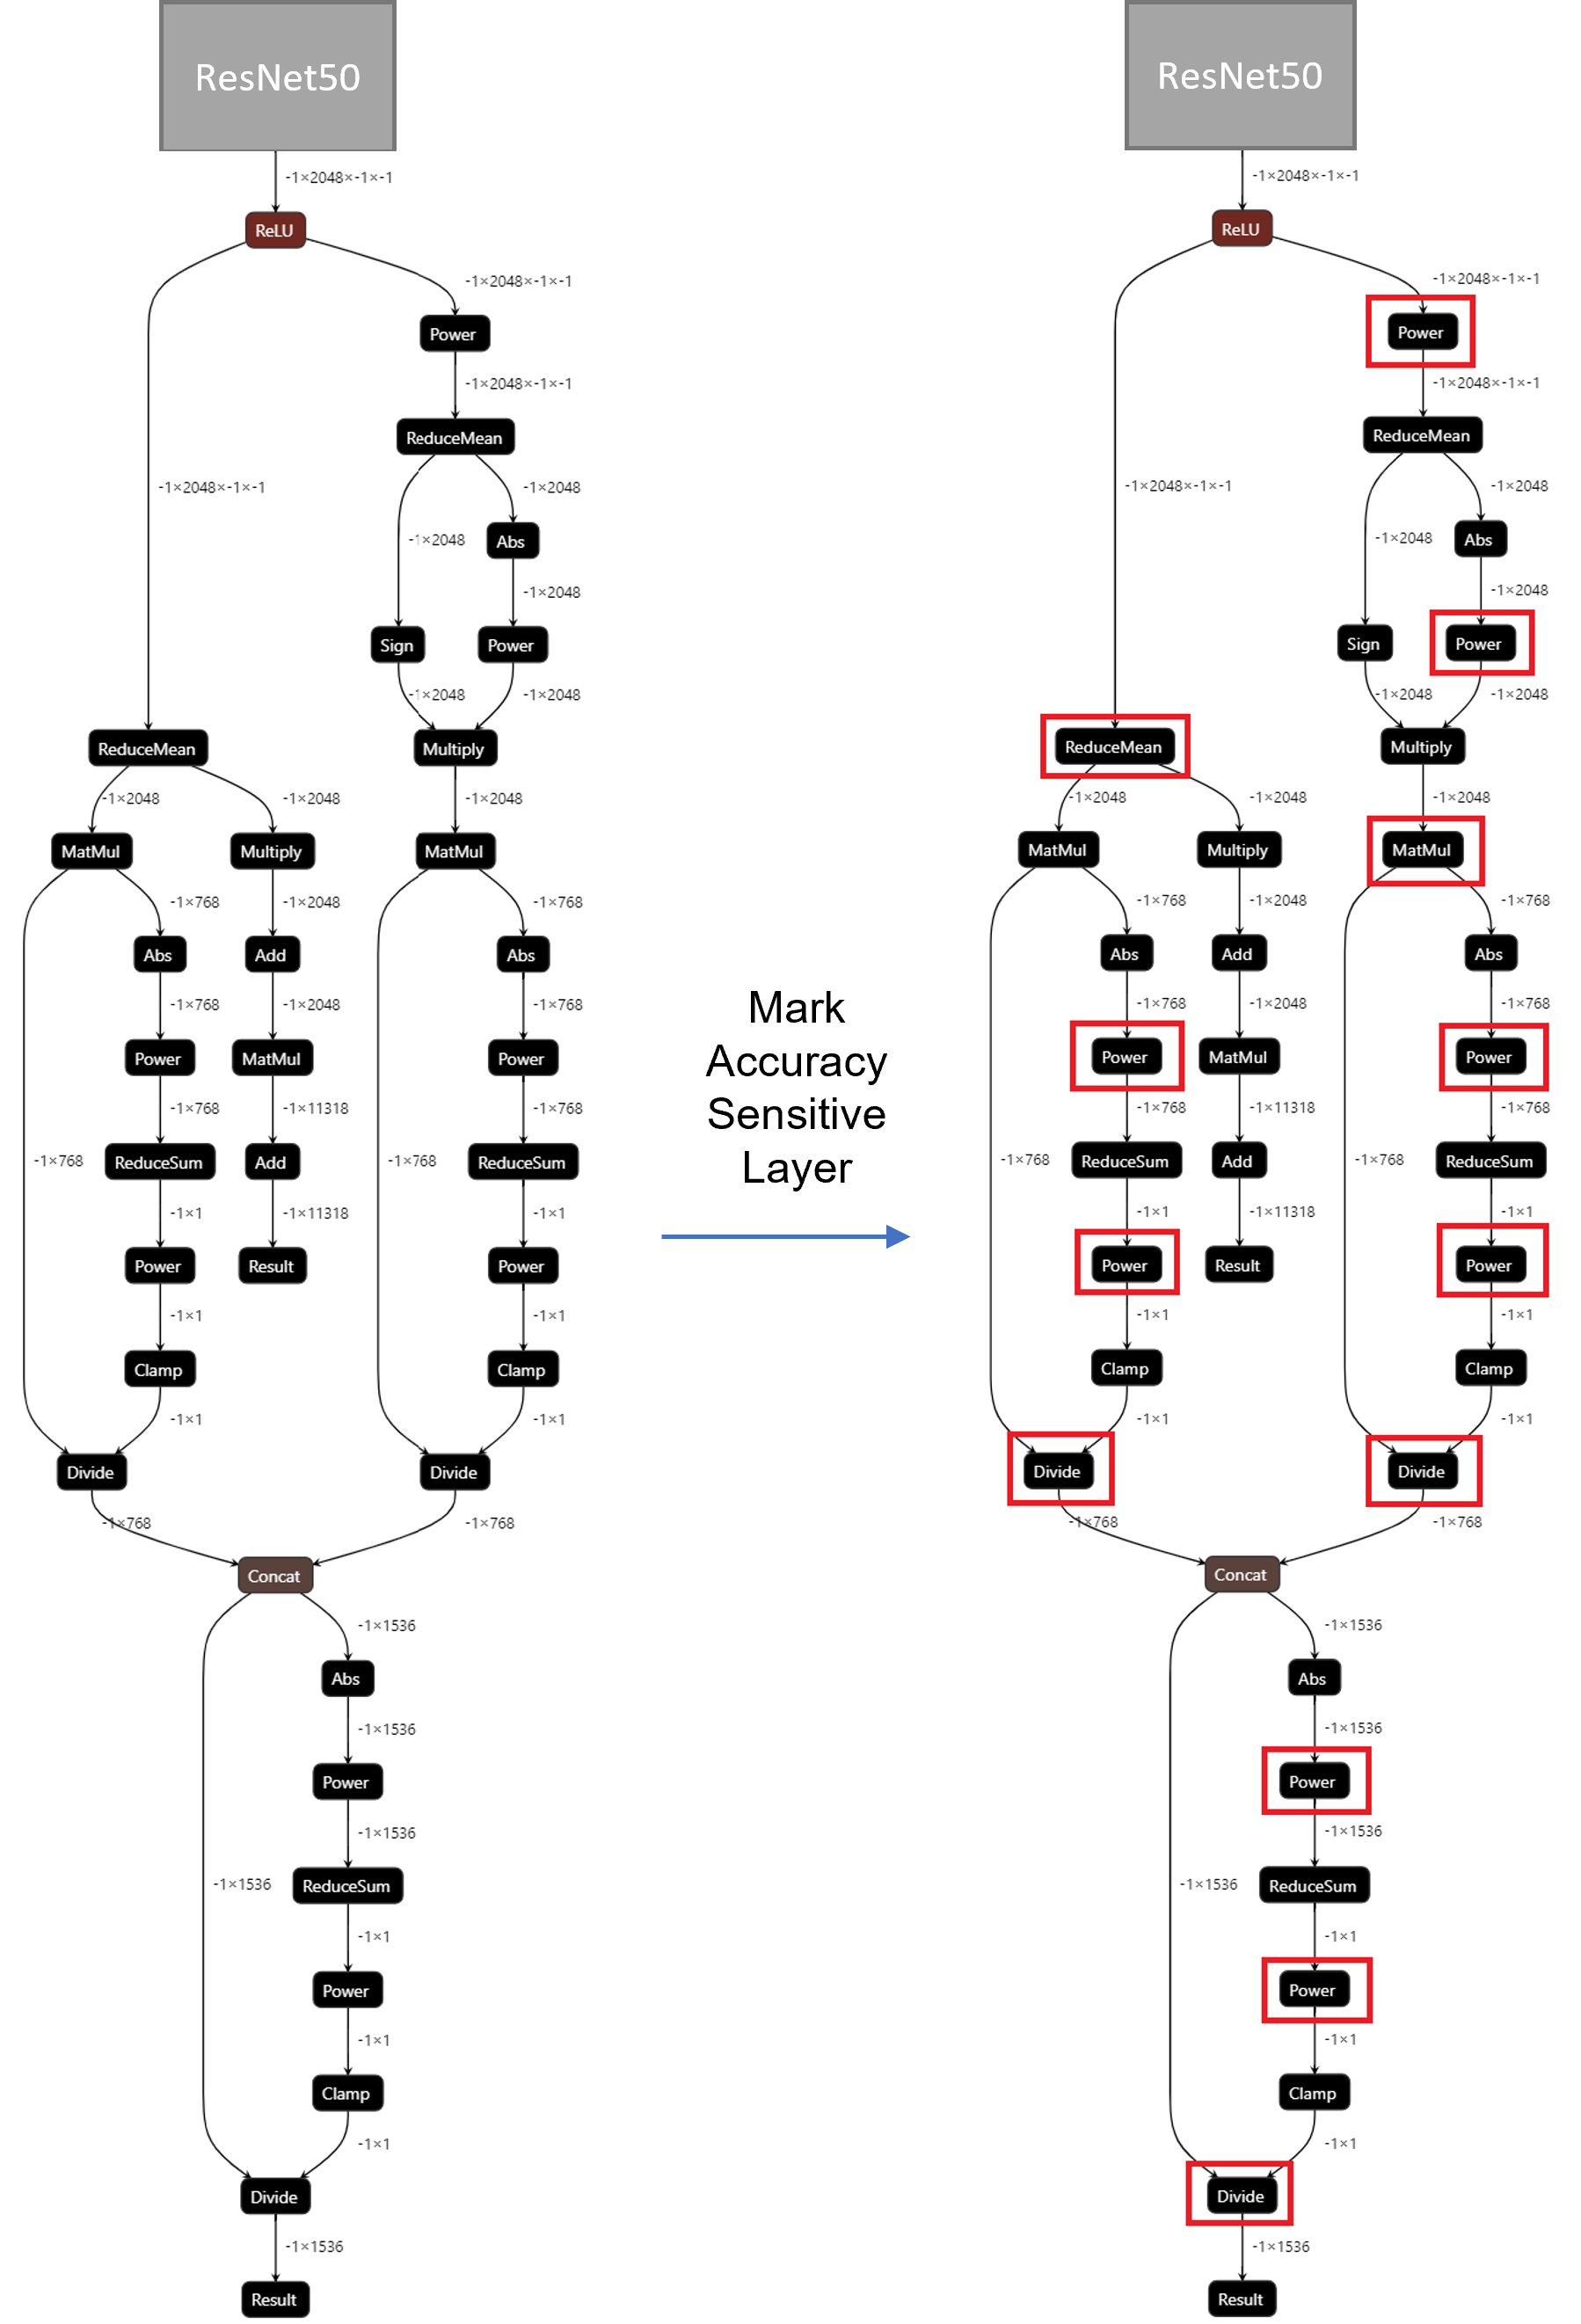
For INT8 quantization, we found some useful tricks to mitigate accuracy issue caused by accuracy sensitive layers, e.g., YOLOv8 OpenVINO Notebook proposes to keep several accuracy sensitive layers in post-processing subgraph as FP32 precision to better preserve accuracy after NNCF PTQ.
For INT8 quantization of CGD model, the left part of Figure 4 shows the subgraph of CGD for global descriptor combination and normalization. Original torch.nn.functional.normalize is accuracy sensitive, which are converted to OpenVINO™ operators (e.g. Power, Divide). Quantization of these operators from FP32 to INT8 weights can lead to accuracy degradation. Here we marked all accuracy-sensitive layers in the right part of Figure 4.
Furthermore, we can use ignored_scopes in NNCF configuration to skip these layers for INT8 quantization to remain FP32 precision as follows:
CGD OpenVINO™ Demo
Here we can run a CGD demo with CGD_OpenVINO_Demo as follows:
Setup Environment
Prepare dataset based on Standard Online Products (SOP)
Download pre-trained Pytorch CGD ResNet50(SG) model trained on SOP dataset to the results directory.
Verify Pytorch FP32 Model Image Retrieval Results
Run NNCF PTQ for default quantization with ignore scopes
Generated FP32 ONNX model and FP32/INT8 OpenVINO™ model will be saved in the “models” directory. Besides, we also store evaluation results of OpenVINO™ FP32/INT8 model as a Database in the “results” directory respectively. The database can be directly used for image retrieval via input query image.
Verify OpenVINO™ FP32 Model Image Retrieval Results
Verify OpenVINO™ INT8 Model Image Retrieval Results
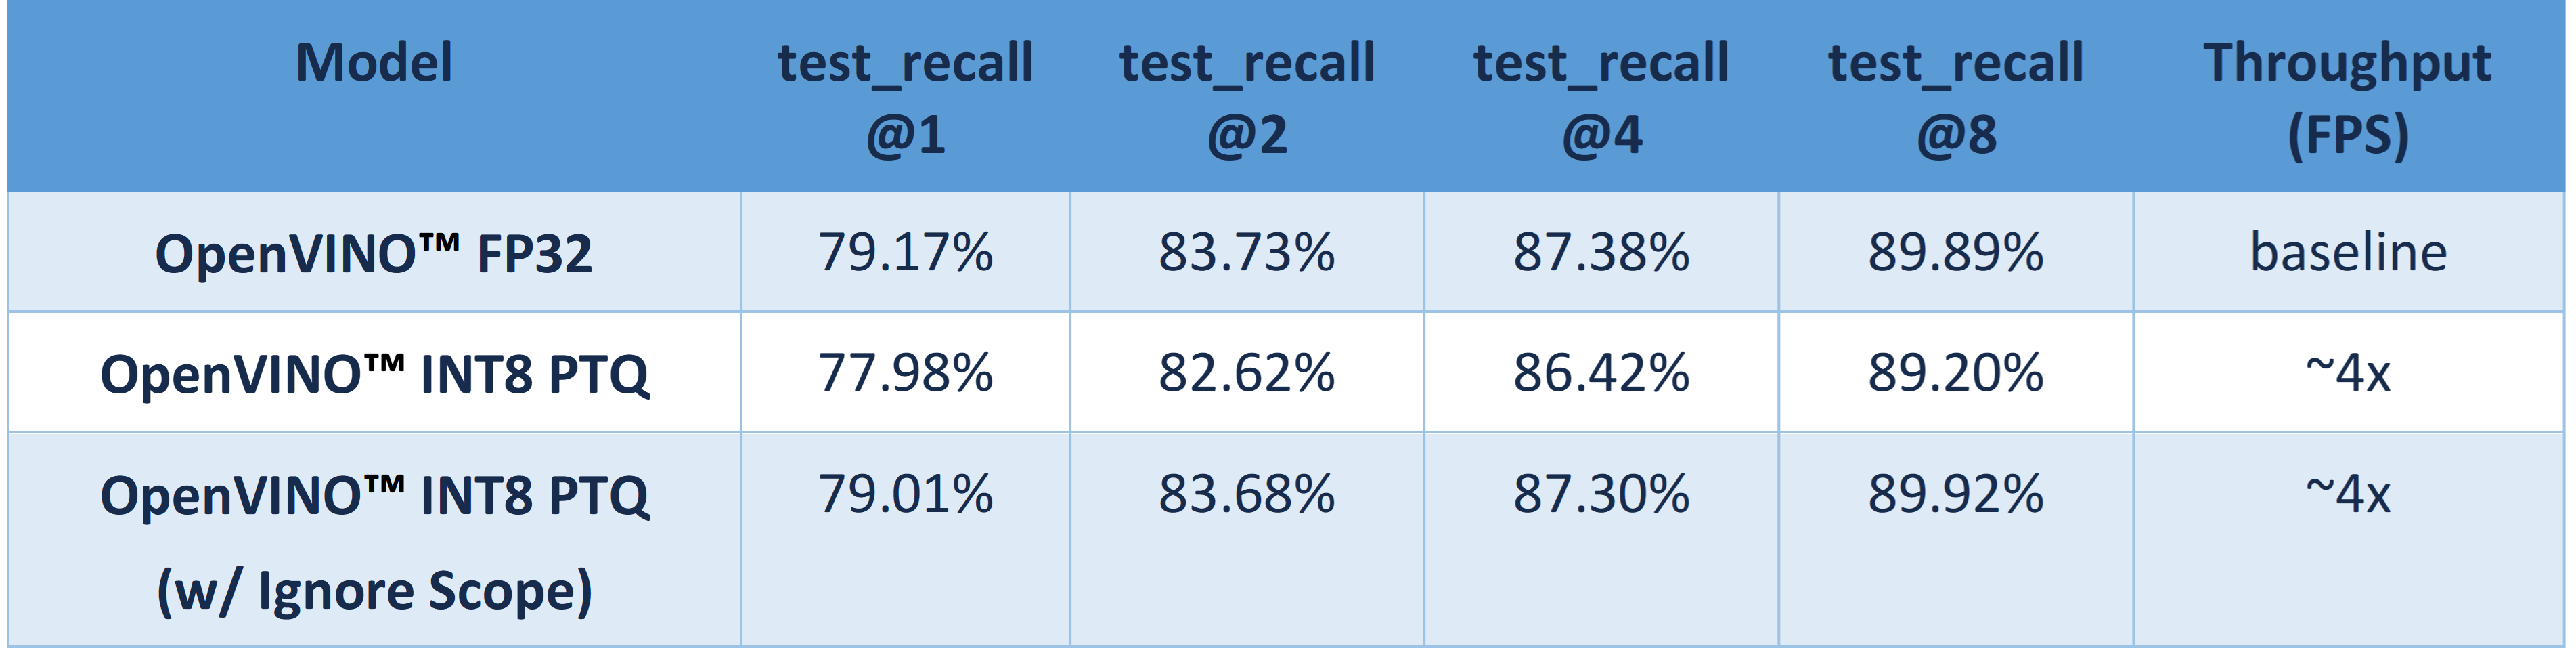
Table 1 shows CGD OpenVINO™ FP32 and INT8 accuracy verification and performance evaluation results with OpenVINO™ 2023.0 on Intel® Xeon® Platinum 8358 Processor.
From an accuracy perspective, test_recall@1/2/4/8 measures if the top n image retrieval results match with the query image. OpenVINO™ INT8 PTQ quantizes all FP32 layers to INT8, which leads to ~1.2% accuracy degradation compared with OpenVINO™ FP32 Model. OpenVINO™ INT8 PTQ (w/ IgnoreScope) skips quantization of accuracy sensitive layers via ignore scopes, which controls the accuracy difference between OpenVINO™ INT8 model and OpenVINO™FP32 model within 0.16%.
Compared with OpenVINO™ FP32 model, both OpenVINO™ INT8 PTQ and OpenVINO™ INT8 PTQ (w/ Ignore Scopes) can reach ~4x performance boost. Results show that keeping serval layers as FP32 precision has minimal impact on OpenVINO™ INT8 model.
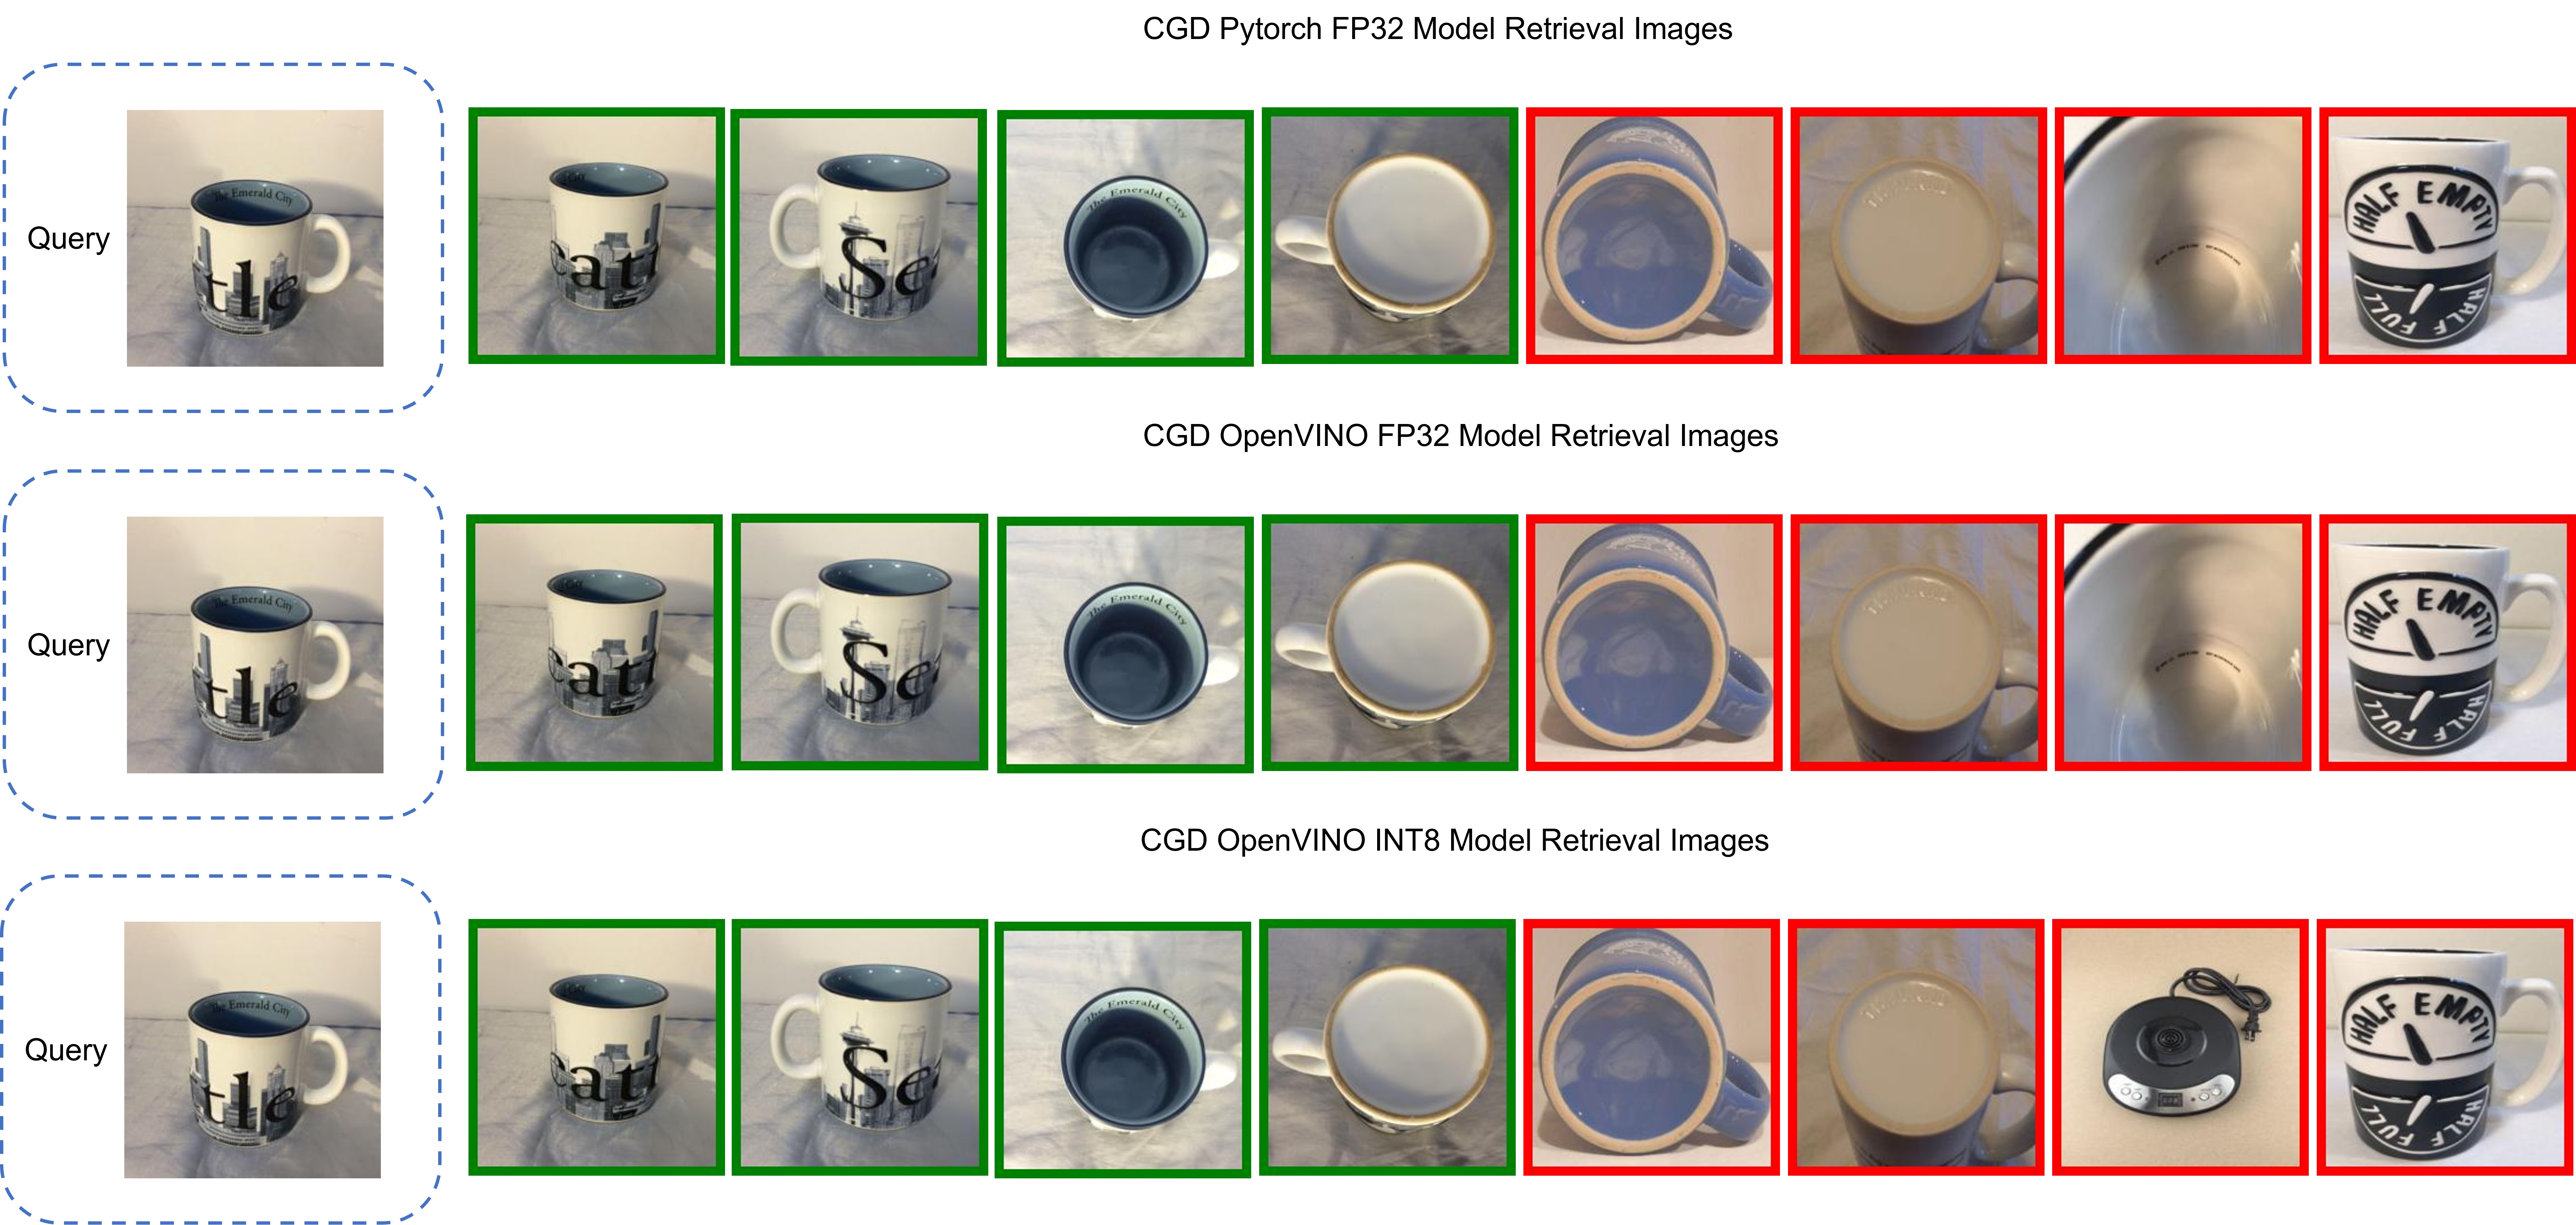
Figure 5 shows the CGD Image Retrieval Results of Pytorch FP32, OpenVINO™ FP32/INT8 models with the same query image. The Pytorch and OpenVINO™ FP32 retrieved images are the same. Although the 7th image of OpenVINO™ INT8 model results is not matched with FP32 model's results, it can be further filtered out with predicted class information.
Conclusion
In this blog, we introduced how to enable and quantize the CGD model with OpenVINO™ runtime and NNCF:
- Proposed INT8 quantization NNCF PTQ with ignore scopes to reach ~4x performance boost while keeping minimal accuracy degradation (<0.16%) compared to FP32 model.
- Provided a demo repository for CGD model enabling, quantization, accuracy verification, and deployment with OpenVINO™ and NNCF.
Reference
Make Your Own YOLOv8 OpenVINO™ Model from Any Data Format with Datumaro
Authors: Vinnam Kim, Wonju Lee, Mark Byun, Minje Park
Introduction
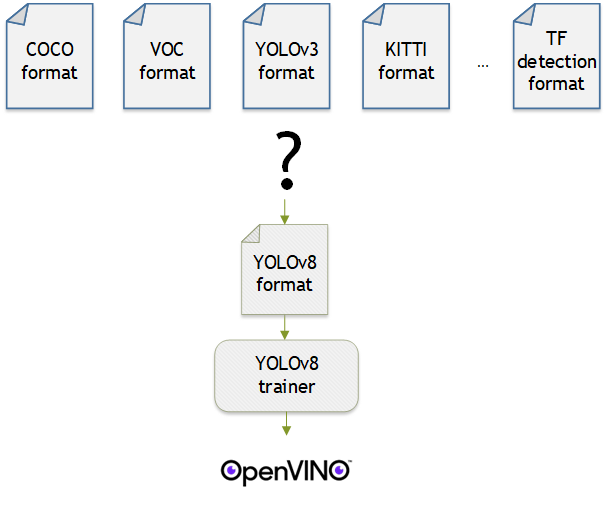
OpenVINO™ provides an easy way to deploy your model with the best inference performance on any Intel hardwares. However, to train your own model for deployment you need to prepare a training framework and dataset. Fortunately, there are many ready-to-use training frameworks and implementations. Then, what about the dataset? A specific training framework requires a specific data format, but there are many data formats in the world. For example, in object detection tasks there are data formats such as YOLO, COCO, and Pascal VOC that are widely used. These formats have different directory structures and annotation file formats as well as different extensions such as txt, json, and, xml, respectively. It's tedious task to convert dataset from one format to another whenever you adopt different training framework.
Let's assume you choose Detectron2, which only supports COCO format datasets. If your dataset is formatted as VOC, you have to convert it into COCO format. Below, we compare the directory structures and annotation file formats of both datasets, VOC and COCO. These datasets have distinct formats and you need to implement codes for format conversion at each time of handling different formats. Of course, this is not technically challenging but this may require tedious code work and debugging for several days. It won't be good to repeat this process if you intend to add more datasets with different formats.
Dataset Management Framework (Datumaro) is a framework that provides Python API and CLI tools to convert, transform, and analyze datasets. Among the many features of Datumaro, we would like to introduce the data format conversion feature on this blog, which is one of the fundamental feature for handling many datasets with different training frameworks. Datumaro supports the import and export of over 40 computer vision data formats (please take a look at supported formats for details!). This means that you can easily change your data format through Datumaro. If your model training framework can only read specific formats, don't worry. Use Datumaro and convert it!
Train YOLOv8 model and export it to OpenVINO™ model
- Prepare dataset
- Convert dataset with Datumaro
- Train with YOLOv8 and export to OpenVINO™ IR
YOLOv8 is a well-known model training framework for object detection and tracking, instance segmentation, image classification, and pose estimation tasks. It provides simple CLI commands to train, test, and export a model to OpenVINO™ Intermediate Representation (IR). However, the data format consumed by YOLOv8 is slightly different from the YOLO format itself. Datumaro named it refers to it as YOLO-Ultralytics format. As you can see here, it requires a special meta file to indicate annotation files for each subset and subset files to list subset image files. It further requires them to be placed in an appropriate directory structure. It can be very tedious to go through these details and implement dataset preprocessing when you want to train a model on your custom dataset.
On this blog, we provide an end-to-end example that covers the complete process of converting your dataset, training a model with the converted dataset, and exporting the trained model to OpenVINO™ IR. We understand that dataset conversion can be a tricky process, especially if you have annotated and built your own dataset. Therefore, we will provide an example of converting the dataset created by the popular CVAT annotation tool. By following our step-by-step guide, you will be able to convert your data format easily and accelerate the inference of your trained model with OpenVINO™.
Prepare dataset
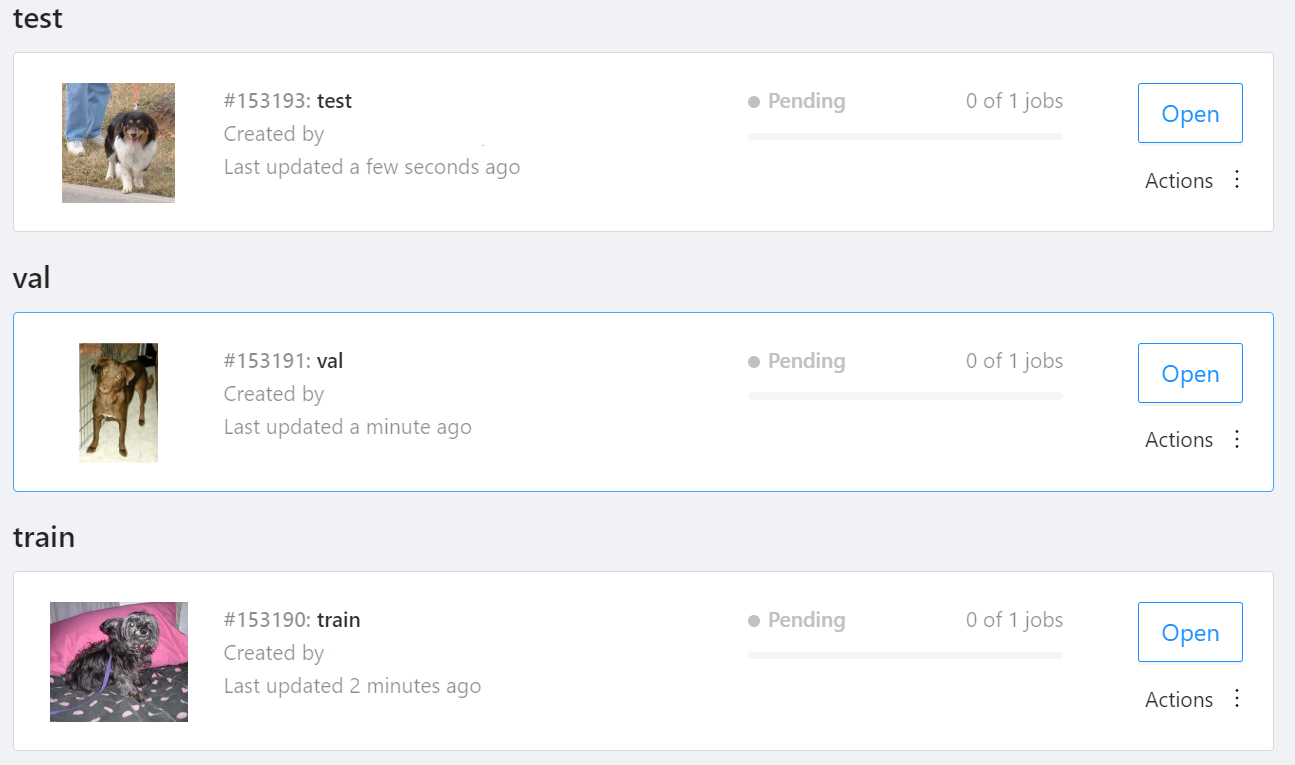
In this section, we introduce the steps to export the project annotated by CVAT for the following workflows. You can skip this section if your dataset is formatted as a different data format and is ready to be imported by Datumaro.
NOTE: We used the cats-and-dogs dataset for this example. You can find the reference for this dataset here.
NOTE: You should have three subsets in your project: "train", "val", and "test" (optional). If your dataset has different subset names, you have to rename them. You can do this by using Datumaro's MapSubsets transform.
We export this project to CVAT for images 1.1 data format. Datumaro can import this data format and export it to YOLO-Ultralytics format which can be consumed by YOLOv8.
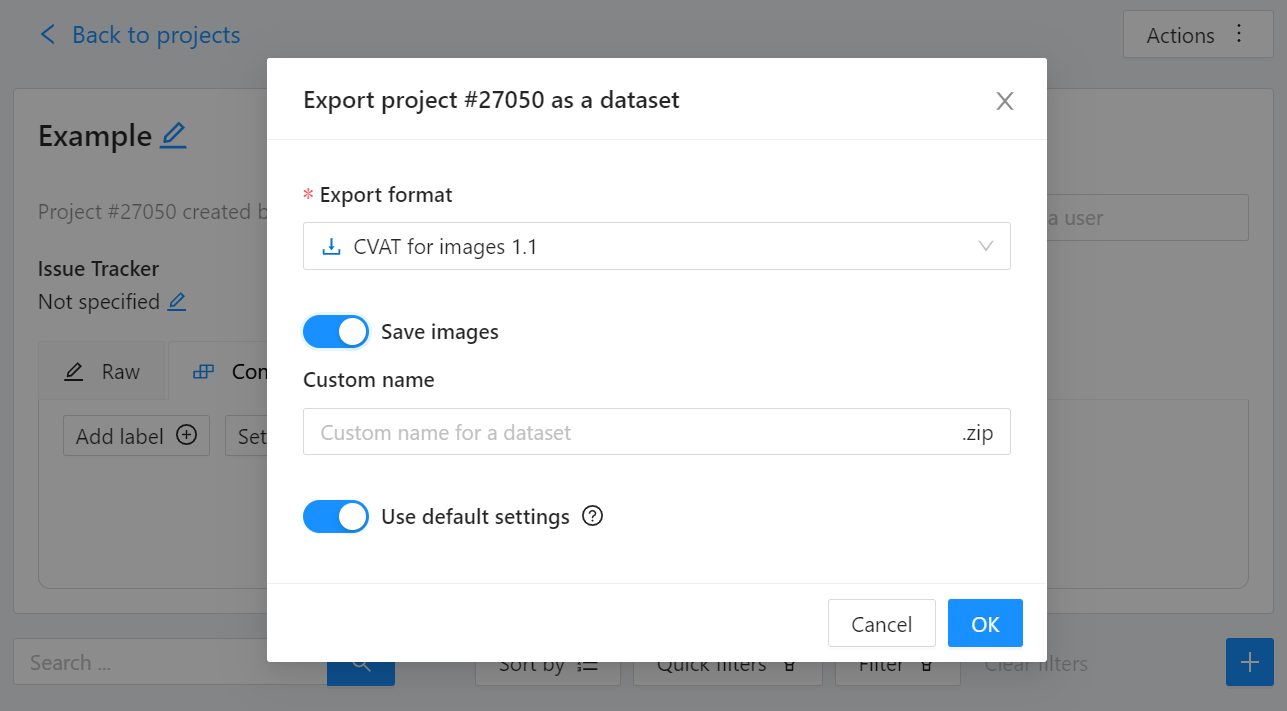
Export CVAT project to CVAT for images 1.1 data format. After exporting the dataset, extract it to the cvat_dataset directory.
You can see the following directory structure:
Convert your dataset using Datumaro
You can convert the dataset located in cvat_dataset using Datumaro's CLI command as follows. For a detailed explanation of the input arguments, see here.
NOTE: If your dataset is not CVAT for images 1.1 format, you can replace -if cvat with the different input format as -if INPUT_FORMAT. Use datum detect CLI command to figure out what format your dataset is.
After the conversion, you can see that yolo_v8_dataset directory is created.
This directory is structured as follows.
Train with YOLOv8 Trainer and Export to OpenVINO™ IR
In this section, we will train the YOLOv8 detector with the dataset converted in the previous section. To train a YOLOv8 detector, please execute the following command.
NOTE: We use data=$(realpath yolo_v8_dataset/data.yaml) to convert the relative path yolo_v8_dataset/data.yaml to the absolute path. This is because YOLOv8 needs the absolute path for the custom dataset.
After the training, the following command enables testing on the test dataset.
Lastly, we will export your YOLOv8 detector to OpenVINO™ IR for inference acceleration on Intel devices.
Using this command, the exported IR is created at this directory path, my-project/train/weights/best_openvino_model.
Conclusion
This post provided an example of training a YOLOv8 detector on an arbitrary data format by utilizing the data format conversion feature of Datumaro and exporting the model to OpenVINO™ IR. You can refer to the executable Jupyter notebook example provided on this blog post here for step-by-step guide. Datumaro offers a range of useful features for managing datasets beyond data format conversion. You can find examples of other Datumaro features, such as noisy label detection during training with OpenVINO™ Training Extensions, in the Jupyter examples directory. For more information about Datumaro and its capabilities, you can visit the Datumaro documentation page. If you have any questions or requests about using Datumaro, feel free to open an issue here.
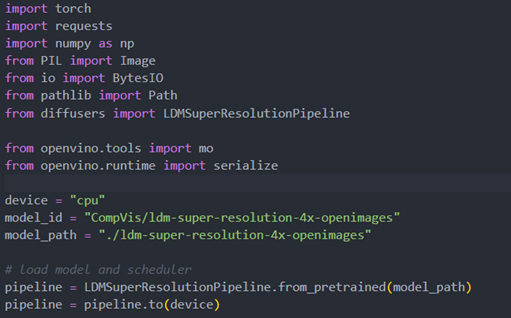
OpenVINO optimizer Latent Diffusion Models (LDM) for super-resolution
OpenVINO optimizer Latent Diffusion Models(LDM) for super-resolution
Introduction
A computer vision approach called image super-resolution aims to increase the resolution of low-resolution images so that they are clearer and more detailed. Applicationsfor super-resolution include the processing of medical images, surveillancefootage, and satellite images.
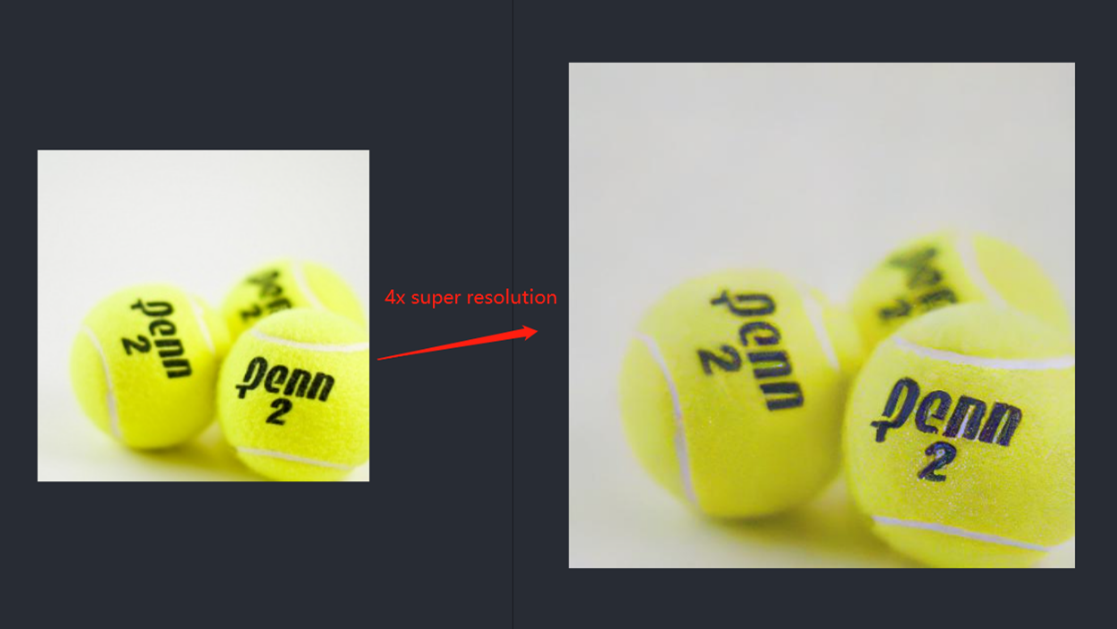
The LDM (LatentDiffusion Models) Super Resolution model, a deep learning-based approach to photo super-resolution, was developed by the Hugging Face Research team. The residual network (ResNet) architecture, a type of convolutional neural network(CNN) created to address the issue of vanishing gradients in deep neuralnetworks.
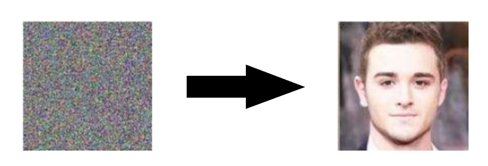
Diffusion models are generative models,meaning that they are used to generate data similar to the data on which they are trained. Fundamentally, Diffusion Models work by destroying training data through the successive addition of Gaussian noise, andthen learning to recover the data by reversing this noising process. After training, we can use the Diffusion Model to generatedata by simply passing randomly sampled noise through the learned denoising process.
Diffusion Model is a latent variable model which maps to the latent space using a fixed Markov chain. This chain gradually adds noise to thedata in order to obtain the approximate posterior.

Ultimately, the image is asymptotically transformed to pure Gaussian noise. The goal of training a diffusion model is to learn the reverse process. By traversing backward along this chain, we can generate new data.

Requirement
- Optimum-intel Optimum Intel is the interface betweenthe HuggingFace Transformers and Diffusers libraries and the differenttools and libraries provided by Intel to accelerate end-to-end pipelines onIntel architectures.
Intel Neural Compressor is an open-source library enabling the usageof the most popular compression techniques such as quantization, pruning and knowledge distillation
- OpenVINO™ is an open-sourcetoolkit for optimizing and deploying AI inference which can boost deep learningperformance in computer vision, automatic speech recognition, natural language processing and other common task.
- optimum-intel==1.5.2(include openvino)
- openvino
- openvino-dev
- diffusers
- pytorch >= 1.9.1
- onnx >= 1.13.0
Reference: optimum-intel-ldm-super-resolution-4x
QuickStart Demo
Original repo is from HuggingFace CompVis/ldm-super-resolution-4x-openimages,we are reference to build our pipeline to implement super-resolution related function.
To transformand acceleration optimize the pipeline by openvino, there are 3 steps need to do.
- Step1. Install the requirement package and initial environment.
- Step2. Convert original model to openvino IR model.
- Step3. Build OpenVINO super resolution pipeline.
Now, Let’s start with the content of our tutorial.
Step 1. Install the requirementpackage and initial environment
OpenVINO has the standard installation process, we can directly refer tothe official OpenVINO documentation to install.
Reference: Install OpenVINO by source code for Linux
Reference: Install OpenVINO by release package
Optimum Intel also can refer the standard guide.
Reference: Optimum-intel install guide
(Optional) Install the latest stable release by pipe :
# pip install openvino, openvino-dev
# pip install"optimum[openvino,nncf]"
Step 2. Convert originalmodel to OpenVINO IR model
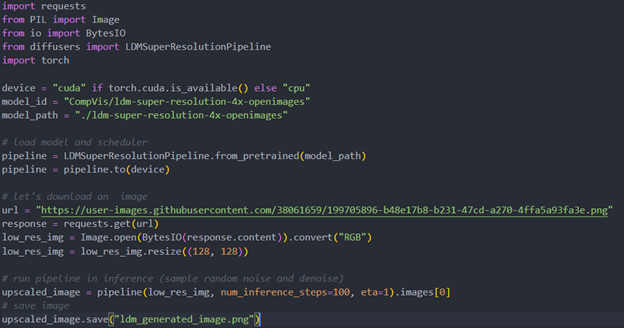
Firstly, run pipe the HuggingFace pipeline, it will automate download the models, and we need to convert them from pytorch->onnx->IR, to enable the model by OpenVINO.
%20workflow.png)
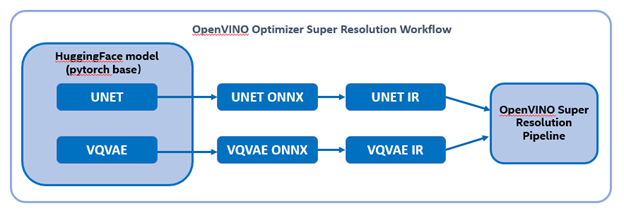
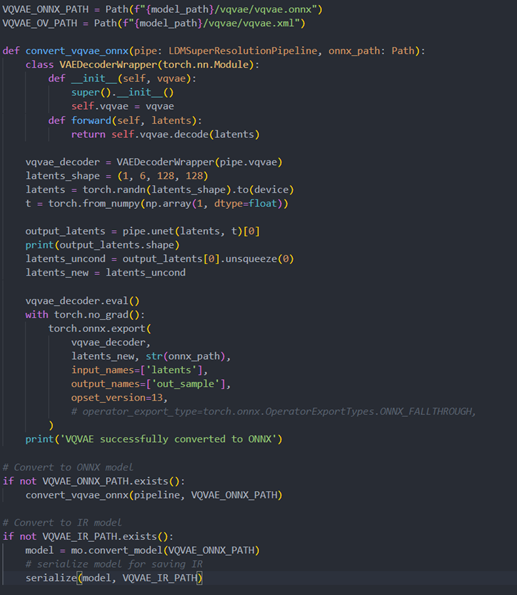
The LDM (LatentDiffusion Models) Super Resolution model has two part of sub-models: unet and vqvae,we should convert each of them in to IR model.
The reference source code for model convert,also we provide the script in the GitHub repo : ov-ldm4x-model-convert.py
Initial parameter and the ov-pipeline
Unet sub-model convert to IR

Vqvae sub-model convert to IR
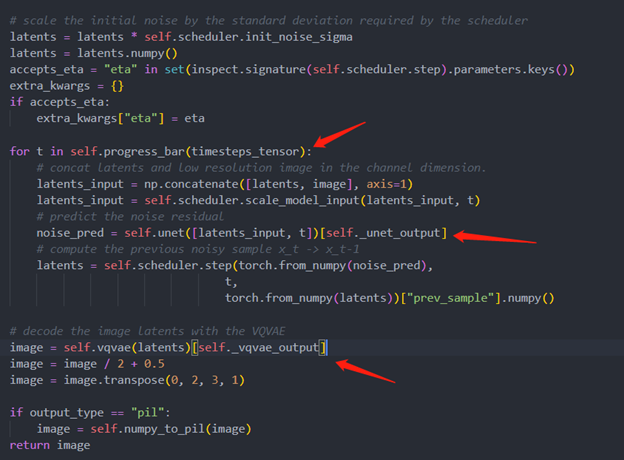
Step 3. Build OpenVINOsuper resolution pipeline
The LDM (Latent Diffusion Models) Super Resolution OpenVINO pipeline main function part code, the whole pipeline script is provided in GitHub repo: ov-ldm4x-pipeline.py
Inference Result
Enable OpenVINO™ Optimization for WeNet
Introduction
The WeNet model provides two-pass approach to unify streaming and non-streaming end-to-end (E2E) speech recognition which is widely used with various HW platforms. In this blog, we provide the OpenVINO™ optimization for WeNet on Intel® platforms.
The public WeNet project is referenced from: wenet-e2e/wenet
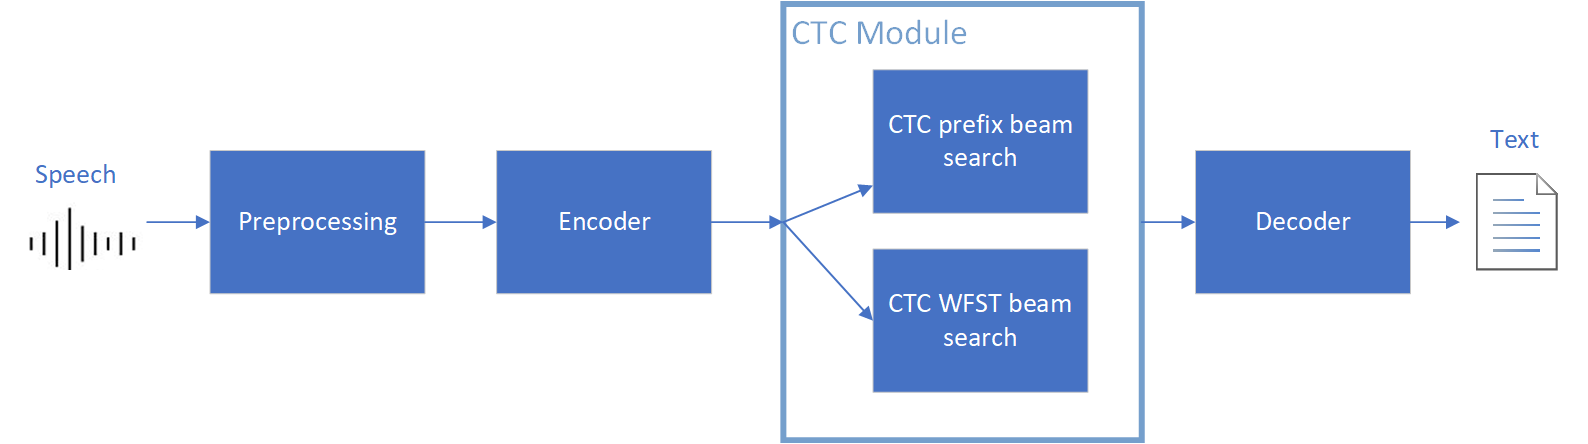
The WeNet model can be considered as a pipeline which is split into 3 parts for decoder, CTC and encoder. Refer the model structure in below picture:
We implement the wrapper function of Automatic Speech Recognition (ASR) model class with OpenVINO™ runtime API programming for these 3 models’ data preparation and inference. Please refer the integrated OpenVINO™ optimization in official project: wenet-e2e/wenet/runtime/openvino
OpenVINO™backend on WeNet
In this project, you do not require to download OpenVINO™ and build the library with WeNet project manually. It’s already fully integrated with OpenVINO™ runtime library for downloading, program compiling and linking. If your operating system is not one of OpenVINO™ runtime library supported, the script will download OpenVINO™ source from Github, and build with CPU plugin to support.
At present, this repository already optimized and validated by OpenVINO™ 2022.3.0 version. Check the operating system which can support OpenVINO™ runtime library directly:
- Windows* 10
- CentOS 7, Red Hat* Enterprise Linux* 8
- Ubuntu* 18.04, 20.04
- Debian 9.13 for X86
- macOS* 10.15
Step 1: Get pretrained ONNX model (Optional)
If you already have the exported ONNX model for WeNet test, you can skip this step.
For users to get pretrained model from WeNet project, you can refer this link:
https://github.com/wenet-e2e/wenet/blob/main/docs/pretrained_models.en.md
Export to 3 ONNX models, including encoder.onnx, ctc.onnx and decoder.onnx by export_onnx_cpu script.
Step 2: Convert ONNX model to OpenVINO™ Intermediate Representation (IR)
Make sure your python environment already installed OpenVINO™ runtime library.
Convert these three ONNX models into IR by OpenVINO™ Model Optimizer command:
Step 3: Build WeNet with OpenVINO™ backend
Please refer system requirement to check if the hardware platform available by OpenVINO™. It will download and install OpenVINO™ library during the CMake configuration.
Some users may cannot easily download OpenVINO™ binary package from server due to firewall or proxy issue. If you failed to download by CMake script, you can download OpenVINO™ package by your selves and put the package to below path:
If you already have OpenVINO™ runtime which is manually built before the WeNet building, you can put the runtime library to below path:
Step 4: Simple inference test
You may run the inference test like below with the speech input audio file (.wav) and model unit file (.txt):
The information of OpenVINO™ integration and results will be print out:
Extend OpenVINO™ to run PyTorch models with custom operations
Authors: Anna Likholat, Nico Galoppo
The OpenVINO™ Frontend Extension API lets you register new custom operations to support models with operations that OpenVINO™ does not support out-of-the-box. This article explains how to export the custom operation to ONNX, add support for it in OpenVINO™, and infer it with the OpenVINO™ Runtime.
The full implementation of the examples in this article can be found on GitHub in the openvino_contrib.
Export a PyTorch model to ONNX
Let's imagine that we have a PyTorch model which includes a new complex multiplication operation created by user (this operation was taken from DIRECT):
We'd like to export the model to ONNX and preserve complex multiplication operations as single fused nodes in the ONNX model graph, so that we can replace those nodes with custom OpenVINO operations down the line. If we were to export MyModel which directly calls the function above from its forward method, then onnx.export() would inline the PyTorch operations into the graph. This can be observed in the figure of the exported ONNX model below.
To prevent inlining of native PyTorch functions during ONNX export, we can wrap the function in a sub-class of torch.autograd.Function and define a static symbolic method. This method should return ONNX operators that represent the function's behavior in ONNX. For example:
You can find the full implementation of the wrapper class here: complex_mul.py
So now we're able to export the model with custom operation nodes to ONNX representation. You can reproduce this step with the export_model.py script:
The resulting ONNX model graph now has a single ComplexMultiplication node, as illustrated below:

Enable custom operation for OpenVINO with Extensibility Mechanism
Now we can proceed with adding support for the ComplexMultiplication operation in OpenVINO. We will create an extension library with the custom operation for OpenVINO. As described in the Custom OpenVINO Operations docs, we start by deriving a custom operation class from the ov::op::Op base class, as in complex_mul.hpp.
1. Implement Operation Constructors
Implement the default constructor and constructors that optionally take the operation inputs and attributes as parameters. (code)
2. Override methods
2.1 validate_and_infer_types() method
Validates operation attributes and calculates output shapes using attributes of the operation: complex_mul.cpp.
2.2 clone_with_new_inputs() method
Creates a copy of the operation with new inputs: complex_mul.cpp.
2.3 has_evaluate() method
Defines the contstraints for evaluation of this operation: complex_mul.cpp.
2.4 evaluate() method
Implementation of the custom operation: complex_mul.cpp
3. Create an entry point
Create an entry point for the extension library with the OPENVINO_CREATE_EXTENSIONS() macro, the declaration of an extension class might look like the following:
This is implemented for the ComplexMultiplication operation in ov_extension.cpp.
4. Configure the build
Configure the build of your extension library using CMake. Here you can find the template of such script:
Also see an example of the finished CMake script for module with custom extensions here: CMakeLists.txt.
5. Build the extension library
Next we build the extension library using CMake. As a result, you'll get a dynamic library - on Linux it will be called libuser_ov_extensions.so, after the TARGET_NAME defined in the CMakeLists.txt above.
Deploy and run the custom model
You can deploy and run the exported ONNX model with custom operations directly with the OpenVINO Python API. Before we load the model, we load the extension library into the OpenVINO Runtime using the add_extension() method.
Now you're ready to load the ONNX model, and infer with it. You could load the model from the ONNX file directly using the read_model() method:
Alternatively, you can convert to an OpenVINO IR model first using Model Optimizer, while pointing at the extension library:
Note that in this case, you still need to load the extension library with the add_extension() method prior to loading the IR into your Python application.
The complete sequence of exporting, inferring, and testing the OpenVINO output against the PyTorch output can be found in the custom_ops test code.
See Also
Remote Tensor API Sample
This AI pipeline implements zero-copy between SYCL and OpenVINO through the Remote Tensor API of the GPU Plugin.
- Introduction
The development of SYCL simplifies the use of OpenCL, which can fully exploit the computing power of GPU in the pipeline. Meanwhile, SYCL has more flexibility to do customized pre- and post-processing of OpenVINO. To further optimize the pipeline, developers can use GPU Plugin to avoid the memory copy overhead between SYCL and OpenVINO. The GPU plugin provides the ov::RemoteContext and ov::RemoteTensor interfaces for video memory sharing and interoperability with existing native APIs, such as OpenCL, Microsoft DirectX, or VAAPI. For details, please refer to the online documentation of OpenVINO.
Based on the pseudocode of the online documentation, here we provide a simple pipeline sample with Remote Tensor API. Because in the rapid iteration of oneAPI, sometimes customers need quick verification so that this sample can be used for testing. OneAPI also provides a real-world, end-to-end example, which optimizes PointPillars for lidar object detection.
- Components
SYCL preprocessing is based on the Sepia Filter sample, which demonstrates how to convert a color image to a Sepia tone image, a monochromatic image with a distinctive Brown Gray color. The sample program works by offloading the compute-intensive conversion of each pixel to Sepia tone using SYCL*-compliant code for CPU and GPU.
OpenVINO inferencing is based on the OpenVINO classification sample, the input from SYCL filtered image in the device will be sent into OpenVINO as a remote tensor without a memory copy.
Remote Tensor API: Create RemoteContext from SYCL pre-processing’s native handle. After model compiling, do memory sharing between the application and GPU plugin with from cl::Buffer to remote tensor.
- Build Sample on Linux
Download the source code from the link. Prepare the model and images.
To run the sample, you need to specify a model and image:
Use pre-trained models from the Open Model Zoo. The models can be downloaded using the Model Downloader. Use images from the media files collection.
Run on Intel NUC Core 11 iGPU with OpenVINO 2022.2 and oneAPI 2022.3.
./intel64/hello_nv12_input_classification_oneAPI../model/FP32/alexnet.xml ../image/dog512.bmp GPU 2
Sample Output:
Warning: With the updating of OpenVINO and oneAPI, different versions may cause problems with the tools in the common directory or the new SYCL header name. Please use the same version or debug following the corresponding release instructions.
Enable OpenVINO™ Optimization for GroundingDINO
Authors: Wenyi Zou, Xiake Sun
Introduction
GroundingDINO introduces a language-guided query selection module to enhance object detection using input text. This module selects relevant features from image and text inputs and uses them as decoder queries. In this blog, we provide the OpenVINO™ optimization for GroundingDINO on Intel® platforms.
The public GroundingDINO project is referenced from: GroundingDINO
The GroundingDINO refer the model structure in below picture:
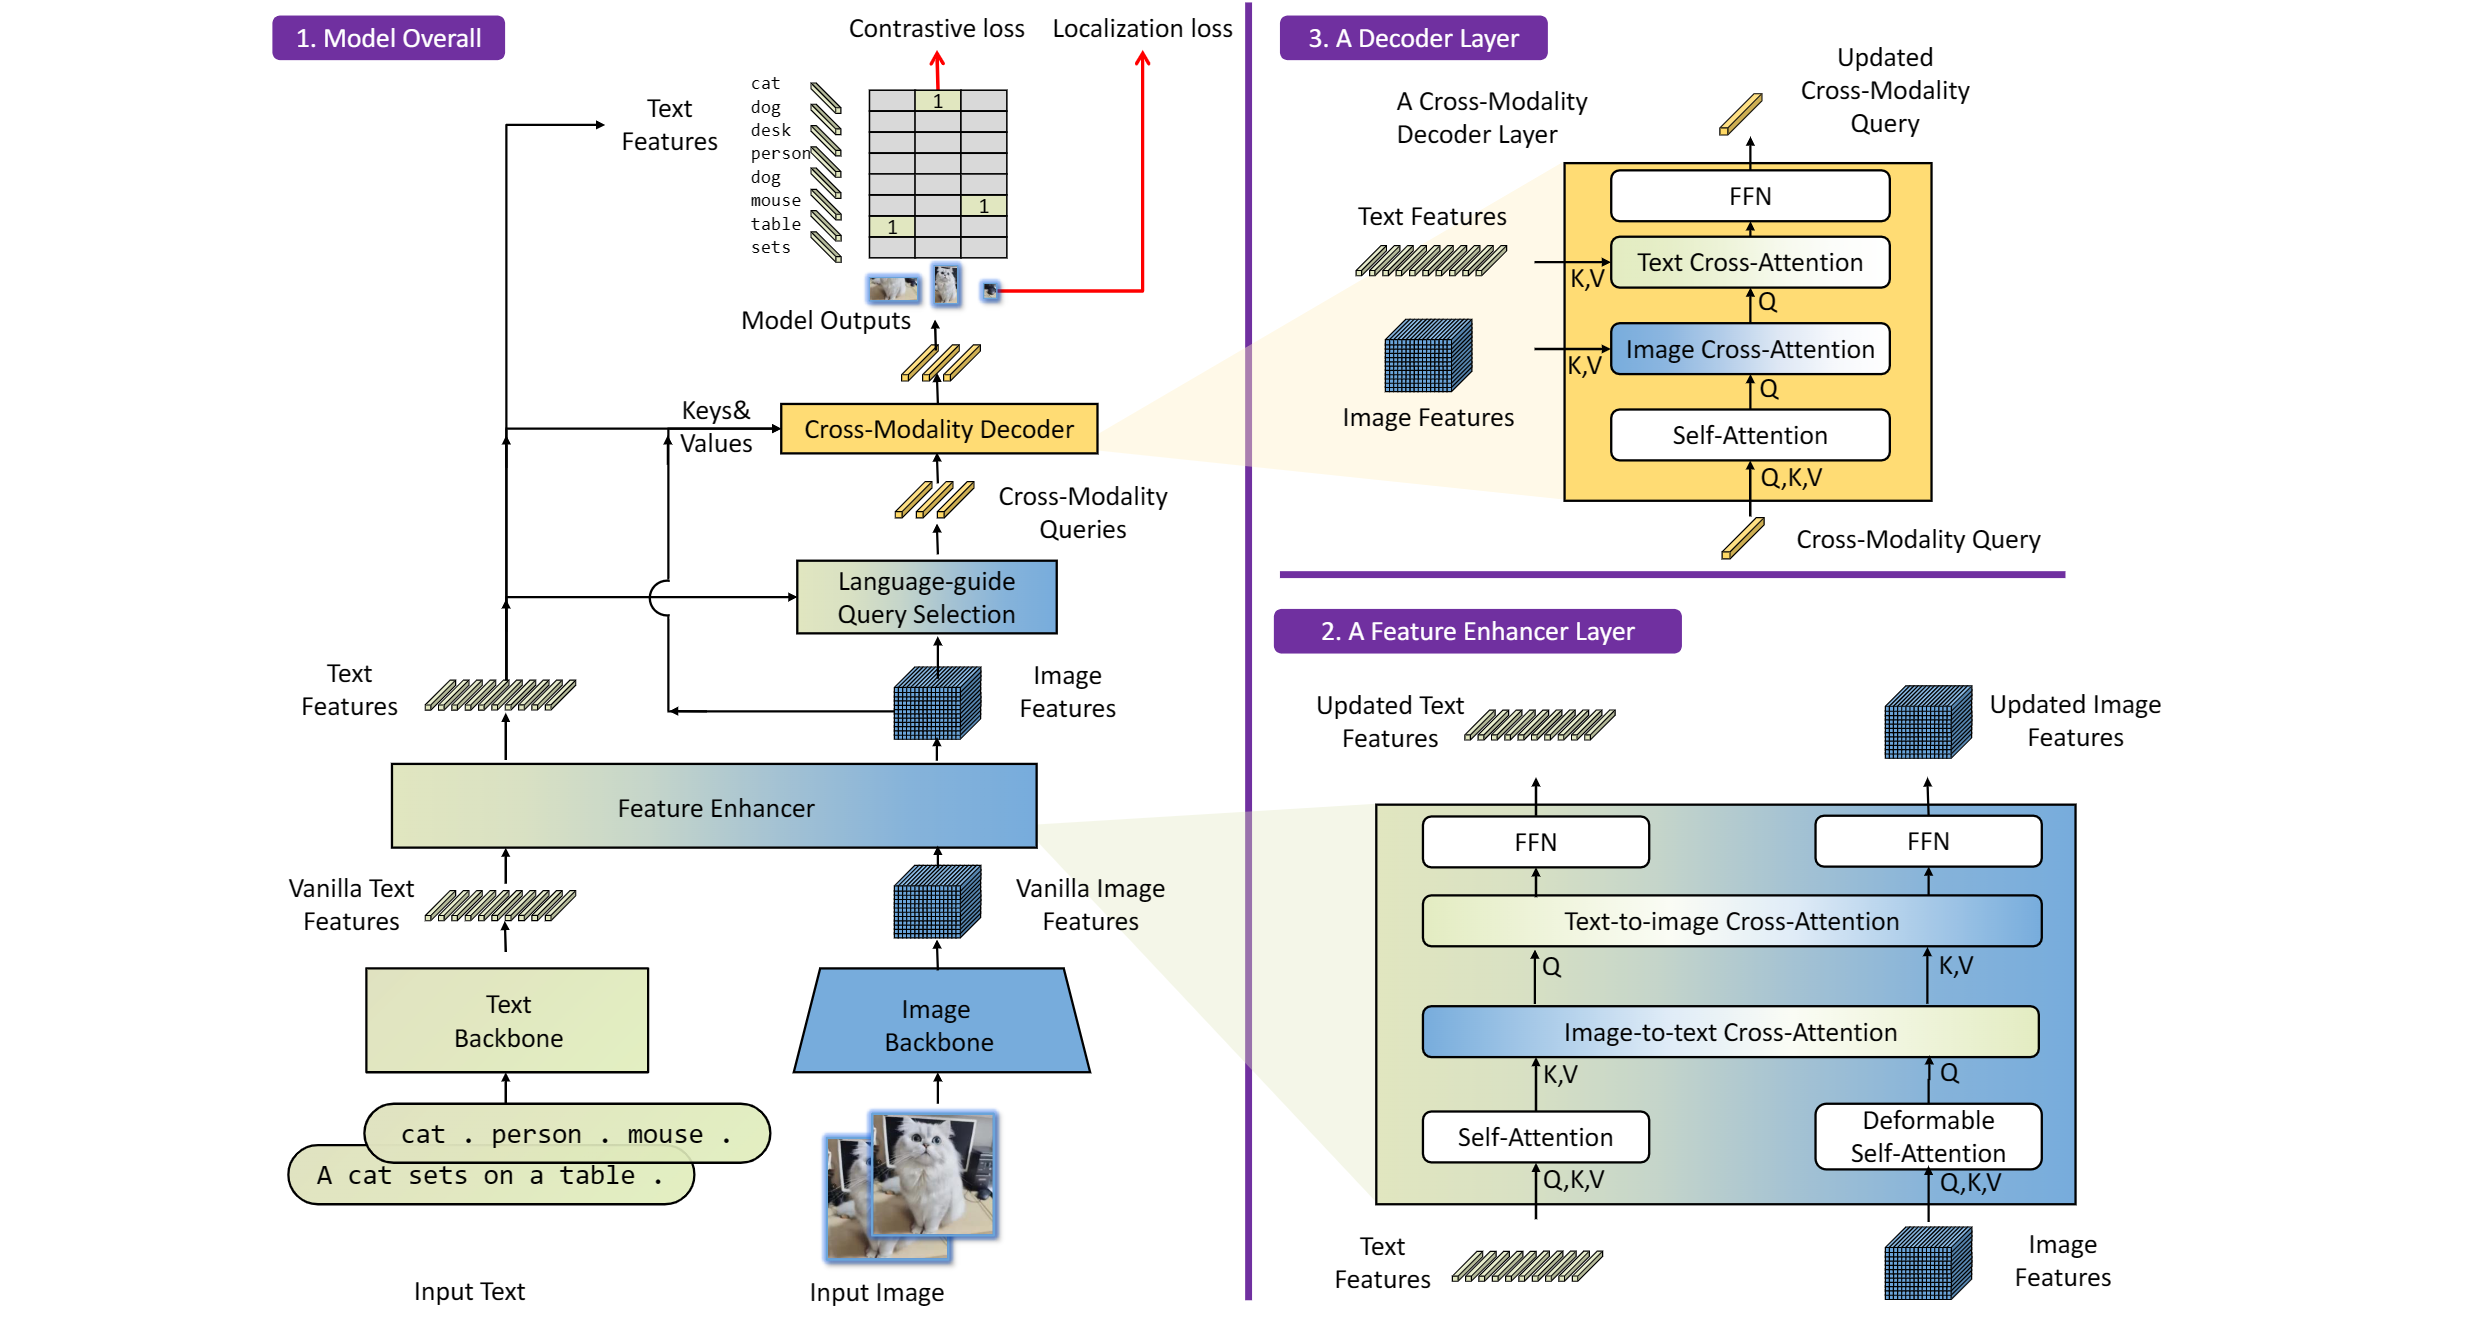
OpenVINO™ backend on GroundingDINO
In this project, you do not require to download OpenVINO™ and build the library with GroundingDINO project manually. It’s already fully integrated with OpenVINO™ runtime library for downloading, program compiling and linking.
At present, this repository already optimized and validated by OpenVINO™ 2023.1.0.dev20230811 version. Check the operating system which can support OpenVINO™ runtime library directly:
- Ubuntu 22.04 long-term support (LTS), 64-bit (Kernel 5.15+)
- Ubuntu 20.04 long-term support (LTS), 64-bit (Kernel 5.15+)
- Ubuntu 18.04 long-term support (LTS) with limitations, 64-bit (Kernel 5.4+)
- Windows* 10
- Windows* 11
- macOS* 10.15 and above, 64-bit
- Red Hat Enterprise Linux* 8, 64-bit
Step 1: Install system dependency and setup environment
Create and enable python virtual environment
Clone the GroundingDINO repository from GitHub
Change the current directory to the GroundingDINO folder
Install python dependency
Install the required dependencies in the current directory
Download pre-trained model weights
Step 2: Export to OpenVINO™ models
Step 3: Simple inference test with PyTorch and OpenVINO™
Inference with PyTorch
Inference with OpenVINO™

Serving OpenVINO Models using the KServe API Standard
There are many network API specifications for model serving on the market today. Two of the most popular are TensorFlow Serving (TFS) and KServe. Starting with the 2022.2 release, OpenVINO Model Server supports KServe -- meaning both of these common API standards can be used for serving OpenVINO models. This blog explains how to take advantage of either API.
OpenVINO provides an efficient and high-performance runtime for executing deep learning inference. In many situations, AI applications need to delegate inference execution to a remote device or service over a network. There are many advantages to this approach including the ability to scale.
AI software developers expect the communication interface with a model server to remain stable. In many cases, developers want to perform pre/post-processing on the client side with minimal dependencies. They are reluctant to switch to a different serving implementation if that requires substantial code changes or new dependencies in their applications.
Since the first release in 2018, OpenVINO Model Server has supported the TFS API. And as of 2022, the KServe API is now supported as well.
KServe is a standard designed by several companies across the industry. It has been adopted by model servers like Triton Inference Server and TorchServe. Now the same client can easily switch to use OpenVINO Model Server and leverage the latest optimizations in Intel(R) CPUs and GPUs.
KServe Python Example
Below is a simple example how to use KServe using the Python-based tritonclient.
Create Model Repository
Start OpenVINO Model Server with a ResNet-50 Model:
Install Python Client Library
Get the Model Metadata
Get a Sample Image
Run Inference via gRPC Interface with a NumPy File as Input Data
Run Inference via REST Interface with a JPEG File as Input Data
Run Inference via REST Interface with a JPEG File as Input Data using cURL
KServe C++ Example
The inference execution is also made easy in C++ based client applications. The examples below show client application execution based on the Triton C++ client library.
Build the Samples:
Get the Model Metadata
The compiled application grpc_model_metadata can make a call to gRPC endpoint and query for a server model metadata.
Run Inference via gRPC with a JPEG Encoded File as the Input Data
The sample application grpc_infer_resnet is sending the inference requests for a set of images listed inresnet_input_images.txt including their expected classification number in the ImageNet dataset.
In addition to the KServe API, the TFS API can still be used by client applications. This gives you the option to use a range of client libraries like tensorflow-serving-api or the much lighter and simplified ovmsclient.
To help you get started, we provide samples in Python, C++, Java and Go:
In conclusion, it is now easier to connect and AI applications to OpenVINO Model Server. In existing applications, you can even use the same code to take advantage of the benefits of OpenVINO.