
Usability

How to build and run OpenVino™ C++ Benchmark Application for Linux
Introduction
The OpenVINO™ Benchmark Application estimates deep learning inference performance on supported devices for synchronous and asynchronous modes.
NOTE: This guide describes the usage of the C++ implementation of the Benchmark Tool. For the Python implementation, refer to the Benchmark Python Tool page. The Python version is recommended for benchmarking models used in Python applications, and the C++ version is recommended for benchmarking models used in C++ applications.
In this tutorial, we will guide you through building and running the C++ implementation of the Benchmark Tool on Ubuntu with OpenVINO™ 2023.1.0 release and demonstrate its usage by benchmarking the Inception (GoogleNet) V3 deep learning model. The following steps outline the process:
- Download and Convert the Model
- Install OpenVINO™ Runtime
- Build OpenVINO™ C++ Runtime Samples
- Run the Benchmark Application
The benchmark application works with models in the OpenVINO™ IR (.xml and .bin), ONNX (.onnx), TensorFlow (*.pb), TensorFlow Lite (*.tflite) and PaddlePaddle (*.pdmodel) formats. Make sure to convert your models if necessary (see "Model conversion to OpenVINO™ IR format" step below).
Requirements
Before getting started, ensure that you have the following requirements in place:
- Ubuntu 18.04 or higher
- CMake version 3.10 or higher
Step 1: Install OpenVINO™
To get started, first install OpenVINO™ Runtime C++ API.
Download and Setup OpenVINO™ Runtime archive file for Linux for your system. The following steps describe the installation process for Ubuntu 20.04 x86_64 system:
1. Download the archive file, extract the files, rename the extracted folder, and move it to the desired path:
2. Install required system dependencies on Linux. To do this, OpenVINO provides a script in the extracted installation directory. Run the following command:
3. For simplicity, it is useful to create a symbolic link as below:
4. Set OpenVINO™ environment variables. Open a terminal window and run the setupvars.sh script to temporarily set your environment variables. If your <INSTALL_DIR> is not /opt/intel/openvino_2023, use the correct one instead:
Step 2: Build OpenVINO™ C++ Runtime Samples
In the existing terminal window where the OpenVINO™ environment is set up, navigate to the /opt/intel/openvino_2023.1.0/samples/cpp directory and run the /build_samples.sh script:
As a result of a successful build, you'll get the message with a path to the sample binaries:
NOTE: You can also use the -b option to specify the sample build directory and -i to specify the sample install directory, for example:
NOTE: The build_samples.sh script will build all the samples in the /opt/intel/openvino_2023.1.0/samples/cpp folder. Remove the other samples from the folder if you want to build only a few samples or only the benchmark_app.
Step 3: Run the Benchmark Application
NOTE: You can use your model for benchmark running or if necessary download model for demo using the Model Downloader. You can find pre-trained models from either public models or Intel’s pre-trained modelsfrom the OpenVINO™ Open Model Zoo. Following are the steps to install the tools and obtain the IR for the Inception (GoogleNet) V3 PyTorch model:
The googlenet-v3-pytorch IR files will be located at: <CURRENT_DIRECTORY>/public/googlenet-v3-pytorch/FP32
Navigate to the samples binaries folder and run the benchmark_app with the following command:
By default, the application will load the specified model onto the CPU and perform inferencing on batches of randomly generated data inputs for 60 seconds. As it loads, it prints information about benchmark parameters. When benchmarking is completed, it reports the minimum, average, and maximum inferencing latency and average the throughput.
NOTE: You can use images from the media files collection available at test_data and infer with specific input data using the -i argument to benchmark_app.
You may be able to improve benchmark results beyond the default configuration by configuring some of the execution parameters for your model. Please find other options for configuring execution parameters here: Benchmark C++ Tool Configuration Options
Model conversion to OpenVINO™ IR format
You can use OpenVINO™ Model Converter to convert your model to Intermediate Representation (IR) when necessary:
1. Install OpenVINO™ for Python which includes the necessary components for utilizing the OpenVINO™ Model Converter.
NOTE: Ensure you install the same version of OpenVINO™ Runtime Package for Python as the OpenVINO™ Runtime C++ API in step 2.
2. To convert the model to IR, run Model Converter:
Related Articles
Install OpenVINO™ Runtime on Linux from an Archive File
Transition from Legacy Conversion API
Running OpenVINO™ C++ samples on Visual Studio
How to Install Intel GPU Drivers on Windows and Ubuntu
Introduction
OpenVINO is an open-source toolkit for optimization and deployment of AI inference. OpenVINO results in more efficient inference of deep learning models at the edge or in data centers. OpenVINO compiles models to run on many different devices, meaning you will have the flexibility to write code once and deploy your model across CPUs, GPUs, VPUs and other accelerators.
The new family of Intel discrete GPUs are not just for gaming, they can also run AI at the edge or on servers. Use this guide to install drivers and setup your system before using OpenVINO for GPU-based inference.
OpenVINO and GPU Compatibility
To get the best possible performance, it’s important to properly set up and install the current GPU drivers on your system. Below, I provide some recommendations for installing drivers on Windows and Ubuntu. This article was tested on Intel® Arc™ graphics and Intel® Data Center GPU Flex Series on systems with Ubuntu 22.04 LTS and Windows 11. To use the OpenVINO™ GPU plugin and offload inference to Intel® GPU, the Intel® Graphics Driver must be properly configured on your system.
Recommended Configuration for Ubuntu 22.04 LTS
The driver for Ubuntu 22.04 works out of the box with Kernel 5.15.0-57. However, if you upgraded/downgraded your kernel or upgraded from Ubuntu 20.04 LTS to 22.04, I suggest updating the kernel version to linux-image-5.19.0-43-generic.
After updating the kernel, check for the latest driver release. I updated my Ubuntu machine to version 23.13.26032.30, which was the latest version at the time of publishing this article, however OpenVINO could be run on discrete GPU with older or newer driver versions.
NOTE: If you upgraded Ubuntu 20.04 to 22.04, please verify your kernel version `uname –r` before updating the driver.
Recommended Configuration for Windows 11
Many driver versions are available for Windows. To run AI workloads, I suggest using the latest beta driver.
Getting Help
Even if you are using the latest available driver, you should always check if your AI models are running properly and generating the expected results. If you discover a bug for a particular model or failure to run a specific model, please file an issue on GitHub. Before reporting an issue, please check whether using the latest Beta version of the driver and latest version of OpenVINO solves the issue.
NOTE: Always refer to the official GPU driver documentation when setting up your system. This blog provides additional recommendations for the best results when using OpenVINO but it is not a replacement for documentation.
Conclusion
Checking the system requirements in Ubuntu 22.04 LTS and Windows 11 resolves some issues running Generative AI models like Stable Diffusion with OpenVINO on discrete GPUs. These updates prevent crashes and compilation errors or poor performance with Stable Diffusion. I suggest testing your AI models with the new driver installation, as it will likely improve the performance of your application. Try out this Stable Diffusion notebook for testing purposes.
Resources
https://github.com/intel/compute-runtime/
https://www.intel.com/content/www/us/en/products/docs/discrete-gpus/arc/software/drivers.html
https://www.intel.com/content/www/us/en/download/729157/intel-arc-iris-xe-graphics-beta-windows.html
https://docs.openvino.ai/2023.0/openvino_docs_OV_UG_supported_plugins_GPU.html
https://github.com/openvinotoolkit/openvino_notebooks/tree/main/notebooks/108-gpu-device
CPU Dispatcher Control for OpenVINO™ Inference Runtime Execution
Introduction
CPU plugin of OpenVINO™ toolkit as one of the most important part, which is powered by oneAPI Deep Neural Network Library (oneDNN) can help user achieve high performance inference of neural networks on Intel®x86-64 CPUs. The CPU plugin detects the Instruction Set Architecture (ISA) in the runtime and uses Just-in-Time (JIT) code generation to deploy the implementation optimized for the latest supported ISA.
In this blog, you will learn how layer primitives been optimized by implementation of ISA extensions and how to change the ISA extensions’ optimized kernel function at runtime for performance tuning and debugging.
After reading this blog, you will start to be proficient in AI workloads performance tuning and OpenVINO™ profiling on Intel® CPU architecture.
CPU Profiling
OpenVINO™ provide Application Program Interface (API) which is easy to turn on CPU profiling and analyze performance of each layer from the bottom level by executed kernel function. Firstly, enable performance counter profiling with executed device during device property configuration before model compiling with device. Learn detailed information from document of OpenVINO™ Configuring Devices.
Then, you are allowed to get object of profiling info from inference requests which complied with the CPU device plugin.
Please note that performance profiling information generally can get after model inference. Refer below code implementation and add this part after model inference. You are possible to get status and performance of layer execution. Follow below code implement, you will get performance counter printing in order of the execution time from largest to smallest.
CPU Dispatching
By enabling device profiling and printing exec_type of layers, you will get the specific kernel functions which powered by oneDNN during runtime execution. Use TensorFlow* ResNet 50 INT8 model for execution and pick the first 10 hotspot layers on 4th Gen Intel® Xeon Scalable processor (code named Sapphire Rapids) as an example:
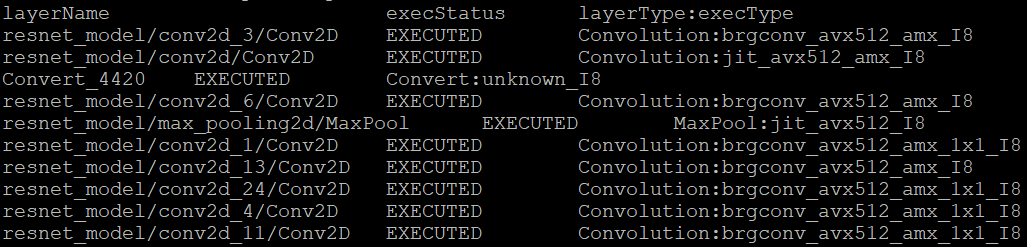
From execution type of layers, it would be helpful to check which oneDNN kernel function used, and the actual precision of layer execution and the optimization from supported ISA on this platform.
Normally, oneDNN is able to detect to certain ISA, and OpenVINO™ allow to use latest ISA with higher priority. If you want to compare optimization rate between different ISA, can use the ONEDNN_MAX_CPU_ISA environment variable to limit processor features with older instruction sets. Follow this link to check oneDNN supported ISA.
Please note, Intel® Advanced Matrix Extensions (Intel® AMX) ISA start to be supported since 4th Gen Intel® Xeon Scalable processor. You can refer Intel® Product Specifications to check the supported instruction set of your current platform.
The ISAs are partially ordered:
· SSE41 < AVX < AVX2 < AVX2_VNNI <AVX2_VNNI_2,
· AVX2 < AVX512_CORE < AVX512_CORE_VNNI< AVX512_CORE_BF16 < AVX512_CORE_FP16 < AVX512_CORE_AMX <AVX512_CORE_AMX_FP16,
· AVX2_VNNI < AVX512_CORE_FP16.
To use CPU dispatcher control, just set the value of ONEDNN_MAX_CPU_ISA environment variable before executable program which contains the OpenVINO™ device profiling printing, you can use benchmark_app as an example:
The benchmark_app provides the option which named “-pcsort” can report performance counters and order analysis information by order of layers execution time when set value of the option by “sort”.
In this case, we use above code implementation can achieve similar functionality of benchmark_app “-pcsort” option. User can consider try to add the code implementation into your own OpenVINO™ program like below:
After setting the CPU dispatcher, the kernel execution function has been switched from AVX512_CORE_AMX to AVX512_CORE_VNNI. Then, the performance counters information would be like below:
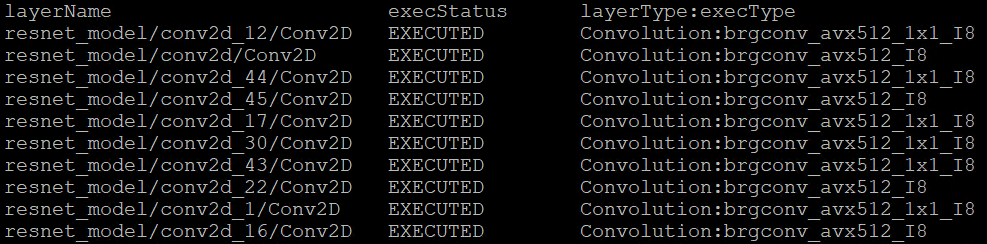
You can easily find the hotspot layers of the same model would be changed when executed by difference kernel function which optimized by implementation of different ISA extensions. That is also the optimization differences between architecture platforms.
Tuning Tips
Users can refer the CPU dispatcher control and OpenVINO™ device profiling API to realize performance tuning of your inference program between CPU architectures. It will also be helpful to developer finding out the place where has the potential space of performance improvement.
For example, the hotspot layer generally should be compute-intensive operations like matrix-matrix multiplication; General vector operations which is not target to artificial intelligence (AI) / machine learning (ML) workloads cannot be optimized by Intel® AMX and Intel® Deep Learning Boost (Intel® DL Boost), and the memory accessing operations, like Transpose which maybe cannot parallelly optimized with instruction sets. If your inference model remains large memory accessing operations rather than compute-intensive operations, you probably need to be focusing on RAM bandwidth optimization.
Automatic Device Selection and Configuration with OpenVINO™
OpenVINO empowers developers to write deep learning application code once and deploy it on a wide range of Intel hardware with best-in-class performance. Previously, significant effort had to be spent configuring inference pipelines to squeeze optimal performance out of target hardware, and the effort had to be repeated whenever the application was ported to a new platform. The new Auto Device Plugin (AUTO) and automatic configuration features in OpenVINO make it easier for developers to unlock performance on multiple hardware targets without needing to spend time optimizing their application pipeline.
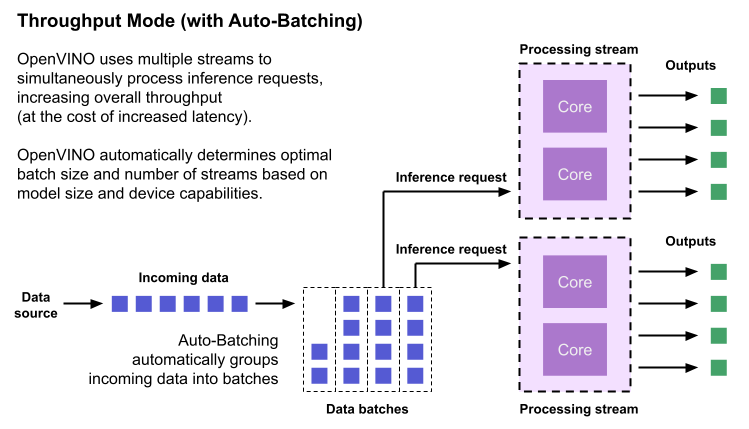
When an OpenVINO application is deployed in a system, the Auto Device Plugin automatically selects the best hardware target to inference the model with. OpenVINO then automatically configures the application to use optimal pipeline parameters based on the hardware capabilities and model size. Developers no longer need to write code for detecting hardware devices and explicitly configuring batch and stream parameters. High-level configuration is provided through performance hints that allow a developer to prioritize their application for either high throughput or minimal latency. AUTO and automatic device configuration make applications hardware-agnostic, allowing them to easily be ported to new hardware without any code changes.
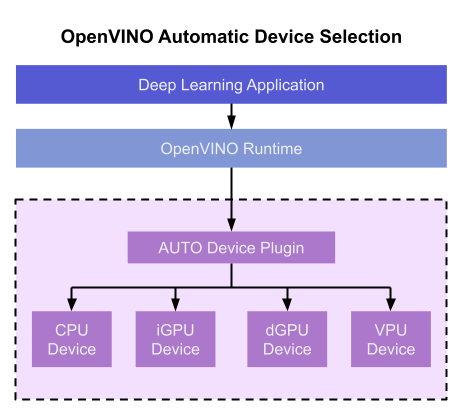
The diagram in Figure 1 shows how OpenVINO’s features automatically configure an application for optimal performance, regardless of the target hardware. When the deep learning model is loaded, AUTO creates a transparent plugin interface to the available processor devices and automatically selects the most suitable device. OpenVINO configures the batch size and number of processing streams based on the selected hardware target, and the Auto-Batching feature automatically groups incoming data into optimally sized batches. AUTO and automatic configuration operate independently from each other, so developers can use either or both in their application.

AUTO and automatic configuration are available starting in the 2022.1 release of OpenVINO Runtime. To use these features, simply install OpenVINO Runtime on the target hardware. The API uses AUTO by default if no processor device is specified when loading a model. Set a “throughput” or “latency” performance hint when loading the model, and the API automatically configures the inference pipeline. Read on to learn more about AUTO, automatic configuration, performance hints, and how to use them in your application.
Automatic Device Selection
Auto Device Plugin (AUTO) is a “virtual” device that provides a transparent interface to physical devices in the system. When an application is initialized, AUTO discovers the available processors and accelerators in the system (CPUs, integrated GPUs, discrete GPUs, VPUs) and selects the best device, based on a default device priority list or an optional user-provided priority list. It creates an interface between the application and device that executes inference requests in an optimized fashion. It enables an application to always achieve optimal performance in a system without the developer having to know beforehand what devices are available in the system.
Key Features and Benefits
Simple and flexible application deployment
Previously, developers needed to know details about target hardware and configure their application specifically for each device. AUTO removes the need to write dedicated code for specific devices. This enables an application to be written once and deployed to any supported hardware. It also allows the application to run on newer generations of hardware as they are released: the developer only needs to compile the application with the latest version of OpenVINO to run it on new hardware. This provides an instant increase in performance with little development time.
Configurability
AUTO provides a configuration interface that is easy to use at a high level while still providing flexibility. Developers can simply specify “AUTO” as the device to tell the application to select the best device for the given model. They can also control which device is selected by providing a device candidate list and setting priorities for each device.
Developers can also use performance hints to configure their application for latency or throughput. When the performance hint is throughput, OpenVINO will create more streams for parallel inferencing to achieve maximum processing bandwidth. In latency mode, OpenVINO creates fewer streams to utilize as many resources as possible to complete each inference quickly. Performance hints also help determine the optimal batch size for inferencing; this is discussed further in the “Performance Hints” section of this document.
Improved first-inference latency
In applications that use accelerated processors like GPUs or VPUs, the time to first inference may be higher than average because it takes time to compile and load the deep learning model into the accelerator. AUTO solves this problem by starting the first inference with the CPU, which has minimal latency and no delays. As the first inference is being performed, AUTO continues to compile and load the model for the selected accelerator device, and then transparently switches over to that device when it is ready. This significantly reduces time to first inference, and is beneficial for applications that require immediate inference results on startup.
How Automatic Device Selection Works
To choose the best device for inference, AUTO discovers which hardware targets are available in the system and matches the model to the best supported device, using the following process:
- AUTO discovers which devices are available using the Query Device API. The query reads an internal file that lists installed hardware plugins, confirms the hardware modules are present by communicating with them through drivers, and returns a list of available devices in the system.
- AUTO checks the precision of the input model by reading the model file.
- AUTO selects the best available device in the device priority table (shown in Table 1 below) that is capable of supporting the model’s precision.
- AUTO attempts to compile the model on the selected device. If the model doesn’t compile (for example, if the device doesn’t support all the operations required by the model), AUTO tries to compile it on the next best device until compilation is successful. The CPU is the final fallback device, as it supports all operations and precisions.
By default, AUTO uses the device priority list shown in Table 1. Developers can customize the table to provide their own device priority list and limit the devices that are available to run inferencing. AUTO will not try to run inference on devices that are not provided in the device list.
Table 1. Default AUTO Device Priority List
As mentioned, AUTO reduces the first inference latency by compiling and loading the model to the CPU first. As the model is loaded to the CPU and first inference is performed, AUTO steps through the rest of the process for selecting the device and compiling the model to that device. This way, devices that require a long time for model compilation do not impede inference as the application is being initialized.
AUTO also provides a model priority feature that enables developers to control which models are loaded to which devices when there are multiple models running on a system with multiple devices. Developers can set “MODEL_PRIORITY” as “HIGH”, “MEDIUM”, or “LOW” to configure which models should be allocated to the best resource. This allows developers to ensure models that are critical for an application are always loaded to the fastest device for processing, while less critical models are loaded to slower devices.
For example, consider a medical imaging application with models for segmenting and/or classifying injuries in X-ray images running on a system that has both a GPU and a CPU. The segmentation model is set to HIGH priority because it takes more processing power to inference, while the classification model is set to MEDIUM priority. If both models are loaded at the same time, the segmentation model will be loaded to the GPU (the higher priority device) and the classification model will be loaded to the CPU (the lower priority device). If only the classification model is loaded, it will be loaded to the GPU since the GPU isn’t occupied by the higher-priority model.
Automatic Device Configuration
The performance of a deep learning application can be improved by configuring runtime parameters to fully utilize the target hardware. There are several factors to take into consideration when optimizing inference for a certain device, such as batch size and number of streams. (See Runtime Inference Optimizations in OpenVINO documentation for more information.) The optimal configuration for these parameters depends on the architecture and memory of the target hardware, and they need to be re-determined when porting an application from one device to another.
OpenVINO provides features that automatically configure an application to use optimal runtime parameters to achieve the best performance on any supported hardware target. These features are enabled through performance hints, which allow a user to specify whether their application should be optimized for latency or throughput. The automatic configuration eliminates the time and effort required to determine optimal configurations. It makes it simple to port to new devices or write one application to work on multiple devices. OpenVINO’s automatic configuration features currently work with CPU and GPU devices, and support for VPUs will be added in a future release.
Performance Hints
OpenVINO allows users to provide high-level "performance hints" for setting latency-focused or throughput-focused inference modes. These performance hints are “latency” and “throughput.” The hints cause the runtime to automatically adjust runtime parameters, such as number of processing streams and inference batch size, to prioritize for reduced latency or high throughput. Performance hints are supported by CPU and GPU devices, and a future release of OpenVINO will add support for VPUs.
The performance hints do not require any device-specific settings and are portable between devices. Parameters are automatically configured based on whichever device is being used. This allows users to easily port applications between hardware targets without having to re-determine the best runtime parameters for the new device.
Latency performance hint
Latency is the amount of time it takes to process a single inference request and is usually measured in milliseconds (ms). In applications where data needs to be inferenced and acted on as quickly as possible (such as autonomous driving), low latency is desirable. When applications are run with the “latency” performance hint, OpenVINO determines the optimal number of parallel inference requests for minimizing latency while still maximizing the parallelization capabilities of the hardware. It automatically sets the number of processing streams to achieve the best latency.
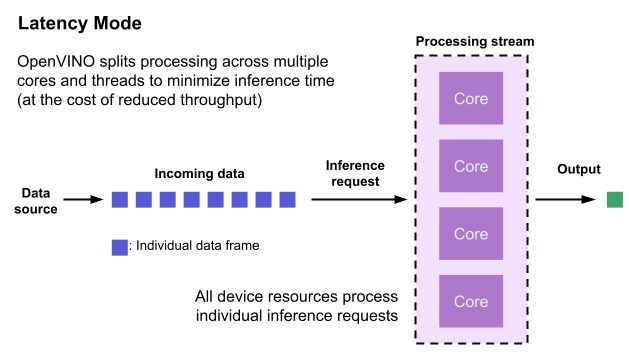
To achieve the fastest latency, the processor device should process only one inference request at a time so all the compute resources are available for calculation. However, devices with multiple cores (such as multi-socket CPUs or multi-tile GPUs) can deliver multiple streams with the same latency as they would with a single stream. OpenVINO automatically checks the compute demands of the model, queries capabilities of the device, and selects the number of streams to be the minimum required to get the best latency. For CPUs, this is typically one stream for each socket. For GPUs, it’s typically one stream per tile.
Throughput performance hint
Throughput is the amount of data an inferencing pipeline can process at once, and it is usually measured in frames per second (FPS) or inferences per second. In applications where large amounts of data needs to be inferenced simultaneously (such as multi-camera video streams), high throughput is needed. To achieve high throughput, the runtime should focus on fully saturating the device with enough data to process. When applications are run with the “throughput” performance hint, OpenVINO maximizes the number of parallel inference requests to utilize all the threads available on the device. On GPU, it automatically sets the inference batch size to fill up the GPU memory available.
To configure the runtime for high throughput, OpenVINO automatically sets the number of streams to use based on the architecture of the device. For CPUs, it creates as many streams as there are cores available. For GPUs, it uses a combination of batch size and parallel streams to fully utilize the GPU’s memory and compute resources. To determine the optimal configuration on GPUs, OpenVINO will first check if the network supports batching. If it does, it loads the network with a batch size of one, determines how much memory is used for the single-batch network, and then scales the batch size and streams up to fill the entire GPU.
Batch size can also be explicitly specified in code when the model is loaded. This can be useful in applications where the number of incoming data sources is known and constant. For example, in an application that processes four camera streams, specify a batch size of four so that each set of frames from the cameras is processed in a single inference request. More information on batch configuration is given in the Auto-Batching section below.
Auto-Batching
Auto-Batching is a new feature of OpenVINO that performs on-the-fly grouping of data inference requests in an application. As the application makes individual inference requests, Auto-Batching transparently collects them into a batch. When the batch is full (or when a timeout limit is reached), OpenVINO executes inference on the whole batch. In short, it takes care of batching data efficiently so the developer doesn’t have to worry about it.
The Auto-Batching feature is controlled by the configuration parameter “ALLOW_AUTO_BATCHING”, which is enabled by default. Auto-Batching is activated when all of the following are true:
- ALLOW_AUTO_BATCHING is true
- The model is loaded to the target device with the throughput performance hint
- The target device supports batching (such as GPU)
- The model topology supports batching
When Auto-Batching is activated, OpenVINO automatically determines the optimal batch size for an application based on model size and hardware capabilities. Developers can also explicitly specify the batch size when loading the model. While the inference pipeline is active, individual inference requests are gathered into a batch and then executed when the batch is full.
Auto-Batching also has a timeout feature that is configurable by the developer. If there aren’t enough individual requests collected within the developer-specified time limit, batch execution will fall back to just using individual inference requests. For example, a developer may specify a timeout limit of 500 ms and a batch size of 16 for a video processing inference pipeline. Once 16 frames are gathered, a batch inference request is made. If only 13 frames arrive before the 500 ms timeout is hit, the application will perform individual inference requests on each of the 13 frames. While the timeout feature makes the pipeline robust to interruptions in incoming data, hitting the timeout limit heavily reduces the performance. To avoid this, developers should make sure there is enough incoming data to fill the batch within the time limit in typical conditions.
Auto-Batching, when combined with OpenVINO's automatic configuration features that determine optimal batch size and number of streams, provides a powerful benefit to the developer. The developer can utilize the full power of the target device with only using one line of code. Best of all, when an application is used on a different device, it will automatically reconfigure itself to achieve optimal performance with zero effort from the developer.
How to Use AUTO and Performance Hints
Using AUTO and automatic configuration with performance hints only requires one line of code. The functionality centers around the “ie.compile_model” method, which is used to compile a model and load it into device memory. The method accepts various configuration parameters that allow a user to provide high-level control over the pipeline.
Here are several Python examples showing how to configure a model and pipeline with the ie.compile_model method. The first example also shows how to import the OpenVINO Core model, initialize it, and read a model before calling ie.compile_model.
Example 1. Load a model on AUTO device
Example 2. Load a model on AUTO device with performance hints
Example 3. Provide a list of device candidates which AUTO may use when loading a model
Example 4. Load multiple models with HIGH, MEDIUM, and LOW priorities
Example 5. Load a model to GPU and use Auto-Batching with an explicitly set batch size
For a more in-depth example of how to use AUTO and automatic configuration, please visit the Automatic Device Selection with OpenVINO Jupyter notebook in the OpenVINO notebooks repository. It provides an end-to-end example that shows:
- How to download a model from Open Model Zoo and convert it to OpenVINO IR format with Model Optimizer
- How to load a model to AUTO device
- The improvement in first inference latency when using AUTO device
- How to perform asynchronous inferencing on data batches in throughput or latency mode
- A performance comparison between throughput and latency modes
The OpenVINO Benchmark App also serves as a useful tool for experimenting with devices and batching to see how performance changes under various configurations. The Benchmark App supports automatic device selection and performance hints for throughput or latency.
Where to Learn More
To learn more please visit auto device plugin and automatic configuration pages in OpenVINO documentation. They provide more information about how to use and configure them in an application.
OpenVINO also provides an example notebook explaining how to use AUTO and showing how it improves performance. The notebook can be downloaded and run on a development machine where OpenVINO Developer Tools have been installed. Visit the notebook at this link: Automatic Device Selection with OpenVINO.
To learn more about OpenVINO toolkit and how to use it to build optimized deep learning applications, visit the Get Started page. OpenVINO also provides a number of example notebooks showing how to use it for basic applications like object detection and speech recognition on the Tutorials page.
Serving OpenVINO Models using the KServe API Standard
There are many network API specifications for model serving on the market today. Two of the most popular are TensorFlow Serving (TFS) and KServe. Starting with the 2022.2 release, OpenVINO Model Server supports KServe -- meaning both of these common API standards can be used for serving OpenVINO models. This blog explains how to take advantage of either API.
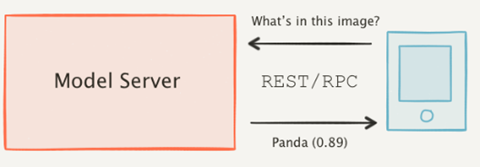
OpenVINO provides an efficient and high-performance runtime for executing deep learning inference. In many situations, AI applications need to delegate inference execution to a remote device or service over a network. There are many advantages to this approach including the ability to scale.
AI software developers expect the communication interface with a model server to remain stable. In many cases, developers want to perform pre/post-processing on the client side with minimal dependencies. They are reluctant to switch to a different serving implementation if that requires substantial code changes or new dependencies in their applications.
Since the first release in 2018, OpenVINO Model Server has supported the TFS API. And as of 2022, the KServe API is now supported as well.
KServe is a standard designed by several companies across the industry. It has been adopted by model servers like Triton Inference Server and TorchServe. Now the same client can easily switch to use OpenVINO Model Server and leverage the latest optimizations in Intel(R) CPUs and GPUs.
KServe Python Example
Below is a simple example how to use KServe using the Python-based tritonclient.
Create Model Repository
Start OpenVINO Model Server with a ResNet-50 Model:
Install Python Client Library
Get the Model Metadata
Get a Sample Image

Run Inference via gRPC Interface with a NumPy File as Input Data
Run Inference via REST Interface with a JPEG File as Input Data
Run Inference via REST Interface with a JPEG File as Input Data using cURL
KServe C++ Example
The inference execution is also made easy in C++ based client applications. The examples below show client application execution based on the Triton C++ client library.
Build the Samples:
Get the Model Metadata
The compiled application grpc_model_metadata can make a call to gRPC endpoint and query for a server model metadata.
Run Inference via gRPC with a JPEG Encoded File as the Input Data
The sample application grpc_infer_resnet is sending the inference requests for a set of images listed inresnet_input_images.txt including their expected classification number in the ImageNet dataset.
In addition to the KServe API, the TFS API can still be used by client applications. This gives you the option to use a range of client libraries like tensorflow-serving-api or the much lighter and simplified ovmsclient.
To help you get started, we provide samples in Python, C++, Java and Go:
In conclusion, it is now easier to connect and AI applications to OpenVINO Model Server. In existing applications, you can even use the same code to take advantage of the benefits of OpenVINO.