
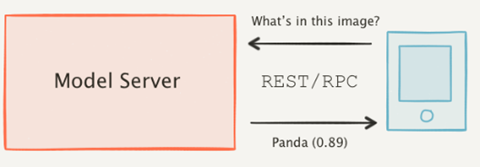
Model Server

Ollama Integrated with OpenVINO, Accelerating DeepSeek Inference
Authors: Hongbo Zhao, Fiona Zhao, Tong Qiu
Why Choose the Ollama + OpenVINO Combination?
Dual-Engine Driven Technical Advantages
The integration of Ollama and OpenVINO delivers a powerful dual-engine solution for the management and inference of large language models (LLMs). Ollama offers a streamlined model management toolchain, while OpenVINO provides efficient acceleration capabilities for model inference across Intel hardware (CPU/GPU/NPU). This combination not only simplifies the deployment and invocation of models but also significantly enhances inference performance, making it particularly suitable for scenarios demanding high performance and ease of use.
You can find more information on github repository:
https://github.com/openvinotoolkit/openvino_contrib/tree/master/modules/ollama_openvino
Core Value of Ollama
1. Streamlined LLM Management Toolchain: Ollama provides a user-friendly command-line interface, enabling users to effortlessly download, manage, and run various LLM models.
2. One-Click Model Deployment: With simple commands, users can quickly deploy and invoke models without complex configurations.
3. Unified API Interface: Ollama offers a unified API interface, making it easy for developersto integrate into various applications.
4. Active Open-Source Community: Ollama boasts a vibrant open-source community, providing users with abundant resources and support.
Limitations of Ollama
Currently, Ollama only supports llama.cpp as itsbackend, which presents some inconveniences:
1. Limited Hardware Compatibility: llama.cpp is primarily optimized for CPUs and NVIDIA GPUs, and cannot fully leverage the acceleration capabilities of Intel GPUs or NPUs, resulting in suboptimal performance in high-performance computing scenarios.
2. Performance Bottlenecks: For large-scale models or high-concurrency scenarios, the performance of llama.cpp may fall short, especially when handling complex tasks, leading to slower inference speeds.
Breakthrough Capabilities of OpenVINO
1. Deep Optimization for Intel Hardware (CPU/iGPU/Arc dGPU/NPU): OpenVINO is deeply optimized for Intel hardware, fully leveraging the performance potential of CPUs, iGPUs, dGPUs, and NPUs.
2. Cross-Platform Heterogeneous Computing Support: OpenVINO supports cross-platform heterogeneous computing, enabling efficient model inference across different hardware platforms.
3. Model Quantization and Compression Toolchain: OpenVINO provides a comprehensive toolchain for model quantization and compression, significantly reducing model size and improving inference speed.
4. Significant Inference Performance Improvement: Through OpenVINO's optimizations, model inference performance can be significantly enhanced, especially for large-scale models and high-concurrency scenarios.
5. Extensibility and Flexibility Support: OpenVINO GenAI offers robust extensibility and flexibility for Ollama-OV, supporting pipeline optimization techniques such as speculative decoding, prompt-lookup decoding, pipeline parallelization, and continuous batching, laying a solid foundation for future pipeline serving optimizations.
Developer Benefits of Integration
1. Simplified Development Experience: Retains Ollama's CLI interaction features, allowing developers to continue using familiar command-line tools for model management and invocation.
2. Performance Leap: Achieves hardware-level acceleration through OpenVINO, significantly boosting model inference performance, especially for large-scale models and high-concurrency scenarios.
3. Multi-Hardware Adaptation and Ecosystem Expansion: OpenVINO's support enables Ollama to adapt to multiple hardware platforms, expanding its application ecosystem and providing developers with more choices and flexibility.
Three Steps to Enable Acceleration
1. Download Precompiled Executables
please refer to : https://github.com/zhaohb/ollama_ov/tree/main?tab=readme-ov-file#google-driver
2.Configure OpenVINO GenAI Environment
For Windows systems, first extract the downloaded OpenVINO GenAI package to the directory openvino_genai_windows_2025.2.0.0.dev20250320_x86_64, then execute the following commands:
cd openvino_genai_windows_2025.2.0.0.dev20250320_x86_64
setupvars.bat
3. Set Up cgocheck
Windows:
set GODEBUG=cgocheck=0
Linux:
export GODEBUG=cgocheck=0
At this point, the executable files have been downloaded, and the OpenVINO GenAI, OpenVINO, and CGO environments have been successfully configured.
Custom Model Deployment Guide
Since the Ollama Model Library does not support uploading non-GGUF format IR models, we will create an OCI image locally using OpenVINO IR that is compatible with Ollama. Here, we use the DeepSeek-R1-Distill-Qwen-7B model as an example:
1. Download the OpenVINO IR Model
Download the model from ModelScope:
pip install modelscope
modelscope download --model zhaohb/DeepSeek-R1-Distill-Qwen-7B-int4-ov --local_dir ./DeepSeek-R1-Distill-Qwen-7B-int4-ov
2. Package the Downloaded OpenVINO IR Directory
Compress the directory into a *.tar.gz file:
tar -zcvf DeepSeek-R1-Distill-Qwen-7B-int4-ov.tar.gz DeepSeek-R1-Distill-Qwen-7B-int4-ov3. Create a Modelfile
Define the model configuration in a Modelfile:
FROM DeepSeek-R1-Distill-Qwen-7B-int4-ov.tar.gz
ModelType "OpenVINO"
InferDevice "GPU"
PARAMETER stop ""
PARAMETER stop "```"
PARAMETER stop "</User|>"
PARAMETER stop "<|end_of_sentence|>"
PARAMETER stop "</|"
PARAMETER max_new_token 4096
PARAMETER stop_id 151643
PARAMETER stop_id 151647
PARAMETER repeat_penalty 1.5
PARAMETER top_p 0.95
PARAMETER top_k 50
PARAMETER temperature 0.8
4. Create an Ollama-Compatible Model
Use the Modelfile to create a model supported by Ollama:
ollama create DeepSeek-R1-Distill-Qwen-7B-int4-ov:v1 -f Modelfile
With these steps, we have successfully created the DeepSeek-R1-Distill-Qwen-7B-int4-ov:v1 model, which is now ready for use with the Ollama OpenVINO backend.
OpenVINO GenAI Serving (OGS) update
Authors: Xiake Sun, Su Yang, Tianmeng Chen, Tong Qiu
OpenVINO GenAI Server (OGS) Update:
-Update LLM: stream generation, reset handle, multi-round chat, model cache config
-Support VLM
-Support Reranker for RAG sample
-Support BLIP image embedding for photo search with DB
-Support C++ GUI with imgui for photo search
Now we scale the text embedding to image embedding for RAG sample and support multi-Vector Retriever for RAG.
- Multi-Vector Retriever for RAG on text: QA over Document
- Multi-Vector Retriever for RAG on image: Photo search with DB retrieval
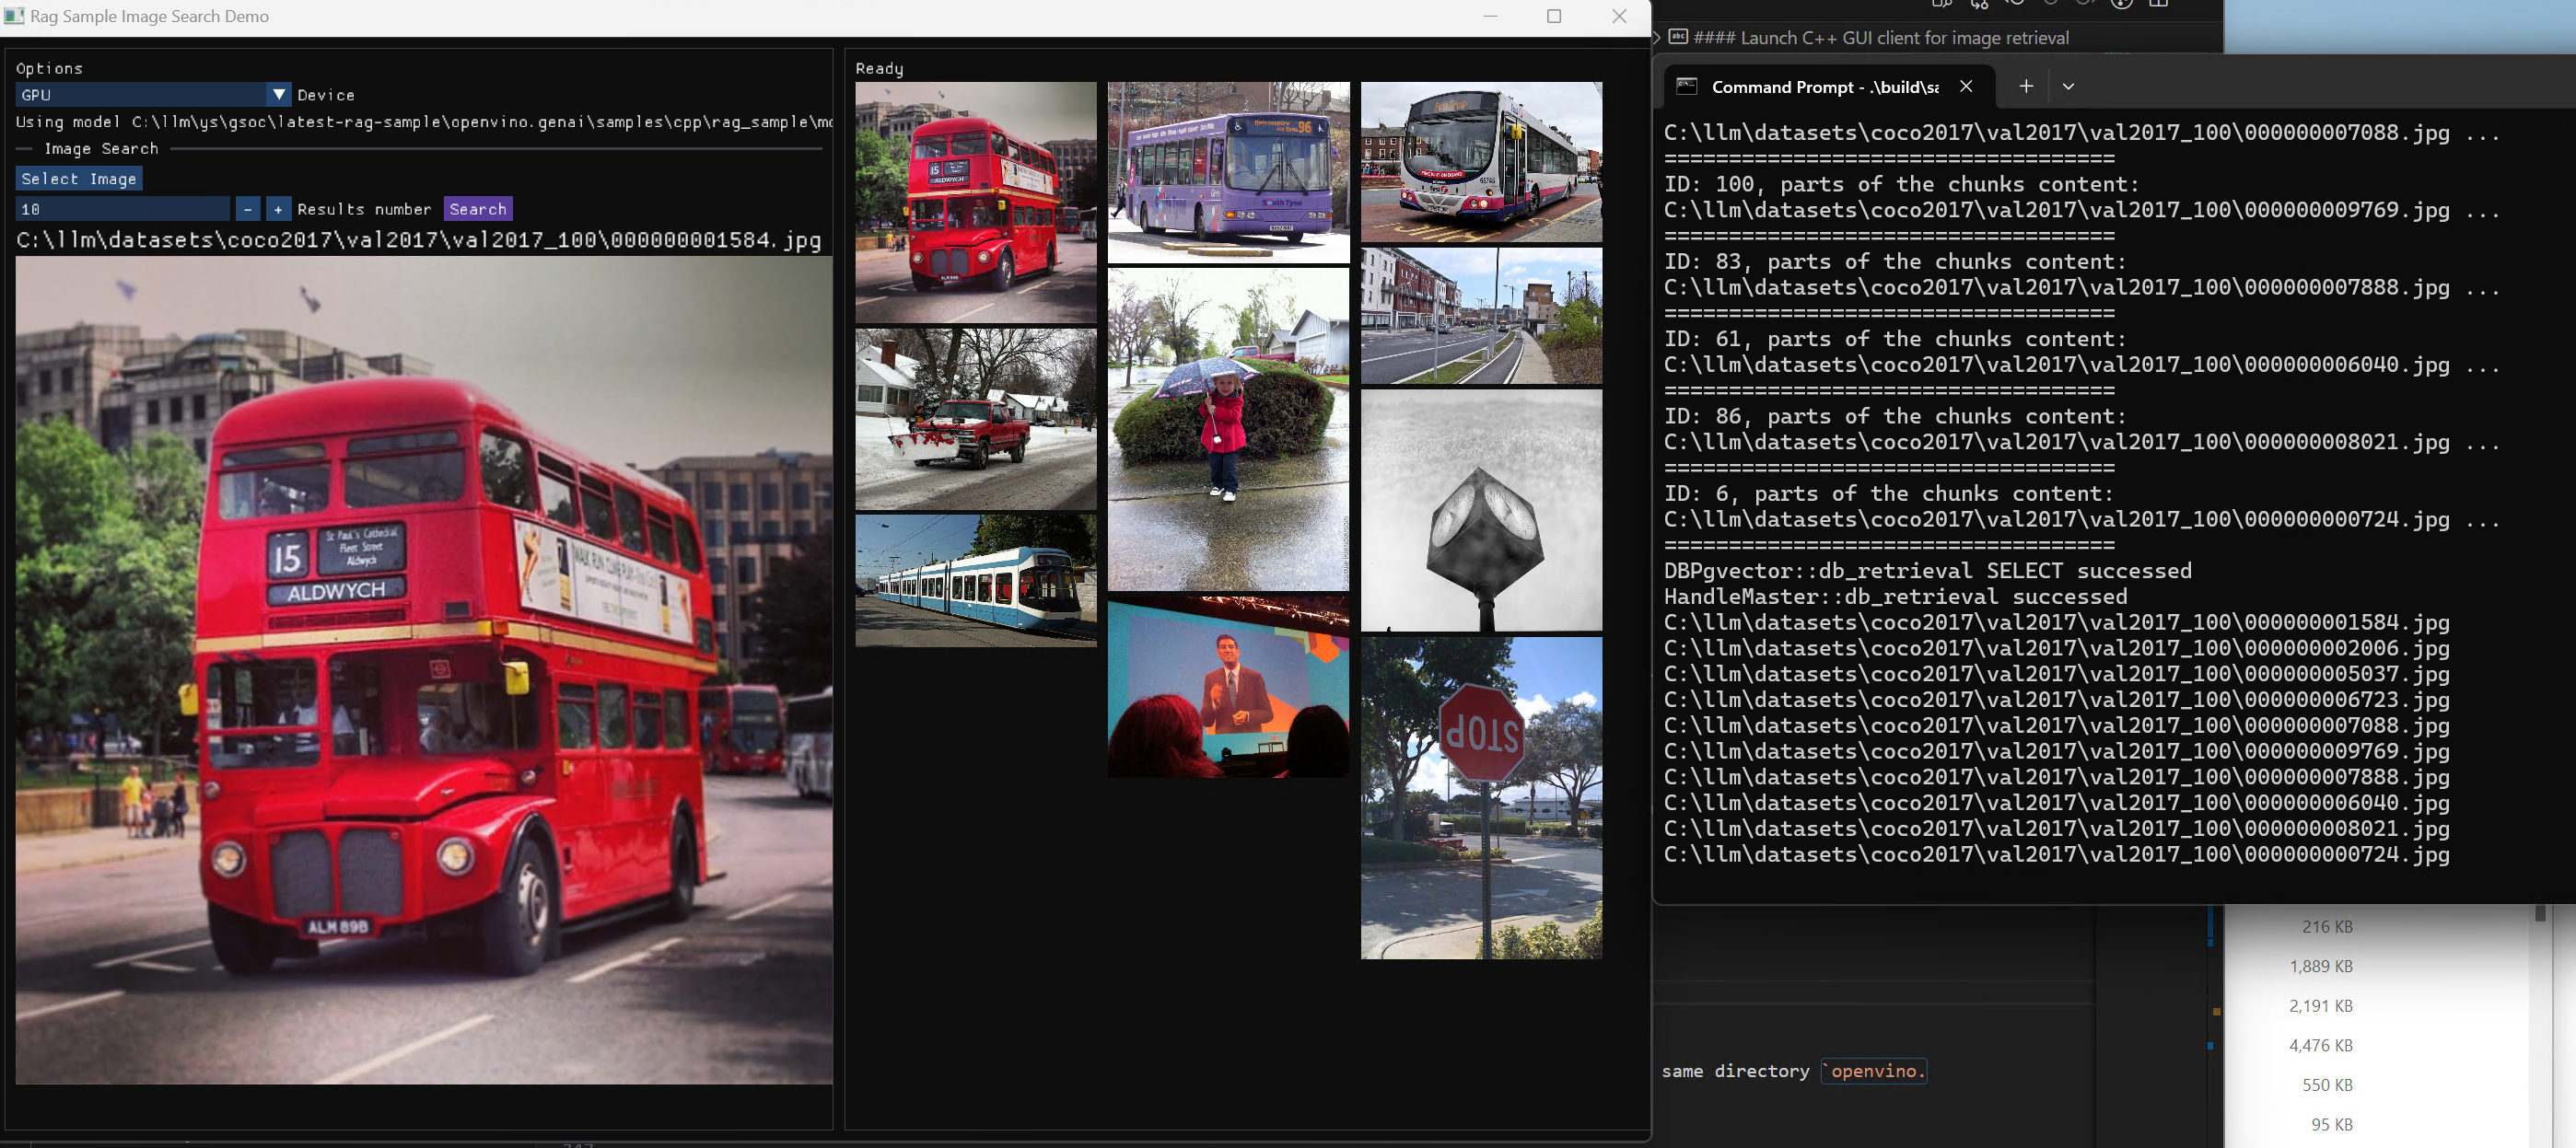
Here is a photo search sample with image embedding.
Usage 2: Photo Search with DB retrieval
Steps:
1.use python client to create image vector DB (PostgreSQL)
2.use GUI to search image
Here is a sample image to demonstrate GUI usage on client platform. we search the bus photo with top 10 similar images from the 100 images which are embedded into Vector DB.
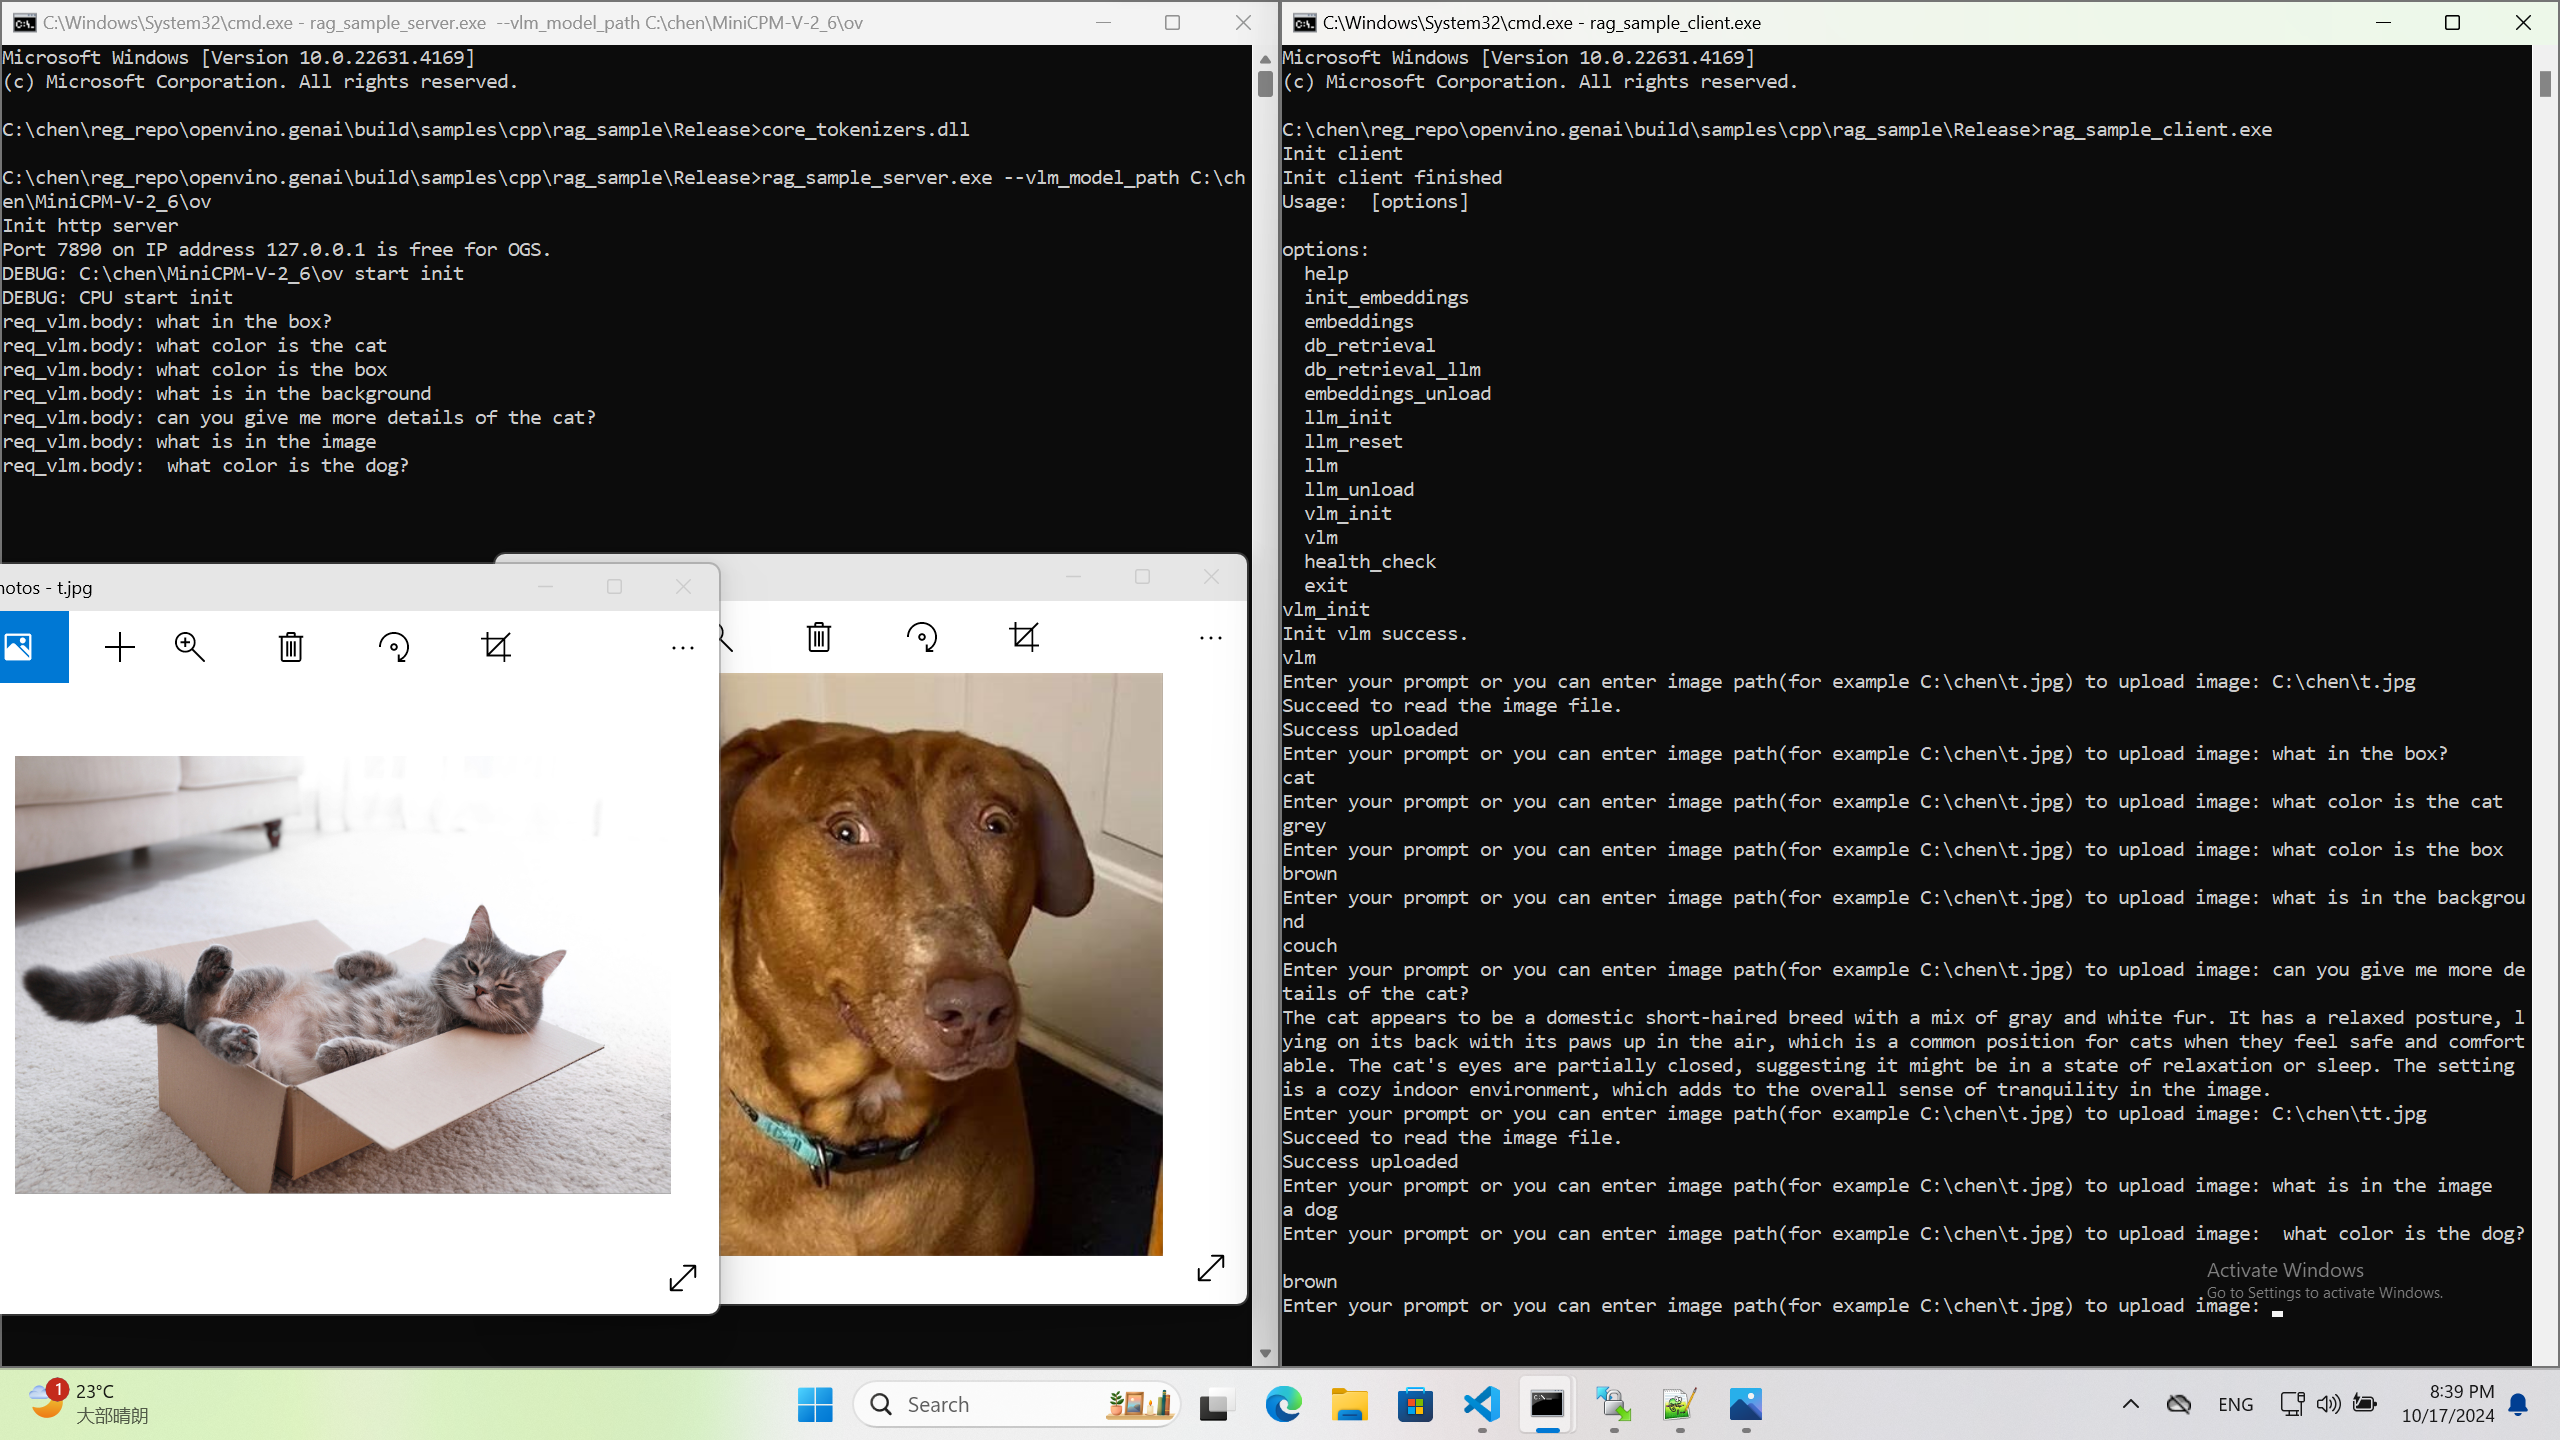
Usage 3: Chat with images via MiniCPM-V
Once we have created a multimodal vector DB through image embedding, we can further communicate with the image through VLM.
We integrate the C++ GenAI sample visual_language_chat with openbmb/MiniCPM-V-2_6.
Here is the demo image on client platform.
OpenVINO GenAI Serving (OGS)
Authors: Fiona Zhao, Xiake Sun, Wenyi Zou, Su Yang, Tianmeng Chen
Model Server reference implementation based on OpenVINO GenAI Package for Edge/Client AI PC Use Case.
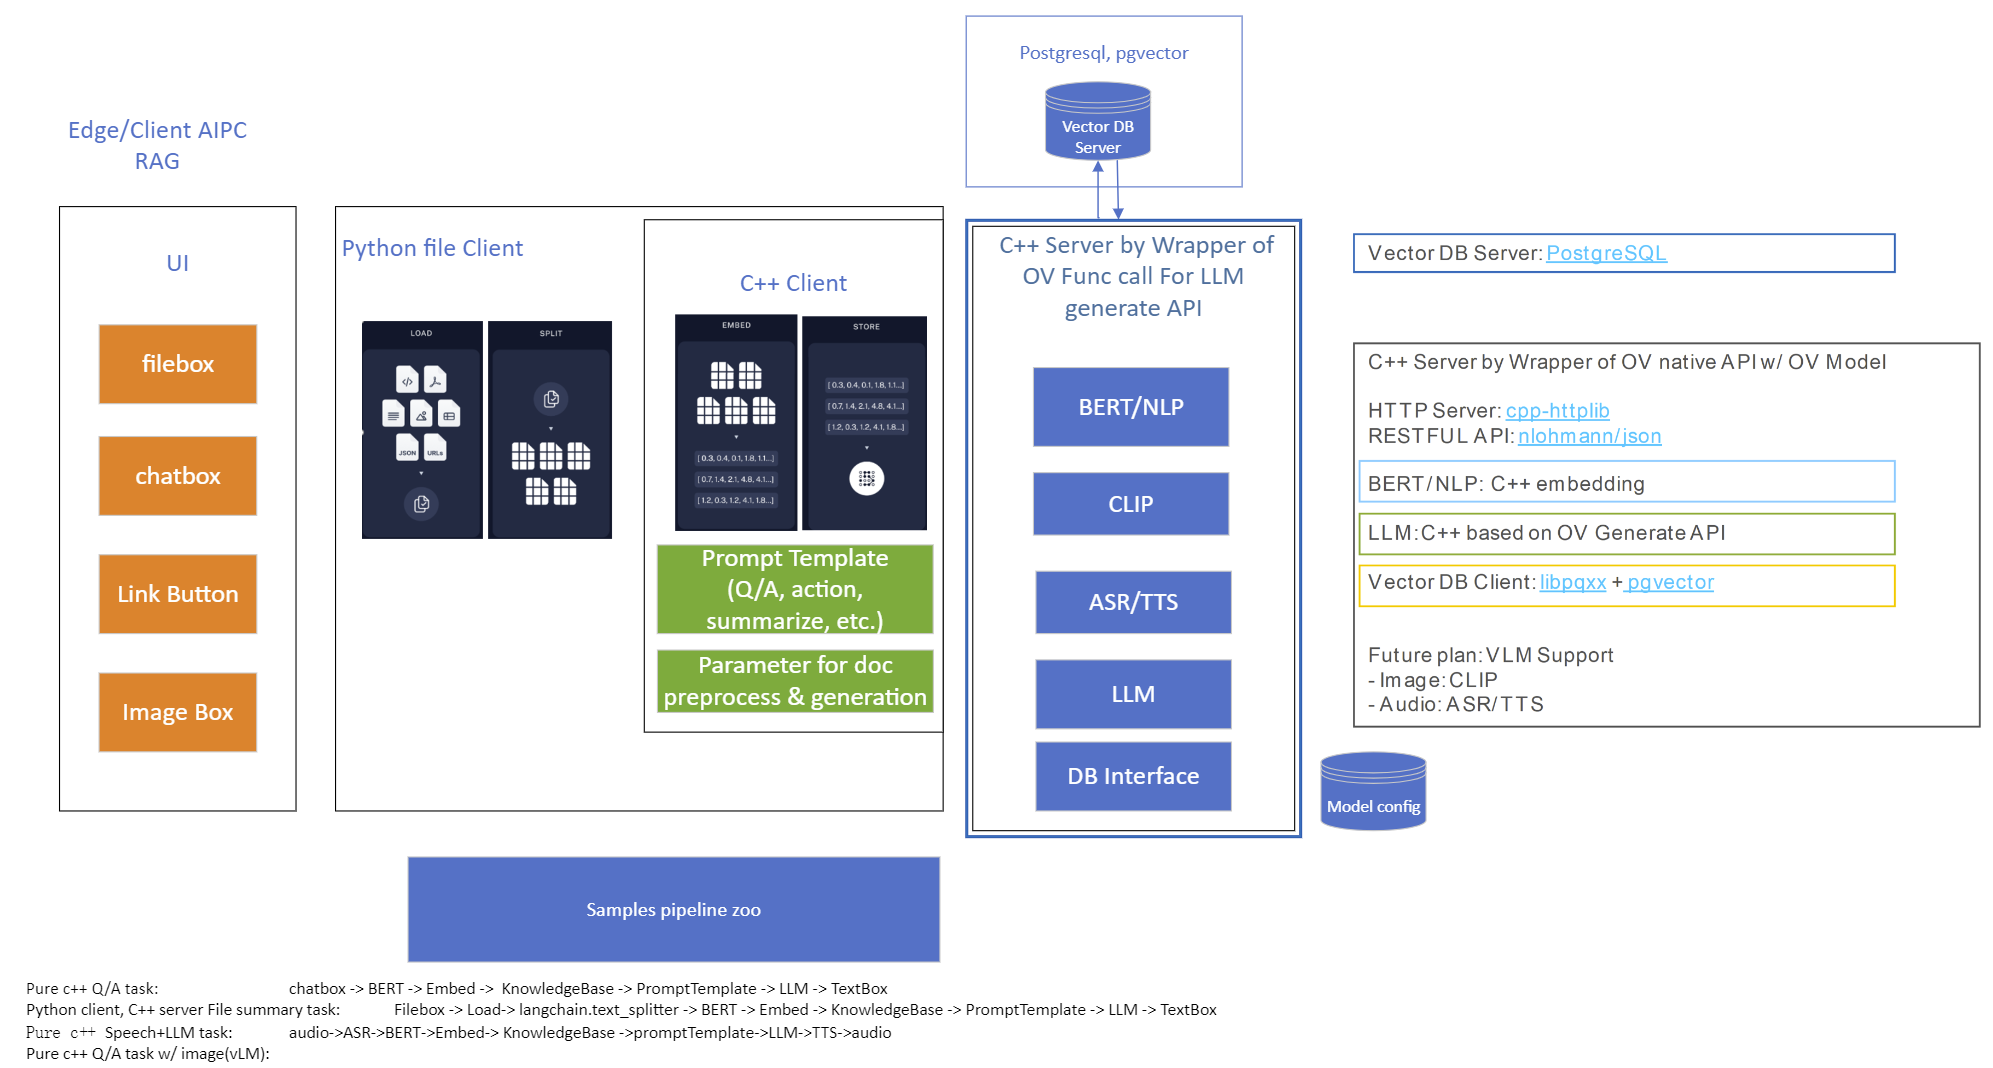
Use Case 1: C++ RAG Sample that supports most popular models like LLaMA 2
This example showcases for Retrieval-Augmented Generation based on text-generation Large Language Models (LLMs): chatglm, LLaMA, Qwen and other models with the same signature and Bert model for embedding feature extraction. The sample fearures ov::genai::LLMPipeline and configures it for the chat scenario. There is also a Jupyter notebook which provides an example of LLM-powered RAG in Python.
Download and convert the model and tokenizers
The --upgrade-strategy eager option is needed to ensure optimum-intel is upgraded to the latest version.
Setup of PostgreSQL, Libpqxx and Pgvector
Langchain's document Loader and Spliter
- Load: document_loaders is used to load document data.
- Split: text_splitter breaks large Documents into smaller chunks. This is useful both for indexing data and for passing it in to a model, since large chunks are harder to search over and won’t in a model’s finite context window.
PostgreSQL
Download postgresql from enterprisedb.(postgresql-16.2-1-windows-x64.exe is tested)
Install PostgreSQL with postgresqltutorial.
Setup of PostgreSQL:
1. Open pgAdmin 4 from Windows Search Bar.
2. Click Browser (left side) > Servers > Postgre SQL 10.
3. Create the user postgres with password openvino (or your own setting)
4. Open SQL Shell from Windows Search Bar to check this setup. 'Enter' to set Server, Database, Port, Username as default and type Password.
libpqxx
'Official' C++ client library (language binding), built on top of C library
Update the source code from https://github.com/jtv/libpqxx in deps\libpqxx
The pipeline connects with DB based on Libpqxx.
pgvector
Open-source vector similarity search for Postgres.
By default, pgvector performs exact nearest neighbor search, which provides perfect recall. It also supports approximate nearest neighbor search (HNSW), which trades some recall for speed.
For Windows, Ensure C++ support in Visual Studio 2022 is installed, then use nmake to build in Command Prompt for VS 2022(run as Administrator). Please follow with the pgvector
Enable the extension (do this once in each database where you want to use it), run SQL Shell from Windows Search Bar with "CREATE EXTENSION vector;".
Printing CREATE EXTENSION shows successful setup of Pgvector.
pgvector-cpp
pgvector support for C++ (supports libpqxx). The headers (pqxx.hpp, vector.hpp, halfvec.hpp) are copied into the local folder rag_sample\include. Our pipeline does the vector similarity search for the chunks embeddings in PostgreSQL, based on pgvector-cpp.
Install OpenVINO, VS2022 and Build this pipeline
Download 2024.2 release from OpenVINO™ archives*. This OV built package is for C++ OpenVINO pipeline, no need to build the source code. Install latest Visual Studio 2022 Community for the C++ dependencies and LLM C++ pipeline editing.
Extract the zip file in any location and set the environment variables with dragging this setupvars.bat in the terminal Command Prompt. setupvars.ps1 is used for terminal PowerShell. <INSTALL_DIR> below refers to the extraction location. Run the following CMD in the terminal Command Prompt.
Notice:
- Install on Windows: Copy all the DLL files of PostgreSQL, OpenVINO and tbb and openvino-genai into the release folder. The SQL DLL files locate in the installed PostgreSQL path like "C:\Program Files\PostgreSQL\16\bin".
- If cmake not installed in the terminal Command Prompt, please use the terminal Developer Command Prompt for VS 2022 instead.
- The openvino tokenizer in the third party needs several minutes to build. Set 8 for -j option to specify the number of parallel jobs.
- Once the cmake finishes, check rag_sample_client.exe and rag_sample_server.exe in the relative path .\build\samples\cpp\rag_sample\Release.
- If Cmake completed without errors, but not find exe, please open the .\build\OpenVINOGenAI.sln in VS2022, and set the solution configuration as Release instead of Debug, then build the llm project within VS2022 again.
Run
Launch RAG Server
rag_sample_server.exe --llm_model_path TinyLlama-1.1B-Chat-v1.0 --llm_device CPU --embedding_model_path bge-large-zh-v1.5 --embedding_device CPU --db_connection "user=postgres host=localhost password=openvino port=5432 dbname=postgres"
Lanuch RAG Client
rag_sample_client.exe
Lanuch python Client
Use python client to send the message of DB init and send the document chunks to DB for embedding and storing.
python client_get_chunks_embeddings.py --docs test_document_README.md
Deploy Language Models with OpenVINO™ Model Server
Authors: Dariusz Trawinski, Damian Kalinowski
Overview
If you are writing an AI application that handles text in Natural Language Processing (NLP) models, you will be pleased to hear that OpenVINO Model Server now supports sending and receiving text in string format.
Now you can combine optimized inference execution with a simple method for sending text data to the model server and reading text responses.
Introduction
Deep Learning models do not deal with text content directly. Instead, they require a numerical representation of text to process it.
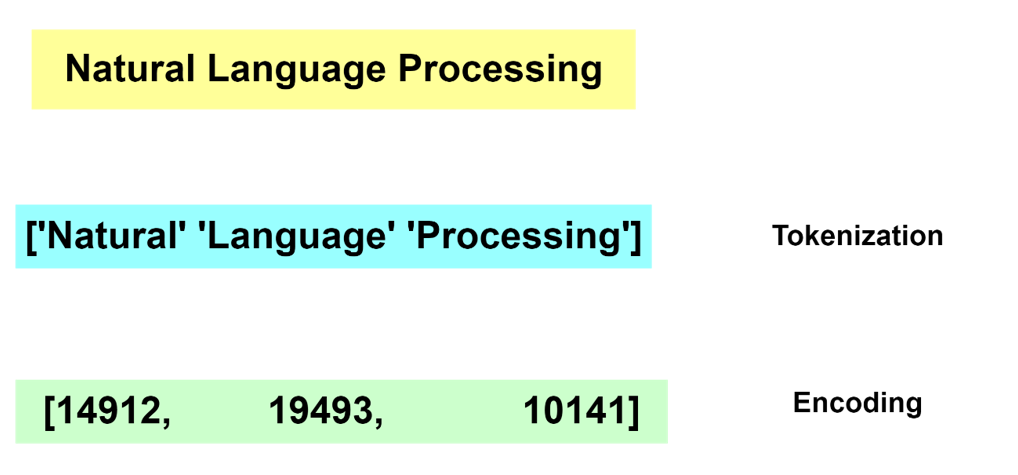
The conversion from human readable text to a machine-readable format is done via a process of tokenization and encoding. Without going into the specifics of tokenization and encoding, these operations are not trivial. Many algorithms exist for these tasks and most often the operation is run by dedicated software libraries.
Generally, during the inference operation, a client application must reproduce the same method for text tokenization and encoding, similar to what is used during the model training phase.
For reference, below are two examples showing how this can be implemented on the application side as pre- and post-processing steps:
In TensorFlow it’s also possible to embed the tokenization operation inside the model by adding a dedicated neuron model layer SentencePieceTokenizer.
Tokenization and Encoding with OpenVINO Model Server
Starting with the 2023.0 release, OpenVINO Model Server can greatly simplify writing applications that leverage LLM and NLP models. We addressed both using models that require tokens and models with an embedded tokenization layer. Both use cases are demonstrated below with a simple client application that sends and receives text in a string format. The complexity of text conversion is fully delegated to the remote serving endpoint.
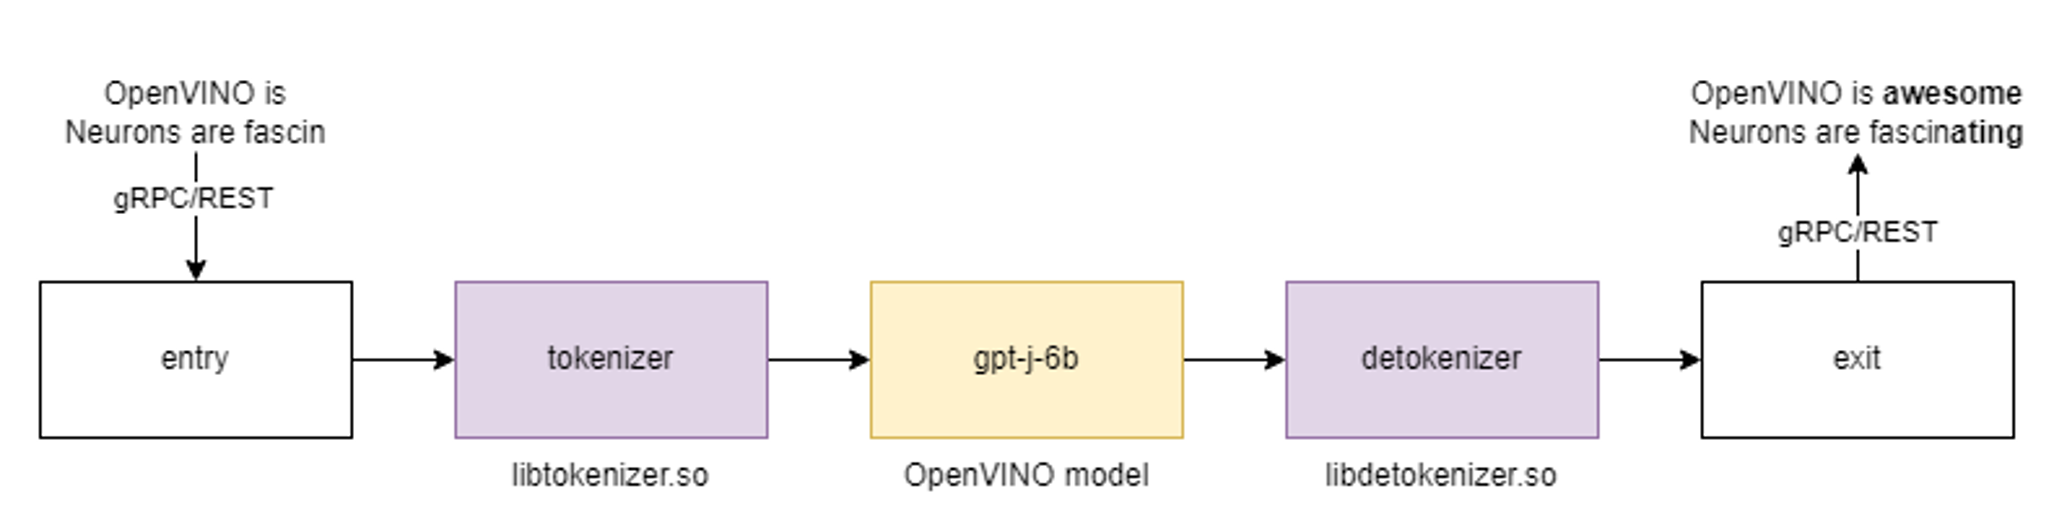
GPT-J Pipeline
In this demo we deploy the tokenizer as a custom node in OpenVINO Model Server. As a result, we get a pipeline with seed strings as input and generated texts as the output.
All steps to reproduce the demo above are documented here: https://docs.openvino.ai/2023.0/ovms_demo_gptj_causal_lm.html
Text generation can be executed iteratively in a loop. An example of the client application generating text output is shown below.

Multilingual Universal Sentence Encoder (MUSE)
The next demonstration includes serving the MUSE model from TensorFlow Hub. The demo shows how OpenVINO Model Server can be used to serve the MUSE model and with 2x better performance without any changes on the client side.
The calls to the model server are simple using a REST API. Below is an example of a call with a batch size 3.
A similar call can be made over gRPC interface using the ovmsclient library which is compatible with the TensorFlow Serving (TFS) API.
In addition to the TFS API, it is also possible to run inference calls using the KServe v2 API. Check the code snippets for more details.
Conclusion
OpenVINO Model Server can simplify writing AI applications that handle text. It can execute a complete text analysis pipeline with just few[TA4] lines of code on the client side without compromising performance by using a tokenizer in C++ and high performance OpenVINO backend to run the AI models. Together with widely used, standard APIs, OpenVINO Model Server is a great solution for deploying effective and efficient AI applications.
References
https://towardsdatascience.com/tokenization-algorithms-explained-e25d5f4322ac
https://www.tensorflow.org/api_docs/python/tfm/nlp/layers/SentencepieceTokenizer
https://docs.openvino.ai/2023.0/ovms_what_is_openvino_model_server.html
https://docs.openvino.ai/2023.0/openvino_docs_performance_benchmarks.html
Deploy End to End Super-Resolution Pipeline with OpenVINO™ Model Server
Introduction
In this blog, we will show how to deploy an end-to-end super-resolution pipeline by leveraging OpenVINOTM Model Server with Demultiplexing in DAG and Custom Node features.
OpenVINOTM Model Server (OVMS) is a high-performance system for serving models that uses the same architecture and API as TensorFlow Serving and KServe while applying OpenVINOTM for inference execution. It is implemented in C++ for scalability and optimized for deployment on intel architectures.
Directed Acyclic Graph (DAG) is an OVMS feature that controls the execution of an entire graph of interconnected models defined within the OVMS configuration. The DAG scheduler makes it possible to create a pipeline of models for execution in the server with a single client request.
During the pipeline execution, it is possible to split a request with multiple batches into a set of branches with a single batch. Internally, OVMS demultiplexer will divide the data, process them in parallel and combine the results.
The custom node in OVMS simplifies linking deep learning models into complete pipeline. Custom node can be used to implement all operations on the data which cannot be handled by the neural network model. It is represented by a C++ dynamic library implementing OVMS API defined in custom_node_interface.h.
Super-Resolution Pipeline Workflow
Figure1 shows the super-resolution pipeline in a flowchart, where we use "demultiply_counter=3" without loss of generality. The whole pipeline starts with input data from the Request node via gRPC calls. Batched input data with 5D shape(3,1,3,270,480) is split into a single batch by the DAG demultiplexer. Each single batch of data is fed into a custom node for image preprocessing. The two outputs of the custom node serve as inputs for model A inference. In the end, all inference results are gathered as output C, which will be sent by the Response node to the client via gRPC calls.

Here is an example configuration for the super-resolution pipeline deployed with OVMS.
“pipeline_config_list” contains super-resolution pipeline information, data enter from the “request” node, flow to “sr_preprocess_node” for image preprocessing, generated two outputs will serve as inputs in “super_resolution_node” for inference, gathered inference results will be returned by “response” node.
- "demultiply_count": acceptable input data batch size when Demultiplexing in DAG feature enabled, “demultiply_count” with value -1 means OVMS can accept dynamic batch input data.
“model_config_list”: contains the basic configuration for super-resolution deep learning model and OpenVINOTM CPU plugin configuration.
- "nireq": set number of infer requests used in OVMS server for deep learning model
- "NUM_STREAMS": set number of streams used in the CPU plugin
- "INFERENCE_PRECISION_HINT": option to select preferred inference precision in CPU plugin. We can set "INFERENCE_PRECISION_HINT":bf16 on the Xeon platform that supports BF16 precision, such as the 4th Gen Intel® Xeon® Scalable processor (formerly codenamed Sapphire Rapids). Otherwise, we should set "INFERENCE_PRECISION_HINT":f32 as the default value.
“custom_node_library_config_list”: contains the name and path of the custom node dynamic library
Image Preprocessing with libvips in Custom Node
In this blog, we use a single-image-super-resolution model from Open Model Zoo for the super-resolution pipeline. The model requires two inputs according to the model specification. The first input is the original image (shape [1,3,270,480]). The second input is a 4x resized image with bicubic interpolation (shape [1,3,1080,1920]). Both input images expected color space is BGR. Therefore, image preprocessing for input image is required.
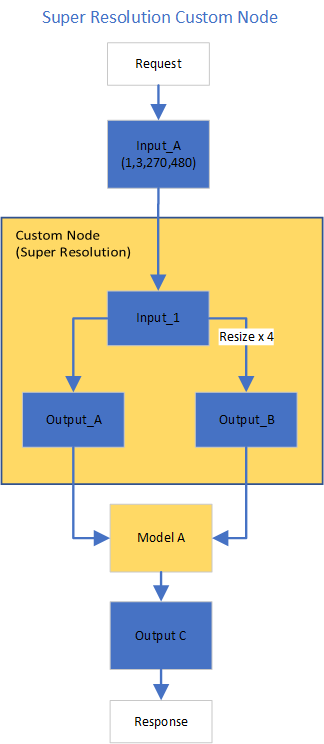
Figure2 shows the custom node designed for image preprocessing in the super-resolution pipeline. The custom node takes the original input image as input data. At first, input data is assigned to output 1 without modification. Besides, the input data is resized 4x with bicubic interpolation and assigned as output 2. The two outputs are passed to the model node for inference. For image processing in the custom node, we utilize libvips – an open-source image processing library that is designed to be fast and efficient with low memory usage. Please see the detailed custom node implementation in super_resolution_nhwc.cpp.
Although libvips is very sufficient for image processing operations with less memory, libvips does not provide functionality for layout (NCHW->NHWC) and color space (RGB->BGR) conversion, which is required by the super-resolution model as inputs. Instead, we can integrate layout and color space conversion into models using OpenVINOTM Preprocessing API.
Integrate Preprocessing with OpenVINOTM Preprocessing API
OpenVINOTM Preprocessing API allows adding custom preprocessing steps into the execution graph of OpenVINOTM models.
Here is a sample code to integrate layout (NCHW-> NHWC) and color space (BRG->RGB) conversion into the super-resolution model with OpenVINOTM Preprocessing API.
In the code snippet above, we first load the original model and initialize the PrePostProcessor object with the original model. Then we modify the model's 1st input element type to “uint8”, change the color format from the default “BGR” to “RGB”, and set the layout from “NCHW” to “NHWC”. In the end, we build a new model and serialize it on the disk. The whole model preprocessing can be done offline, please find details in model_preprocess.py.
Build Model Server Docker Image for Super-Resolution Pipeline
Build OVMS docker image with custom node
Copy compiled custom nodes library to the “models” directory
Setup client environment
Integrate preprocessing with OpenVINOTM Preprocessing API
The resulting model will be saved in the “super_resolution_model_preprocessed/1” directory.
Super-Resolution Pipeline Demo
Start the OpenVINOTM Model Server with docker binding with 8 cores
Run client with command line
Figure 3 shows the original input image (shape 270x480).

Figure 4 shows the resized image (shape 1080x1920) after image preprocessing in the custom node.

Figure 5 shows the inference result of the super-resolution model (shape1080x1920).
Conclusion
In this blog, we demonstrate an end-to-end super-resolution pipeline deployment with OpenVINOTM Model Server. The whole pipeline takes dynamic batched images (RGB, NHWC) as input, demultiplexing into single batch data, preprocess with a custom node, runs an inference with a super-resolution model, send gathered inference results to the client in the end.
This blog provides following examples that utilize OpenVINOTM Model Server and OpenVINOTM features:
- Enable OVMS DAG demultiplexing feature
- Provide custom node for image preprocessing using libvips
- Provide sample code for integrating preprocessing into the model with OpenVINOTM Preprocessing API.
- Support super-resolution end-to-end pipeline with image preprocessing and model inference with OVMS DAG scheduler
Reduce OpenVINO Model Server Latency with In-Process C-API
Starting with the 2022.3 release, OpenVINO Model Server (OVMS) provides a C-API that allows OVMS to be linked directly into a C/C++ application as a dynamic library. Existing AI applications can leverage serving functionalities while running inference locally without networking latency overhead.
The ability to bypass gRPC/REST endpoints and send input data directly from in-process memory creates new opportunities to use OpenVINO locally while maintaining the benefits of model serving. For example, we can combine the benefits of using OpenVINO Runtime with model configuration, version management and support for both local and cloud model storage.
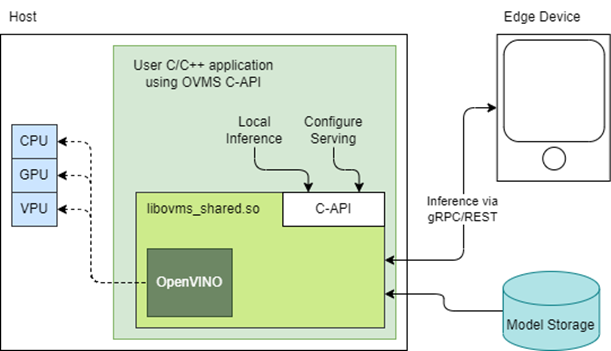
OpenVINO Model Server is typically started as a separate process or run in a container where the client application communicates over a network connection. Now, as you can see above, it is possible to link the model server as a shared library inside the client application and use the internal C API to execute internal inference methods.
We demonstrate the concept in a simple example below and show the impact on latency.
Example C-API Usage
NOTE: complete end to end inference demonstration via C-API with example app can be found here: https://docs.openvino.ai/latest/ovms_demo_capi_inference_demo.html
To start using the Model Server C-API, we need to prepare a model and configuration file. Download an example dummy model from our GitHub repo and prepare a config.json file to serve this model. “Dummy” model adds value 1 to all numbers inside an input.
Download Model
Create Config File
Get libovms_shared.so
Next, download and unpack the OVMS library. The library can be obtained from GitHub release page. There are 2 packages – one for Ubuntu 20 and one for RedHat 8.7. There is also documentation showing how to build the library from source. For purpose of this demo, we will use the Ubuntu version:
Start Server
To start the server, use ServerStartFromConfigurationFile. There are many options, all of which are documented in the header file. Let’s launch the server with configuration file and optional log level error:
Input Data Preparation
Use OVMS_InferenceRequestInputSetData call, to provide input data with no additional copy operation. In InferenceRequestNew call, we can specify model name (the same as defined in config.json) and specific version (or 0 to use default). We also need to pass input names, data precision and shape information. In the example we provide 10 subsequent floating-point numbers, starting from 0.
Invoke Synchronous Inference
Simply call OVMS_Inference. This is required to pass response pointer and receive results in the next steps.
Read Results
Use call OVMS_InferenceResponseGetOutput API call to read the results. There are bunch of metadata we can read optionally, such as: precision, shape, buffer type and device ID. The expected output after addition should be:
Check the header file to learn more about the supported methods and their parameters.
Compile and Run Application
In this example we omitted error handling and resource cleanup upon failure. Please refer to the full demo instructions for a more complete example.
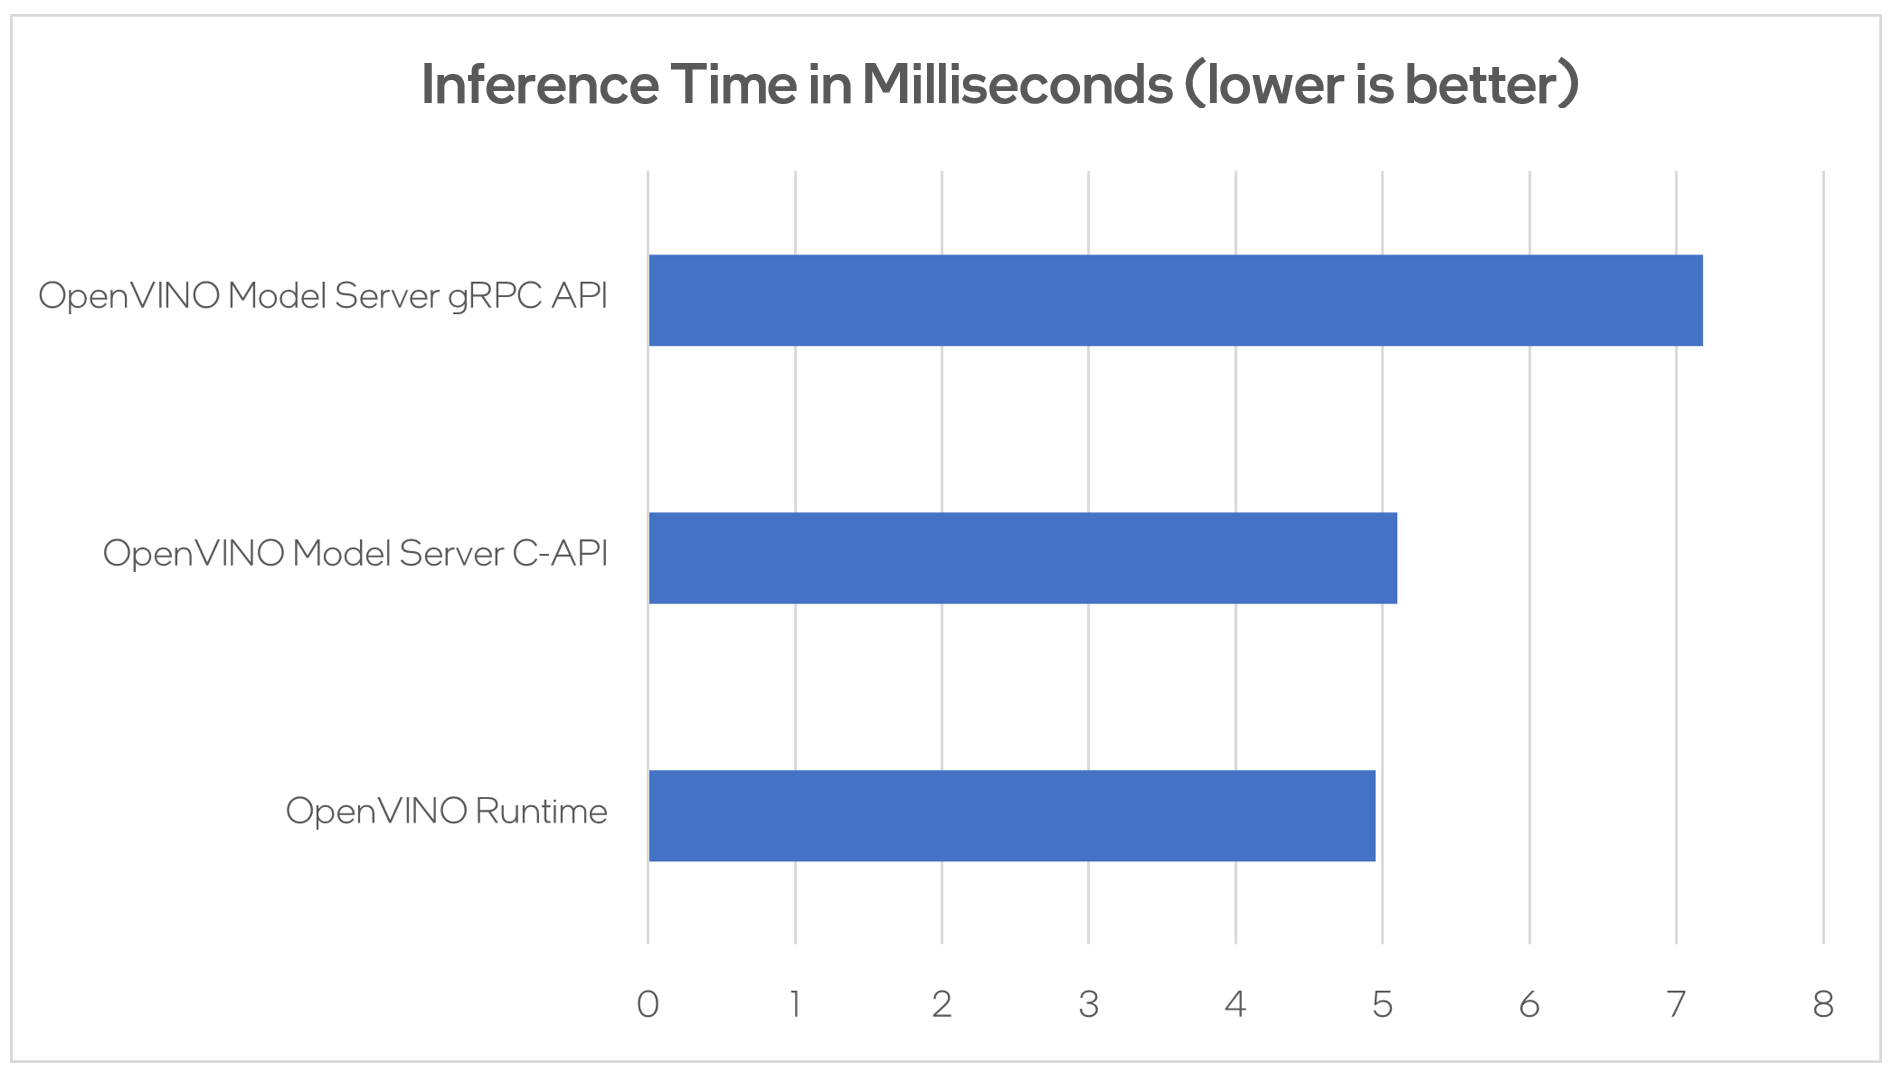
Performance Analysis
Using benchmarking tools from OpenVINO Runtime and both the C-API and gRPC API in OpenVINO Model Server, we can compare inference results via C-API to typical scenario of gRPC or direct integration of OpenVINO Runtime. The Resnet-50-tf model from Open Model Zoo was used for the testing below.
Hardware configuration used:
- 1-node, Intel Xeon Gold 6252 @ 2.10GHz processor with 256GB (8 slots/16GB/2666) total DDR memory, HT on, Turbo on, Ubuntu 20.04.2 LTS,5.4.0-109-generic kernel
- Intel S2600WFT motherboard
Tested by Intel on 01/31/2023.
Conclusion
With the new method of embedding OVMS into C++ applications, users can decrease inference latency even further by entirely skipping the networking part of model serving. The C-API is still in preview and has some limitations, but in its current state is ready to integrate into C++ applications. If you have questions or feedback, please file an issue on GitHub.
Read more:
- Complete API description: https://docs.openvino.ai/latest/ovms_docs_c_api.html
- End to end demo: https://docs.openvino.ai/latest/ovms_demo_capi_inference_demo.html
Deploy AI Workloads with OpenVINO™ Model Server across CPUs and GPUs
Authors: Xiake Sun, Kunda Xu
1. Introduction
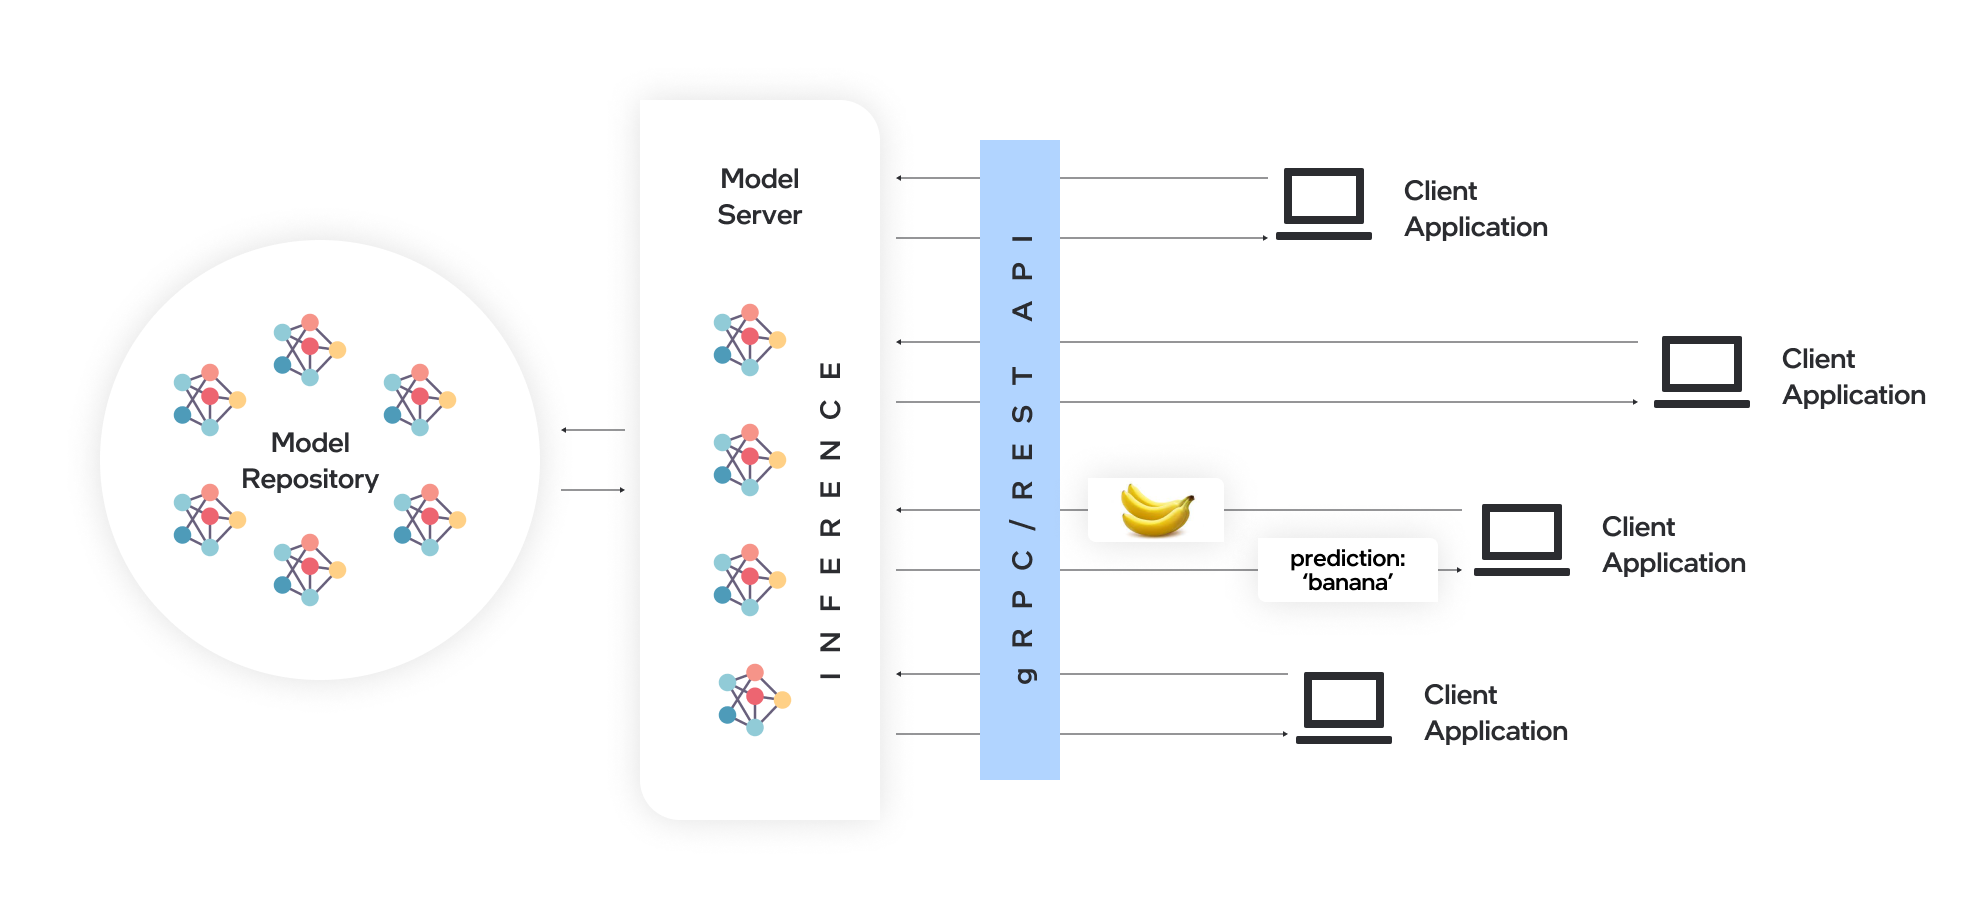
OpenVINO™ Model Server (OVMS) is a high-performance system for serving models. Implemented in C++ for scalability and optimized for deployment on Intel® architectures, the model server uses the same architecture and API as TensorFlow Serving and KServe while applying OpenVINO™ for inference execution. Inference service is provided via gRPC or REST API, making deploying new algorithms and AI experiments easy.
Docker is the recommended way to deploy OpenVINO™ Model Server. Pre-built container images are available on Docker Hub and Red Hat Ecosystem Catalog.
In this blog, we will introduce how to leverage OpenVINO™ Model Server to deploy AI workload across various hardware platforms, including Intel® CPU, Intel® GPU, and Nvidia GPU.
2. OpenVINO™ Model Server Pre-built Docker Image for Intel® CPU
Pull the latest pre-built OVMS docker image hosted in Docker Hub:
Verify OVMS docker image and OpenVINO™ backend version:
Here is an example output of the command line above:

Download a model and create an appropriate directory structure. For example, a person-vehicle-bike-detection model from Intel’s Open Model Zoo:
where a model directory structure looks like that:

After the model repository preparation, let’s start OVMS to host a person-vehicle-bike-detection-2000 model in the Model Server with Intel® CPU as target device.
The parameter “--target_device CPU” specified workload to allocate on Intel® CPU. “--port 30001” set up the gRPC server port as 30001, and “--rest_port 30001” set up the REST server port as 30002. The parameter “--model_path” specified the model directory path in the docker image, while “--model_name” specified which model to host in the model server.
3. Build OpenVINO™ Model Server Benchmark Client
OpenVINO™ Model Server provides a useful tool - Benchmark Client to generate traffic and measure the performance of the model served in OpenVINO™ Model Server. In this blog, you could use Benchmark Client to verify OpenVINO™ model server functionality quickly.
To build the docker image and tag it as benchmark_client as follow:
Here is an example to use benchmark_client to generate 8 requests and send them via gRPC API, then receive the severed model performance data:
In the output, "window_netto_frame_rate" measures the overall performance of a service - how many frames per second the model server processed. Please note, model serving example above was set up with default parameters, see the performance tuning section for more details.
4. Build OpenVINO™ Model Server from Source Code
Download the model server source code as follows:
OVMS provides a “Makefile” to build the docker image with environment parameters, which you can pass via the command line for the building process.
- BASE_OS: base OS docker image used to build OVMS docker image, current supported values are “ubuntu” (by default) and “redhat”.
- OV_USE_BINARY: control whether to use a pre-built OpenVINO™ binary package for building OVMS docker image. If "OV_USE_BINARY=1", OVMS use a pre-built OpenVINO™ binary package. If "OV_USE_BINARY=0", OpenVINO™ will be built from source code during OVMS building process.
- DLDT_PACKAGE_URL: If "OV_USE_BINRAY=1", "DLDT_PACKAGE_URL" is used to set the URL path to the pre-built OpenVINO™ binary package
- GPU: control whether to enable OVMS support for Intel® GPU. By default, “GPU=0” disables OVMS support for Intel® GPU. If "GPU=1", OVMS support for intel® GPU will be enabled.
- NVIDIA: control whether to enable OVMS support for Nvidia GPU. By default, "NVIDIA=0" disables OVMS support for Nvidia GPU. If "NVIDIA=1", OVMS support for Nvidia GPU will be enabled, which requires building OpenVINO from the source code.
- OV_SOURCE_BRANCH: If "OV_USE_BINARY=0", "OV_SOURCE_BRANCH" is used to set the target branch or commit hash of OpenVINO source code. The default value is “master”
- OV_CONTRIB_BRANCH: If "NVIDIA=1", "OV_CONTRIB_BRANCH" is used to set the target branch or commit hash of OpenVINO contrib source code. The default value is “master"
Here is an example of building OVMS with the "releases/2022/3" branch of OpenVINO™ GitHub source code with target device Intel® CPU.
Built docker image will be available in the host as “openvino/model_server:latest”.
5. Build OpenVINO™ Model Server with Intel® GPU Support
Since OpenVINO™ 2022.3 release, OpenVINO™ added full support for Intel’s integrated GPU, Intel’s discrete graphics cards, such as Intel® Data Center GPU Flex Series, and Intel® Arc™ GPU for DL inferencing workloads in the intelligent cloud, edge, and media analytics workloads. OpenVINO™ Model Server 2022.3 also added support for Intel® GPU. The pre-built OpenVINO™ Model Server docker image with GPU driver for Intel® GPU is available in Docker Hub:
Here is an example of building OVMS with Intel® GPU support based on the OpenVINO™ source code:
The default GPU driver (version 22.8 for RedHat 8.7 or version 22.35 for Ubuntu 20.04) will be installed during the building process. Built docker image will be available in the host as “openvino/model_server:latest-gpu”.
Here is an example to launch the OVMS docker image with Intel® GPU as target device:
The parameter “--target_device GPU” specified workload to allocate on Intel® GPU. The parameter “--device /dev/dri” is used to pass the device context. The parameter “--group-add=$(stat -c"%g" /dev/dri/render\* | head -n 1) -u $(id -u):$(id -g)” is used to ensure the model server process security context account with correct permissions to run inference on Intel® GPU.
Here is an example to verify the severed model performance on Intel® GPU with benchmark_client:
6. Build OpenVINO™ Model Server with Nvidia GPU Support
OpenVINO™ Model Server can also support Nvidia GPU cards by using NVIDIA plugin from the GitHub repo openvino_contrib. Here is an example of building OVMS with Nvidia GPU support step by step:
First, pull the Nvidia docker base image with the GPU driver, e.g.,“docker.io/nvidia/cuda:11.8.0-runtime-ubuntu20.04”, please ensure to install same GPU driver version in the local host environment.
Install Nvidia Container Toolkit to expose the GPU driver to docker and restart docker.
Build OVMS docker image with Nvidia GPU support.“NVIDIA=1” enables to build OVMS with Nvidia GPU support, and “OV_USE_BINARY=0” enables building OpenVINO from the source code. Besides, “OV_SOURCE_BRANCH=releases/2022/3” refer to the OpenVINO™ GitHub "releases/2022/3" branch, while “OV_CONTRIB_BRANCH=releases/2022/3” refer to the OpenVINO contrib GitHub "releases/2022/3" branch.
Built docker image will be available in the host as “openvino/model_server-cuda:latest”.
Here is an example to launch the OVMS docker image with Nvidia GPU as target device:
The parameter “--target_device NVIDIA” is specified to allocate workload on NVIDIA GPU. The parameter “--gpu all” flag is used to access all GPU resources available in the host system.
Here is an example to verify the severed model performance on Nvidia GPU with benchmark_client:
7. Migration from Triton Inference Server to OpenVINO™ Model Server
KServe, as a robust and extensible cloud-native model server for Kubernetes, is widely adopted by model servers including Triton Inference Server. Since the 2022.3 release, OpenVINO™ Model Server added KServer API that supports REST and gRPC calls. Therefore, OVMS with Nvidia GPU support is fully compatible to receive requests from Triton Inference Client and run inference on Nvidia GPU.
Here is an example to pull the Triton Inference Server docker image:
Then you could use perf_client tools in the docker image to send generated workload as requests to OVMS via KServe API with gRPC port, then receive measured performance data on Nvidia GPU.
The simple example above shows how smoothly developers can migrate their own AI service workload from Triton Inference Server to OpenVINO™ Model Server without any change from the client.
Use Metrics to Scale Model Serving Deployments in Kubernetes
In this blog you will learn how to set up horizontal autoscaling in Kubernetes using inference performance metrics exposed by OpenVINO™ Model Server. This will enable efficient scaling of model serving pods for inference on Intel® CPUs and GPUs.
Why use custom metrics?
OpenVINO™ Model Server provides high performance AI inference on Intel CPUs and GPUs that can be scaled in Kubernetes. However, when it comes to automatic scaling in Kubernetes, the Horizontal Pod Autoscaler by default, relies on CPU utilization and memory usage metrics only. Although resource consumption indicates how busy the application is, it does not clearly say whether serving provides expected quality of service to the clients or not. Since OpenVINO Model Server exposes performance metrics, we can automatically scale based on service quality rather than resource utilization.
The first metric that comes to mind when thinking about service performance is the duration of request processing, otherwise known as latency. For example, mean or median over a specified period or latency percentiles. OpenVINO Model Server provides such metrics but setting autoscaling based on latency requires specific knowledge about each model and the environment where the inference is running in order to properly set thresholds that trigger scaling.
While autoscaling based on latency works and may be a good choice when you have model-specific knowledge, we will instead focus on a more generic metric using ovms_requests_streams_ratio. Let’s dive into what this means.

In the equation above:
- currently_processed_requests - number of inference requests to a model being processed by the service at a given time.
- execution_streams_number – number of execution streams. (When a model is loaded on the device, its computing units are divided into streams. Each stream independently handles inference requests, meaning that the number of streams defines how many inferences can be run on the device in parallel. Note that the more streams there are, the less powerful they are, so we get more throughput at a cost of higher minimal latency / inference time.)
In this equation, for any model exceeding a value of 1 indicates that requests are starting to queue up. Setting the autoscaler threshold for the ovms_requests_streams_ratio metric is somewhat of an arbitrary decision that should be made by a cluster administrator. Setting the threshold too low will result in underutilization of nodes and setting it too high will force the system to work with insufficient resources for extended periods of time. Now that we have chosen a metric for autoscaling, let’s start setting it up.
Deploy Model Server with Autoscaling Metrics
First, we need to create a deployment of OpenVINO Model Server in Kubernetes. To do this, follow instructions to install the OpenVINO Operator in your Kubernetes cluster. Then create a configuration where we can specify the model to be served and enable metrics:
Create ConfigMap:
With the configuration in place, we can deploy OpenVINO Model Server instance:
Create ModelServer resource:
Deploy and Configure Prometheus
Next, we need to read serving metrics and expose them to the Horizontal Pod Autoscaler. To do this we will deploy Prometheus to collect serving metrics and the Prometheus Adapter to expose them to the autoscaler.
Deploy Prometheus Monitoring Tool
Let’s start with Prometheus. In the example below we deploy a simple Prometheus instance via the Prometheus Operator. To deploy the Prometheus Operator, run the following command:
Next, we need to configure role-based access control to give Prometheus permission to access the Kubernetes API:
The last step is to create a Prometheus instance by deploying Prometheus resource:
If the deployment was successful, a Prometheus service should be running on port 9090. You can set up a port forward for this service, enabling access to the web interface via localhost on your machine:
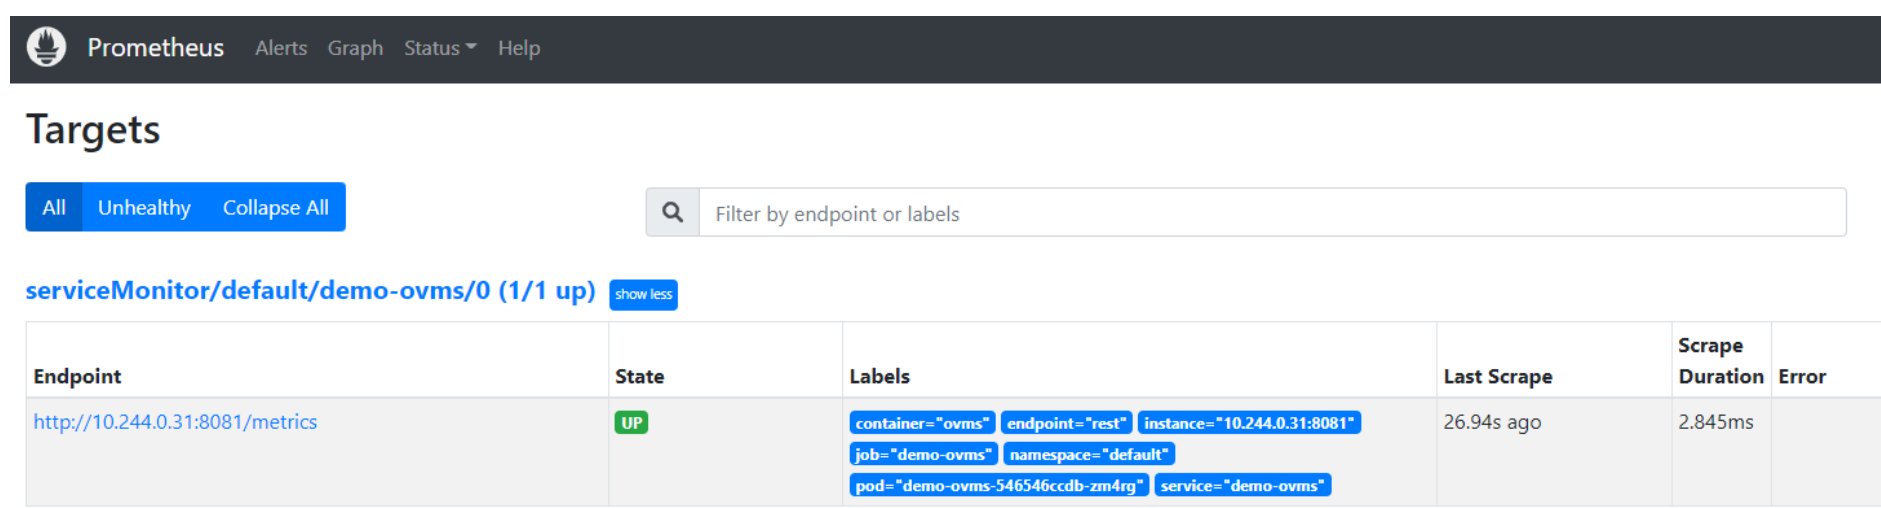
Now, when you open http://localhost:9090 in a browser you should see the Prometheus user interface. Next, we need to expose the Model Server to Prometheus by creating a ServiceMonitor resource:
Once it’s ready, you should see a demo-ovms target in the Prometheus UI:
Now that the metrics are available via Prometheus, we need to expose them to the Horizonal Pod Autoscaler. To do this, we deploy the Prometheus Adapter.
Deploy Prometheus Adapter
Prometheus Adapter can be quickly installed via helm or step-by-step via kubectl. For the sake of simplicity, we will use helm3. Before deploying the adapter, we will prepare a configuration that tells it how to expose the ovms_requests_streams_ratio metric:
Create a ConfigMap:
Now that we have a configuration, we can install the adapter:
Keep checking until custom metrics are available from the API:
Once you see the output above, you can configure the Horizontal Pod Autoscaler to use these metrics.
Set up Horizontal Pod Autoscaler
As mentioned previously, we will set up autoscaling based on the ovms_requests_streams_ratio metric and target an average value of 1. This will try to keep all streams busy all the time while preventing requests from queueing up. We will set minimum and maximum number of replicas to 1 and 3, respectively, and the stabilization window for both upscaling and downscaling to 120 seconds:
Create HorizontalPodAutoscaler:
Once deployed, you can generate some load for your model and see the results. Below you can see how Horizontal Pod Autoscaler scales the number of replicas by checking its status:

This data can also be visualized with a Grafana dashboard:
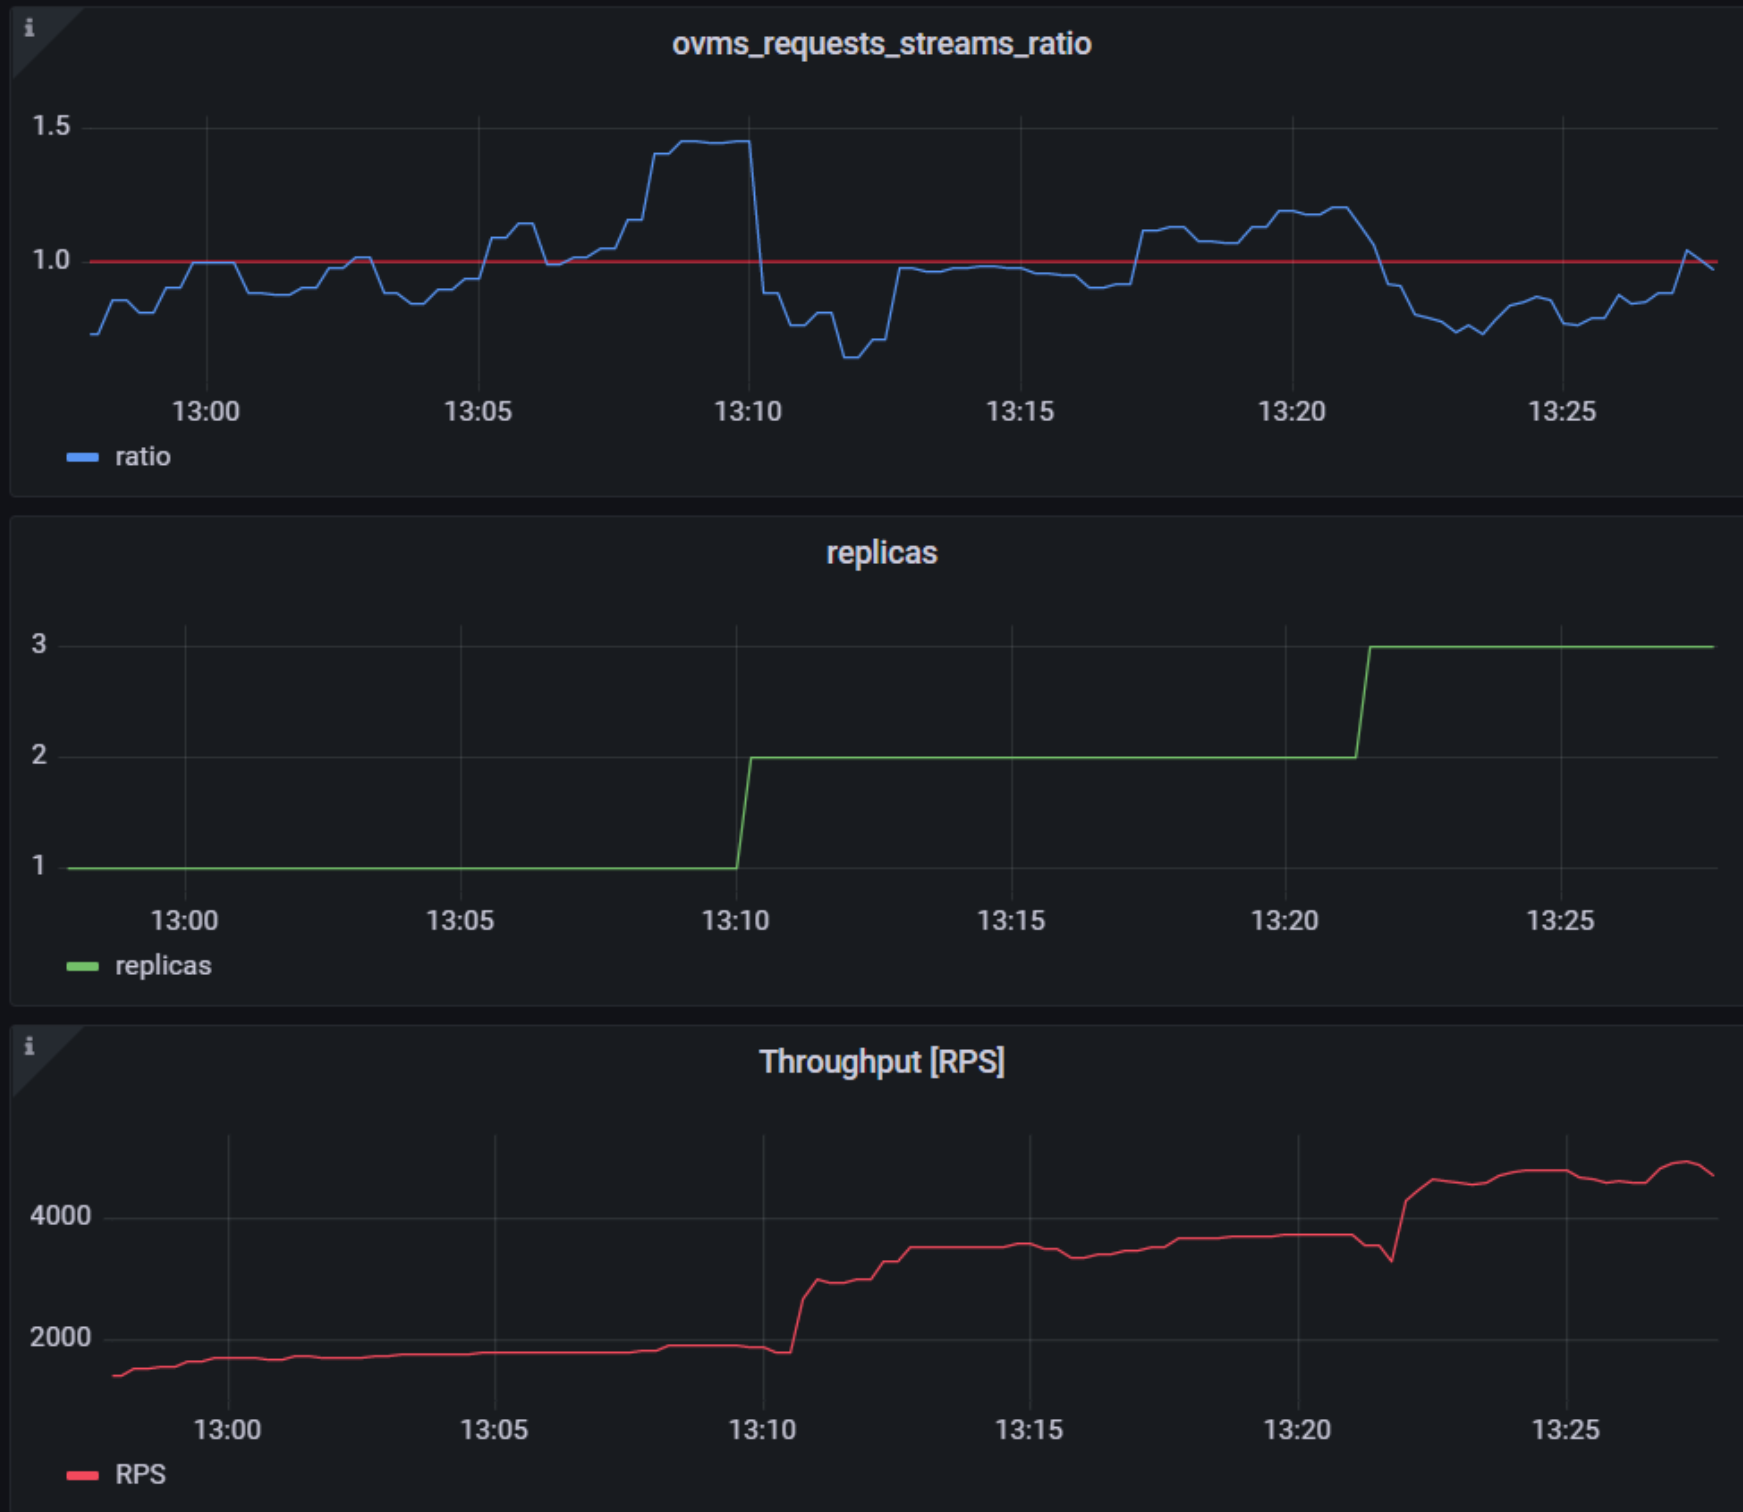
As you can see, with OpenVINO Model Server metrics, you can quickly set up inferencing system with monitoring and autoscaling for any model. Moreover, with custom metrics, you can set up autoscaling for inference on any Intel CPUs and GPUs.
See also:
- Load Balancing OpenVINO Model Server Deployments with Red Hat
- Kubernetes Device Plugin for Intel GPU
- OpenVINO Model Server metrics

Deploy AI Inference with OpenVINO™ and Kubernetes
Introduction
Model servers play a vital role in bringing AI models from development to production. Models are served via network endpoints which expose APIs to run predictions. These microservices abstract inference execution while providing scalability and efficient resource utilization.
In this blog, you will learn how to use key features of the OpenVINO™ Operator for Kubernetes. We will demonstrate how to deploy and use OpenVINO Model Server in two scenarios:
1. Serving a single model
2. Serving a pipeline of multiple models

Kubernetes provides an optimal environment for deploying model servers but managing these resources can be challenging in larger-scale deployments. Using our Operator for Kubernetes makes this easier.
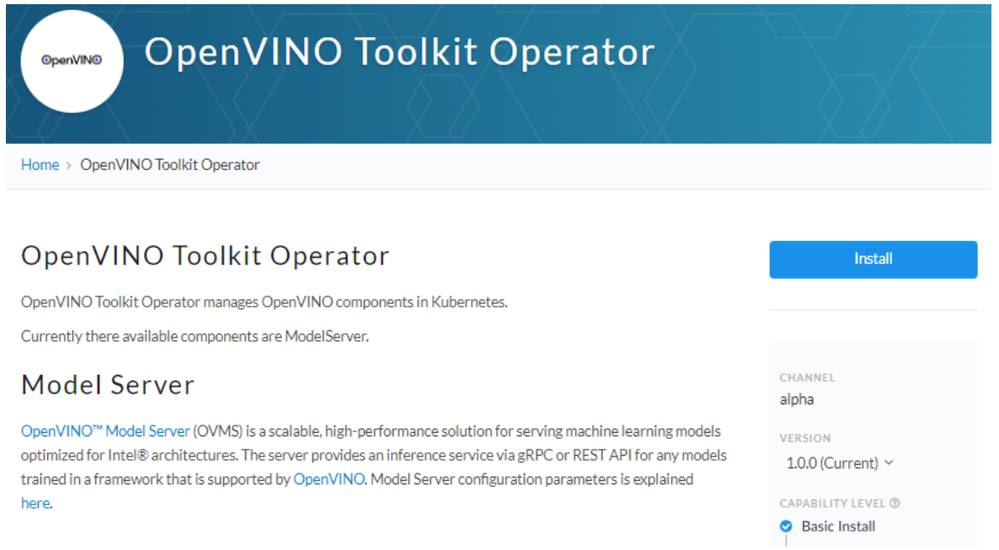
Install via OperatorHub
The OpenVINO Operator can be installed in a Kubernetes cluster from the OperatorHub. Just search for OpenVINO and click the 'Install' button.
Serve a Single OpenVINO Model in Kubernetes
Create a new instance of OpenVINO Model Server by defining a custom resource called ModelServer using the provided CRD. All parameters are explained here.
In the sample below, a fully functional model server is deployed along with a ResNet-50 image classification model pulled from Google Cloud storage.
A successful deployment will create a service called ovms-sample.
Now that the model is deployed and ready for requests, we can use the ovms-sample service with our Python client known as ovmsclient.
Send Inference Requests to the Service
The example below shows how to use the ovms-sample service inside the same Kubernetes cluster where it’s running. To create a client container, launch an interactive session to a pod with Python installed:
From inside the client container, we will connect to the model server API endpoints. A simple curl command lists the served models with their version and status:
Additional REST API calls are described in the documentation.
Now let’s use the ovmsclient Python library to process an inference request. Create a virtual environment and install the client with pip:
Download a sample image of a zebra:
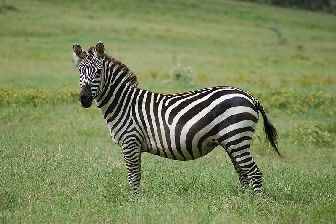
The Python code below collects the model metadata using the ovmsclient library:
The code above returns the following response:
Now create a simple Python script to classify the JPEG image of the zebra :
The detected class from imagenet is 341, which represents `zebra`.
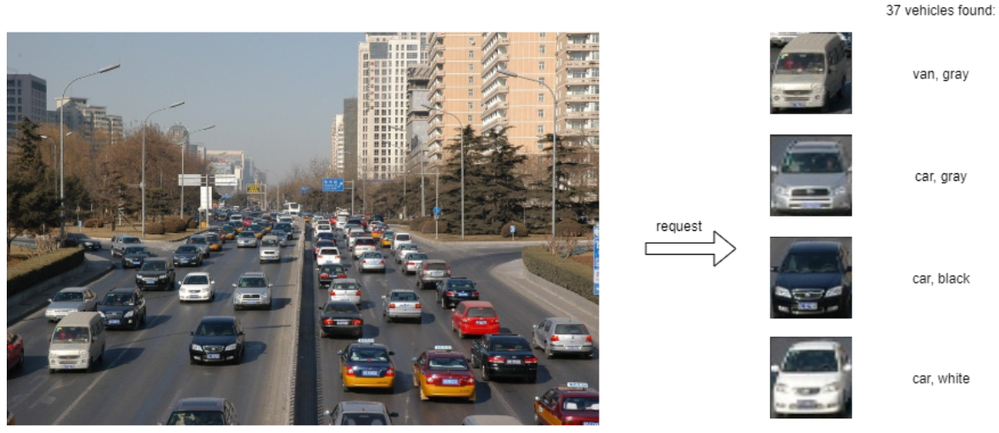
Serve a Multi-Model Pipeline
Now that we have run a simple example of serving a single model, let’s explore the more advanced scenario of a multi-model vehicle analysis pipeline. This pipeline leverages the Directed Acyclic Graph feature in OpenVINO Model Server.
The remaining steps in this demo require `mc` minio client binary and access to an S3-compatible bucket. See the quick start with MinIO for more information about setting up S3 storage in your cluster.
First, prepare all dependencies using the vehicle analysis pipeline example below:
The command above downloads the required models and builds a custom library to run the pipeline, then places these files in the workspace directory. Copy these files to a shared S3-compatible storage accessible within the cluster (like MinIO). In the example below, the S3 server alias is mys3:
To use the previously created model server config file in `workspace/config.json`, we need to adjust the paths to models and the custom node library. The commands below change the model paths to use our S3 bucket and the custom node library to `/config` directory which will be mounted as a Kubernetes configmap.
Next, add both the config file and the custom name library to a Kubernetes config map:
Now we are ready to deploy the model server with the pipeline configuration. Use kubectl to apply the following ovms-pipeline.yaml configuration:
This creates the model serving service
To test the pipeline, we can use the same client container as the previous example with a single model. From inside the client container shell, download a sample image to analyze:
Run a prediction using the following command:
The sample code above returns a list of the pipeline outputs without data interpretation. More complete client code samples for vehicle analysis are available on GitHub.
Conclusion
OpenVINO Model Server makes it easy to deploy and manage inference as a service in Kubernetes environments. In this blog, we learned how to run predictions using the ovmsclient Python library with both a single model scenario and with multiple models using a DAG pipeline.
Learn more about the OpenVINO Operator: https://github.com/openvinotoolkit/operator
Check out our other model serving demos.
Serving OpenVINO Models using the KServe API Standard
There are many network API specifications for model serving on the market today. Two of the most popular are TensorFlow Serving (TFS) and KServe. Starting with the 2022.2 release, OpenVINO Model Server supports KServe -- meaning both of these common API standards can be used for serving OpenVINO models. This blog explains how to take advantage of either API.
OpenVINO provides an efficient and high-performance runtime for executing deep learning inference. In many situations, AI applications need to delegate inference execution to a remote device or service over a network. There are many advantages to this approach including the ability to scale.
AI software developers expect the communication interface with a model server to remain stable. In many cases, developers want to perform pre/post-processing on the client side with minimal dependencies. They are reluctant to switch to a different serving implementation if that requires substantial code changes or new dependencies in their applications.
Since the first release in 2018, OpenVINO Model Server has supported the TFS API. And as of 2022, the KServe API is now supported as well.
KServe is a standard designed by several companies across the industry. It has been adopted by model servers like Triton Inference Server and TorchServe. Now the same client can easily switch to use OpenVINO Model Server and leverage the latest optimizations in Intel(R) CPUs and GPUs.
KServe Python Example
Below is a simple example how to use KServe using the Python-based tritonclient.
Create Model Repository
Start OpenVINO Model Server with a ResNet-50 Model:
Install Python Client Library
Get the Model Metadata
Get a Sample Image
Run Inference via gRPC Interface with a NumPy File as Input Data
Run Inference via REST Interface with a JPEG File as Input Data
Run Inference via REST Interface with a JPEG File as Input Data using cURL
KServe C++ Example
The inference execution is also made easy in C++ based client applications. The examples below show client application execution based on the Triton C++ client library.
Build the Samples:
Get the Model Metadata
The compiled application grpc_model_metadata can make a call to gRPC endpoint and query for a server model metadata.
Run Inference via gRPC with a JPEG Encoded File as the Input Data
The sample application grpc_infer_resnet is sending the inference requests for a set of images listed inresnet_input_images.txt including their expected classification number in the ImageNet dataset.
In addition to the KServe API, the TFS API can still be used by client applications. This gives you the option to use a range of client libraries like tensorflow-serving-api or the much lighter and simplified ovmsclient.
To help you get started, we provide samples in Python, C++, Java and Go:
In conclusion, it is now easier to connect and AI applications to OpenVINO Model Server. In existing applications, you can even use the same code to take advantage of the benefits of OpenVINO.