
Computer Vision

Encrypt Your Dataset and Train Your Model with It Directly
Encrypt Your Dataset and Train Your Model with It Directly

Introduction
When we deal with dataset for creating AI models, we need to consider sensitive information managed and stored online in the cloud or on connected devices. Unsecured datasets can be vulnerable to unauthorized access, theft, and misuse, particularly when processed for machine learning workloads. Certain fields, such as industrial or medical sectors, face exceptionally high risks when their data is exposed to these potential threats. For example, if a dataset used to train a detection model for identifying factory process errors is leaked, it can expose sensitive factory process technology. This highlights the importance of safeguarding datasets at every stage, from data storage to model training.
Dataset Management Framework (Datumaro) offers a dataset encryption feature for AI model training. With Datumaro, you can encrypt datasets of any computer vision data format into the DatumaroBinary format. This encrypted dataset can remain encrypted as far as it is needed for decryption. By combining the encrypted dataset with OpenVINO training extensions™, you can use it directly for model training without decryption. Whenever needed, you can use Datumaro once again to decrypt the dataset and convert it back to any major computer vision data format, such as VOC, COCO, or YOLO. Please refer to another posting data_convert for data convert.
Encrypt Your Dataset Using Datumaro
Datumaro provides two ways to encrypt a dataset: CLI and Python API. First, you need to install Datumaro on your system. Please refer to the installation guide here for detailed instructions. Once you have completed the installation of Datumaro, let's first look at the CLI usage. You can encrypt a dataset using the datum convert CLI command as follows:
The necessary user inputs for this command are as follows:
- -i <input-dataset-path>: Enter the path to the dataset you want to encrypt in <input-dataset-path>.
- -o <output-dataset-path>: Enter the path where the encrypted dataset will be produced in <output-dataset-path>.
NOTE:: (Optional) You can additionally specify the data format of your input dataset by entering the -if <input-dataset-format> argument. In most cases, Datumaro can automatically infer the data format of the input dataset, but it might fail. In such cases, you can use the datum detect --show-rejections <input-dataset-path> command to identify the cause of the failure while inferring the data format.
NOTE:: The --save-media argument is a flag that allows you to convert your media files (e.g., images) as well. If this argument is not provided, the encrypted media will not be included in the output directory and only the encrypted annotations are included in the output directory.
Next, let's take a look at how to encrypt a dataset using the Python API. Please examine the following code snippet:
You import the dataset by specifying the path of the input dataset in the import_from function as path="<input-dataset-path>". Then, to export the dataset, you specify the path of the output dataset in the save_dir="<output-dataset-path>" of the export function. Similarly, you also need to provide the encryption=True and format="datumaro_binary" keyword arguments as in the CLI example. A more detailed end-to-end example for this can be found in a Jupyter notebook. Please refer to this link for more information.
So far, all the examples have used the datumaro_binary (DatumaroBinary) format for the exported dataset. Currently, the dataset encryption feature is only supported for the datumaro_binary format. DatumaroBinary is a Datumaro's own data format that stores annotation data in binary representation. It is much faster and storage efficient compared to string-based datasets such as COCO based on JSON. For more detailed information about DatumaroBinary, please refer to this link.
How Datumaro Encrypts Your Dataset?
Datumaro uses the Fernet symmetric encryption recipe provided by the cryptography library to encrypt the dataset. Fernet is built on top of a number of standard cryptographic primitives such as AES or HMAC, and hence Fernet guarantees that a message encrypted cannot be manipulated or read without the key. Please refer to this link for detailed information.
When encrypting the dataset, Datumaro generates a secret key through Fernet and saves it as a txt file at the following path: <output-dataset-path>/secret_key.txt. The secret key generated at this path is a 50-characters string, which consists of a randomly generated 32-bytes string encoded in base64, with the prefix datum- added.
If you have checked the secret key in this file, you must ensure that it is not in the same location with the dataset. If this secret key is uncovered, an attacker would be able to access the contents of the encrypted dataset. Additionally, this secret key is required when training models using OpenVINO training extensions™ with the encrypted dataset or when decrypting it later. Therefore, you should be careful not to lose this secret key.
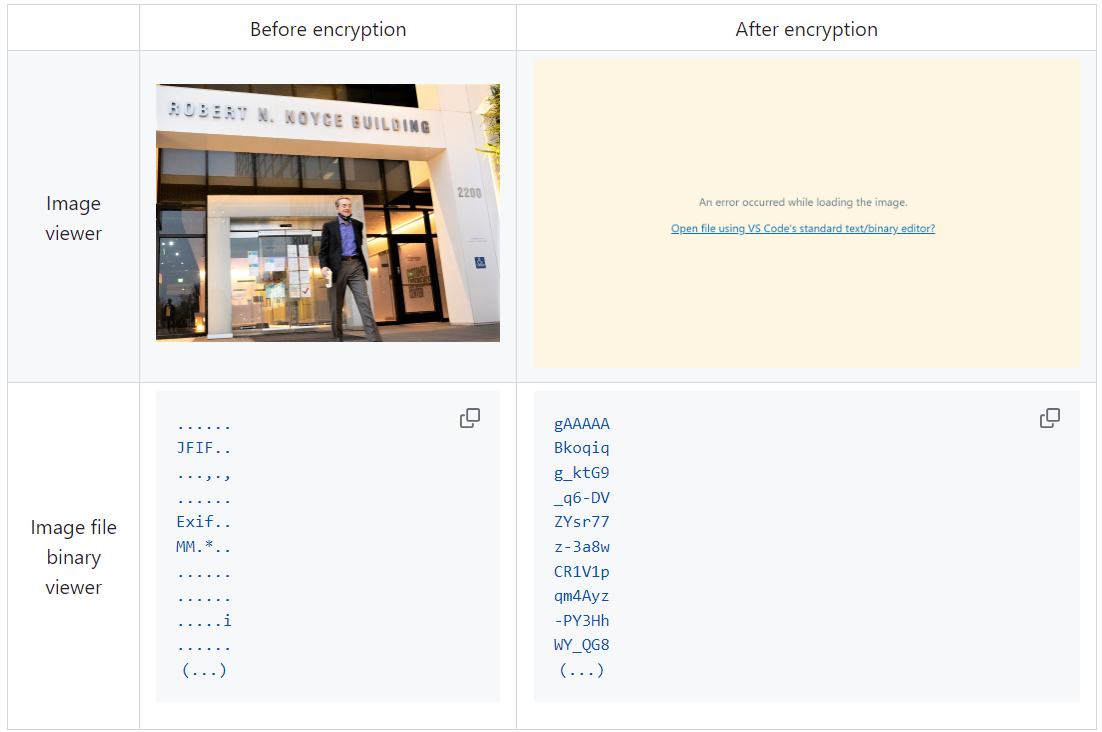
The following table briefly shows how the data is encrypted. The binary representation of the data is encrypted, so that the following image cannot be seen by the image viewer.
Train Your Model with the Encrypted Dataset Using OpenVINO Training Extensions™
OpenVINO training extensions™ is a tool that allows convenient training of computer vision models and accelerated inference on Intel® devices by exporting trained models to OpenVINO Intermediate Representation (IR) through a CLI. Within the OpenVINO ecosystem, Datumaro is integrated with OpenVINO training extensions™ as a dataset interface. Therefore, the encrypted dataset can be directly used for model training through OpenVINO training extensions™. For detailed installation instructions of OpenVINO training extensions™, please refer to the following link.
Next, let's explore how to use the encrypted dataset directly for model training through the CLI command.
The user inputs required for this command are as follows:
- --train-data-roots <encrypted-dataset-path> and --val-data-roots <encrypted-dataset-path>: Specify the path to the encrypted dataset by replacing <encrypted-dataset-path>. Since the DatumaroBinary format uses the same root directory for both the training and validation subsets, both arguments should have the same value.
- --encryption-key <secret-key>: Provide the secret key corresponding to the encrypted dataset in <secret-key>. This is the 50-character string with the datum- prefix described in the previous section.
NOTE:: <template> is the name of the model template provided by OpenVINO training extensions™. A model template is a recipe for a deep learning model for a specific computer vision task. To explore all the model templates supported by OpenVINO training extensions™, you can use the otx find CLI command or refer to this link.
Decrypt the Encrypted Dataset Using Datumaro
If you want to utilize the encrypted dataset in another AI workload, you need to decrypt the encrypted data. This process reverses the dataset encryption using Datumaro, and encryption-decryption preserves all the information without loss. Similar to the previous section, decryption can be done using the CLI or Python API. Let's first look at decryption using the CLI.
You can use the same datum convert command as before. However, specify the path to the encrypted dataset as the input dataset path (-i <encrypted-dataset-path>), and provide the secret key, which is a 50-character string with the datum- prefix described in the previous section, as the <secret-key> argument for --encryption-key <secret-key>. Additionally, you can choose any data format supported by Datumaro as the output data format. To learn more about the data formats supported by Datumaro, refer to this link.
Next, let's see how decryption can be done using Python API.
Similar to the CLI method, provide the path to the encrypted dataset and the secret key as arguments to the import_from function. For the export function, specify the output dataset path and the output data format.
Conclusion
This post introduced dataset encryption feature provided by Datumaro. It demonstrated how to encrypt a dataset using Datumaro and train a model with the encrypted dataset using OpenVINO training extensions™. Whenever needed you can decrypt it with Datumaro for other AI projects and training frameworks. You can refer to the end-to-end Jupyter notebook example provided on this blog post here for step-by-step guide. The features introduced in this post are available in Datumaro version 1.4.0 or higher and OpenVINO training extensions™ version 1.4.0 or higher.
Datumaro offers a range of useful features for managing datasets besides the dataset encryption feature. You can find examples of other Datumaro features, such as noisy label detection during training with OpenVINO training extensions™, in the Jupyter examples directory. For more information about Datumaro and its capabilities, you can visit the Datumaro documentation page. If you have any questions or requests about using Datumaro, feel free to open an issue here.
Make Your Own YOLOv8 OpenVINO™ Model from Any Data Format with Datumaro
Authors: Vinnam Kim, Wonju Lee, Mark Byun, Minje Park
Introduction
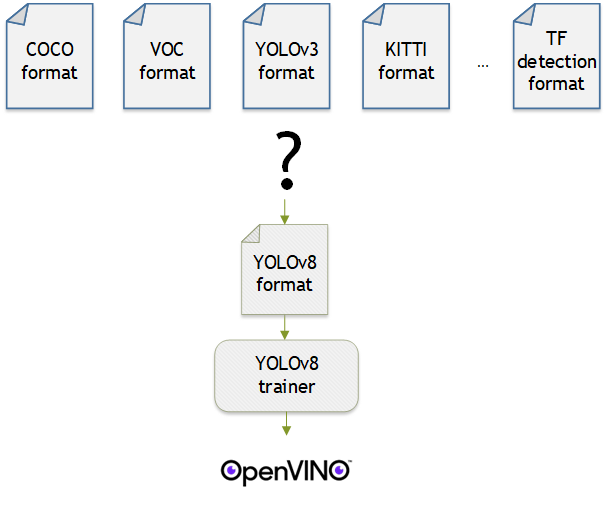
OpenVINO™ provides an easy way to deploy your model with the best inference performance on any Intel hardwares. However, to train your own model for deployment you need to prepare a training framework and dataset. Fortunately, there are many ready-to-use training frameworks and implementations. Then, what about the dataset? A specific training framework requires a specific data format, but there are many data formats in the world. For example, in object detection tasks there are data formats such as YOLO, COCO, and Pascal VOC that are widely used. These formats have different directory structures and annotation file formats as well as different extensions such as txt, json, and, xml, respectively. It's tedious task to convert dataset from one format to another whenever you adopt different training framework.
Let's assume you choose Detectron2, which only supports COCO format datasets. If your dataset is formatted as VOC, you have to convert it into COCO format. Below, we compare the directory structures and annotation file formats of both datasets, VOC and COCO. These datasets have distinct formats and you need to implement codes for format conversion at each time of handling different formats. Of course, this is not technically challenging but this may require tedious code work and debugging for several days. It won't be good to repeat this process if you intend to add more datasets with different formats.
Dataset Management Framework (Datumaro) is a framework that provides Python API and CLI tools to convert, transform, and analyze datasets. Among the many features of Datumaro, we would like to introduce the data format conversion feature on this blog, which is one of the fundamental feature for handling many datasets with different training frameworks. Datumaro supports the import and export of over 40 computer vision data formats (please take a look at supported formats for details!). This means that you can easily change your data format through Datumaro. If your model training framework can only read specific formats, don't worry. Use Datumaro and convert it!
Train YOLOv8 model and export it to OpenVINO™ model
- Prepare dataset
- Convert dataset with Datumaro
- Train with YOLOv8 and export to OpenVINO™ IR
YOLOv8 is a well-known model training framework for object detection and tracking, instance segmentation, image classification, and pose estimation tasks. It provides simple CLI commands to train, test, and export a model to OpenVINO™ Intermediate Representation (IR). However, the data format consumed by YOLOv8 is slightly different from the YOLO format itself. Datumaro named it refers to it as YOLO-Ultralytics format. As you can see here, it requires a special meta file to indicate annotation files for each subset and subset files to list subset image files. It further requires them to be placed in an appropriate directory structure. It can be very tedious to go through these details and implement dataset preprocessing when you want to train a model on your custom dataset.
On this blog, we provide an end-to-end example that covers the complete process of converting your dataset, training a model with the converted dataset, and exporting the trained model to OpenVINO™ IR. We understand that dataset conversion can be a tricky process, especially if you have annotated and built your own dataset. Therefore, we will provide an example of converting the dataset created by the popular CVAT annotation tool. By following our step-by-step guide, you will be able to convert your data format easily and accelerate the inference of your trained model with OpenVINO™.
Prepare dataset
In this section, we introduce the steps to export the project annotated by CVAT for the following workflows. You can skip this section if your dataset is formatted as a different data format and is ready to be imported by Datumaro.
NOTE: We used the cats-and-dogs dataset for this example. You can find the reference for this dataset here.
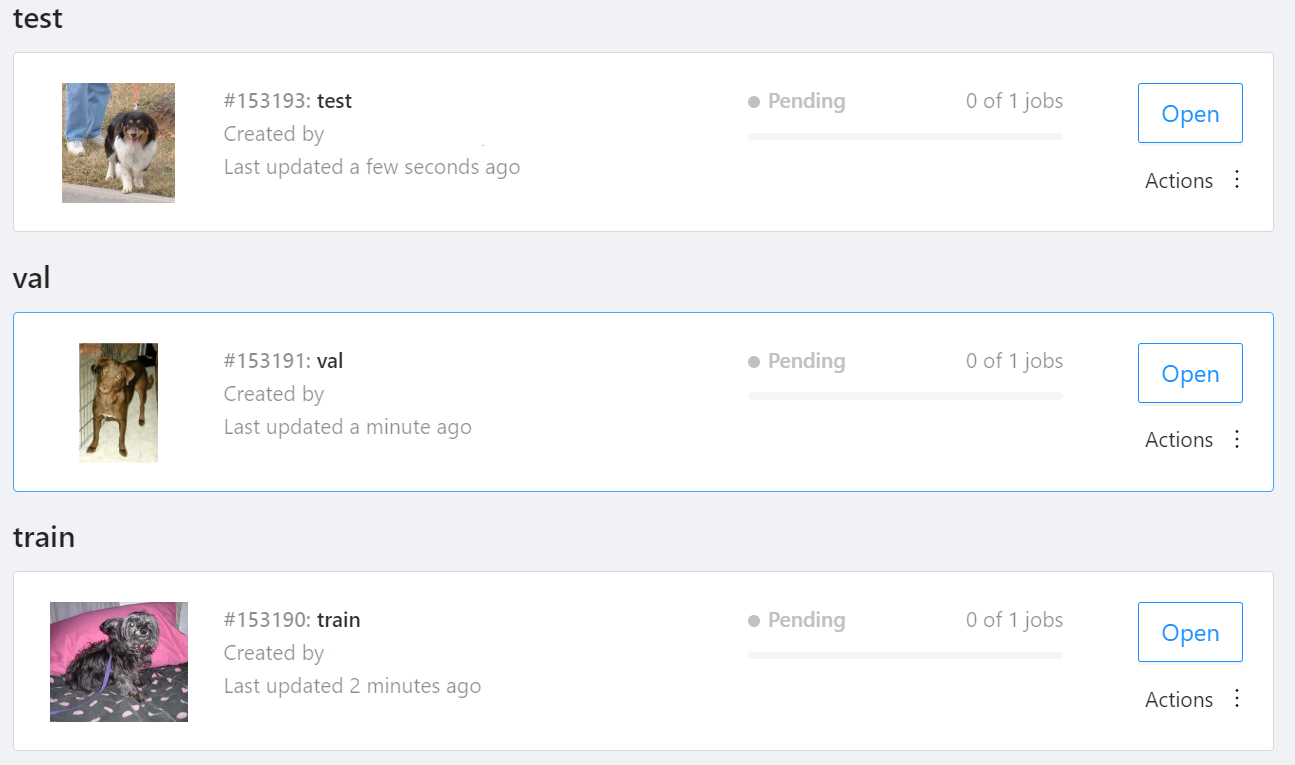
NOTE: You should have three subsets in your project: "train", "val", and "test" (optional). If your dataset has different subset names, you have to rename them. You can do this by using Datumaro's MapSubsets transform.
We export this project to CVAT for images 1.1 data format. Datumaro can import this data format and export it to YOLO-Ultralytics format which can be consumed by YOLOv8.
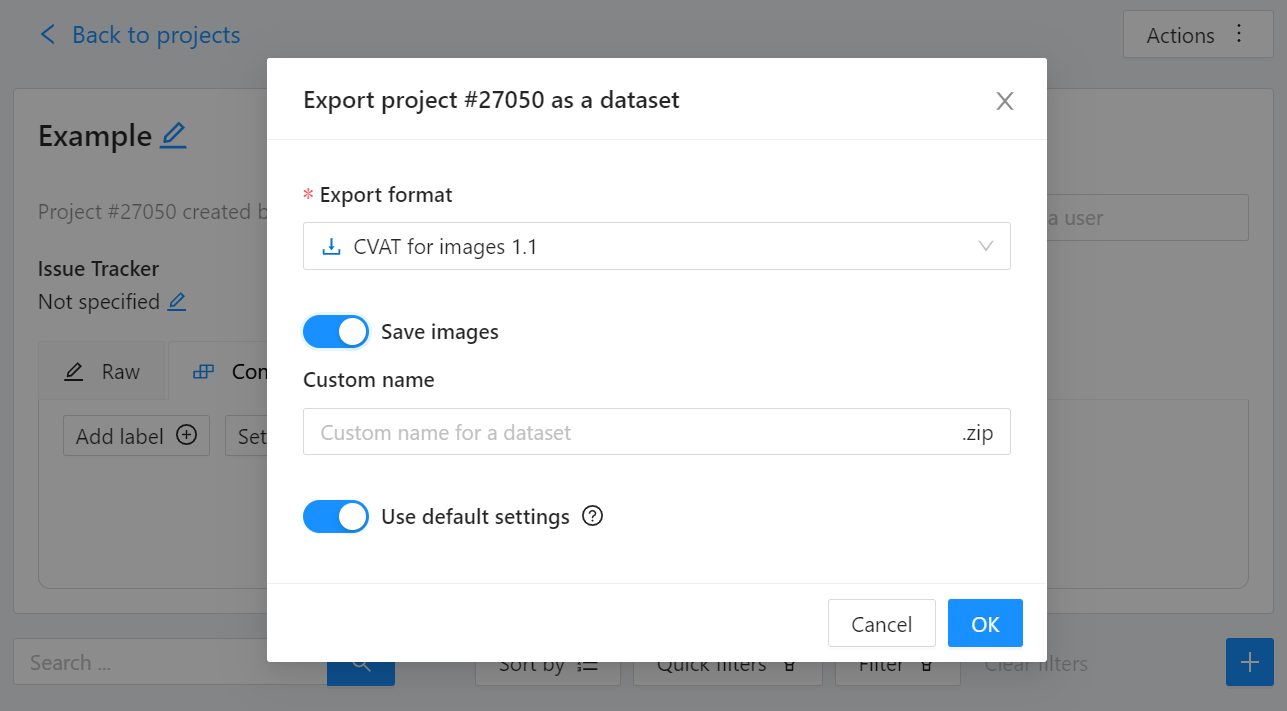
Export CVAT project to CVAT for images 1.1 data format. After exporting the dataset, extract it to the cvat_dataset directory.
You can see the following directory structure:
Convert your dataset using Datumaro
You can convert the dataset located in cvat_dataset using Datumaro's CLI command as follows. For a detailed explanation of the input arguments, see here.
NOTE: If your dataset is not CVAT for images 1.1 format, you can replace -if cvat with the different input format as -if INPUT_FORMAT. Use datum detect CLI command to figure out what format your dataset is.
After the conversion, you can see that yolo_v8_dataset directory is created.
This directory is structured as follows.
Train with YOLOv8 Trainer and Export to OpenVINO™ IR
In this section, we will train the YOLOv8 detector with the dataset converted in the previous section. To train a YOLOv8 detector, please execute the following command.
NOTE: We use data=$(realpath yolo_v8_dataset/data.yaml) to convert the relative path yolo_v8_dataset/data.yaml to the absolute path. This is because YOLOv8 needs the absolute path for the custom dataset.
After the training, the following command enables testing on the test dataset.
Lastly, we will export your YOLOv8 detector to OpenVINO™ IR for inference acceleration on Intel devices.
Using this command, the exported IR is created at this directory path, my-project/train/weights/best_openvino_model.
Conclusion
This post provided an example of training a YOLOv8 detector on an arbitrary data format by utilizing the data format conversion feature of Datumaro and exporting the model to OpenVINO™ IR. You can refer to the executable Jupyter notebook example provided on this blog post here for step-by-step guide. Datumaro offers a range of useful features for managing datasets beyond data format conversion. You can find examples of other Datumaro features, such as noisy label detection during training with OpenVINO™ Training Extensions, in the Jupyter examples directory. For more information about Datumaro and its capabilities, you can visit the Datumaro documentation page. If you have any questions or requests about using Datumaro, feel free to open an issue here.

Deploy AI Inference with OpenVINO™ and Kubernetes
Introduction
Model servers play a vital role in bringing AI models from development to production. Models are served via network endpoints which expose APIs to run predictions. These microservices abstract inference execution while providing scalability and efficient resource utilization.
In this blog, you will learn how to use key features of the OpenVINO™ Operator for Kubernetes. We will demonstrate how to deploy and use OpenVINO Model Server in two scenarios:
1. Serving a single model
2. Serving a pipeline of multiple models

Kubernetes provides an optimal environment for deploying model servers but managing these resources can be challenging in larger-scale deployments. Using our Operator for Kubernetes makes this easier.
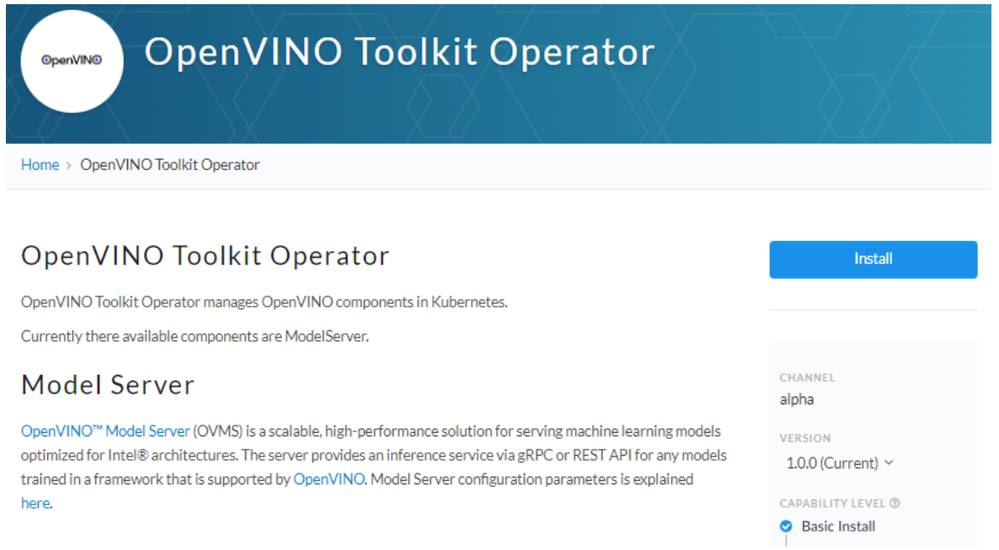
Install via OperatorHub
The OpenVINO Operator can be installed in a Kubernetes cluster from the OperatorHub. Just search for OpenVINO and click the 'Install' button.
Serve a Single OpenVINO Model in Kubernetes
Create a new instance of OpenVINO Model Server by defining a custom resource called ModelServer using the provided CRD. All parameters are explained here.
In the sample below, a fully functional model server is deployed along with a ResNet-50 image classification model pulled from Google Cloud storage.
A successful deployment will create a service called ovms-sample.
Now that the model is deployed and ready for requests, we can use the ovms-sample service with our Python client known as ovmsclient.
Send Inference Requests to the Service
The example below shows how to use the ovms-sample service inside the same Kubernetes cluster where it’s running. To create a client container, launch an interactive session to a pod with Python installed:
From inside the client container, we will connect to the model server API endpoints. A simple curl command lists the served models with their version and status:
Additional REST API calls are described in the documentation.
Now let’s use the ovmsclient Python library to process an inference request. Create a virtual environment and install the client with pip:
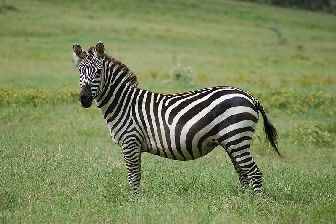
Download a sample image of a zebra:
The Python code below collects the model metadata using the ovmsclient library:
The code above returns the following response:
Now create a simple Python script to classify the JPEG image of the zebra :
The detected class from imagenet is 341, which represents `zebra`.
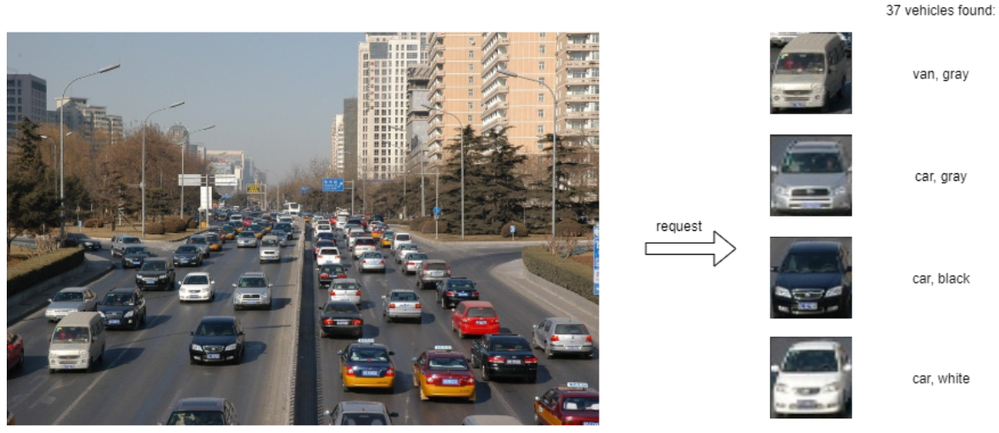
Serve a Multi-Model Pipeline
Now that we have run a simple example of serving a single model, let’s explore the more advanced scenario of a multi-model vehicle analysis pipeline. This pipeline leverages the Directed Acyclic Graph feature in OpenVINO Model Server.
The remaining steps in this demo require `mc` minio client binary and access to an S3-compatible bucket. See the quick start with MinIO for more information about setting up S3 storage in your cluster.
First, prepare all dependencies using the vehicle analysis pipeline example below:
The command above downloads the required models and builds a custom library to run the pipeline, then places these files in the workspace directory. Copy these files to a shared S3-compatible storage accessible within the cluster (like MinIO). In the example below, the S3 server alias is mys3:
To use the previously created model server config file in `workspace/config.json`, we need to adjust the paths to models and the custom node library. The commands below change the model paths to use our S3 bucket and the custom node library to `/config` directory which will be mounted as a Kubernetes configmap.
Next, add both the config file and the custom name library to a Kubernetes config map:
Now we are ready to deploy the model server with the pipeline configuration. Use kubectl to apply the following ovms-pipeline.yaml configuration:
This creates the model serving service
To test the pipeline, we can use the same client container as the previous example with a single model. From inside the client container shell, download a sample image to analyze:
Run a prediction using the following command:
The sample code above returns a list of the pipeline outputs without data interpretation. More complete client code samples for vehicle analysis are available on GitHub.
Conclusion
OpenVINO Model Server makes it easy to deploy and manage inference as a service in Kubernetes environments. In this blog, we learned how to run predictions using the ovmsclient Python library with both a single model scenario and with multiple models using a DAG pipeline.
Learn more about the OpenVINO Operator: https://github.com/openvinotoolkit/operator
Check out our other model serving demos.

Introducing OpenVINO™ integration with TensorFlow*
ArindamViral adoption of technologies is often triggered by leaps in user experience. For example, the iPhone prompted the rapid adoption of smartphones and the “app store.” Or, more recently, the ease of use seen in TensorFlow kickstarted the massive growth of Artificial Intelligence that touches almost every aspect of our daily lives today.
OpenVINO™ toolkit has redefined AI inferencing on Intel powered devices and has attained unprecedented developer adoption. Today hundreds of thousands of developers use OpenVINO™ toolkit to accelerate AI inferencing across almost all imaginable use cases, from emulation of human vision, automatic speech recognition, natural language processing, recommendation systems, and many others. Based on latest generations of artificial neural networks, including Convolutional Neural Networks (CNNs), recurrent and attention-based networks, the toolkit extends computer vision and non-vision workloads across Intel® hardware (Intel® CPU, Intel® Integrated Graphics, Intel® Neural Compute Stick 2, and Intel® Vision Accelerator Design with Intel® Movidius™ VPUs), maximizing performance. It accelerates applications with high-performance, AI, and deep learning inference deployed from edge to cloud.
We are honored to partner with our customers and contribute to their success. We are constantly listening and innovating to meet their evolving needs while also aiming to provide a world class user experience. Therefore, based on customer feedback, and building on OpenVINO™ toolkit’s success, we are introducing the OpenVINO™ integration with TensorFlow*. This integration enables TensorFlow developers to accelerate inferencing of their TensorFlow models in deployment with just 2 additional lines of code.
Benefits for TensorFlow Developers:
OpenVINO™ integration with TensorFlow* delivers OpenVINO™ toolkit inline optimizations and runtime needed for an enhanced level of TensorFlow compatibility. It is designed for developers who would like to experience the benefits of using OpenVINO™ toolkit – help boost performance for their inferencing applications – with minimal code modifications. It accelerates inference across many AI models on a variety of Intel® silicon, such as:
- Intel® CPU
- Intel® Integrated Graphics
- Intel® Movidius™ Vision Processing Units - referred as VPU
- Intel® Vision Accelerator Design with 8 Intel Movidius™ MyriadX VPUs - referred as VAD-M or HDDL
Developers leveraging this integration can expect the following benefits:
- Performance acceleration compared to native TensorFlow (depending on underlying hardware configuration).
- Accuracy – preserve accuracy nearly identical to original model.
- Simplicity – Continue to use TensorFlow APIs for inferencing. No need to refactor code. Just import, enable, and set device.
- Robustness – architected to support a wide range of TensorFlow models and operators across a variety of OS/Python environments.
- Seamless, inline model conversions – no explicit model conversion required.
- Lightweight footprint – minimal incremental memory and disk footprint required.
- Support for broad range of Intel powered devices – CPUs, iGPUs, VPUs (Myriad-X).
[Note: For maximum performance, efficiency, tooling customization, and hardware control, we recommend going beyond this component to adopt native OpenVINO™ APIs and its runtime.]
How does it work?
Developers can greatly accelerate the inferencing of their TensorFlow models by adding the following two lines of code to their Python code or Jupyter Notebooks.
import openvino_tensorflow
openvino_tensorflow.set_backend('<backend_name>')
Supported backends include 'CPU', 'GPU', 'MYRIAD', and 'VAD-M'. See Figure 1.
Sample code:
Here is an example of OpenVINO™ integration with TensorFlow* at work:
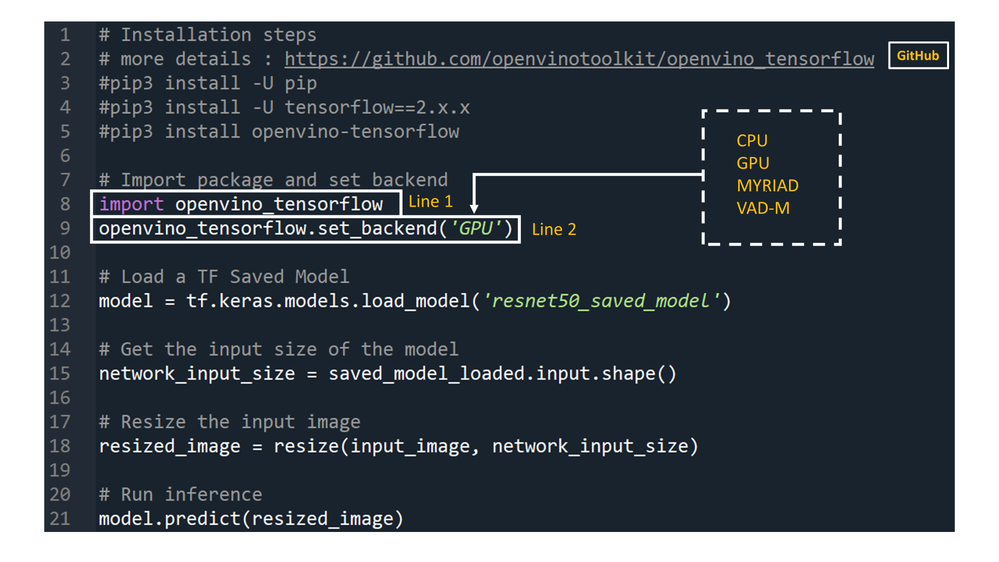
Figure 1
How does it really work under the hood?
OpenVINO™ integration with TensorFlow* provides accelerated TensorFlow performance by efficiently partitioning TensorFlow graphs into multiple subgraphs, which are then dispatched to either the TensorFlow runtime or the OpenVINO™ runtime for optimal accelerated inferencing. The results are finally assembled to provide the final inference results.
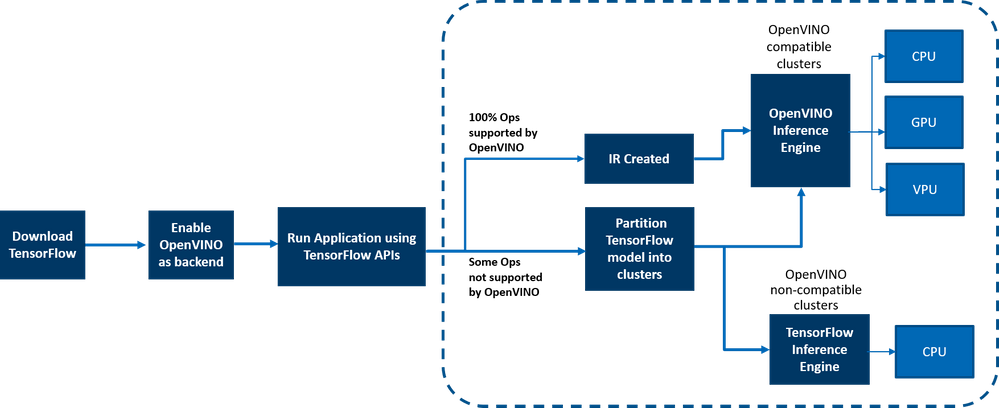
Figure 2: End-to-end overview of the workflow
Here is a detailed architecture diagram.
Deployment at the Edge and the Cloud
OpenVINO™ integration with TensorFlow* works in a variety of environments – from the cloud to the edge – as long as the underlying hardware is an Intel platform. E.g., the add-on works on the following cloud platforms:
- Intel® DevCloud for the Edge
- AWS Deep Learning AMI Ubuntu 18 & Ubuntu 20 on EC2 C5 instances optimized for inferencing
- Azure ML
- Google colab
Any AI based Edge device is supported.
Samples are available in the examples/ directory in the gitrepo.
How is this different from using native OpenVINO™ toolkit:
OpenVINO™ integration with TensorFlow* enables TensorFlow developers to accelerate their TensorFlow model inferencing in a very quick and easy manner – with just 2 lines of code. The OpenVINO™ model optimizer accelerates inference performance, along with a wealth of integrated developer tools and advanced features, but as mentioned earlier, for maximum performance, efficiency, tooling customization, and hardware control, we recommend native OpenVINO™ APIs and its runtime.
Customer adoption
Customers are using OpenVINO™ integration for TensorFlow for a variety of use cases. Here are a few examples
- Extreme Vision: Dedicated AI-only clouds such as Extreme Vision’s CV MART helps enable hundreds of thousands of developers with a rich catalog of services, models, and frameworks to further optimize their AI workloads on a variety of Intel platforms such as CPUs and iGPUs. An easy-to-use developer toolkit to accelerate models, properly integrated with AI frameworks, such as OpenVINO™ integration with TensorFlow*, provides the best of both worlds – an increase in inference speed as well as the ability to reuse already created AI inference code with minimal changes. The Extreme Vision team is testing OpenVINO™ integration with TensorFlow* with the goal of enabling TensorFlow developers on the Extreme Vision platform.
- Genome Analysis Toolkit (GATK) developed by the Broad Institute is one of the world’s most widely used open-source toolkit for variant calling. Terra is a more secure, scalable, open-source platform for biomedical researchers to access data, run analysis tools and collaborate. The cloud-based platform is co-developed by the Broad Institute of MIT and Harvard, Microsoft, and Verily. Terra platform includes GATK tools and pipelines for the research community to run their analytics. CNNScoreVariants is one of the deep learning tools included in GATK which apply a Convolutional Neural Net to filter annotated variants. In a blog, Broad Institute showcase’s how to further accelerate inference performance of CNNScoreVariants using OpenVINO™ integration with TensorFlow*.
Conclusion
Now that you have a better understanding of the benefits, how it works, deployments environments, and how OpenVINO integration with TensorFlow differs from using native OpenVINO APIs, we can’t wait for you to try OpenVINO integration with TensorFlow for yourself and begin experiencing a boost in inference performance of your AI models on all Intel platforms. And as always, we would love to hear your feedback on this integration, please contact us at OpenVINO-tensorflow@intel.com or raise issues in the gitrepo. Thank you!
Resources
Here are resources to help you learn more:

OpenVINO Execution Provider for ONNX Runtime – Same Docker Container, Different Channel
Docker containers can help you deploy deep learning models easily on different devices. With the OpenVINO Execution Provider for ONNX Runtime docker container, you can run deep learning models easily on different Intel® hardware that Intel® Distribution of OpenVINO™ Toolkit supports with the added benefit of not having to install any dependencies. Just in case you haven’t heard about OpenVINO Execution Provider for ONNX Runtime before, the OpenVINO Execution Provider for ONNX Runtime enables ONNX models for running inference using ONNX Runtime API’s while using OpenVINO™ toolkit as a backend.
Now that you know about OpenVINO Execution Provider for ONNX RT, you must be wondering how you can get your hands on it and try it out. In our previous blog, you learned about OpenVINO Execution Provider for ONNX Runtime in depth and tested out some of the object detection samples that we created. Over time, Docker Containers have become essential for AI development and we, at Intel, are aware of that. In the past, many of you have gotten access to OpenVINO Execution Provider for ONNX Runtime docker image through Microsoft’s Container Registry. Now, things are going to be a little different. We are happy to announce that the OpenVINO Execution Provider for ONNX Runtime Docker Image is now LIVE on Docker Hub.
You will still get full access to OpenVINO Execution Provider but going forward keep an eye on Docker Hub as newer versions of the Docker Image will be released there with latest and even better features. With just a simple docker pull, you will be able to accelerate inferencing of ONNX models and get that extra performance boost you’re looking for. To learn more about the latest features that OpenVINO Execution Provider has, you can check out the release notes here. If you want to learn more about how the docker container works and how to use it, please keep reading ahead.
How to Install
Prerequisites
Ubuntu/Cent-OS Linux Machine
Installation
Step 1: Downloading the docker image on the host machine
docker pull openvino/onnxruntime_ep_ubuntu18
Step 2: Running the container.
docker run -it --rm --device-cgroup-rule='c 189:* rmw' -v /dev/bus/usb:/dev/bus/usb openvino/onnxruntime_ep_ubuntu18:latest
Reference: https://hub.docker.com/r/openvino/onnxruntime_ep_ubuntu18
Video embeds must follow Webflow Guidelines
Other ways to install OpenVINO Execution Provider for ONNX Runtime
There are also other ways to install the OpenVINO Execution Provider for ONNX Runtime. One such way is to build from source. By building from source, you will also get access to C++, C# and Python API’s. Another way to install OpenVINO Execution Provider for ONNX Runtime is to install the Python wheel package via pip.
Enable OpenVINO™ Optimization for GroundingDINO
Authors: Wenyi Zou, Xiake Sun
Introduction
GroundingDINO introduces a language-guided query selection module to enhance object detection using input text. This module selects relevant features from image and text inputs and uses them as decoder queries. In this blog, we provide the OpenVINO™ optimization for GroundingDINO on Intel® platforms.
The public GroundingDINO project is referenced from: GroundingDINO
The GroundingDINO refer the model structure in below picture:
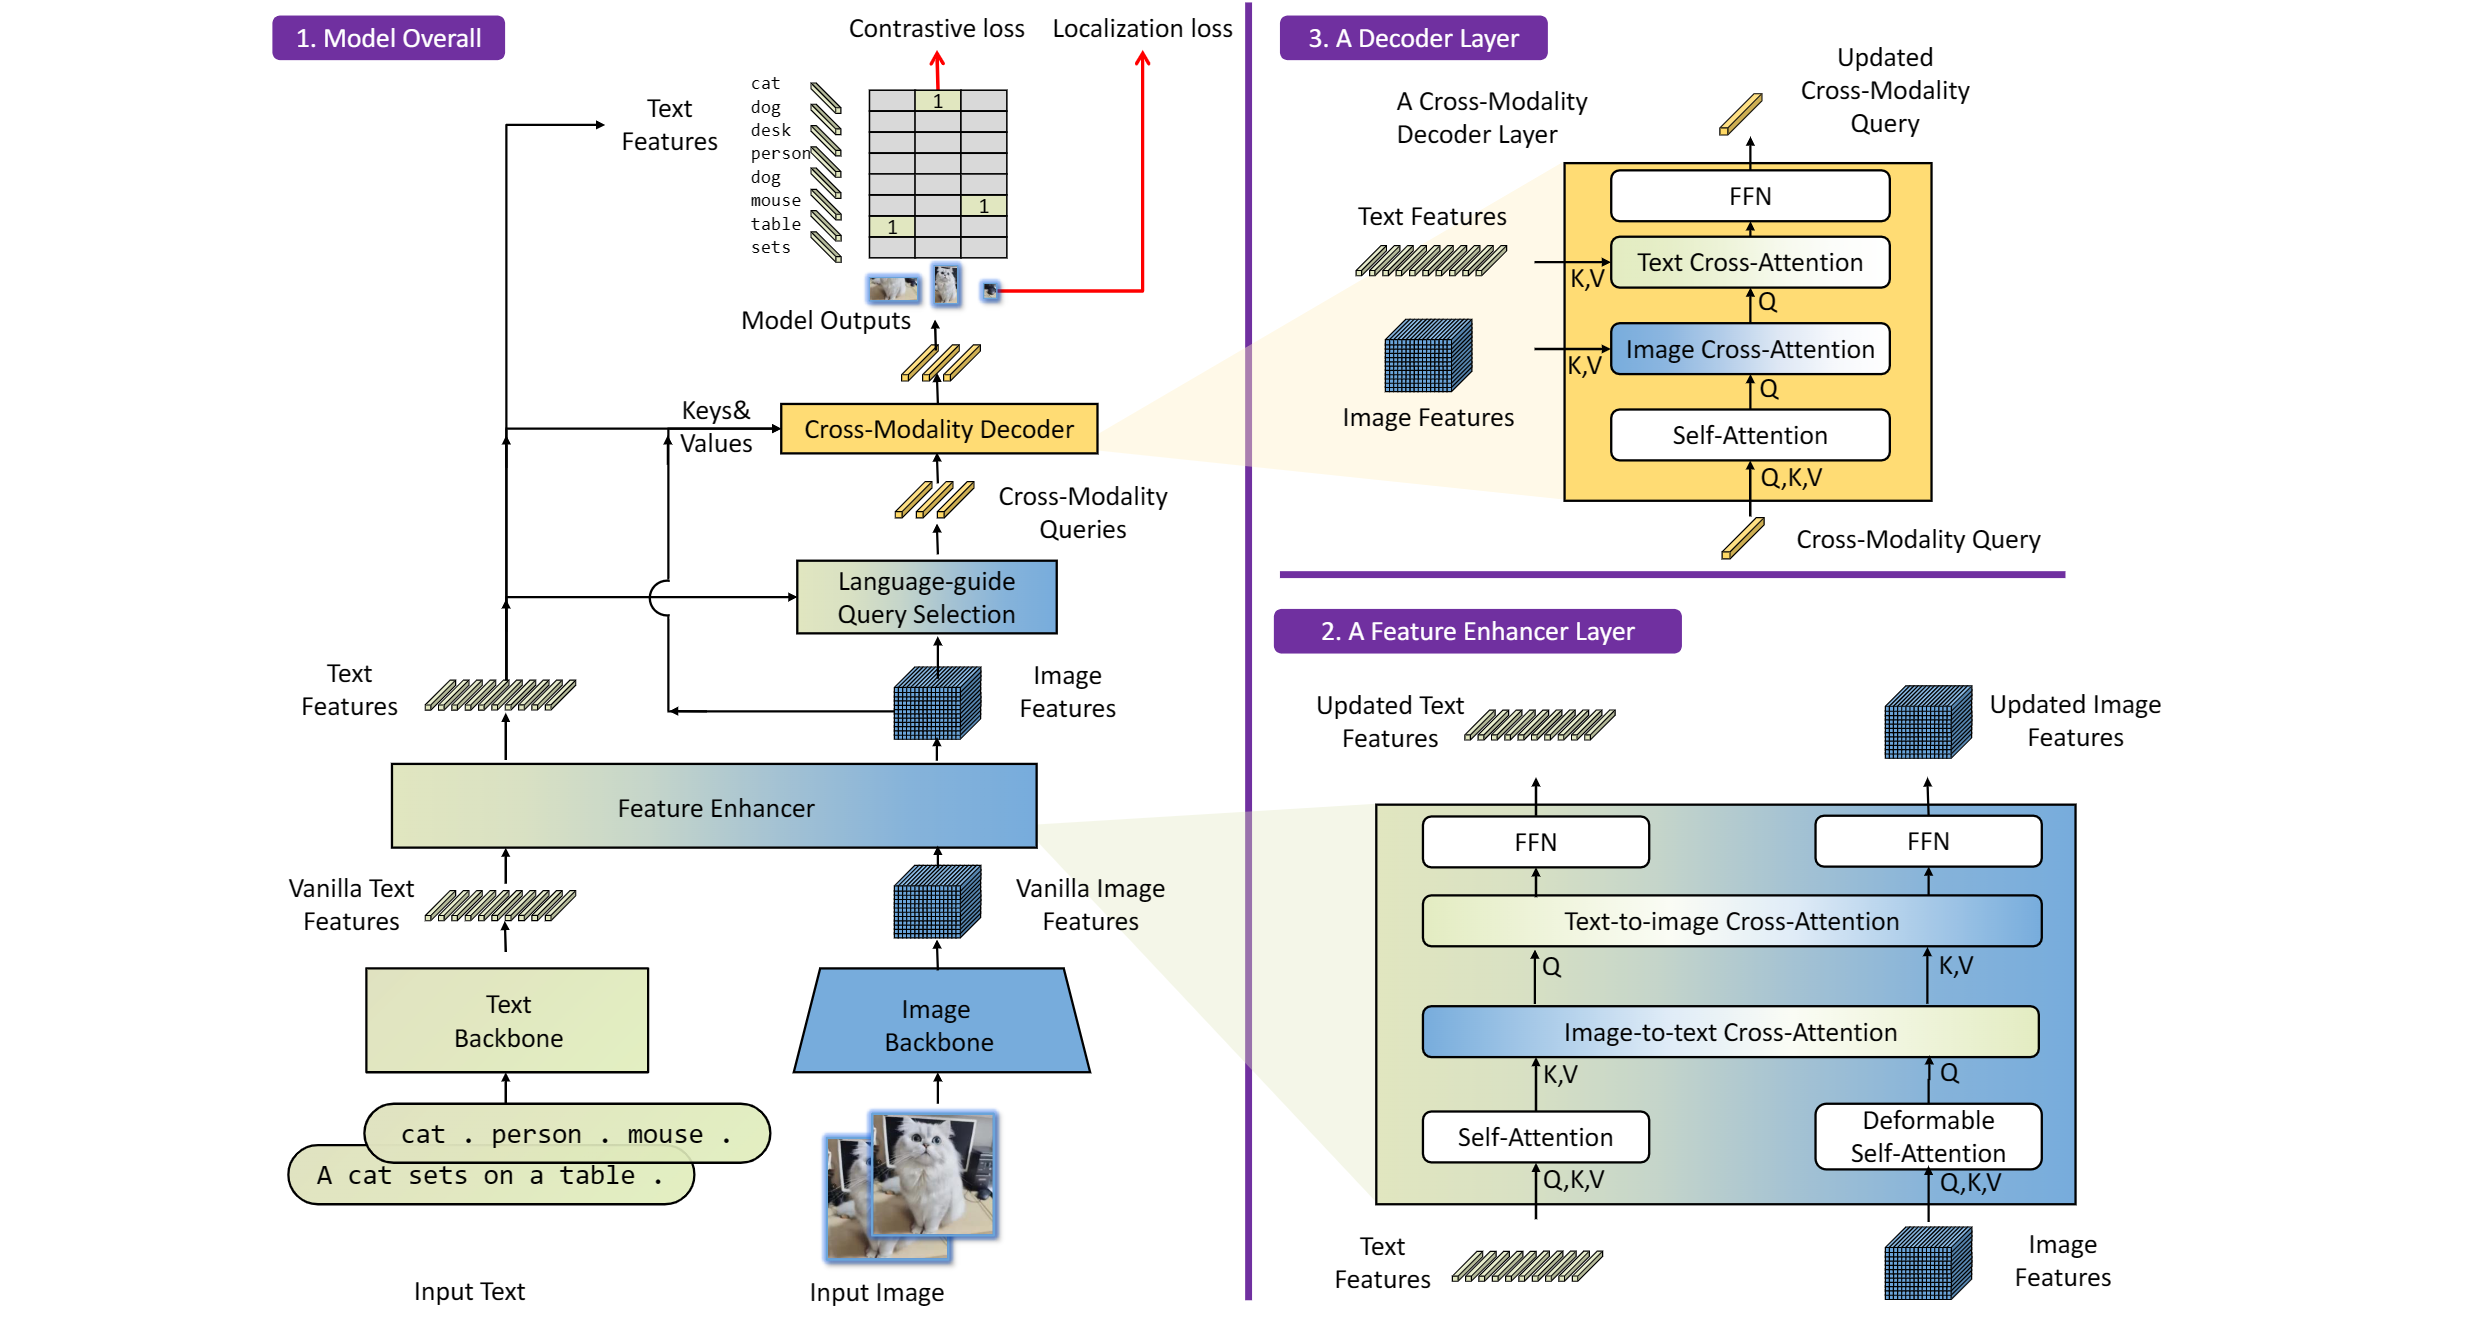
OpenVINO™ backend on GroundingDINO
In this project, you do not require to download OpenVINO™ and build the library with GroundingDINO project manually. It’s already fully integrated with OpenVINO™ runtime library for downloading, program compiling and linking.
At present, this repository already optimized and validated by OpenVINO™ 2023.1.0.dev20230811 version. Check the operating system which can support OpenVINO™ runtime library directly:
- Ubuntu 22.04 long-term support (LTS), 64-bit (Kernel 5.15+)
- Ubuntu 20.04 long-term support (LTS), 64-bit (Kernel 5.15+)
- Ubuntu 18.04 long-term support (LTS) with limitations, 64-bit (Kernel 5.4+)
- Windows* 10
- Windows* 11
- macOS* 10.15 and above, 64-bit
- Red Hat Enterprise Linux* 8, 64-bit
Step 1: Install system dependency and setup environment
Create and enable python virtual environment
Clone the GroundingDINO repository from GitHub
Change the current directory to the GroundingDINO folder
Install python dependency
Install the required dependencies in the current directory
Download pre-trained model weights
Step 2: Export to OpenVINO™ models
Step 3: Simple inference test with PyTorch and OpenVINO™
Inference with PyTorch
Inference with OpenVINO™

An end-to-end workflow with training on Habana® Gaudi® Processor and post-training quantization and Inference using OpenVINO™ toolkit
Authors: Sachin Rastogi, Maajid N Khan, Akhila Vidiyala
Background:
Brain tumors are abnormal growths of braincells and can be benign (non-cancerous) or malignant (cancerous). Accurate diagnosis and treatment of brain tumors are critical for the patient's prognosis, and one important step in this process is the segmentation of the tumor in medical images. This involves identifying the boundaries of the tumor and separating it from the surrounding healthy brain tissue.
MRI is a non-invasive imaging technique that uses a strong magnetic field and radio waves to produce detailed images of the brain. MRI scans can provide high-resolution images of the brain, including the location and size of tumors. Traditionally, trained professionals, such as radiologists or medical image analysts, perform manual segmentation of brain tumors. However, this process is time-consuming and subject to human error, leading to the development of automated methods using machine learning.
Introduction:
As demand for deep learning applications grows for medical imaging, so does the need for cost-effective cloud solutions that can efficiently train Deep Learning models. With the Amazon EC2 DL1 instances powered by Gaudi® accelerators from Habana® Labs (An Intel® company), you can train deep learning models for medical image segmentation at a reduced cost of up to 40% than the current generation GPU-based EC2 instances.
Medical Imaging AI solutions often need to be deployed on various hardware platforms, including both new and older systems. The usage of Intel® Distribution of OpenVINO™ toolkit makes it easier to deploy these solutions on systems with Intel® Architecture.
This reference implementation demonstrates how this toolkit can be used to detect and distinguish between healthy and cancerous tissue in MRI scans. It can be used on a range of Intel® Architecture platforms, including CPUs, integrated GPUs, and VPUs, with no need to modify the code when switching between platforms. This allows developers to choose the hardware that meets their needs in terms of performance, cost, and power consumption.
The Challenge:
Identify and separate cancerous tumors from healthy tissue in an MRI scan of the brain with the best price performance.
The Solution:
One approach to brain tumor segmentation using machine learning is to use supervised learning, where the algorithm is trained on a dataset of labelled brain images, with the tumor regions already identified by experts. The algorithm can then learn to identify these tumor regions in new images.
Convolutional neural networks (CNNs) are a type of machine learning model that has been successful in image classification and segmentation tasks and are often used for brain tumor segmentation. In a CNN, the input image is passed through multiple layers of filters that learn to recognize specific features in the image. The output of the CNN is a segmented image, with each pixel classified as either part of the tumor or healthy tissue.
Another approach to brain tumor segmentation is to use unsupervised learning, where the algorithm is not given any labelled examples and must learn to identify patterns in the data on its own. One unsupervised method for brain tumor segmentation is to use clustering algorithms, which can group similar pixels together and identify the tumor region as a separate cluster. However, unsupervised learning is not commonly used for brain tumor segmentation due to the complexity and variability of the data.
Regardless of the approach used, the performance of brain tumor segmentation algorithms can be evaluated using metrics such as dice coefficient, Jaccard index, and sensitivity.
Our medical imaging AI solution is designed to be used widely and in a cost-effective manner. Our approach ensures that the accuracy of the model is not compromised while still being affordable. We have used a U-Net 2D model that can be trained using the Habana® Gaudi® platform and the Medical Decathlon dataset (BraTS 2017 Brain Tumor Dataset) to achieve the best possible accuracy for image segmentation. The model can then be used for inferencing with the OpenVINO™ on Intel® Architecture.
This reference implementation provides an AWS*cloud-based generic AI workflow, which showcases U-Net-2D model-based image segmentation with the medical decathlon dataset. The reference implementation is available for use by Docker containers and Helm chart.

Training:
Primarily, we are leveraging AWS* EC2 DL1workflows to train U-Net 2D models for the end-to-end pipeline. We are consistently seeing cost savings compared to existing GPU-based instances across model types, enabling us to achieve much better Time-to-Market for existing models or training much larger and more complex models.
AWS*DL1 instances with Gaudi® accelerators offer the best price-performance savings compared to other GPU offerings in the market. The models were trained using the Pytorch framework.
The reference training code with detailed instructions is available here.
Inference and Optimization:
Intel® OpenVINO™ is an inference solution that optimizes and accelerates the computation of AI workloads on Intel® hardware. The trained Pytorch models were converted to ONNX (Open Neural Network Exchange) model representation format and then further optimized to the OpenVINO™ format or Intermediate representation (IR) of OpenVINO™ using the Model Optimizer tool from OpenVINO™.
TheFP32-optimized IR models outperformed using OpenVINO™ runtime in terms of throughput compared to other Deep Learning framework runtimes on the same Intel® hardware.
Asa next step, the FP32 IR model was further optimized and converted to lower8-bit precision with post-training quantization using the default quantization algorithm from the Post Training Optimization Tool (POT) from the OpenVINO™ toolkit. This inherently leads to a jump in the model’s performance, in terms of its processing speed and throughput, for you get a higher FPS when dealing with video streams with very negligible loss in accuracy.
TheINT8 IR models performed extremely well for inference on Intel® CPU(Central Processing Unit) 3rd Generation Intel® Xeon.
The reference inference code with detailed instructions is available here.
GitHub: https://github.com/intel/cv-training-and-inference-openvino/tree/main/gaudi-segmentation-unet-ptq
Developer Catalog: https://www.intel.com/content/www/us/en/developer/articles/reference-implementation/gaudi-processor-training-and-inference-openvino.html
Inference Result:
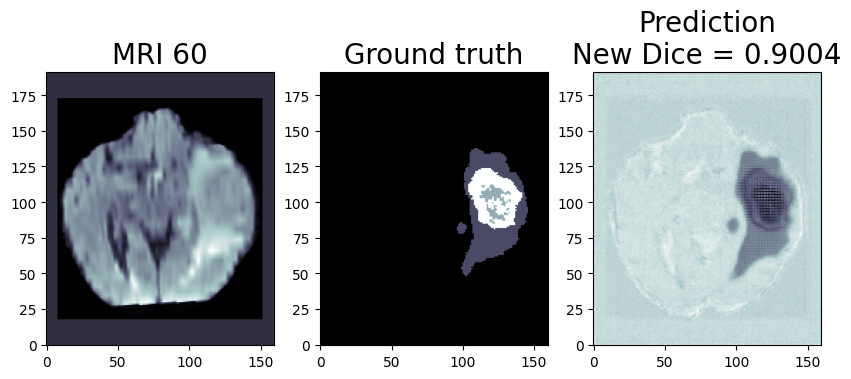
We are using OpenVINO™ Model Optimizer(MO) to convert the trained ONNX FP32 model to FP32 OpenVINO™ or Intermediate Representation(IR) format. The FP32prediction shown here is from a test image from the training dataset which was never used for training. The prediction is from a trained model which was trained for 8 epochs with 8 HPU multi-card training on an AWS* EC2 DL1 Instance with 400/484 images from the training folder.

Quantization (Recommended to use if you need the better performance of the model)
Quantization is the process of converting a deep learning model’s weight to a lower precision requiring less computation. This inherently leads to an increase in model performance, in terms of its processing speed and throughput, you will see a higher throughput(FPS) when dealing with video streams. We are using OpenVINO™ POT for the Default Quantization Algorithm to quantize the FP32 OpenVINO™ format model into the INT8 OpenVINO™ format model.
The INT8 prediction shown here is from a testimage from a training dataset that was never used for training. The predictionis from a quantized model which we quantized using POT with a calibrationdataset of 300 samples.
This application is available on the Intel® Developer Catalog for the developers to use as it is or use as a base code to bootstrap their customized solution. Intel® Developer Catalog offers reference implementations and software packages to build modular applications using containerized building blocks. Using the containerized building blocks the developers can rapidly develop deployable solutions.
Conclusion:
In conclusion, brain tumor segmentation using machine learning can help improve the accuracy and efficiency of the diagnosis and treatment of brain tumors.
There are several challenges and limitations to using machine learning for brain tumor segmentation. One of the main challenges is the limited availability of annotated data, as it is time consuming and expensive to annotate large datasets of medical images. In addition, there is a high degree of variability and complexity in the data, as brain tumors can have different shapes, sizes, and intensity patterns on MRI scans. This can make it difficult for the machine learning algorithm to generalize and accurately classify tumors in new data.
Another challenge is the potential for bias in the training data, as the dataset may not be representative of the entire population. This can lead to inaccurate or biased results if the algorithm is not properly trained or validated.
While there are still challenges to be overcome, the use of machine learning in medical image analysis shows great promise for improving patient care.
Notices & Disclaimers:
Intel technologies may require enabled hardware, software or service activation.
No product or component can be absolutely secure.
Your costs and results may vary.
© Intel Corporation. Intel, the Intel logo, and other Intel marks are trademarks of Intel Corporation or its subsidiaries. Other names and brands may be claimed as the property of others.