
Tutorials

OpenVINO.GenAI Delivers C API for Seamless Language Interop with Practical Examples in .NET
Authors: Tong Qiu, Xiake Sun
Starting with OpenVINO.GenAI 2025.1, the C API has been introduced, primarily to enhance interoperability with other programming languages, enabling developers to more effectively utilize OpenVINO-based generative AI across diverse coding environments.
Compared to C++, C's ABI is more stable, often serving as an interface layer or bridge language for cross-language interoperability and integration. This allows developers to leverage the performance benefits of C++ in the backend while using other high-level languages for easier implementation and integration.
As a milestone, we have currently delivered only the LLMPipeline and its associated C API interface. If you have other requirements or encounter any issues during usage, please submit an issue to OpenVINO.GenAI
Currently, we have implemented a Go application Ollama using the C API (Please refer to https://blog.openvino.ai/blog-posts/ollama-integrated-with-openvino-accelerating-deepseek-inference), which includes more comprehensive features such as performance benchmarking for developers reference.
Now, let's dive into the design logic of the C API, using a .NET C# example as a case study, based on the Windows platform with .NET 8.0.
Live Demo
Before we dive into the details, let's take a look at the final C# version of the ChatSample, which supports multi-turn conversations. Below is a live demo
How to Build a Chat Sample by C#
P/Invoke: Wrapping Unmanaged Code in .NET
First, the official GenAI C API can be found in this folder https://github.com/openvinotoolkit/openvino.genai/tree/master/src/c/include/openvino/genai/c . We also provide several pure C samples https://github.com/openvinotoolkit/openvino.genai/tree/master/samples/c/text_generation . Now, we will build our own C# Chat Sample based on the chat_sample_c. This sample can facilitate multi-turn conversations with the LLM.
C# can access structures, functions and callbacks in the unmanaged library openvino_genai_c.dll through P/Invoke. This example demonstrates how to invoke unmanaged functions from managed code.
public static class NativeMethods
{
 DllImport("openvino_genai_c.dll", CallingConvention = CallingConvention.Cdecl)]
public static extern ov_status_e ov_genai_llm_pipeline_create(
        [MarshalAs(UnmanagedType.LPStr)] string models_path,
        [MarshalAs(UnmanagedType.LPStr)] string device,
        out IntPtr pipe);

[DllImport("openvino_genai_c.dll", CallingConvention = CallingConvention.Cdecl)]
public static extern void ov_genai_llm_pipeline_free(IntPtr pipeline);

//Other methods
The dynamic library openvino_genai_c.dll is imported, which relies on openvino_genai.dll. CallingConvention = CallingConvention.Cdecl here corresponds to the default calling convention _cdecl in C, which defines the argument-passing order, stack-maintenance responsibility, and name-decoration convention. For more details, refer to Argument Passing and Naming Conventions.
Additionally, the return value ov_status_e reuses an enum type from openvino_c.dll to indicate the execution status of the function. We need to implement a corresponding enum type in C#, such as
public enum ov_status_e
{
    OK = 0,
    GENERAL_ERROR = -1,
    NOT_IMPLEMENTED = -2,
    //...

}
Next, we will implement our C# LLMPipeline, which inherits the IDisposable interface. This means that its instances require cleanup after use to release the unmanaged resources they occupy. In practice, object allocation and deallocation for native pointers are handled through the C interface provided by OpenVINO.GenAI. The OpenVINO.GenAI library takes full responsibility for memory management, which ensures memory safety and eliminates the risk of manual memory errors.
public class LlmPipeline : IDisposable
{
    private IntPtr _nativePtr;

    public LlmPipeline(string modelPath, string device)
    {
        var status = NativeMethods.ov_genai_llm_pipeline_create(modelPath, device, out _nativePtr);
        if (_nativePtr == IntPtr.Zero || status != ov_status_e.OK)
        {
            Console.WriteLine($"Error: {status} when creating LLM pipeline.");
            throw new Exception("Failed to create LLM pipeline.");
        }

        Console.WriteLine("LLM pipeline created successfully!");
    }

    public void Dispose()
    {
        if (_nativePtr != IntPtr.Zero)
        {
            NativeMethods.ov_genai_llm_pipeline_free(_nativePtr);
            _nativePtr = IntPtr.Zero;
        }

        GC.SuppressFinalize(this);
    }
    // Other Methods
}
Callback Implementation
Next, let's implement the most complex method of the LLMPipeline, the GenerateStream method. This method encapsulates the LLM inference process. Let's take a look at the original C code. The result can be retrieved either via ov_genai_decoded_results or streamer_callback. ov_genai_decoded_results provides the inference result all at once, while streamer_callback allows for streaming inference results. ov_genai_decoded_results or streamer_callback must be non-NULL; neither can be NULL at the same time. For more information please refer to the comments https://github.com/openvinotoolkit/openvino.genai/blob/master/src/c/include/openvino/genai/c/llm_pipeline.h
// code snippets from //https://github.com/openvinotoolkit/openvino.genai/blob/master/src/c/include/openvino/genai/c/llm_// pipeline.h
typedef enum {
    OV_GENAI_STREAMMING_STATUS_RUNNING = 0,  // Continue to run inference
    OV_GENAI_STREAMMING_STATUS_STOP =
        1,  // Stop generation, keep history as is, KV cache includes last request and generated tokens
    OV_GENAI_STREAMMING_STATUS_CANCEL = 2  // Stop generate, drop last prompt and all generated tokens from history, KV
                                           // cache includes history but last step
} ov_genai_streamming_status_e;

// ...
typedef struct {
    ov_genai_streamming_status_e(
        OPENVINO_C_API_CALLBACK* callback_func)(const char* str, void* args);  //!< Pointer to the callback function
    void* args;  //!< Pointer to the arguments passed to the callback function
} streamer_callback;

// ...
OPENVINO_GENAI_C_EXPORTS ov_status_e ov_genai_llm_pipeline_generate(ov_genai_llm_pipeline* pipe,
                                                                    const char* inputs,
                                                                    const ov_genai_generation_config* config,
                                                                    const streamer_callback* streamer,
                                                                    ov_genai_decoded_results** results);
The streamer_callback structure includes not only the callback function itself, but also an additional void* args for enhanced flexibility. This design allows developers to pass custom context or state information to the callback.
For example, in C++ it's common to pass a this pointer through args, enabling the callback function to access class members or methods when invoked.
// args is a this pointer
void callback_func(const char* str, void* args) {
    MyClass* self = static_cast<MyClass*>(args);
    self->DoSomething();
}
This C# code defines a class StreamerCallback that helps connect a C callback function with a C# method. It wraps a C function pointer MyCallbackDelegate and a void* args into a struct.
- ToNativePTR method constructs the streamer_callback structure, allocates a block of memory, and copies the structure's data into it, allowing it to be passed to a native C function.
- GCHandle is used to safely pin the C# object so that it can be passed as a native pointer to unmanaged C code.
- CallbackWrapper method is the actual function that C code will call.
[UnmanagedFunctionPointer(CallingConvention.Cdecl)]
public delegate ov_genai_streamming_status_e MyCallbackDelegate(IntPtr str, IntPtr args);

[StructLayout(LayoutKind.Sequential)]
public struct streamer_callback
{
    public MyCallbackDelegate callback_func;
    public IntPtr args;
}
public class StreamerCallback : IDisposable
{
    public Action<string> OnStream;
    public MyCallbackDelegate Delegate;
    private GCHandle _selfHandle;

    public StreamerCallback(Action<string> onStream)
    {
        OnStream = onStream;
        Delegate = new MyCallbackDelegate(CallbackWrapper);
        _selfHandle = GCHandle.Alloc(this);
    }

    public IntPtr ToNativePtr()
    {
        var native = new streamer_callback
        {
            callback_func = Delegate,
            args = GCHandle.ToIntPtr(_selfHandle)
        };

        IntPtr ptr = Marshal.AllocHGlobal(Marshal.SizeOf<streamer_callback>());
        Marshal.StructureToPtr(native, ptr, false);
        return ptr;
    }

    public void Dispose()
    {
        if (_selfHandle.IsAllocated)
            _selfHandle.Free();
    }

    private ov_genai_streamming_status_e CallbackWrapper(IntPtr str, IntPtr args)
    {
        string content = Marshal.PtrToStringAnsi(str) ?? string.Empty;

        if (args != IntPtr.Zero)
        {
            var handle = GCHandle.FromIntPtr(args);
            if (handle.Target is StreamerCallback self)
            {
                self.OnStream?.Invoke(content);
            }
        }

        return ov_genai_streamming_status_e.OV_GENAI_STREAMMING_STATUS_RUNNING;
    }
}
Then We implemented the GenerateStream method in class LLMPipeline.
 public void GenerateStream(string input, GenerationConfig config, StreamerCallback? callback = null)
 {
     IntPtr configPtr = config.GetNativePointer();
     IntPtr decodedPtr;// placeholder

     IntPtr streamerPtr = IntPtr.Zero;

     if (callback != null)
     {
         streamerPtr = callback.ToNativePtr();
     }

     var status = NativeMethods.ov_genai_llm_pipeline_generate(
         _nativePtr,
         input,
         configPtr,
         streamerPtr,
         out decodedPtr
     );

     if (streamerPtr != IntPtr.Zero)
         Marshal.FreeHGlobal(streamerPtr);

     callback?.Dispose();

     if (status != ov_status_e.OK)
     {
         Console.WriteLine($"Error: {status} during generation.");
         throw new Exception("Failed to generate results.");
     }
     return;
 }
We use the following code to invoke our callback and GenerateStream.
pipeline.StartChat(); // Start chat with keeping history in kv cache.

Console.WriteLine("question:");
while (true)
{
    string? input = Console.ReadLine();
    if (string.IsNullOrWhiteSpace(input)) break;

    using var streamerCallback = new StreamerCallback((string chunk) =>
    {
        Console.Write(chunk);
    });

    pipeline.GenerateStream(input, generationConfig, streamerCallback);

    input = null;
    Console.WriteLine("\n----------\nquestion:");
}

pipeline.FinishChat(); // Finish chat and clear history in kv cache.
About Deployment
We can directly download the OpenVINO official release of the LLM's IR from Hugging Face using this link.
git clone https://huggingface.co/OpenVINO/Phi-3.5-mini-instruct-int8-ov
The OpenVINO.GenAI 2025.1 package can be downloaded via this link.
The C# project directly depends on openvino_genai_c.dll, which in turn has transitive dependencies on other toolkit-related DLLs, including Intel TBB libraries.
To ensure proper runtime behavior, all the DLLs delivered with OpenVINO.GenAI — including openvino_genai_c.dll and its dependencies — are bundled and treated as part of the C# project’s runtime dependencies.
We use the following cmd commands to download the genai package and copy all the required dependent DLLs to the directory containing the *.csproj file.
curl -O https://storage.openvinotoolkit.org/repositories/openvino_genai/packages/2025.1/windows/openvino_genai_windows_2025.1.0.0_x86_64.zip
tar -xzvf openvino_genai_windows_2025.1.0.0_x86_64.zip
xcopy /y openvino_genai_windows_2025.1.0.0_x86_64\runtime\bin\intel64\Release\*.dll "C:\path\to\ChatSample\"
xcopy /y openvino_genai_windows_2025.1.0.0_x86_64\runtime\3rdparty\tbb\bin\*.dll "C:\path\to\ChatSample\"
Full Implementation
Please refer to https://github.com/apinge/openvino_ai_practice/tree/main/ov_genai_interop/ov_genai_interop_net, to access the full implementation.
Optimizing MeloTTS for AIPC Deployment with OpenVINO: A Lightweight Text-to-Speech Solution
Authors : Qiu Tong, Zhao Hongbo
MeloTTS released by MyShell.ai, is a high-quality, multilingual Text-to-Speech (TTS) library that supports English, Chinese (mixed English), and various other languages. The strengths of the model lie in its lightweight design, which is well-suited for applications on AIPC systems, coupled with its impressive performance. In this article, I will guide you through the process of converting the model to be compatible with OpenVINO toolkits, enabling it to run on various devices such as CPUs, GPUs and NPUs. Additionally, I will provide a concise overview of the model's inference procedure.
Overview of Model Inference Procedure and Pipeline
For each language type, the pipeline requires only two models (two inference procedures). For instance, English language generation necessitates just the 'bert-base-uncased' model and its corresponding MeloTTS-English. Similarly, for Chinese language generation (which includes mixed English), the pipeline needs only the 'bert-base-multilingual-uncased' and MeloTTS-Chinese. This greatly streamlines the pipeline compared to other TTS frameworks, and the compact size of the models makes them suitable for deployment on edge devices.
MeloTTS is based on Variational Inference with adversarial learning for end-to-end Text-to-Speech (VITS). The inference process is illustrated in the figure. It encompasses a text encoder, a stochastic duration predictor, a decoder.
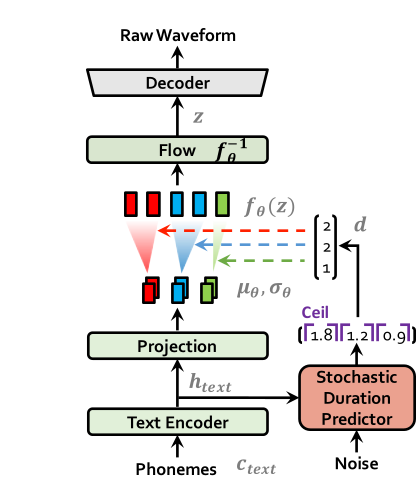
The text encoder accepts phones, tones and a hidden layer from a BERT model as input. It then produces the text encoder's output along with its mean value and a logarithmic variance. To align the input texts with the target speech, the outputs from the encoders are processed using a stochastic duration predictor, which generates an alignment matrix. This matrix is then used to expand the mean value and a logarithmic variance (assuming a Gaussian distribution) to obtain the results for the latent variables .Subsequently, the inverse flow transformation is applied to obtain the distribution of final latent variable z, which represents the spectrogram. In the decoder, by upsampling the spectrogram, the final audio waveform is obtained.
def ov_infer(self, phones=None, phones_length=None, speaker_id=None, tones=None, lang_ids=None, bert=None, ja_bert=None, sdp_ratio=0.2, noise_scale=0.6, noise_scale_w=0.8, speed=1.0):
The inference entry is the function. In practical inference, phone refers to the distinct speech sounds, while tone refers to the vocal pitch contour. For Chinese, a phone corresponds to pinyin, and a tone corresponds to one of the four tones. In English, phones are the consonants and vowels, and tones relate to stress patterns. Here, noise_scale and noise_scale_w do not refer to actual noise. Both noise_scale_w and noise_scale are components within the Stochastic Duration Predictor, used to introduce randomness in order to enhance the expressiveness of the model.
Note that MeloTTS does not include a voice cloning component, unlike the majority of other TTS models, which makes it more lightweight. If voice cloning is required, please refer to OpenVoice.
Enable Model for OpenVINO
As previously mentioned, the pipeline requires just two models for each language. Taking English as an example, we must first convert both 'bert-base-uncased' and 'MeloTTS-English' into the OpenVINO IR format.
        example_input={
                "x": x_tst,
                "x_lengths": x_tst_lengths,
                "sid": speakers,
                "tone": tones,
                "language": lang_ids,
                "bert": bert,
                "ja_bert": ja_bert,
                "noise_scale": noise_scale,
                "length_scale": length_scale,
                "noise_scale_w": noise_scale_w,
                "sdp_ratio": sdp_ratio,
            }

        ov_model = ov.convert_model(
            self.model,
            example_input=example_input,
        )
        get_input_names = lambda: ["phones", "phones_length", "speakers",
                                  "tones", "lang_ids", "bert", "ja_bert",
                                  "noise_scale", "length_scale", "noise_scale_w", "sdp_ratio"]
        for input, input_name in zip(ov_model.inputs, get_input_names()):
            input.get_tensor().set_names({input_name})
        outputs_name = ['audio']
        for output, output_name in zip(ov_model.outputs, outputs_name):
            output.get_tensor().set_names({output_name})
        """
        reshape model
        Set the batch size of all input tensors to 1
        """
        shapes = {}
        for input_layer  in ov_model.inputs:
            shapes[input_layer] = input_layer.partial_shape
            shapes[input_layer][0] = 1
        ov_model.reshape(shapes)

        ov.save_model(ov_model, Path(ov_model_path))
For instance, we convert the MeloTTS-English model from the pytorch format directly by utilizing the openvino.convert_model API along with pseudo input data.
Note that the input and output layers (it is optional) are renamed to facilitate subsequent development. Furthermore, the batch dimension for all inputs is fixed at 1, as multiple batches are not required here (this is also optional).
We further quantized both the BERT and TTS models to int8 using pseudo data. We observed that our method of quantizing the TTS model introduces a slight distortion to the current sound. To suppress this, we implemented DeepFilterNet, which is also very lightweight.
More about model conversion and int8 quantization please refer to MeloTTS-OV .
Run BERT part on NPU
To enhance performance and reduce CPU offloading, we can shift the execution of the BERT model to the NPU on Meteor Lake.
To adapt the model for the NPU, we've converted the model to accept static shape inputs a and pad each input during inference.
def reshape_for_npu(model, bert_static_shape = 32):
        # change dynamic shape to static shape
        shapes = dict()
        for input_layer  in model.inputs:
            shapes[input_layer] = bert_static_shape
        model.reshape(shapes)
        ov.save_model(model, Path(ov_model_save_path))
        print(f"save static model in {Path(ov_model_save_path)}")

def main():
    core = Core()
    model = core.read_model(ov_model_path)
    reshape_for_npu(model, bert_static_shape=bert_static_shape)
Simple Demo
Here are the audio files generated by the int8 quantized model from OpenVINO.
https://github.com/zhaohb/MeloTTS-OV/tree/speech-enhancement-and-npu/demo
Encrypt Your Dataset and Train Your Model with It Directly
Encrypt Your Dataset and Train Your Model with It Directly

Introduction
When we deal with dataset for creating AI models, we need to consider sensitive information managed and stored online in the cloud or on connected devices. Unsecured datasets can be vulnerable to unauthorized access, theft, and misuse, particularly when processed for machine learning workloads. Certain fields, such as industrial or medical sectors, face exceptionally high risks when their data is exposed to these potential threats. For example, if a dataset used to train a detection model for identifying factory process errors is leaked, it can expose sensitive factory process technology. This highlights the importance of safeguarding datasets at every stage, from data storage to model training.
Dataset Management Framework (Datumaro) offers a dataset encryption feature for AI model training. With Datumaro, you can encrypt datasets of any computer vision data format into the DatumaroBinary format. This encrypted dataset can remain encrypted as far as it is needed for decryption. By combining the encrypted dataset with OpenVINO training extensions™, you can use it directly for model training without decryption. Whenever needed, you can use Datumaro once again to decrypt the dataset and convert it back to any major computer vision data format, such as VOC, COCO, or YOLO. Please refer to another posting data_convert for data convert.
Encrypt Your Dataset Using Datumaro
Datumaro provides two ways to encrypt a dataset: CLI and Python API. First, you need to install Datumaro on your system. Please refer to the installation guide here for detailed instructions. Once you have completed the installation of Datumaro, let's first look at the CLI usage. You can encrypt a dataset using the datum convert CLI command as follows:
The necessary user inputs for this command are as follows:
- -i <input-dataset-path>: Enter the path to the dataset you want to encrypt in <input-dataset-path>.
- -o <output-dataset-path>: Enter the path where the encrypted dataset will be produced in <output-dataset-path>.
NOTE:: (Optional) You can additionally specify the data format of your input dataset by entering the -if <input-dataset-format> argument. In most cases, Datumaro can automatically infer the data format of the input dataset, but it might fail. In such cases, you can use the datum detect --show-rejections <input-dataset-path> command to identify the cause of the failure while inferring the data format.
NOTE:: The --save-media argument is a flag that allows you to convert your media files (e.g., images) as well. If this argument is not provided, the encrypted media will not be included in the output directory and only the encrypted annotations are included in the output directory.
Next, let's take a look at how to encrypt a dataset using the Python API. Please examine the following code snippet:
You import the dataset by specifying the path of the input dataset in the import_from function as path="<input-dataset-path>". Then, to export the dataset, you specify the path of the output dataset in the save_dir="<output-dataset-path>" of the export function. Similarly, you also need to provide the encryption=True and format="datumaro_binary" keyword arguments as in the CLI example. A more detailed end-to-end example for this can be found in a Jupyter notebook. Please refer to this link for more information.
So far, all the examples have used the datumaro_binary (DatumaroBinary) format for the exported dataset. Currently, the dataset encryption feature is only supported for the datumaro_binary format. DatumaroBinary is a Datumaro's own data format that stores annotation data in binary representation. It is much faster and storage efficient compared to string-based datasets such as COCO based on JSON. For more detailed information about DatumaroBinary, please refer to this link.
How Datumaro Encrypts Your Dataset?
Datumaro uses the Fernet symmetric encryption recipe provided by the cryptography library to encrypt the dataset. Fernet is built on top of a number of standard cryptographic primitives such as AES or HMAC, and hence Fernet guarantees that a message encrypted cannot be manipulated or read without the key. Please refer to this link for detailed information.
When encrypting the dataset, Datumaro generates a secret key through Fernet and saves it as a txt file at the following path: <output-dataset-path>/secret_key.txt. The secret key generated at this path is a 50-characters string, which consists of a randomly generated 32-bytes string encoded in base64, with the prefix datum- added.
If you have checked the secret key in this file, you must ensure that it is not in the same location with the dataset. If this secret key is uncovered, an attacker would be able to access the contents of the encrypted dataset. Additionally, this secret key is required when training models using OpenVINO training extensions™ with the encrypted dataset or when decrypting it later. Therefore, you should be careful not to lose this secret key.
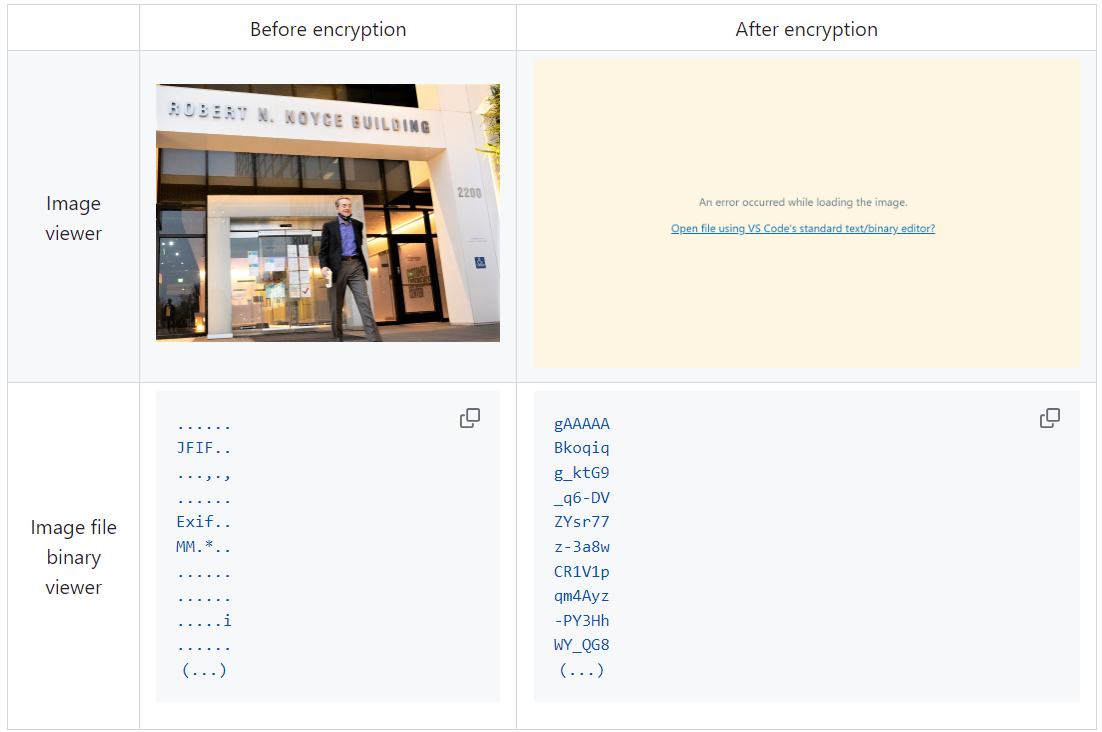
The following table briefly shows how the data is encrypted. The binary representation of the data is encrypted, so that the following image cannot be seen by the image viewer.
Train Your Model with the Encrypted Dataset Using OpenVINO Training Extensions™
OpenVINO training extensions™ is a tool that allows convenient training of computer vision models and accelerated inference on Intel® devices by exporting trained models to OpenVINO Intermediate Representation (IR) through a CLI. Within the OpenVINO ecosystem, Datumaro is integrated with OpenVINO training extensions™ as a dataset interface. Therefore, the encrypted dataset can be directly used for model training through OpenVINO training extensions™. For detailed installation instructions of OpenVINO training extensions™, please refer to the following link.
Next, let's explore how to use the encrypted dataset directly for model training through the CLI command.
The user inputs required for this command are as follows:
- --train-data-roots <encrypted-dataset-path> and --val-data-roots <encrypted-dataset-path>: Specify the path to the encrypted dataset by replacing <encrypted-dataset-path>. Since the DatumaroBinary format uses the same root directory for both the training and validation subsets, both arguments should have the same value.
- --encryption-key <secret-key>: Provide the secret key corresponding to the encrypted dataset in <secret-key>. This is the 50-character string with the datum- prefix described in the previous section.
NOTE:: <template> is the name of the model template provided by OpenVINO training extensions™. A model template is a recipe for a deep learning model for a specific computer vision task. To explore all the model templates supported by OpenVINO training extensions™, you can use the otx find CLI command or refer to this link.
Decrypt the Encrypted Dataset Using Datumaro
If you want to utilize the encrypted dataset in another AI workload, you need to decrypt the encrypted data. This process reverses the dataset encryption using Datumaro, and encryption-decryption preserves all the information without loss. Similar to the previous section, decryption can be done using the CLI or Python API. Let's first look at decryption using the CLI.
You can use the same datum convert command as before. However, specify the path to the encrypted dataset as the input dataset path (-i <encrypted-dataset-path>), and provide the secret key, which is a 50-character string with the datum- prefix described in the previous section, as the <secret-key> argument for --encryption-key <secret-key>. Additionally, you can choose any data format supported by Datumaro as the output data format. To learn more about the data formats supported by Datumaro, refer to this link.
Next, let's see how decryption can be done using Python API.
Similar to the CLI method, provide the path to the encrypted dataset and the secret key as arguments to the import_from function. For the export function, specify the output dataset path and the output data format.
Conclusion
This post introduced dataset encryption feature provided by Datumaro. It demonstrated how to encrypt a dataset using Datumaro and train a model with the encrypted dataset using OpenVINO training extensions™. Whenever needed you can decrypt it with Datumaro for other AI projects and training frameworks. You can refer to the end-to-end Jupyter notebook example provided on this blog post here for step-by-step guide. The features introduced in this post are available in Datumaro version 1.4.0 or higher and OpenVINO training extensions™ version 1.4.0 or higher.
Datumaro offers a range of useful features for managing datasets besides the dataset encryption feature. You can find examples of other Datumaro features, such as noisy label detection during training with OpenVINO training extensions™, in the Jupyter examples directory. For more information about Datumaro and its capabilities, you can visit the Datumaro documentation page. If you have any questions or requests about using Datumaro, feel free to open an issue here.
Make Your Own YOLOv8 OpenVINO™ Model from Any Data Format with Datumaro
Authors: Vinnam Kim, Wonju Lee, Mark Byun, Minje Park
Introduction
OpenVINO™ provides an easy way to deploy your model with the best inference performance on any Intel hardwares. However, to train your own model for deployment you need to prepare a training framework and dataset. Fortunately, there are many ready-to-use training frameworks and implementations. Then, what about the dataset? A specific training framework requires a specific data format, but there are many data formats in the world. For example, in object detection tasks there are data formats such as YOLO, COCO, and Pascal VOC that are widely used. These formats have different directory structures and annotation file formats as well as different extensions such as txt, json, and, xml, respectively. It's tedious task to convert dataset from one format to another whenever you adopt different training framework.
Let's assume you choose Detectron2, which only supports COCO format datasets. If your dataset is formatted as VOC, you have to convert it into COCO format. Below, we compare the directory structures and annotation file formats of both datasets, VOC and COCO. These datasets have distinct formats and you need to implement codes for format conversion at each time of handling different formats. Of course, this is not technically challenging but this may require tedious code work and debugging for several days. It won't be good to repeat this process if you intend to add more datasets with different formats.
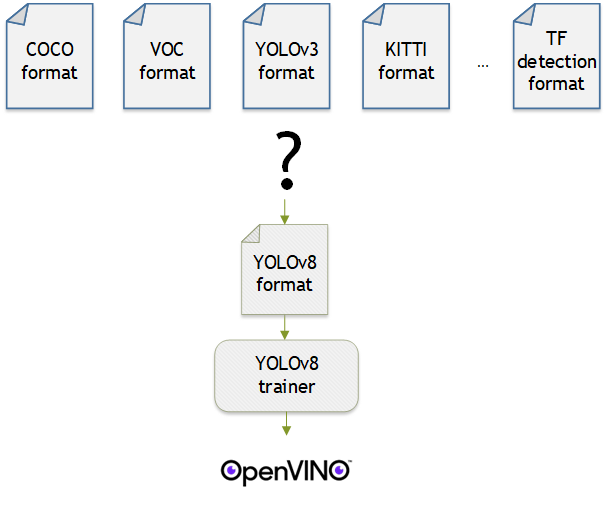
Dataset Management Framework (Datumaro) is a framework that provides Python API and CLI tools to convert, transform, and analyze datasets. Among the many features of Datumaro, we would like to introduce the data format conversion feature on this blog, which is one of the fundamental feature for handling many datasets with different training frameworks. Datumaro supports the import and export of over 40 computer vision data formats (please take a look at supported formats for details!). This means that you can easily change your data format through Datumaro. If your model training framework can only read specific formats, don't worry. Use Datumaro and convert it!
Train YOLOv8 model and export it to OpenVINO™ model
- Prepare dataset
- Convert dataset with Datumaro
- Train with YOLOv8 and export to OpenVINO™ IR
YOLOv8 is a well-known model training framework for object detection and tracking, instance segmentation, image classification, and pose estimation tasks. It provides simple CLI commands to train, test, and export a model to OpenVINO™ Intermediate Representation (IR). However, the data format consumed by YOLOv8 is slightly different from the YOLO format itself. Datumaro named it refers to it as YOLO-Ultralytics format. As you can see here, it requires a special meta file to indicate annotation files for each subset and subset files to list subset image files. It further requires them to be placed in an appropriate directory structure. It can be very tedious to go through these details and implement dataset preprocessing when you want to train a model on your custom dataset.
On this blog, we provide an end-to-end example that covers the complete process of converting your dataset, training a model with the converted dataset, and exporting the trained model to OpenVINO™ IR. We understand that dataset conversion can be a tricky process, especially if you have annotated and built your own dataset. Therefore, we will provide an example of converting the dataset created by the popular CVAT annotation tool. By following our step-by-step guide, you will be able to convert your data format easily and accelerate the inference of your trained model with OpenVINO™.
Prepare dataset
In this section, we introduce the steps to export the project annotated by CVAT for the following workflows. You can skip this section if your dataset is formatted as a different data format and is ready to be imported by Datumaro.
NOTE: We used the cats-and-dogs dataset for this example. You can find the reference for this dataset here.
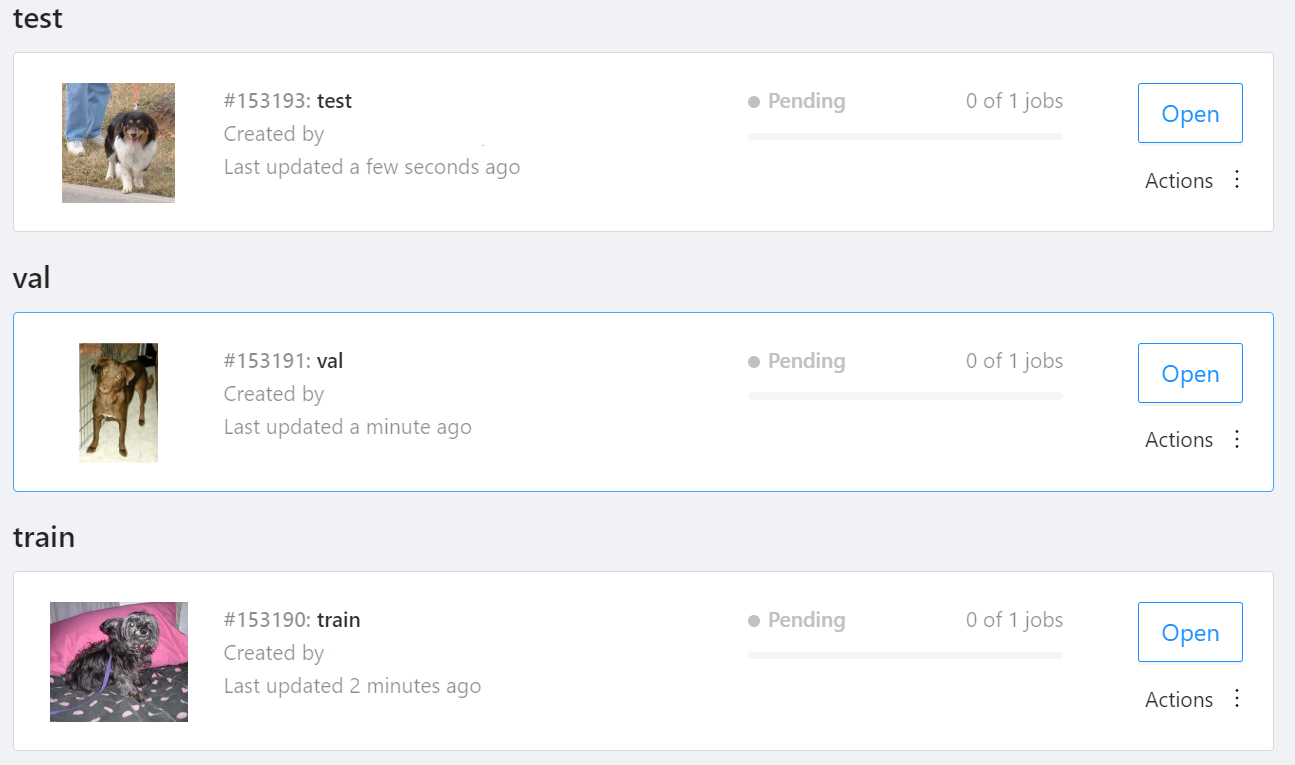
NOTE: You should have three subsets in your project: "train", "val", and "test" (optional). If your dataset has different subset names, you have to rename them. You can do this by using Datumaro's MapSubsets transform.
We export this project to CVAT for images 1.1 data format. Datumaro can import this data format and export it to YOLO-Ultralytics format which can be consumed by YOLOv8.
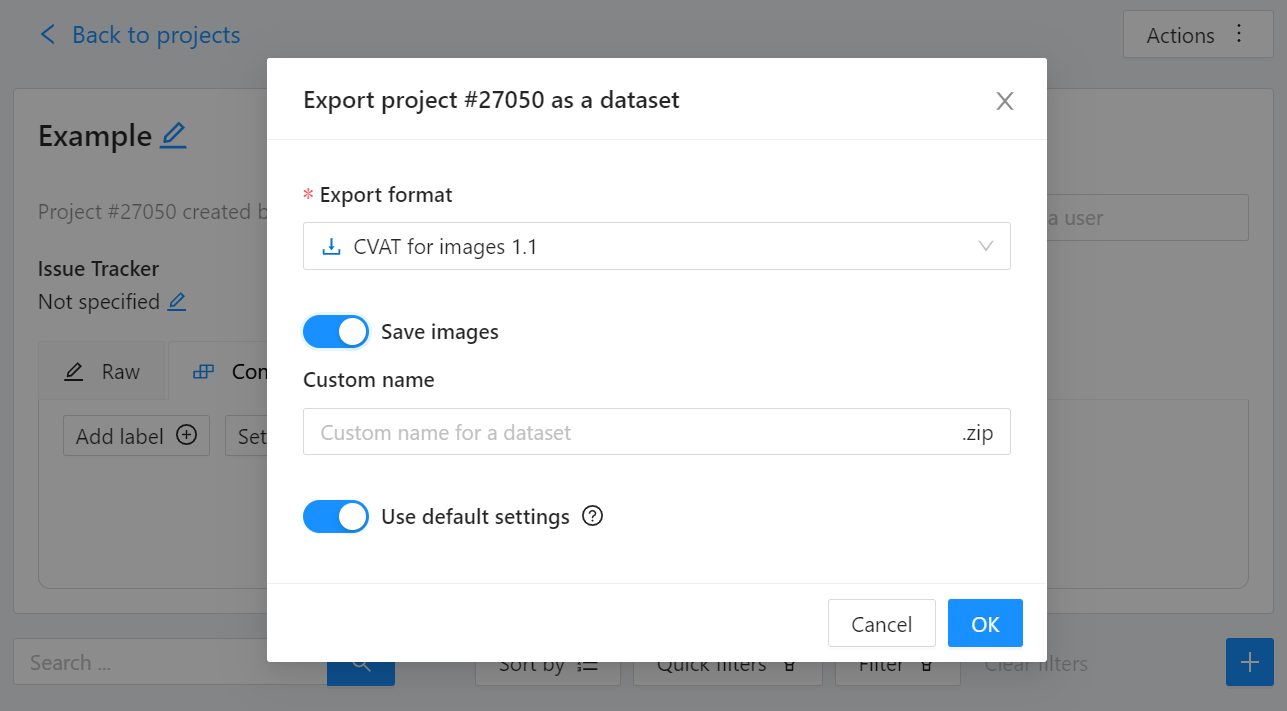
Export CVAT project to CVAT for images 1.1 data format. After exporting the dataset, extract it to the cvat_dataset directory.
You can see the following directory structure:
Convert your dataset using Datumaro
You can convert the dataset located in cvat_dataset using Datumaro's CLI command as follows. For a detailed explanation of the input arguments, see here.
NOTE: If your dataset is not CVAT for images 1.1 format, you can replace -if cvat with the different input format as -if INPUT_FORMAT. Use datum detect CLI command to figure out what format your dataset is.
After the conversion, you can see that yolo_v8_dataset directory is created.
This directory is structured as follows.
Train with YOLOv8 Trainer and Export to OpenVINO™ IR
In this section, we will train the YOLOv8 detector with the dataset converted in the previous section. To train a YOLOv8 detector, please execute the following command.
NOTE: We use data=$(realpath yolo_v8_dataset/data.yaml) to convert the relative path yolo_v8_dataset/data.yaml to the absolute path. This is because YOLOv8 needs the absolute path for the custom dataset.
After the training, the following command enables testing on the test dataset.
Lastly, we will export your YOLOv8 detector to OpenVINO™ IR for inference acceleration on Intel devices.
Using this command, the exported IR is created at this directory path, my-project/train/weights/best_openvino_model.
Conclusion
This post provided an example of training a YOLOv8 detector on an arbitrary data format by utilizing the data format conversion feature of Datumaro and exporting the model to OpenVINO™ IR. You can refer to the executable Jupyter notebook example provided on this blog post here for step-by-step guide. Datumaro offers a range of useful features for managing datasets beyond data format conversion. You can find examples of other Datumaro features, such as noisy label detection during training with OpenVINO™ Training Extensions, in the Jupyter examples directory. For more information about Datumaro and its capabilities, you can visit the Datumaro documentation page. If you have any questions or requests about using Datumaro, feel free to open an issue here.
OpenVINO™ optimize Fairseq S2T model
OpenVINO™ Optimize Fairseq S2T Model
Introduction
Fairseq is a sequence modeling toolkit that allows researchers and developers to train custom models for translation, summarization, language modeling and other text generation tasks.
There are 2 steps to generate model ready for OpenVINO™ acceleration:
1. Use torch.export.onnx function convert the “.pt” model to “.onnx” model;
2. Use OpenVINO™ MO toolkit convert the “.onnx” model to “IR” model.
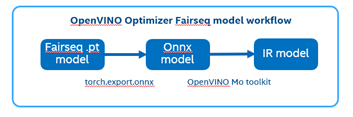
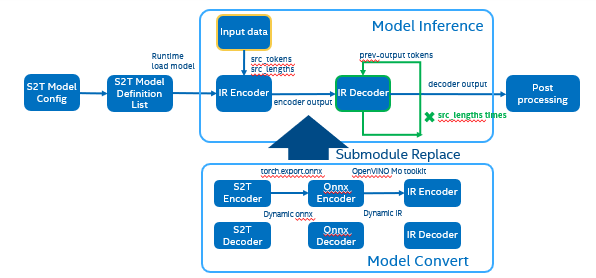
The following graph is the Fairseq framework inference workflow, it defines the model structure by “Model Config”, composes “Model Definition List” through multiple subgraph models, and dynamically loads the submodules in the model inference runtime.
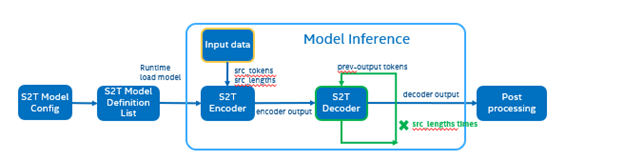
Such as in the S2T task, model consists of two parts: Encoder and Decoder.
· Encoder is for extracting feature information from audio file.
· Decoder is for decoding the feature information to generate text information.
Fairseq Inference workflow
The length of audio information will affect the length of the feature information, and the length of the feature information will affect the Decoder submodule loop’s times. Therefore, the structure of the S2T model is dynamically defined according to the length of the input audio.
To optimize Fairseq framework model there’re 4 challenges need to be solved:
- Fairseq define submodules for various function, include variable in model layer define.
- Model structure is dynamically loaded in runtime and can’t export a whole torch model graph.
- Encoder and Decoder part models’ input shapes are dynamic, depending on input data size.
- Decoder part loop times depends by input sequence lengths.
OpenVINO™ optimize Fairseq workflow
So that we should use some optimization tricks to solve these problems, to make sure the pipeline optimized by OpenVINO™.
- Divide model into Encoder and Decoder two parts, and separately export to onnx model,
- Because of the model structure define by input seq_len, should export dynamic shape onnx model.
- Convert onnx to IR model by OpenVINO™ MO toolkit.
- Replace the Fairseq S2T task pipeline Encoder and Decoder into IR model.
- Loading Inference Engine to run pipeline the pipeline on OpenVINO™.
Requirement
- Fairseq is a sequence modeling toolkit that allows researchers and developers to train custom models for translation, summarization, language modeling and other text generation tasks
- OpenVINO™ is an open-source toolkit for optimizing and deploying AI inference which can boost deep learning performance in computer vision, automatic speech recognition, natural language processing and other common task.
- Python version >=3.8
- PyTorch version >=1.10.0
Reference: GitHub: Fairseq-OpenVINO
Quick Start Demo
Step 1. Install fairseq and requirement
#Install OpenVINO™
Reference: Install OpenVINO by source code for Linux
Reference: Install OpenVINO by release package
Step 2. Download audio file and pre-train model file
In this blog we refer the “S2T Example: STon CoVoST” as sample, Preparation dataset and pre-train model can follow the Fairseq original step. Also, you can use “torch audio” to convert audio file to build customer dataset.
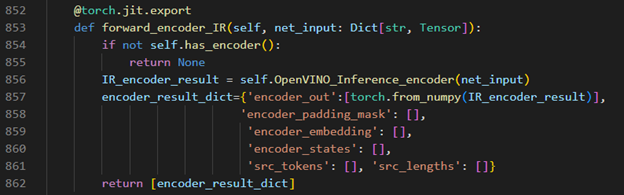
Step 3. Modify code to export onnx
Torch model export to onnx, We should adjust the contents in fairseq/sequence_generator.py +781 line "self.save_onnx = True" , +782 line "self.openvino_engine = False" The encoder.onnx and decoder.onnx will save in models
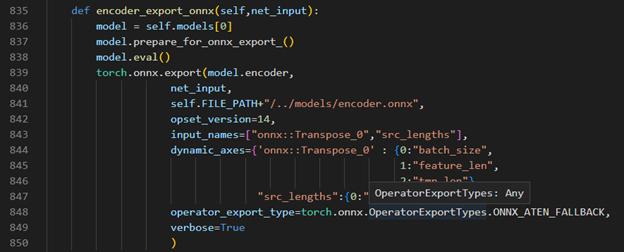
Encoder part model export to dynamic onnx
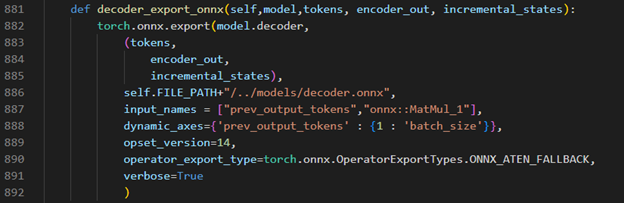
Decoder part model export to dynamic onnx
Step 4. Convert Model to IR
Convert encoder.onnx and decoder.onnx to encoder.xml and decoder.xml
Step 5. OpenVINO™ Inference Engine optimize S2T pipeline
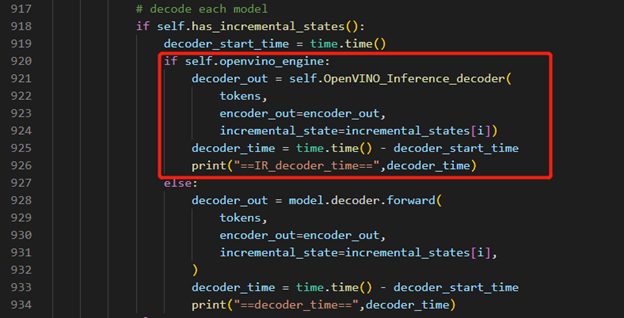
OpenVINO™ Inference S2T pipeline We should adjust the contents in fairseq/sequence_generator.py +781 line "self.save_onnx = False" , +782 line "self.openvino_engine =True" Use the converted the model to run OpenVINO™ Inference S2T pipeline.
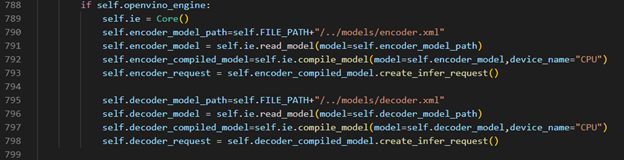
OpenVINO™ Inference Engine initialization
Encoder part inference by OpenVINO™

Decoder part inference by OpenVINO™

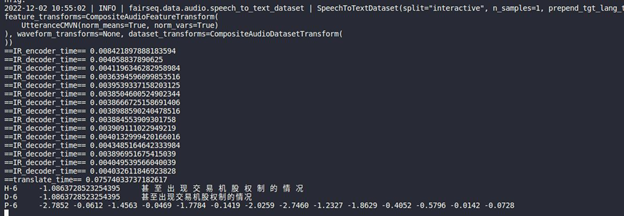
Inference Result
Build OpenVINO on CentOS 7 with Script
Authors: Xiake Sun, Su Yang
We provide a script to help users easily install and test OpenVINO™ on CentOS 7.6. This script is a practice and supplement to the Building OpenVINO™ on CentOS 7 Guide in the OpenVINO™ wiki. The installation of OpenVINO™ 2022.1.0 and 2022.2.0 has been verified under the following eight configurations of CentOS 7.6 (GCC:7.3.1, 8.3.1 and Python: 3.6,3.7, 3.8, 3.9). The script could also be used for the newer version of OpenVINO with some modifications in the future.
CentOS 7 is an open-source server operating system released by the CentOS project. It was officially released on July 7, 2014. CentOS 7 is an enterprise-level Linux distribution, which is redistributed from the free and open-source code of RedHat, and its stability is trustworthy. The CentOS community and RedHat have announced that CentOS 8 will end on December 31, 2021, and CentOS 7 will end on June 30, 2024. Therefore, CentOS 7 is still the mainstream operating system of most cloud platforms.
However, CentOS 7 default GCC 4.8.5 and CMake 2.8.12 does not meet the OpenVINO software requirement for building on a Linux system. Since OpenVINO™ release 2022.1, the binary and python wheel installation packages will not be provided on CentOS 7. To help users with the verification and integration of the OpenVINO™ new version, Here we provide the installation guide and script.
Script Usage
1.Download OpenVINO™ and Script:
2.Usage Example:
3.Script Execution Time:
The environment configuration and dependency library download time are dependent on the network environment and will not be downloaded repeatedly. Compile time depends on the hardware. Every time the script is run, the user needs clean up the previous compilation-related folders (install, build, temp) and recompile.
4.Hints:
Contents
The script steps are similar to the Building OpenVINO™ on CentOS 7 Guide. Here are the contents with some comments. For details, please refer to the script and wiki guide.
0. Install system dependencies setup on CentOS 7.6 and install Anaconda
To test more Python version, we use Anaconda instead of Miniconda. Anaconda silent installation is recommended to avoid manually agreeing to the certificate and restarting bash (the script part is as shown below).
1. Download CMake
Download the pre-built CMake 3.18.4 and add environment variables: no need to change the existing CMake version of the system and no need to compile.
2. Install devtoolset and setup environment
Because CentOS7 was released too early, the default GCC version is 4.8.5, which does not support the compilation of OpenVINO™. Using devtoolset can install a higher version of GCC without changing the system GCC version.
The library Wheel is one of Python dependencies. Wheel 0.37.1 is recommended for OpenVINO 2022.1.0 and 2022.2.0. The higher version of Wheel is not suitable.
3. Build OV with CMake
Create a Python environment with conda and check the name of Python library and header folder.
4. Install Python Wheels
Install the two generated wheels.(runtime and development tool)
5.Model evaluation with benchmark_app and OpenVINO™ CLI usage
Install the specified version of dependencies, for ONNX 1.12 not support python3.6.
Quickly download and convert models from OpenVINO™ Toolkit - Open Model Zoo repository.
C++/Python benchmark_app: The C++ version requires additional compilation, with the Python version by default.
In the end, the script will show the OpenVINO™ usage example as below.
Use Metrics to Scale Model Serving Deployments in Kubernetes
In this blog you will learn how to set up horizontal autoscaling in Kubernetes using inference performance metrics exposed by OpenVINO™ Model Server. This will enable efficient scaling of model serving pods for inference on Intel® CPUs and GPUs.
Why use custom metrics?
OpenVINO™ Model Server provides high performance AI inference on Intel CPUs and GPUs that can be scaled in Kubernetes. However, when it comes to automatic scaling in Kubernetes, the Horizontal Pod Autoscaler by default, relies on CPU utilization and memory usage metrics only. Although resource consumption indicates how busy the application is, it does not clearly say whether serving provides expected quality of service to the clients or not. Since OpenVINO Model Server exposes performance metrics, we can automatically scale based on service quality rather than resource utilization.
The first metric that comes to mind when thinking about service performance is the duration of request processing, otherwise known as latency. For example, mean or median over a specified period or latency percentiles. OpenVINO Model Server provides such metrics but setting autoscaling based on latency requires specific knowledge about each model and the environment where the inference is running in order to properly set thresholds that trigger scaling.
While autoscaling based on latency works and may be a good choice when you have model-specific knowledge, we will instead focus on a more generic metric using ovms_requests_streams_ratio. Let’s dive into what this means.

In the equation above:
- currently_processed_requests - number of inference requests to a model being processed by the service at a given time.
- execution_streams_number – number of execution streams. (When a model is loaded on the device, its computing units are divided into streams. Each stream independently handles inference requests, meaning that the number of streams defines how many inferences can be run on the device in parallel. Note that the more streams there are, the less powerful they are, so we get more throughput at a cost of higher minimal latency / inference time.)
In this equation, for any model exceeding a value of 1 indicates that requests are starting to queue up. Setting the autoscaler threshold for the ovms_requests_streams_ratio metric is somewhat of an arbitrary decision that should be made by a cluster administrator. Setting the threshold too low will result in underutilization of nodes and setting it too high will force the system to work with insufficient resources for extended periods of time. Now that we have chosen a metric for autoscaling, let’s start setting it up.
Deploy Model Server with Autoscaling Metrics
First, we need to create a deployment of OpenVINO Model Server in Kubernetes. To do this, follow instructions to install the OpenVINO Operator in your Kubernetes cluster. Then create a configuration where we can specify the model to be served and enable metrics:
Create ConfigMap:
With the configuration in place, we can deploy OpenVINO Model Server instance:
Create ModelServer resource:
Deploy and Configure Prometheus
Next, we need to read serving metrics and expose them to the Horizontal Pod Autoscaler. To do this we will deploy Prometheus to collect serving metrics and the Prometheus Adapter to expose them to the autoscaler.
Deploy Prometheus Monitoring Tool
Let’s start with Prometheus. In the example below we deploy a simple Prometheus instance via the Prometheus Operator. To deploy the Prometheus Operator, run the following command:
Next, we need to configure role-based access control to give Prometheus permission to access the Kubernetes API:
The last step is to create a Prometheus instance by deploying Prometheus resource:
If the deployment was successful, a Prometheus service should be running on port 9090. You can set up a port forward for this service, enabling access to the web interface via localhost on your machine:
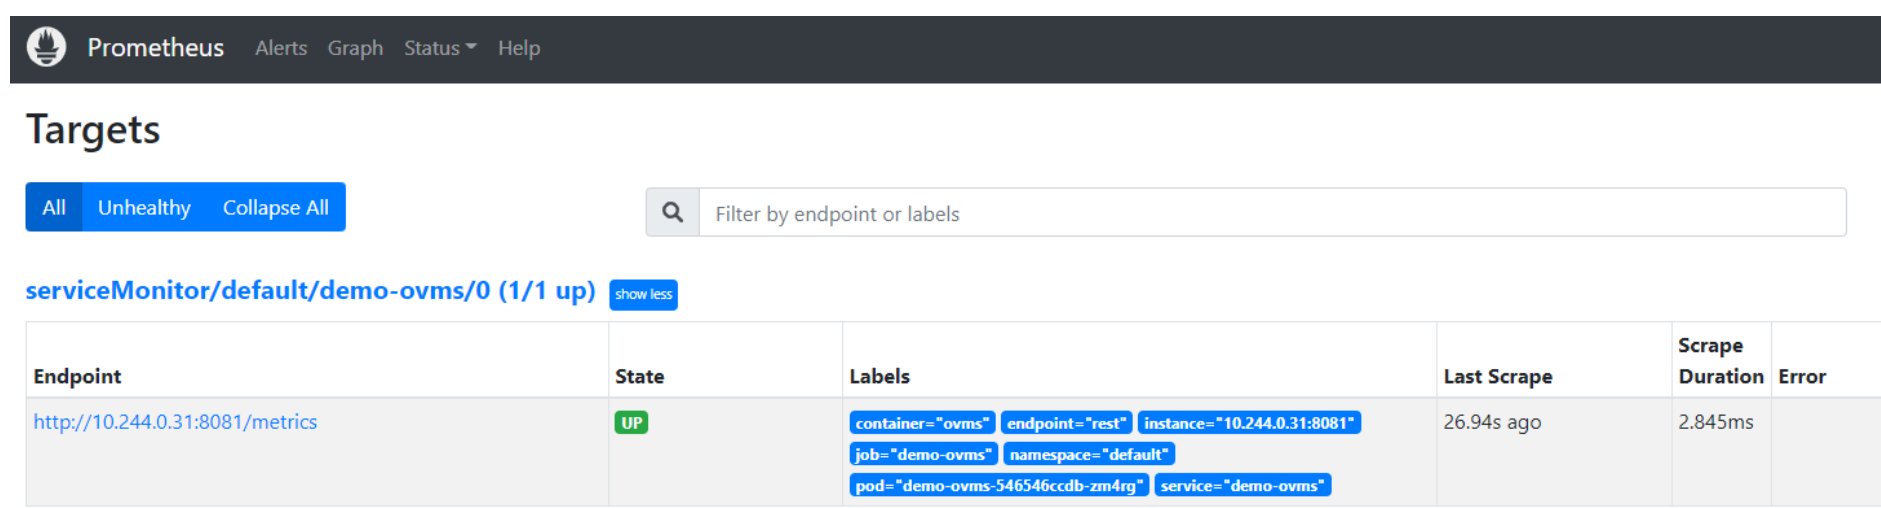
Now, when you open http://localhost:9090 in a browser you should see the Prometheus user interface. Next, we need to expose the Model Server to Prometheus by creating a ServiceMonitor resource:
Once it’s ready, you should see a demo-ovms target in the Prometheus UI:
Now that the metrics are available via Prometheus, we need to expose them to the Horizonal Pod Autoscaler. To do this, we deploy the Prometheus Adapter.
Deploy Prometheus Adapter
Prometheus Adapter can be quickly installed via helm or step-by-step via kubectl. For the sake of simplicity, we will use helm3. Before deploying the adapter, we will prepare a configuration that tells it how to expose the ovms_requests_streams_ratio metric:
Create a ConfigMap:
Now that we have a configuration, we can install the adapter:
Keep checking until custom metrics are available from the API:
Once you see the output above, you can configure the Horizontal Pod Autoscaler to use these metrics.
Set up Horizontal Pod Autoscaler
As mentioned previously, we will set up autoscaling based on the ovms_requests_streams_ratio metric and target an average value of 1. This will try to keep all streams busy all the time while preventing requests from queueing up. We will set minimum and maximum number of replicas to 1 and 3, respectively, and the stabilization window for both upscaling and downscaling to 120 seconds:
Create HorizontalPodAutoscaler:
Once deployed, you can generate some load for your model and see the results. Below you can see how Horizontal Pod Autoscaler scales the number of replicas by checking its status:

This data can also be visualized with a Grafana dashboard:
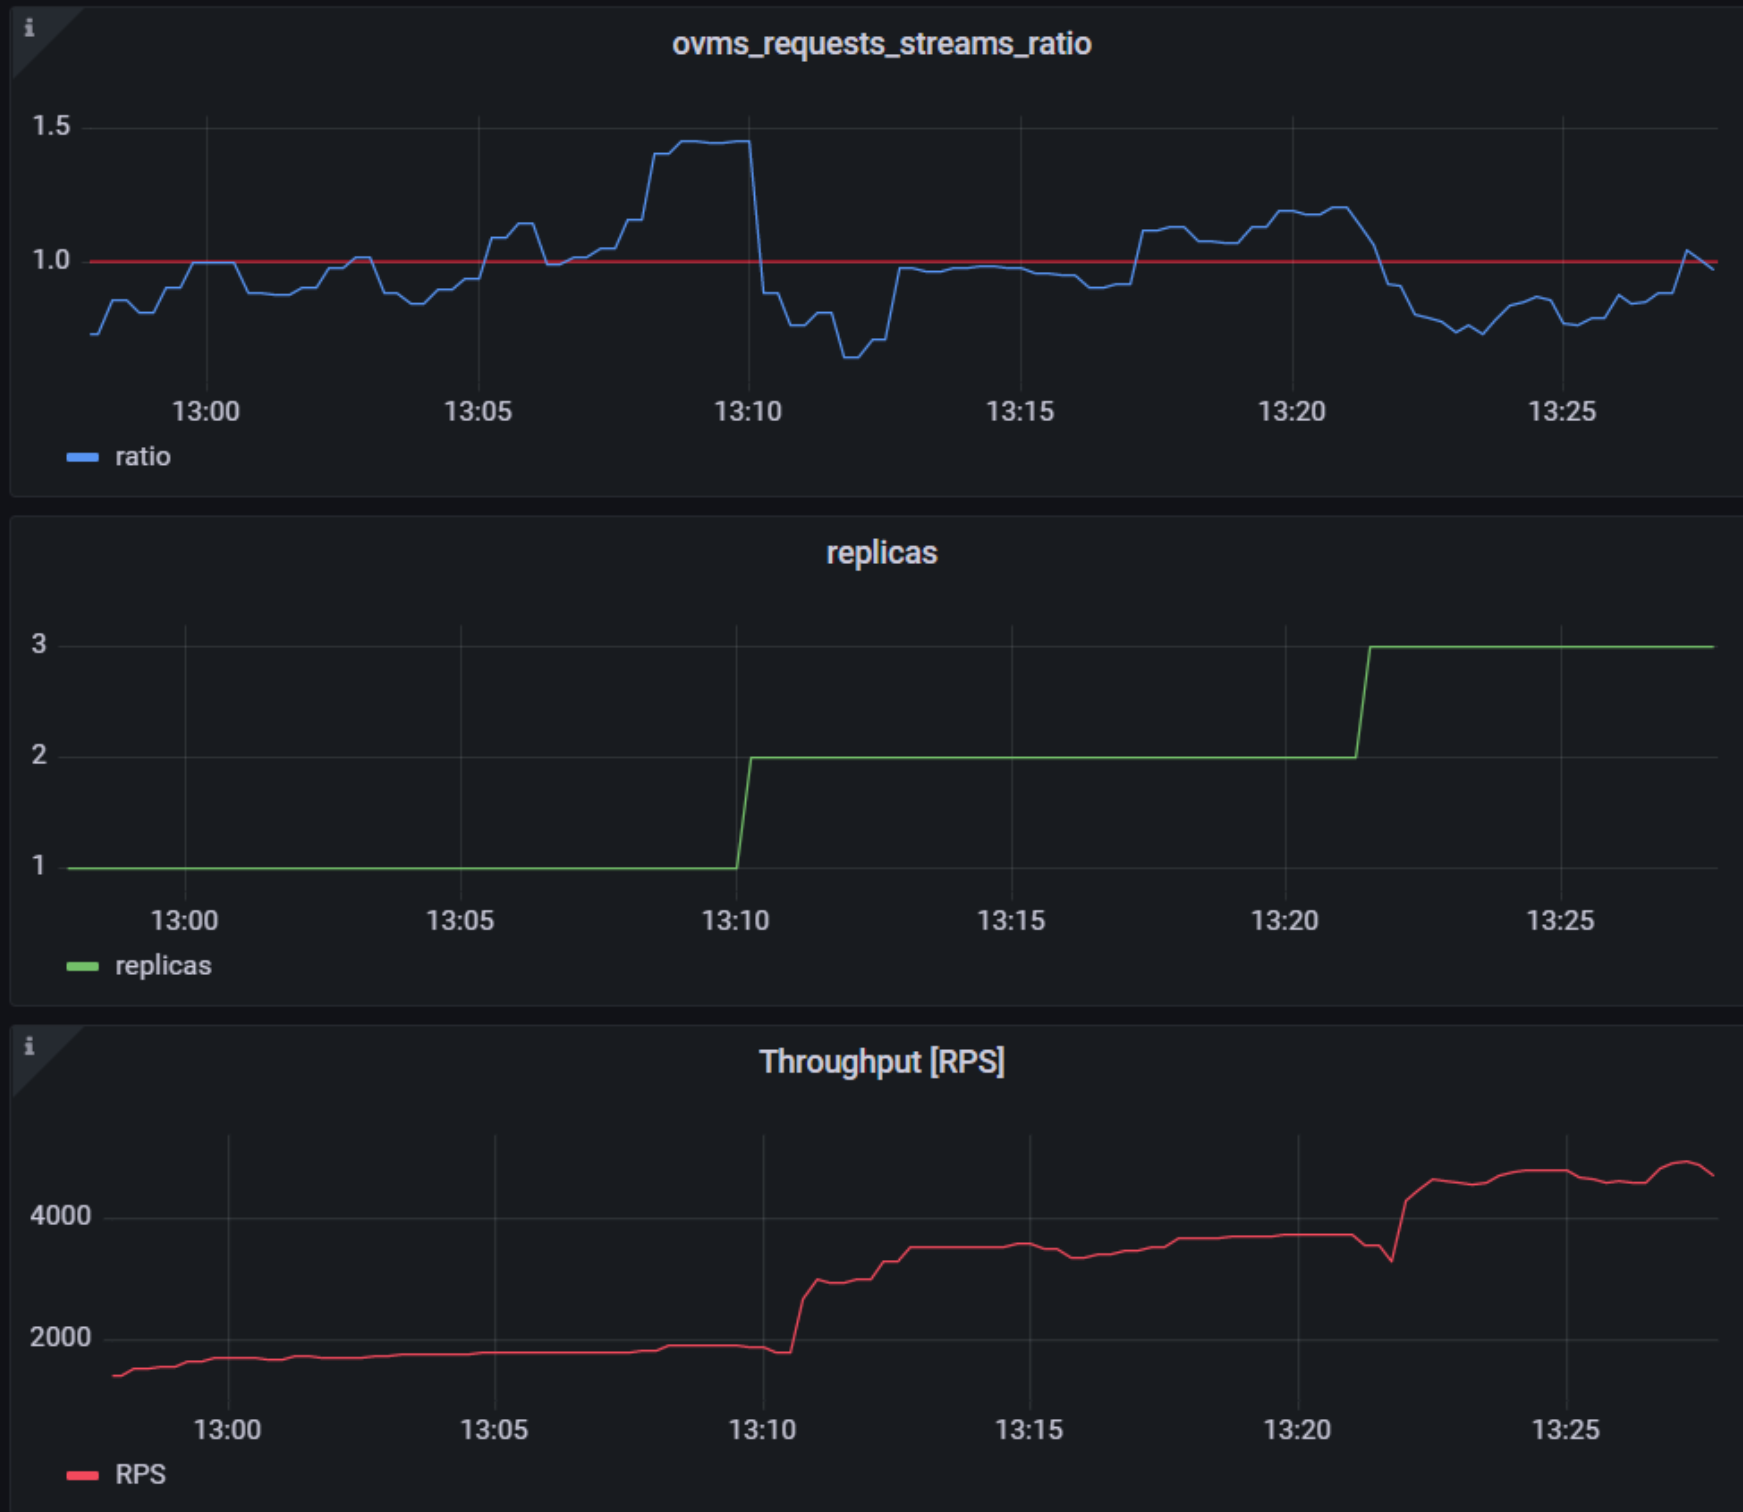
As you can see, with OpenVINO Model Server metrics, you can quickly set up inferencing system with monitoring and autoscaling for any model. Moreover, with custom metrics, you can set up autoscaling for inference on any Intel CPUs and GPUs.
See also:
- Load Balancing OpenVINO Model Server Deployments with Red Hat
- Kubernetes Device Plugin for Intel GPU
- OpenVINO Model Server metrics
Enable ControlNet with Stable Diffusion Pipeline via Optimum-Intel
Authors: Tianmeng Chen, Xiake Sun
Introduction
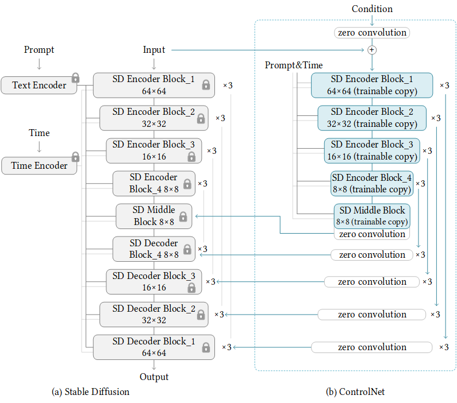
Stable Diffusion is a generative artificial intelligence model that produces unique images from text and image prompts. ControlNet is a neural network that controls image generation in Stable Diffusion by adding extra conditions. The specific structure of Stable Diffusion + ControlNet is shown below:
In many cases, ControlNet is used in conjunction with other models or frameworks, such as OpenPose, Canny, Line Art, Depth, etc. An example of Stable Diffusion + ControlNet + OpenPose:
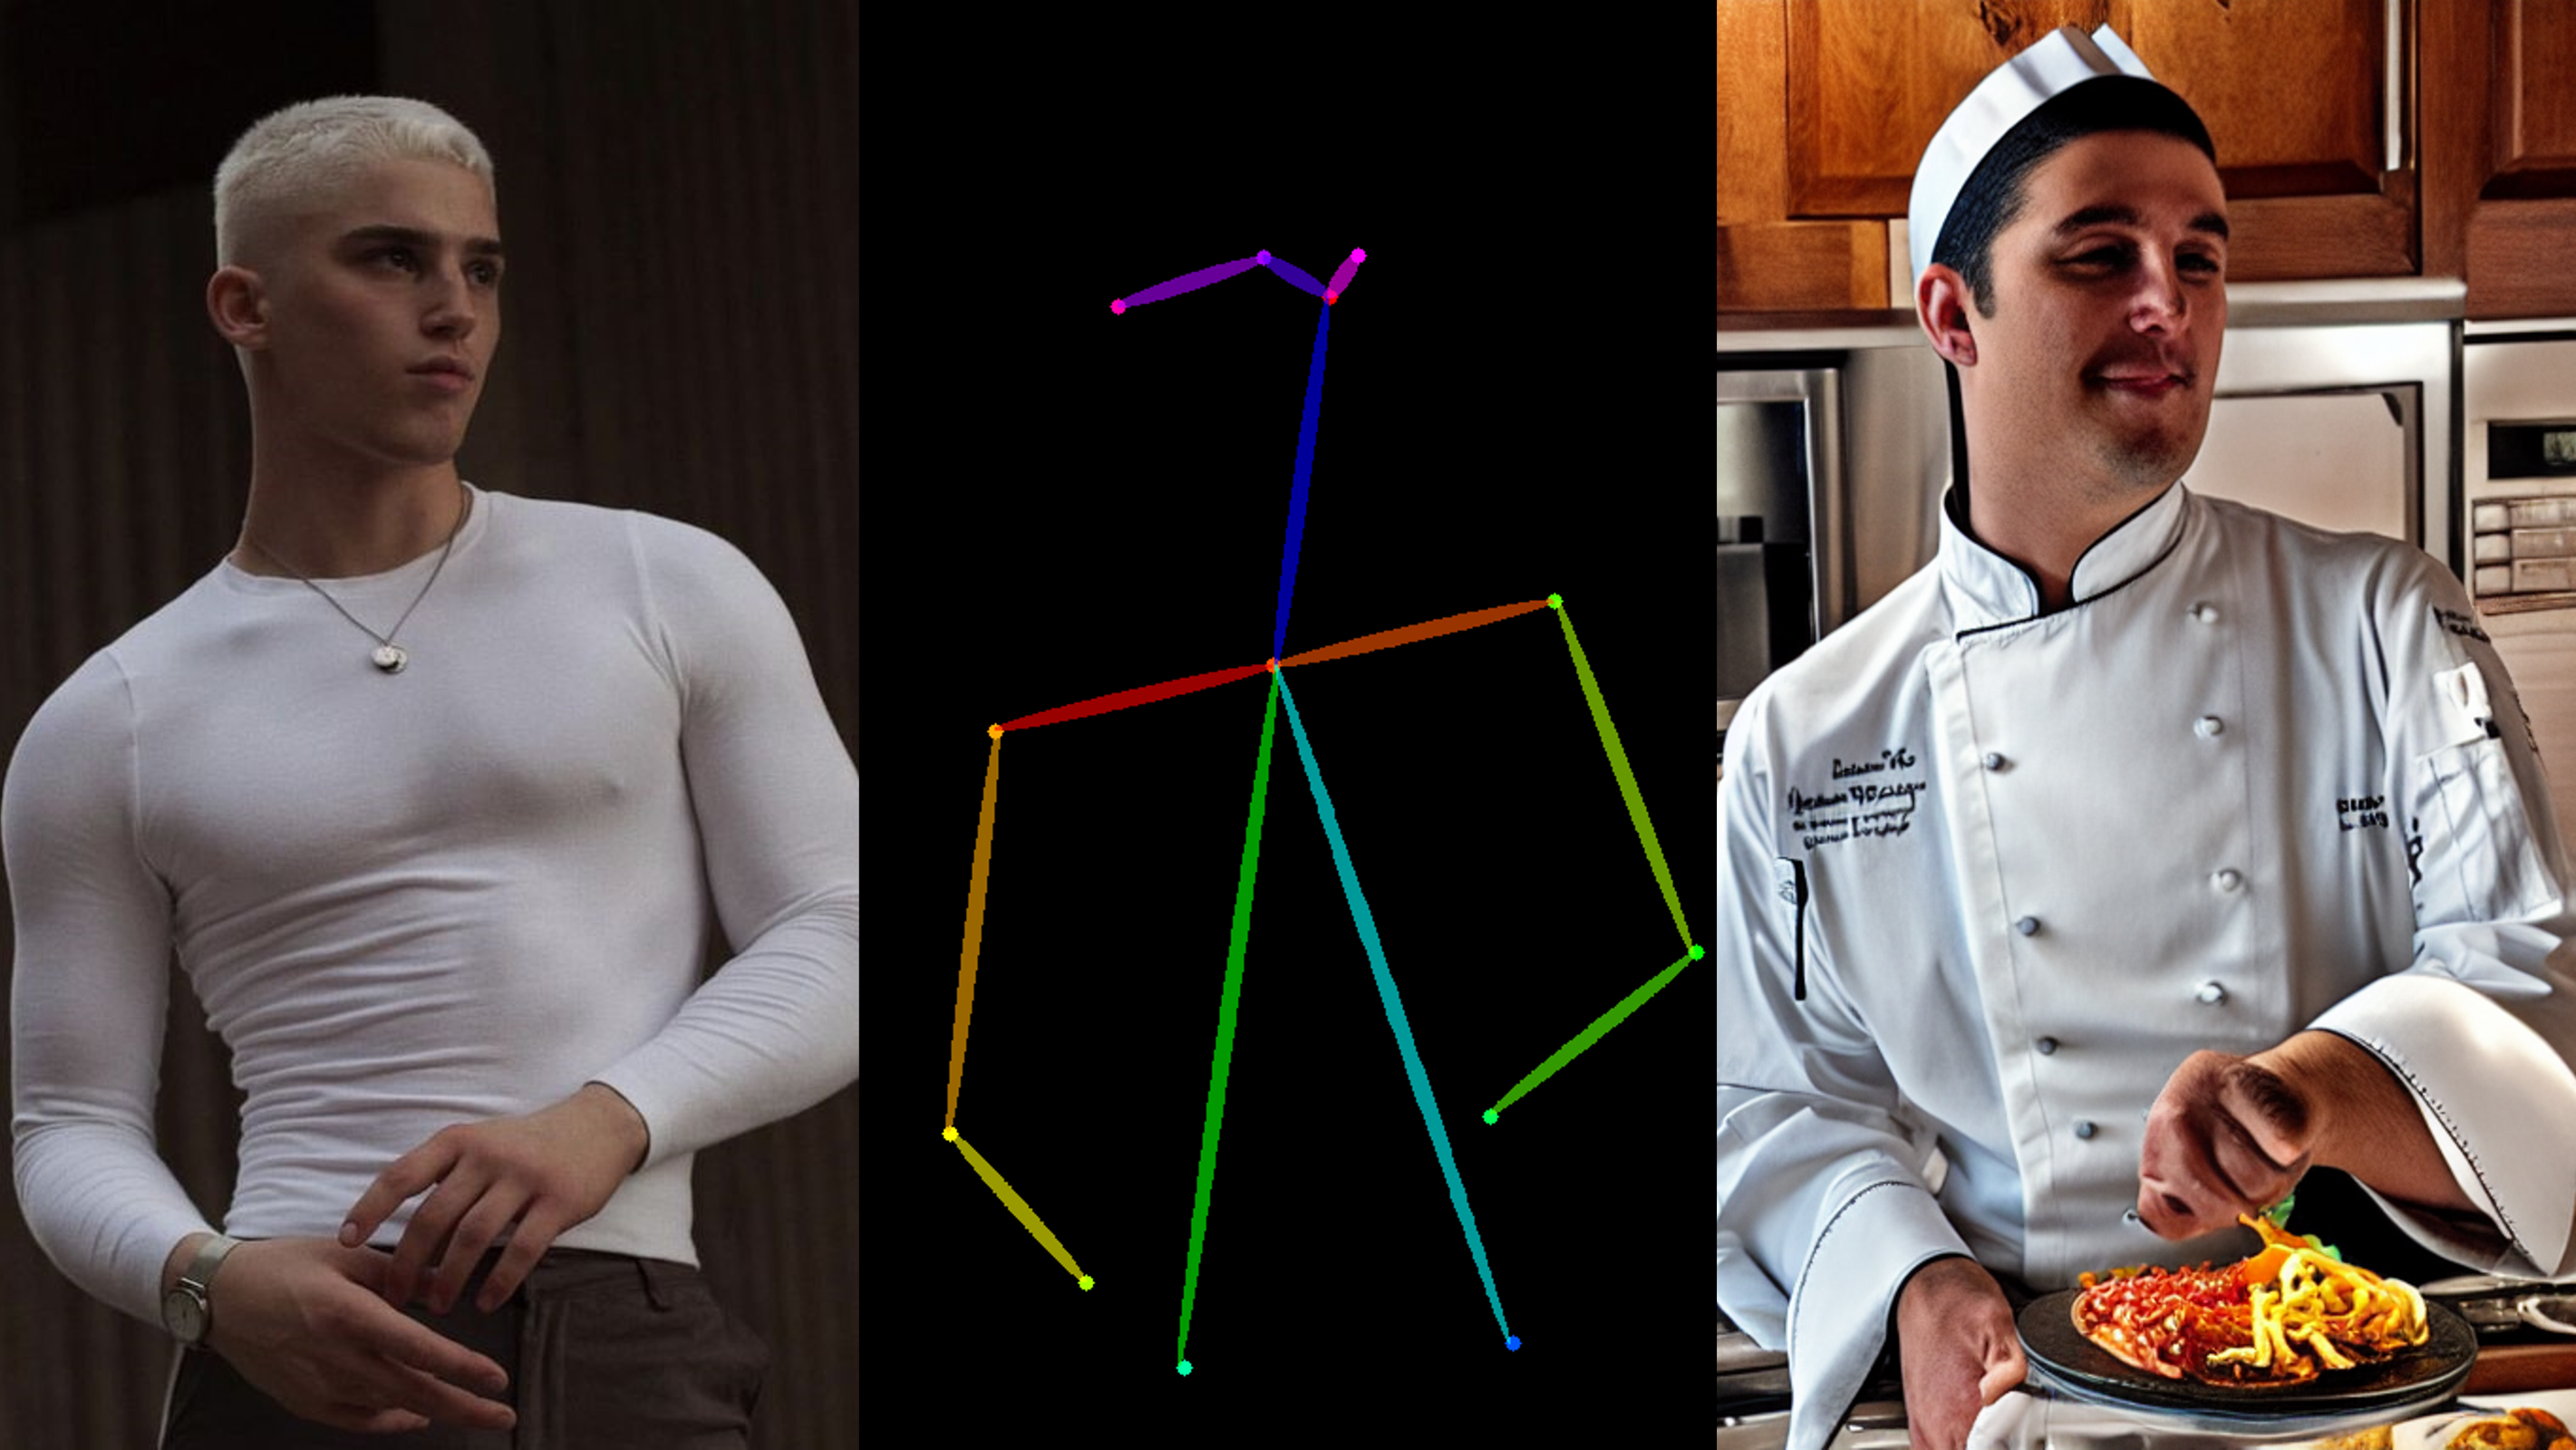
OpenPose identifies the key points of the human body from the left image to get the pose image, and then inputs the Pose image to ControlNet and Stable Diffusion to get the right image. In this way, ControlNet can control the generation of Stable Diffusion.
In this blog, we focus on enabling the stable diffusion pipeline with ControlNet in Optimum-intel. Some details can be found in this open PR.
How to enable StableDiffusionControlNet pipeline in Optimum-Intel
The important code is in optimum/intel/openvino/modelling_diffusion.py and optimum/exporters/openvino/model_configs.py. There is the diffusion pipeline related code in file modelling_diffusion.py, you can find several Class: OVStableDiffusionPipelineBase, OVStableDiffusionPipeline, OVStableDiffusionXLPipelineBase, OVStableDiffusionXLPipeline, and so on. What we need to do is mimic these base classes to add the OVStableDiffusionControlNetPipelineBase, StableDiffusionContrlNetPipelineMixin, and OVStableDiffusionControlNetPipeline. A few of the important parts are as follows:
_from_pretrained function in class OVStableDiffusionControlNetPipelineBase: initial whole pipeline from local or download.
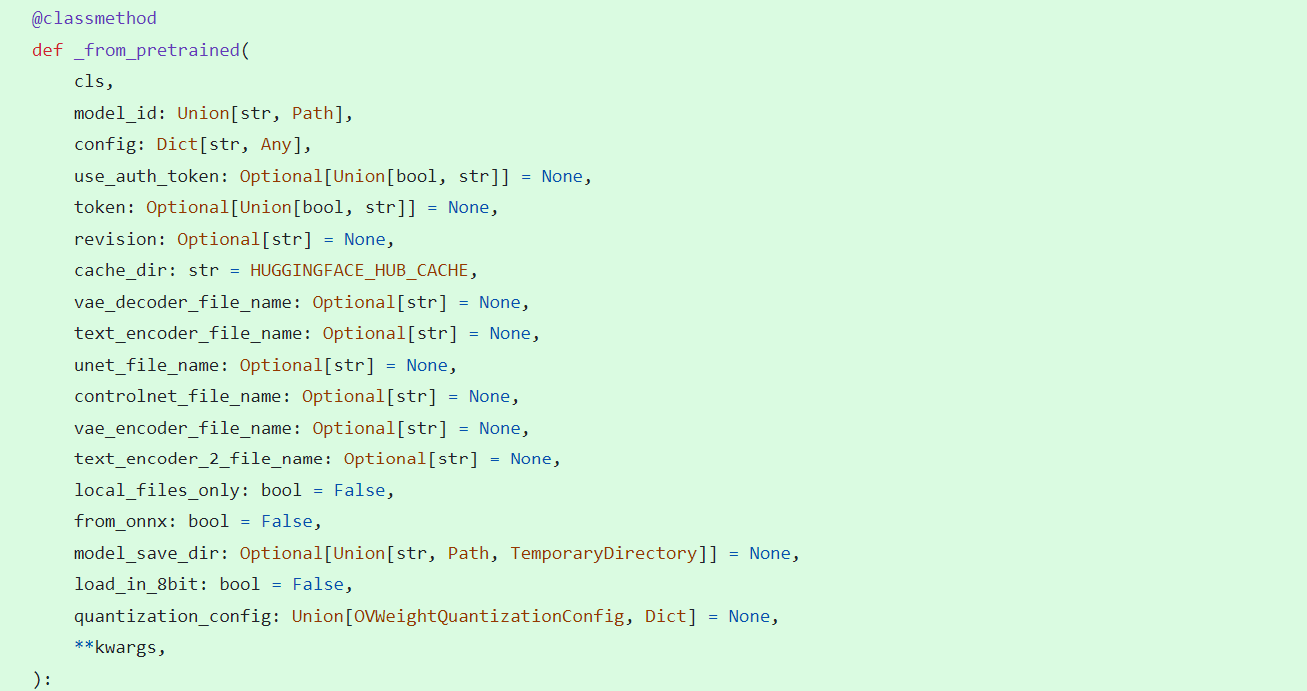
_from_transformers function in class OVStableDiffusionControlNetPipelineBase: convert torch model to OpenVINO IR model.

_reshape_unet_controlnet and _reshape_controlnet in class OVStableDiffusionControlNetPipelineBase: reshape dynamic OpenVINO IR model to static in order to decrease cost.


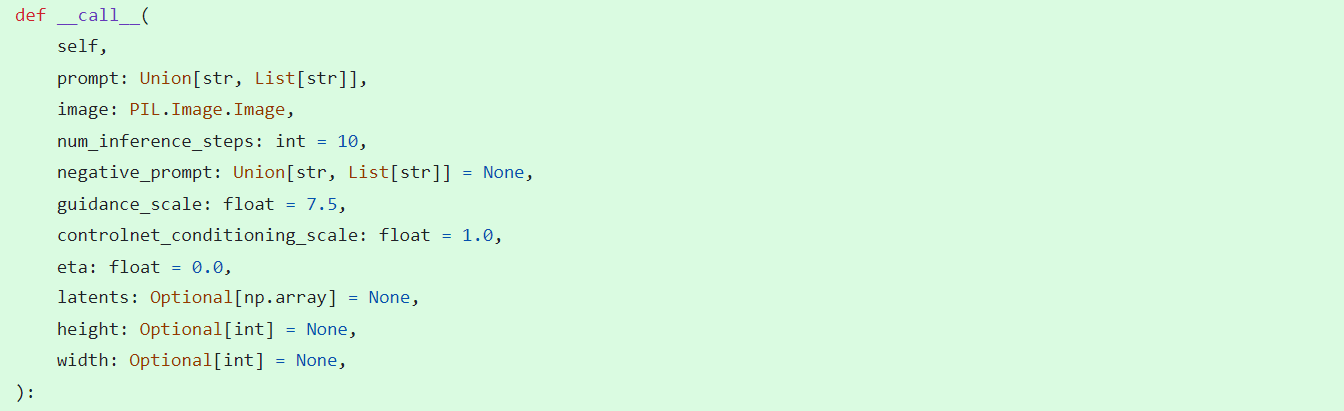
__call__ function in class StableDiffusionContrlNetPipelineMixin: do the inference in the pipeline.
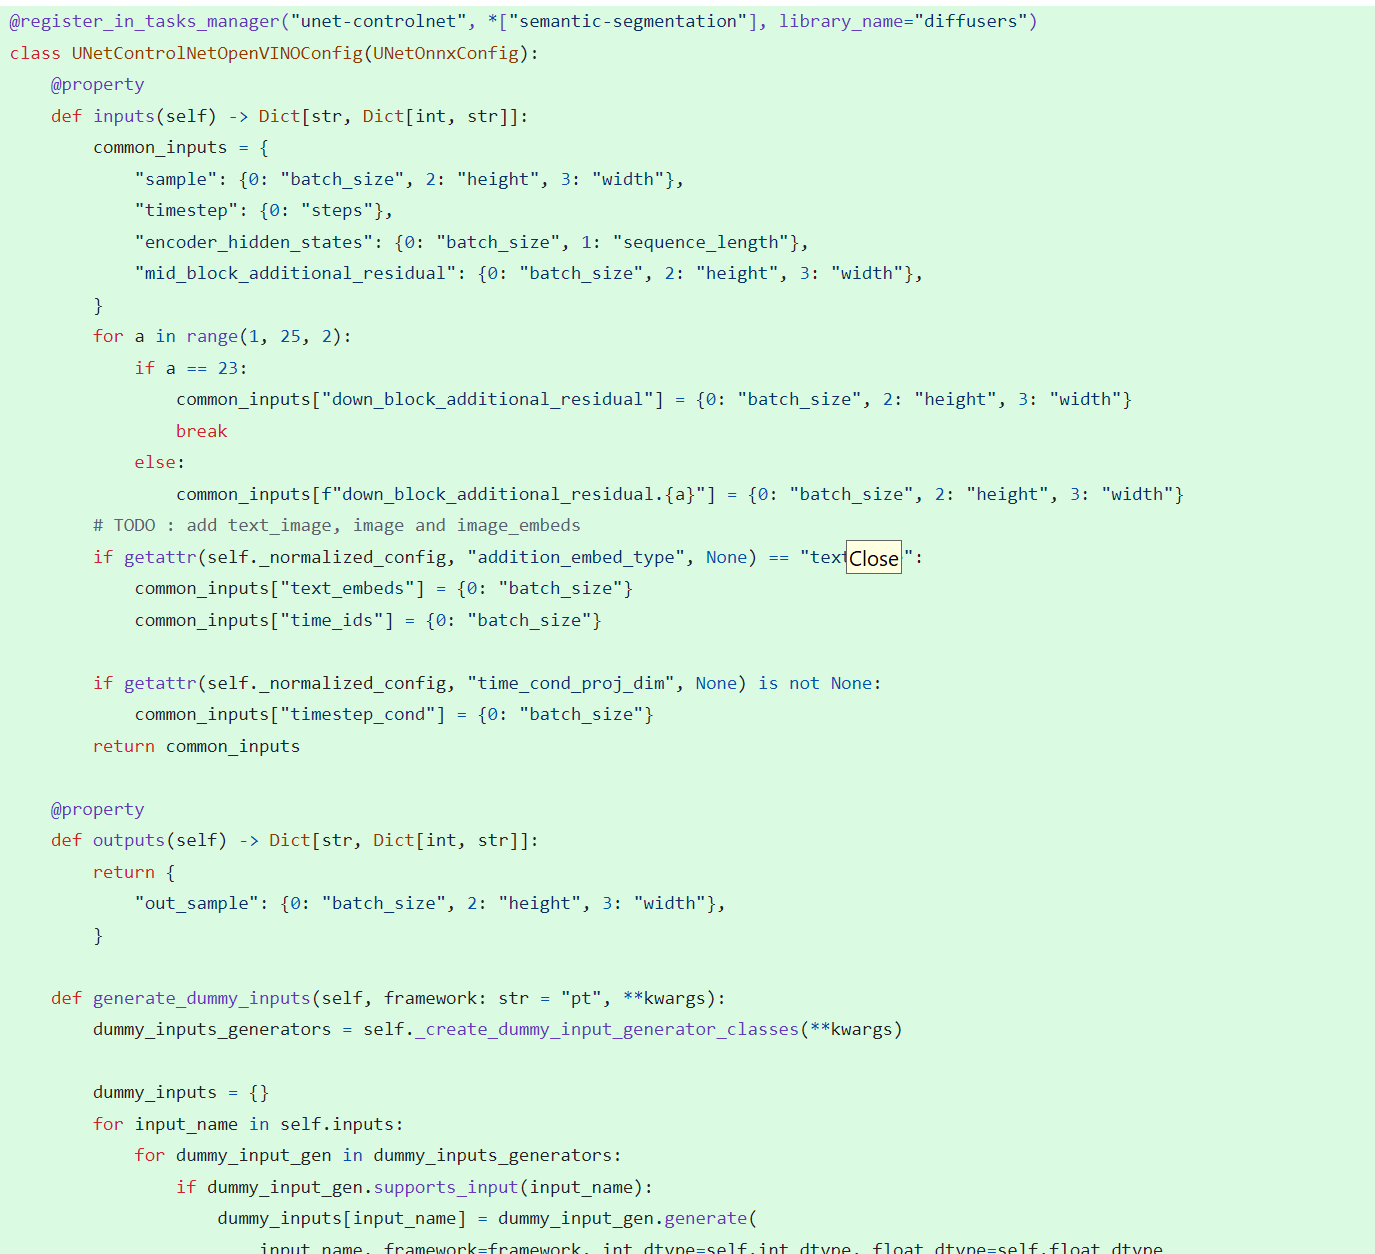
In model_configs.py, we define UNetControlNetOpenVINOConfig by inheriting UNetOnnxConfig, which includes UNetControlNet inputs and outputs.
By now we have completed the rough code, after which some very detailed code additions are needed, so I won't go into that here.
How to use StableDiffusionControlNet pipeline via Optimum-Intel
The next step is how to use the code, examples of which can be found in this repository.
Installation and update of environments and dependencies from source. Make sure your python version is greater that 3.10 and your optimum-intel and optimum version is up to date accounding to the requirements.txt.
# %python -m venv stable-diffusion-controlnet
# %source stable-diffusion-controlnet/bin/activate
%pip install -r requirements.txt
At first, we should convert pytorch model to openvino IR with dynamic shape. Now import related packages.
from optimum.intel import OVStableDiffusionControlNetPipeline
import os
from diffusers import UniPCMultistepScheduler
Set pytroch models of stable diffusion 1.5 and controlnet path if you have them in local, else you can run pipeline from download.
SD15_PYTORCH_MODEL_DIR="stable-diffusion-v1-5"
CONTROLNET_PYTORCH_MODEL_DIR="control_v11p_sd15_openpose"


if os.path.exists(SD15_PYTORCH_MODEL_DIR) and os.path.exists(CONTROLNET_PYTORCH_MODEL_DIR):
    scheduler = UniPCMultistepScheduler.from_config("scheduler_config.json")
    ov_pipe = OVStableDiffusionControlNetPipeline.from_pretrained(SD15_PYTORCH_MODEL_DIR, controlnet_model_id=CONTROLNET_PYTORCH_MODEL_DIR, compile=False, export=True, scheduler=scheduler,device="GPU.1")
    ov_pipe.save_pretrained(save_directory="./ov_models_dynamic")
    print("Dynamic model is saved in ./ov_models_dynamic")

else:
    scheduler = UniPCMultistepScheduler.from_config("scheduler_config.json")
    ov_pipe = OVStableDiffusionControlNetPipeline.from_pretrained("runwayml/stable-diffusion-v1-5", controlnet_model_id="lllyasviel/control_v11p_sd15_openpose", compile=False, export=True, scheduler=scheduler, device="GPU.1")
    ov_pipe.save_pretrained(save_directory="./ov_models_dynamic")
    print("Dynamic model is saved in ./ov_models_dynamic")
Now you will have openvino IR models file under **ov_models_dynamic ** folder.
from optimum.intel import OVStableDiffusionControlNetPipeline
from controlnet_aux import OpenposeDetector
from pathlib import Path
import numpy as np
import os
from PIL import Image
from diffusers import UniPCMultistepScheduler
import requests
import torch
We recommand to use static shape model to decrease GPU memory cost. Set your STATIC_SHAPE and DEVICE_NAME.
NEED_STATIC = True
STATIC_SHAPE = [1024,1024]
DEVICE_NAME = "GPU.1"
Load openvino model files, if is static, reshape dynamic models to fixed shape.
if NEED_STATIC:
    print("Using static models")
    scheduler = UniPCMultistepScheduler.from_config("scheduler_config.json")
    ov_config ={"CACHE_DIR": "", 'INFERENCE_PRECISION_HINT': 'f16'}
    if not os.path.exists("ov_models_static"):
        if os.path.exists("ov_models_dynamic"):
            print("load dynamic models from local ov files and reshape to static")
            ov_pipe = OVStableDiffusionControlNetPipeline.from_pretrained(Path("ov_models_dynamic"), scheduler=scheduler, device=DEVICE_NAME, compile=True, ov_config=ov_config, height=STATIC_SHAPE[0], width=STATIC_SHAPE[1])
            ov_pipe.reshape(batch_size=1 ,height=STATIC_SHAPE[0], width=STATIC_SHAPE[1], num_images_per_prompt=1)
            ov_pipe.save_pretrained(save_directory="./ov_models_static")
            print("Static model is saved in ./ov_models_static")
        else:
            raise ValueError("No ov_models_dynamic exists, please trt ov_model_export.py first")
    else:
        print("load static models from local ov files")
        ov_pipe = OVStableDiffusionControlNetPipeline.from_pretrained(Path("ov_models_static"), scheduler=scheduler, device=DEVICE_NAME, compile=True, ov_config=ov_config, height=STATIC_SHAPE[0], width=STATIC_SHAPE[1])
else:
    scheduler = UniPCMultistepScheduler.from_config("scheduler_config.json")
    ov_config ={"CACHE_DIR": "", 'INFERENCE_PRECISION_HINT': 'f16'}
    print("load dynamic models from local ov files")
    ov_pipe = OVStableDiffusionControlNetPipeline.from_pretrained(Path("ov_models_dynamic"), scheduler=scheduler, device=DEVICE_NAME, compile=True, ov_config=ov_config)
Set seed for Numpy and torch to make result reproducible.
seed = 42
torch.manual_seed(seed)
torch.cuda.manual_seed(seed)
torch.cuda.manual_seed_all(seed)
np.random.seed(seed)
Load image for ControlNet, or you can use your own image, or generate image with OpenPose OpenVINO model, notice that OpenPose model is not supported by OVStableDiffusionControlNetPipeline yet, so you need to convert it to openvino model first manually. Here we use directly the result from OpenPose:
pose = Image.open(Path("pose_1024.png"))
Set prompt, negative_prompt, image inputs.
prompt = "Dancing Darth Vader, best quality, extremely detailed"
negative_prompt = "monochrome, lowres, bad anatomy, worst quality, low quality"

result = ov_pipe(prompt=prompt, image=pose, num_inference_steps=20, negative_prompt=negative_prompt, height=STATIC_SHAPE[0], width=STATIC_SHAPE[1])

result[0].save("result_1024.png")
Build OpenVINO on Kylin OS Guide
Authors: Tong Qiu, Wenyi Zou
Kylin is an operating system based on Linux, developed by academics at the National University of Defense Technology in the People's Republic of China. For more information about Kylin OS, please visit the Wikipedia page at Kylin. In the following sections, we will provide a step-by-step guide to building and running OpenVINO on the Kylin Operating System.
System
The version of Kylin OS we are using is “Kylin HostOS V10”, with the specific version being “V10 (Helium)”. You may obtain this information by executing the command:
We build OpenVINO using GCC 10.3.1, CMake 3.26.0, and Python 3.9.9, which can all be installed by default using command lines. Next, we will demonstrate how to install these necessary dependencies.
Install Build Dependencies
Instead of executing the ./install_build_dependencies.sh script referenced in Build OpenVINO™ Runtime for Linux systems, you can directly install the build dependencies using the following command lines:
Setup Python Virtual Environment
The next step is to create and activate a Python virtual environment. While this step is optional, we strongly recommend it to ensure better management of your project's dependencies.
Following the completion of the steps to build OpenVINO within the Python virtual environment, you can activate OpenVINO alongside the Python virtual environment each time by executing the source command.
Build OpenVINO with CMake 3.26.0 and GCC 10.3.1
Now we've reached the step to build OpenVINO. First, clone the OpenVINO repository and update its submodules.
Next, install the Python dependencies that are required for building Python wheels.
Then, create the build directory.
To build OpenVINO with CMake, start by using the command provided below. For enhanced performance, it is recommended to append the -DCMAKE_CXX_FLAGS=-march=native to your command, as this will enable the compiler to optimize the build for your specific hardware by using all supported instruction subsets. Additionally, if you require a Python wheel, include the corresponding build option. Remember to tailor the CMake parameters to fit your particular requirements.
Once the build process is complete, you can install the generated wheel using the pip command.
Quick test for built openvino runtime and openvino-dev tools
You can quickly verify your built and installed OpenVINO setup. Start by creating a model directory and installing the dependencies for the model optimizer.
Next, download the resnet50 pytorch model using omz_downloader.
Then, convert resnet50 pytorch model to OpenVINO FP32 IR via omz_converter.
Finally, execute benchmark_app with resnet50 FP32 IR model on CPU.
Additional Details for OpenVINO Setup
If you prefer to build OpenVINO with a different compiler, such as clang, you can modify the CMake configuration step accordingly. To build with the clang compiler, please refer to the website at Clang - Getting Started for instructions on installation and setup. Below is an example of a CMake generation command that specifies clang as the compiler: