Kylin is an operating system based on Linux, developed by academics at the National University of Defense Technology in the People's Republic of China. For more information about Kylin OS, please visit the Wikipedia page at Kylin. In the following sections, we will provide a step-by-step guide to building and running OpenVINO on the Kylin Operating System.
System
The version of Kylin OS we are using is “Kylin HostOS V10”, with the specific version being “V10 (Helium)”. You may obtain this information by executing the command:
cat /etc/*release
We build OpenVINO using GCC 10.3.1, CMake 3.26.0, and Python 3.9.9, which can all be installed by default using command lines. Next, we will demonstrate how to install these necessary dependencies.
Install Build Dependencies
Instead of executing the ./install_build_dependencies.sh script referenced in Build OpenVINO™ Runtime for Linux systems, you can directly install the build dependencies using the following command lines:
The next step is to create and activate a Python virtual environment. While this step is optional, we strongly recommend it to ensure better management of your project's dependencies.
Following the completion of the steps to build OpenVINO within the Python virtual environment, you can activate OpenVINO alongside the Python virtual environment each time by executing the source command.
Build OpenVINO with CMake 3.26.0 and GCC 10.3.1
Now we've reached the step to build OpenVINO. First, clone the OpenVINO repository and update its submodules.
To build OpenVINO with CMake, start by using the command provided below. For enhanced performance, it is recommended to append the -DCMAKE_CXX_FLAGS=-march=native to your command, as this will enable the compiler to optimize the build for your specific hardware by using all supported instruction subsets. Additionally, if you require a Python wheel, include the corresponding build option. Remember to tailor the CMake parameters to fit your particular requirements.
Quick test for built openvino runtime and openvino-dev tools
You can quickly verify your built and installed OpenVINO setup. Start by creating a model directory and installing the dependencies for the model optimizer.
Finally, execute benchmark_app with resnet50 FP32 IR model on CPU.
benchmark_app -m ~/ov_models/public/resnet-50-pytorch/FP32/resnet-50-pytorch.xml -d CPU
Additional Details for OpenVINO Setup
If you prefer to build OpenVINO with a different compiler, such as clang, you can modify the CMake configuration step accordingly. To build with the clang compiler, please refer to the website at Clang - Getting Started for instructions on installation and setup. Below is an example of a CMake generation command that specifies clang as the compiler:
Starting with OpenVINO.GenAI 2025.1, the C API has been introduced, primarily to enhance interoperability with other programming languages, enabling developers to more effectively utilize OpenVINO-based generative AI across diverse coding environments.
Compared to C++, C's ABI is more stable, often serving as an interface layer or bridge language for cross-language interoperability and integration. This allows developers to leverage the performance benefits of C++ in the backend while using other high-level languages for easier implementation and integration.
As a milestone, we have currently delivered only the LLMPipeline and its associated C API interface. If you have other requirements or encounter any issues during usage, please submit an issue to OpenVINO.GenAI
Currently, we have implemented a Go application Ollama using the C API (Please refer to https://blog.openvino.ai/blog-posts/ollama-integrated-with-openvino-accelerating-deepseek-inference), which includes more comprehensive features such as performance benchmarking for developers reference.
Now, let's dive into the design logic of the C API, using a .NET C# example as a case study, based on the Windows platform with .NET 8.0.
Live Demo
Before we dive into the details, let's take a look at the final C# version of the ChatSample, which supports multi-turn conversations. Below is a live demo
How to Build a Chat Sample by C#
P/Invoke: Wrapping Unmanaged Code in .NET
First, the official GenAI C API can be found in this folder https://github.com/openvinotoolkit/openvino.genai/tree/master/src/c/include/openvino/genai/c . We also provide several pure C samples https://github.com/openvinotoolkit/openvino.genai/tree/master/samples/c/text_generation . Now, we will build our own C# Chat Sample based on the chat_sample_c. This sample can facilitate multi-turn conversations with the LLM.
C# can access structures, functions and callbacks in the unmanaged library openvino_genai_c.dll through P/Invoke. This example demonstrates how to invoke unmanaged functions from managed code.
The dynamic library openvino_genai_c.dll is imported, which relies on openvino_genai.dll. CallingConvention = CallingConvention.Cdecl here corresponds to the default calling convention _cdecl in C, which defines the argument-passing order, stack-maintenance responsibility, and name-decoration convention. For more details, refer to Argument Passing and Naming Conventions.
Additionally, the return value ov_status_e reuses an enum type from openvino_c.dll to indicate the execution status of the function. We need to implement a corresponding enum type in C#, such as
Next, we will implement our C# LLMPipeline, which inherits the IDisposable interface. This means that its instances require cleanup after use to release the unmanaged resources they occupy. In practice, object allocation and deallocation for native pointers are handled through the C interface provided by OpenVINO.GenAI. The OpenVINO.GenAI library takes full responsibility for memory management, which ensures memory safety and eliminates the risk of manual memory errors.
publicclassLlmPipeline : IDisposable
{
private IntPtr _nativePtr;
publicLlmPipeline(string modelPath, string device){
var status = NativeMethods.ov_genai_llm_pipeline_create(modelPath, device, out _nativePtr);
if (_nativePtr == IntPtr.Zero || status != ov_status_e.OK)
{
Console.WriteLine($"Error: {status} when creating LLM pipeline.");
thrownew Exception("Failed to create LLM pipeline.");
}
Console.WriteLine("LLM pipeline created successfully!");
}
publicvoidDispose(){
if (_nativePtr != IntPtr.Zero)
{
NativeMethods.ov_genai_llm_pipeline_free(_nativePtr);
_nativePtr = IntPtr.Zero;
}
GC.SuppressFinalize(this);
}
// Other Methods}
Callback Implementation
Next, let's implement the most complex method of the LLMPipeline, the GenerateStream method. This method encapsulates the LLM inference process. Let's take a look at the original C code. The result can be retrieved either via ov_genai_decoded_results or streamer_callback. ov_genai_decoded_results provides the inference result all at once, while streamer_callback allows for streaming inference results. ov_genai_decoded_results or streamer_callback must be non-NULL; neither can be NULL at the same time. For more information please refer to the comments https://github.com/openvinotoolkit/openvino.genai/blob/master/src/c/include/openvino/genai/c/llm_pipeline.h
// code snippets from //https://github.com/openvinotoolkit/openvino.genai/blob/master/src/c/include/openvino/genai/c/llm_// pipeline.h typedefenum { OV_GENAI_STREAMMING_STATUS_RUNNING = 0, // Continue to run inference OV_GENAI_STREAMMING_STATUS_STOP =
1, // Stop generation, keep history as is, KV cache includes last request and generated tokens OV_GENAI_STREAMMING_STATUS_CANCEL = 2// Stop generate, drop last prompt and all generated tokens from history, KV// cache includes history but last step} ov_genai_streamming_status_e;
// ...typedefstruct { ov_genai_streamming_status_e(
OPENVINO_C_API_CALLBACK* callback_func)(constchar* str, void* args); //!< Pointer to the callback functionvoid* args; //!< Pointer to the arguments passed to the callback function} streamer_callback;
// ...OPENVINO_GENAI_C_EXPORTS ov_status_e ov_genai_llm_pipeline_generate(ov_genai_llm_pipeline* pipe,
constchar* inputs,
const ov_genai_generation_config* config,
const streamer_callback* streamer,
ov_genai_decoded_results** results);
The streamer_callback structure includes not only the callback function itself, but also an additional void* args for enhanced flexibility. This design allows developers to pass custom context or state information to the callback.
For example, in C++ it's common to pass a this pointer through args, enabling the callback function to access class members or methods when invoked.
// args is a this pointervoidcallback_func(constchar* str, void* args){
MyClass* self = static_cast<MyClass*>(args);
self->DoSomething();
}
This C# code defines a class StreamerCallback that helps connect a C callback function with a C# method. It wraps a C function pointer MyCallbackDelegate and a void* args into a struct.
- ToNativePTR method constructs the streamer_callback structure, allocates a block of memory, and copies the structure's data into it, allowing it to be passed to a native C function.
- GCHandle is used to safely pin the C# object so that it can be passed as a native pointer to unmanaged C code.
- CallbackWrapper method is the actual function that C code will call.
[UnmanagedFunctionPointer(CallingConvention.Cdecl)]
public delegate ov_genai_streamming_status_e MyCallbackDelegate(IntPtr str, IntPtr args);
[StructLayout(LayoutKind.Sequential)]
publicstructstreamer_callback{public MyCallbackDelegate callback_func;
public IntPtr args;
}
publicclassStreamerCallback : IDisposable
{
public Action<string> OnStream;
public MyCallbackDelegate Delegate;
private GCHandle _selfHandle;
publicStreamerCallback(Action<string> onStream){
OnStream = onStream;
Delegate = new MyCallbackDelegate(CallbackWrapper);
_selfHandle = GCHandle.Alloc(this);
}
public IntPtr ToNativePtr(){
var native = new streamer_callback
{
callback_func = Delegate,
args = GCHandle.ToIntPtr(_selfHandle)
};
IntPtr ptr = Marshal.AllocHGlobal(Marshal.SizeOf<streamer_callback>());
Marshal.StructureToPtr(native, ptr, false);
return ptr;
}
publicvoidDispose(){
if (_selfHandle.IsAllocated)
_selfHandle.Free();
}
private ov_genai_streamming_status_e CallbackWrapper(IntPtr str, IntPtr args){
string content = Marshal.PtrToStringAnsi(str) ?? string.Empty;
if (args != IntPtr.Zero)
{
var handle = GCHandle.FromIntPtr(args);
if (handle.Target is StreamerCallback self)
{
self.OnStream?.Invoke(content);
}
}
return ov_genai_streamming_status_e.OV_GENAI_STREAMMING_STATUS_RUNNING;
}
}
Then We implemented the GenerateStream method in class LLMPipeline.
publicvoidGenerateStream(string input, GenerationConfig config, StreamerCallback? callback = null){
IntPtr configPtr = config.GetNativePointer();
IntPtr decodedPtr;// placeholder IntPtr streamerPtr = IntPtr.Zero;
if (callback != null)
{
streamerPtr = callback.ToNativePtr();
}
var status = NativeMethods.ov_genai_llm_pipeline_generate(
_nativePtr,
input,
configPtr,
streamerPtr,
out decodedPtr
);
if (streamerPtr != IntPtr.Zero)
Marshal.FreeHGlobal(streamerPtr);
callback?.Dispose();
if (status != ov_status_e.OK)
{
Console.WriteLine($"Error: {status} during generation.");
thrownew Exception("Failed to generate results.");
}
return;
}
We use the following code to invoke our callback and GenerateStream.
pipeline.StartChat(); // Start chat with keeping history in kv cache.Console.WriteLine("question:");
while (true)
{
string? input = Console.ReadLine();
if (string.IsNullOrWhiteSpace(input)) break;
using var streamerCallback = new StreamerCallback((string chunk) =>
{
Console.Write(chunk);
});
pipeline.GenerateStream(input, generationConfig, streamerCallback);
input = null;
Console.WriteLine("\n----------\nquestion:");
}
pipeline.FinishChat(); // Finish chat and clear history in kv cache.
About Deployment
We can directly download the OpenVINO official release of the LLM's IR from Hugging Face using this link.
The OpenVINO.GenAI 2025.1 package can be downloaded via this link.
The C# project directly depends on openvino_genai_c.dll, which in turn has transitive dependencies on other toolkit-related DLLs, including Intel TBB libraries.
To ensure proper runtime behavior, all the DLLs delivered with OpenVINO.GenAI — including openvino_genai_c.dll and its dependencies — are bundled and treated as part of the C# project’s runtime dependencies.
We use the following cmd commands to download the genai package and copy all the required dependent DLLs to the directory containing the *.csproj file.
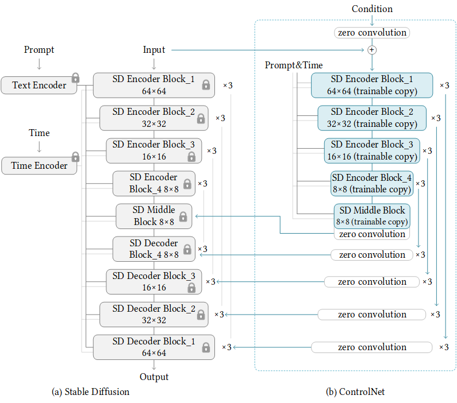
Stable Diffusion is a generative artificial intelligence model that produces unique images from text and image prompts. ControlNet is a neural network that controls image generation in Stable Diffusion by adding extra conditions. The specific structure of Stable Diffusion + ControlNet is shown below:
In many cases, ControlNet is used in conjunction with other models or frameworks, such as OpenPose, Canny, Line Art, Depth, etc. An example of Stable Diffusion + ControlNet + OpenPose:
OpenPose identifies the key points of the human body from the left image to get the pose image, and then inputs the Pose image to ControlNet and Stable Diffusion to get the right image. In this way, ControlNet can control the generation of Stable Diffusion.
In this blog, we focus on enabling the stable diffusion pipeline with ControlNet in Optimum-intel. Some details can be found in this open PR.
How to enable StableDiffusionControlNet pipeline in Optimum-Intel
The important code is in optimum/intel/openvino/modelling_diffusion.py and optimum/exporters/openvino/model_configs.py. There is the diffusion pipeline related code in file modelling_diffusion.py, you can find several Class: OVStableDiffusionPipelineBase, OVStableDiffusionPipeline, OVStableDiffusionXLPipelineBase, OVStableDiffusionXLPipeline, and so on. What we need to do is mimic these base classes to add the OVStableDiffusionControlNetPipelineBase, StableDiffusionContrlNetPipelineMixin, and OVStableDiffusionControlNetPipeline. A few of the important parts are as follows:
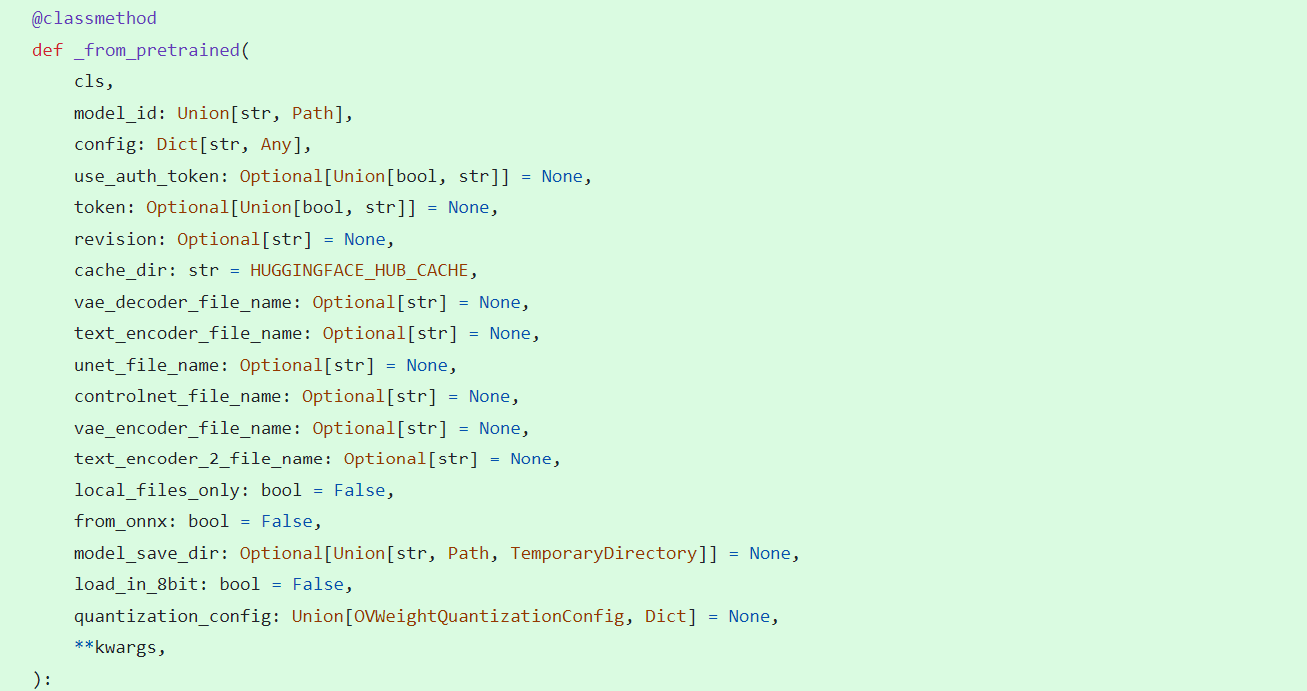
_from_pretrained function in class OVStableDiffusionControlNetPipelineBase: initial whole pipeline from local or download.
_from_transformers function in class OVStableDiffusionControlNetPipelineBase: convert torch model to OpenVINO IR model.
_reshape_unet_controlnet and _reshape_controlnet in class OVStableDiffusionControlNetPipelineBase: reshape dynamic OpenVINO IR model to static in order to decrease cost.
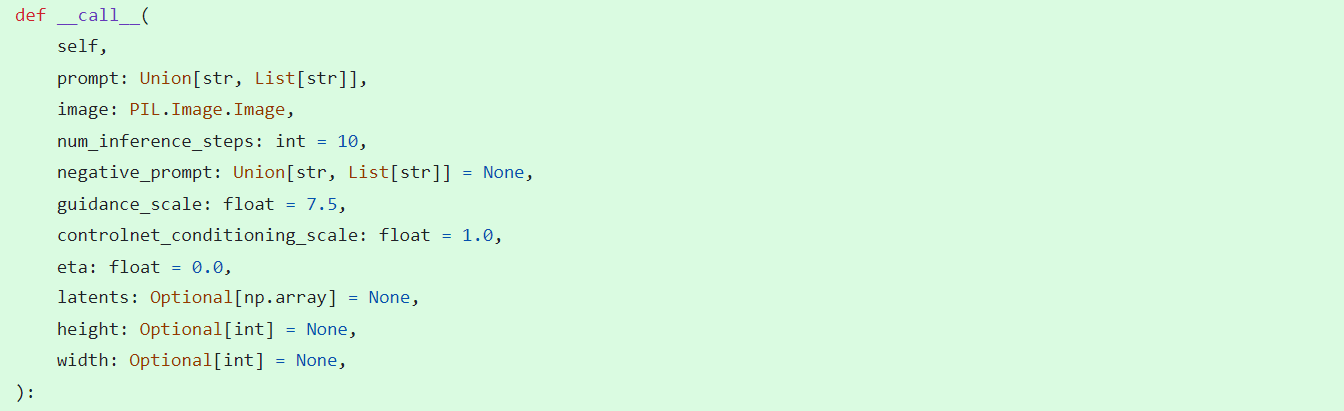
__call__ function in class StableDiffusionContrlNetPipelineMixin: do the inference in the pipeline.
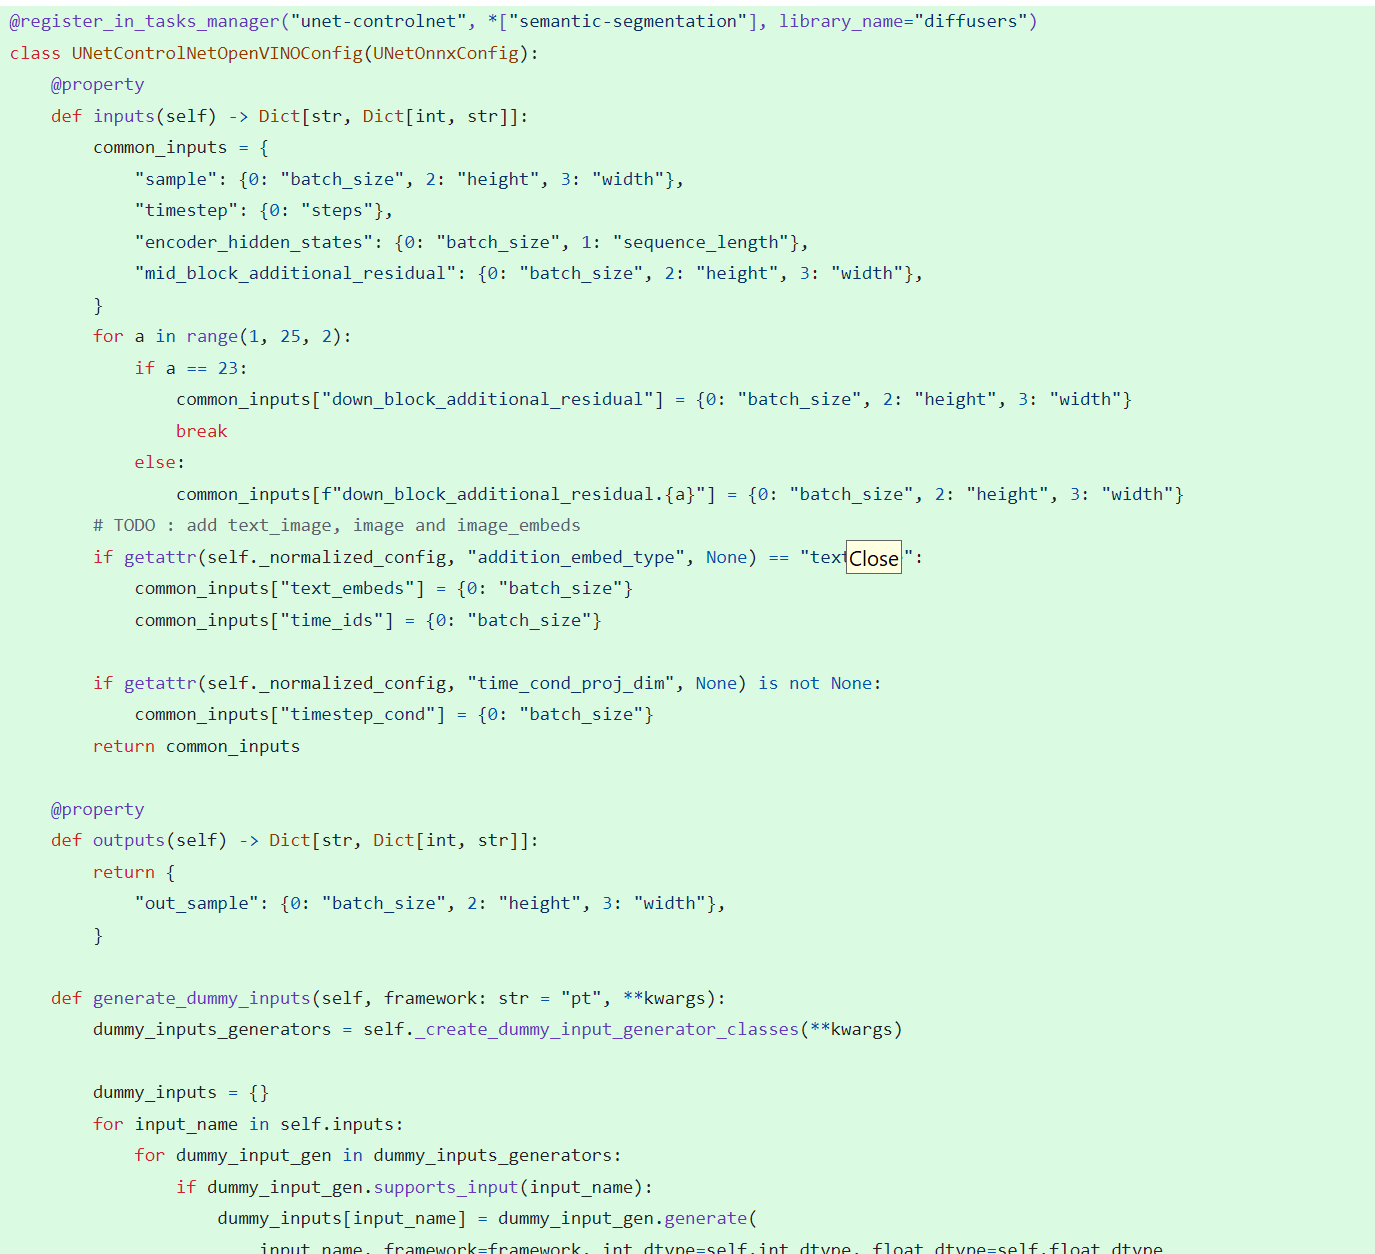
In model_configs.py, we define UNetControlNetOpenVINOConfig by inheriting UNetOnnxConfig, which includes UNetControlNet inputs and outputs.
By now we have completed the rough code, after which some very detailed code additions are needed, so I won't go into that here.
How to use StableDiffusionControlNet pipeline via Optimum-Intel
The next step is how to use the code, examples of which can be found in this repository.
Installation and update of environments and dependencies from source. Make sure your python version is greater that 3.10 and your optimum-intel and optimum version is up to date accounding to the requirements.txt.
At first, we should convert pytorch model to openvino IR with dynamic shape. Now import related packages.
from optimum.intel import OVStableDiffusionControlNetPipeline
import os
from diffusers import UniPCMultistepScheduler
Set pytroch models of stable diffusion 1.5 and controlnet path if you have them in local, else you can run pipeline from download.
SD15_PYTORCH_MODEL_DIR="stable-diffusion-v1-5"CONTROLNET_PYTORCH_MODEL_DIR="control_v11p_sd15_openpose"if os.path.exists(SD15_PYTORCH_MODEL_DIR) and os.path.exists(CONTROLNET_PYTORCH_MODEL_DIR):
scheduler = UniPCMultistepScheduler.from_config("scheduler_config.json")
ov_pipe = OVStableDiffusionControlNetPipeline.from_pretrained(SD15_PYTORCH_MODEL_DIR, controlnet_model_id=CONTROLNET_PYTORCH_MODEL_DIR, compile=False, export=True, scheduler=scheduler,device="GPU.1")
ov_pipe.save_pretrained(save_directory="./ov_models_dynamic")
print("Dynamic model is saved in ./ov_models_dynamic")
else:
scheduler = UniPCMultistepScheduler.from_config("scheduler_config.json")
ov_pipe = OVStableDiffusionControlNetPipeline.from_pretrained("runwayml/stable-diffusion-v1-5", controlnet_model_id="lllyasviel/control_v11p_sd15_openpose", compile=False, export=True, scheduler=scheduler, device="GPU.1")
ov_pipe.save_pretrained(save_directory="./ov_models_dynamic")
print("Dynamic model is saved in ./ov_models_dynamic")
Now you will have openvino IR models file under **ov_models_dynamic ** folder.
from optimum.intel import OVStableDiffusionControlNetPipeline
from controlnet_aux import OpenposeDetector
from pathlib import Path
import numpy as np
import os
from PIL import Image
from diffusers import UniPCMultistepScheduler
import requests
import torch
We recommand to use static shape model to decrease GPU memory cost. Set your STATIC_SHAPE and DEVICE_NAME.
Load image for ControlNet, or you can use your own image, or generate image with OpenPose OpenVINO model, notice that OpenPose model is not supported by OVStableDiffusionControlNetPipeline yet, so you need to convert it to openvino model first manually. Here we use directly the result from OpenPose:
MeloTTS released by MyShell.ai, is a high-quality, multilingual Text-to-Speech (TTS) library that supports English, Chinese (mixed English), and various other languages. The strengths of the model lie in its lightweight design, which is well-suited for applications on AIPC systems, coupled with its impressive performance. In this article, I will guide you through the process of converting the model to be compatible with OpenVINO toolkits, enabling it to run on various devices such as CPUs, GPUs and NPUs. Additionally, I will provide a concise overview of the model's inference procedure.
Overview of Model Inference Procedure and Pipeline
For each language type, the pipeline requires only two models (two inference procedures). For instance, English language generation necessitates just the 'bert-base-uncased' model and its corresponding MeloTTS-English. Similarly, for Chinese language generation (which includes mixed English), the pipeline needs only the 'bert-base-multilingual-uncased' and MeloTTS-Chinese. This greatly streamlines the pipeline compared to other TTS frameworks, and the compact size of the models makes them suitable for deployment on edge devices.
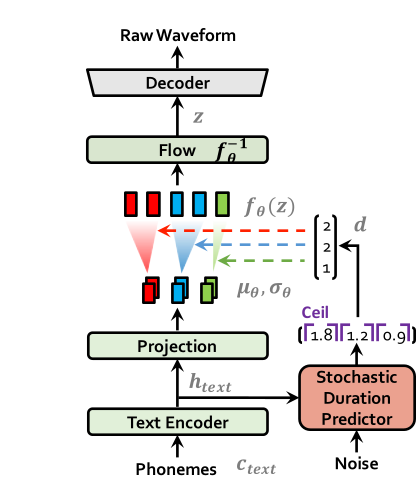
Inference procedure from https://arxiv.org/abs/2106.06103
The text encoder accepts phones, tones and a hidden layer from a BERT model as input. It then produces the text encoder's output along with its mean value and a logarithmic variance. To align the input texts with the target speech, the outputs from the encoders are processed using a stochastic duration predictor, which generates an alignment matrix. This matrix is then used to expand the mean value and a logarithmic variance (assuming a Gaussian distribution) to obtain the results for the latent variables .Subsequently, the inverse flow transformation is applied to obtain the distribution of final latent variable z, which represents the spectrogram. In the decoder, by upsampling the spectrogram, the final audio waveform is obtained.
The inference entry is the function. In practical inference, phone refers to the distinct speech sounds, while tone refers to the vocal pitch contour. For Chinese, a phone corresponds to pinyin, and a tone corresponds to one of the four tones. In English, phones are the consonants and vowels, and tones relate to stress patterns. Here, noise_scale and noise_scale_w do not refer to actual noise. Both noise_scale_w and noise_scale are components within the Stochastic Duration Predictor, used to introduce randomness in order to enhance the expressiveness of the model.
Note that MeloTTS does not include a voice cloning component, unlike the majority of other TTS models, which makes it more lightweight. If voice cloning is required, please refer to OpenVoice.
Enable Model for OpenVINO
As previously mentioned, the pipeline requires just two models for each language. Taking English as an example, we must first convert both 'bert-base-uncased' and 'MeloTTS-English' into the OpenVINO IR format.
        example_input={
                "x": x_tst,
                "x_lengths": x_tst_lengths,
                "sid": speakers,
                "tone": tones,
                "language": lang_ids,
                "bert": bert,
                "ja_bert": ja_bert,
                "noise_scale": noise_scale,
                "length_scale": length_scale,
                "noise_scale_w": noise_scale_w,
                "sdp_ratio": sdp_ratio,
            }

        ov_model = ov.convert_model(
            self.model,
            example_input=example_input,
        )
        get_input_names = lambda: ["phones", "phones_length", "speakers",
                                  "tones", "lang_ids", "bert", "ja_bert",
                                  "noise_scale", "length_scale", "noise_scale_w", "sdp_ratio"]
        for input, input_name in zip(ov_model.inputs, get_input_names()):
            input.get_tensor().set_names({input_name})
        outputs_name = ['audio']
        for output, output_name in zip(ov_model.outputs, outputs_name):
            output.get_tensor().set_names({output_name})
        """
        reshape model
        Set the batch size of all input tensors to 1
        """
        shapes = {}
        for input_layer  in ov_model.inputs:
            shapes[input_layer] = input_layer.partial_shape
            shapes[input_layer][0] = 1
        ov_model.reshape(shapes)

        ov.save_model(ov_model, Path(ov_model_path))
For instance, we convert the MeloTTS-English model from the pytorch format directly by utilizing the openvino.convert_model API along with pseudo input data.
Note that the input and output layers (it is optional) are renamed to facilitate subsequent development. Furthermore, the batch dimension for all inputs is fixed at 1, as multiple batches are not required here (this is also optional).
We further quantized both the BERT and TTS models to int8 using pseudo data. We observed that our method of quantizing the TTS model introduces a slight distortion to the current sound. To suppress this, we implemented DeepFilterNet, which is also very lightweight.
More about model conversion and int8 quantization please refer to MeloTTS-OV .
Run BERT part on NPU
To enhance performance and reduce CPU offloading, we can shift the execution of the BERT model to the NPU on Meteor Lake.
To adapt the model for the NPU, we've converted the model to accept static shape inputs a and pad each input during inference.
def reshape_for_npu(model, bert_static_shape = 32):
        # change dynamic shape to static shape
        shapes = dict()
        for input_layer  in model.inputs:
            shapes[input_layer] = bert_static_shape
        model.reshape(shapes)
        ov.save_model(model, Path(ov_model_save_path))
        print(f"save static model in {Path(ov_model_save_path)}")

def main():
    core = Core()
    model = core.read_model(ov_model_path)
    reshape_for_npu(model, bert_static_shape=bert_static_shape)
Simple Demo
Here are the audio files generated by the int8 quantized model from OpenVINO.

.png)