
AIGC

OpenVINO.GenAI Delivers C API for Seamless Language Interop with Practical Examples in .NET
Authors: Tong Qiu, Xiake Sun
Starting with OpenVINO.GenAI 2025.1, the C API has been introduced, primarily to enhance interoperability with other programming languages, enabling developers to more effectively utilize OpenVINO-based generative AI across diverse coding environments.
Compared to C++, C's ABI is more stable, often serving as an interface layer or bridge language for cross-language interoperability and integration. This allows developers to leverage the performance benefits of C++ in the backend while using other high-level languages for easier implementation and integration.
As a milestone, we have currently delivered only the LLMPipeline and its associated C API interface. If you have other requirements or encounter any issues during usage, please submit an issue to OpenVINO.GenAI
Currently, we have implemented a Go application Ollama using the C API (Please refer to https://blog.openvino.ai/blog-posts/ollama-integrated-with-openvino-accelerating-deepseek-inference), which includes more comprehensive features such as performance benchmarking for developers reference.
Now, let's dive into the design logic of the C API, using a .NET C# example as a case study, based on the Windows platform with .NET 8.0.
Live Demo
Before we dive into the details, let's take a look at the final C# version of the ChatSample, which supports multi-turn conversations. Below is a live demo
How to Build a Chat Sample by C#
P/Invoke: Wrapping Unmanaged Code in .NET
First, the official GenAI C API can be found in this folder https://github.com/openvinotoolkit/openvino.genai/tree/master/src/c/include/openvino/genai/c . We also provide several pure C samples https://github.com/openvinotoolkit/openvino.genai/tree/master/samples/c/text_generation . Now, we will build our own C# Chat Sample based on the chat_sample_c. This sample can facilitate multi-turn conversations with the LLM.
C# can access structures, functions and callbacks in the unmanaged library openvino_genai_c.dll through P/Invoke. This example demonstrates how to invoke unmanaged functions from managed code.
public static class NativeMethods
{
 DllImport("openvino_genai_c.dll", CallingConvention = CallingConvention.Cdecl)]
public static extern ov_status_e ov_genai_llm_pipeline_create(
        [MarshalAs(UnmanagedType.LPStr)] string models_path,
        [MarshalAs(UnmanagedType.LPStr)] string device,
        out IntPtr pipe);

[DllImport("openvino_genai_c.dll", CallingConvention = CallingConvention.Cdecl)]
public static extern void ov_genai_llm_pipeline_free(IntPtr pipeline);

//Other methods
The dynamic library openvino_genai_c.dll is imported, which relies on openvino_genai.dll. CallingConvention = CallingConvention.Cdecl here corresponds to the default calling convention _cdecl in C, which defines the argument-passing order, stack-maintenance responsibility, and name-decoration convention. For more details, refer to Argument Passing and Naming Conventions.
Additionally, the return value ov_status_e reuses an enum type from openvino_c.dll to indicate the execution status of the function. We need to implement a corresponding enum type in C#, such as
public enum ov_status_e
{
    OK = 0,
    GENERAL_ERROR = -1,
    NOT_IMPLEMENTED = -2,
    //...

}
Next, we will implement our C# LLMPipeline, which inherits the IDisposable interface. This means that its instances require cleanup after use to release the unmanaged resources they occupy. In practice, object allocation and deallocation for native pointers are handled through the C interface provided by OpenVINO.GenAI. The OpenVINO.GenAI library takes full responsibility for memory management, which ensures memory safety and eliminates the risk of manual memory errors.
public class LlmPipeline : IDisposable
{
    private IntPtr _nativePtr;

    public LlmPipeline(string modelPath, string device)
    {
        var status = NativeMethods.ov_genai_llm_pipeline_create(modelPath, device, out _nativePtr);
        if (_nativePtr == IntPtr.Zero || status != ov_status_e.OK)
        {
            Console.WriteLine($"Error: {status} when creating LLM pipeline.");
            throw new Exception("Failed to create LLM pipeline.");
        }

        Console.WriteLine("LLM pipeline created successfully!");
    }

    public void Dispose()
    {
        if (_nativePtr != IntPtr.Zero)
        {
            NativeMethods.ov_genai_llm_pipeline_free(_nativePtr);
            _nativePtr = IntPtr.Zero;
        }

        GC.SuppressFinalize(this);
    }
    // Other Methods
}
Callback Implementation
Next, let's implement the most complex method of the LLMPipeline, the GenerateStream method. This method encapsulates the LLM inference process. Let's take a look at the original C code. The result can be retrieved either via ov_genai_decoded_results or streamer_callback. ov_genai_decoded_results provides the inference result all at once, while streamer_callback allows for streaming inference results. ov_genai_decoded_results or streamer_callback must be non-NULL; neither can be NULL at the same time. For more information please refer to the comments https://github.com/openvinotoolkit/openvino.genai/blob/master/src/c/include/openvino/genai/c/llm_pipeline.h
// code snippets from //https://github.com/openvinotoolkit/openvino.genai/blob/master/src/c/include/openvino/genai/c/llm_// pipeline.h
typedef enum {
    OV_GENAI_STREAMMING_STATUS_RUNNING = 0,  // Continue to run inference
    OV_GENAI_STREAMMING_STATUS_STOP =
        1,  // Stop generation, keep history as is, KV cache includes last request and generated tokens
    OV_GENAI_STREAMMING_STATUS_CANCEL = 2  // Stop generate, drop last prompt and all generated tokens from history, KV
                                           // cache includes history but last step
} ov_genai_streamming_status_e;

// ...
typedef struct {
    ov_genai_streamming_status_e(
        OPENVINO_C_API_CALLBACK* callback_func)(const char* str, void* args);  //!< Pointer to the callback function
    void* args;  //!< Pointer to the arguments passed to the callback function
} streamer_callback;

// ...
OPENVINO_GENAI_C_EXPORTS ov_status_e ov_genai_llm_pipeline_generate(ov_genai_llm_pipeline* pipe,
                                                                    const char* inputs,
                                                                    const ov_genai_generation_config* config,
                                                                    const streamer_callback* streamer,
                                                                    ov_genai_decoded_results** results);
The streamer_callback structure includes not only the callback function itself, but also an additional void* args for enhanced flexibility. This design allows developers to pass custom context or state information to the callback.
For example, in C++ it's common to pass a this pointer through args, enabling the callback function to access class members or methods when invoked.
// args is a this pointer
void callback_func(const char* str, void* args) {
    MyClass* self = static_cast<MyClass*>(args);
    self->DoSomething();
}
This C# code defines a class StreamerCallback that helps connect a C callback function with a C# method. It wraps a C function pointer MyCallbackDelegate and a void* args into a struct.
- ToNativePTR method constructs the streamer_callback structure, allocates a block of memory, and copies the structure's data into it, allowing it to be passed to a native C function.
- GCHandle is used to safely pin the C# object so that it can be passed as a native pointer to unmanaged C code.
- CallbackWrapper method is the actual function that C code will call.
[UnmanagedFunctionPointer(CallingConvention.Cdecl)]
public delegate ov_genai_streamming_status_e MyCallbackDelegate(IntPtr str, IntPtr args);

[StructLayout(LayoutKind.Sequential)]
public struct streamer_callback
{
    public MyCallbackDelegate callback_func;
    public IntPtr args;
}
public class StreamerCallback : IDisposable
{
    public Action<string> OnStream;
    public MyCallbackDelegate Delegate;
    private GCHandle _selfHandle;

    public StreamerCallback(Action<string> onStream)
    {
        OnStream = onStream;
        Delegate = new MyCallbackDelegate(CallbackWrapper);
        _selfHandle = GCHandle.Alloc(this);
    }

    public IntPtr ToNativePtr()
    {
        var native = new streamer_callback
        {
            callback_func = Delegate,
            args = GCHandle.ToIntPtr(_selfHandle)
        };

        IntPtr ptr = Marshal.AllocHGlobal(Marshal.SizeOf<streamer_callback>());
        Marshal.StructureToPtr(native, ptr, false);
        return ptr;
    }

    public void Dispose()
    {
        if (_selfHandle.IsAllocated)
            _selfHandle.Free();
    }

    private ov_genai_streamming_status_e CallbackWrapper(IntPtr str, IntPtr args)
    {
        string content = Marshal.PtrToStringAnsi(str) ?? string.Empty;

        if (args != IntPtr.Zero)
        {
            var handle = GCHandle.FromIntPtr(args);
            if (handle.Target is StreamerCallback self)
            {
                self.OnStream?.Invoke(content);
            }
        }

        return ov_genai_streamming_status_e.OV_GENAI_STREAMMING_STATUS_RUNNING;
    }
}
Then We implemented the GenerateStream method in class LLMPipeline.
 public void GenerateStream(string input, GenerationConfig config, StreamerCallback? callback = null)
 {
     IntPtr configPtr = config.GetNativePointer();
     IntPtr decodedPtr;// placeholder

     IntPtr streamerPtr = IntPtr.Zero;

     if (callback != null)
     {
         streamerPtr = callback.ToNativePtr();
     }

     var status = NativeMethods.ov_genai_llm_pipeline_generate(
         _nativePtr,
         input,
         configPtr,
         streamerPtr,
         out decodedPtr
     );

     if (streamerPtr != IntPtr.Zero)
         Marshal.FreeHGlobal(streamerPtr);

     callback?.Dispose();

     if (status != ov_status_e.OK)
     {
         Console.WriteLine($"Error: {status} during generation.");
         throw new Exception("Failed to generate results.");
     }
     return;
 }
We use the following code to invoke our callback and GenerateStream.
pipeline.StartChat(); // Start chat with keeping history in kv cache.

Console.WriteLine("question:");
while (true)
{
    string? input = Console.ReadLine();
    if (string.IsNullOrWhiteSpace(input)) break;

    using var streamerCallback = new StreamerCallback((string chunk) =>
    {
        Console.Write(chunk);
    });

    pipeline.GenerateStream(input, generationConfig, streamerCallback);

    input = null;
    Console.WriteLine("\n----------\nquestion:");
}

pipeline.FinishChat(); // Finish chat and clear history in kv cache.
About Deployment
We can directly download the OpenVINO official release of the LLM's IR from Hugging Face using this link.
git clone https://huggingface.co/OpenVINO/Phi-3.5-mini-instruct-int8-ov
The OpenVINO.GenAI 2025.1 package can be downloaded via this link.
The C# project directly depends on openvino_genai_c.dll, which in turn has transitive dependencies on other toolkit-related DLLs, including Intel TBB libraries.
To ensure proper runtime behavior, all the DLLs delivered with OpenVINO.GenAI — including openvino_genai_c.dll and its dependencies — are bundled and treated as part of the C# project’s runtime dependencies.
We use the following cmd commands to download the genai package and copy all the required dependent DLLs to the directory containing the *.csproj file.
curl -O https://storage.openvinotoolkit.org/repositories/openvino_genai/packages/2025.1/windows/openvino_genai_windows_2025.1.0.0_x86_64.zip
tar -xzvf openvino_genai_windows_2025.1.0.0_x86_64.zip
xcopy /y openvino_genai_windows_2025.1.0.0_x86_64\runtime\bin\intel64\Release\*.dll "C:\path\to\ChatSample\"
xcopy /y openvino_genai_windows_2025.1.0.0_x86_64\runtime\3rdparty\tbb\bin\*.dll "C:\path\to\ChatSample\"
Full Implementation
Please refer to https://github.com/apinge/openvino_ai_practice/tree/main/ov_genai_interop/ov_genai_interop_net, to access the full implementation.
DeepSeek Janus-Pro Model Enabling with OpenVINO
1. Introduction
Janus is a unified multimodal understanding and generation model developed by DeepSeek. Janus proposed decoupling visual encoding to alleviate the conflict between multimodal understanding and generation tasks. Janus-Pro further scales up the Janus model to larger model size (deepseek-ai/Janus-Pro-1B & deepseek-ai/Janus-Pro-7B) with optimized training strategy and training data, achieving significant advancements in both multimodal understanding and text-to-image tasks.
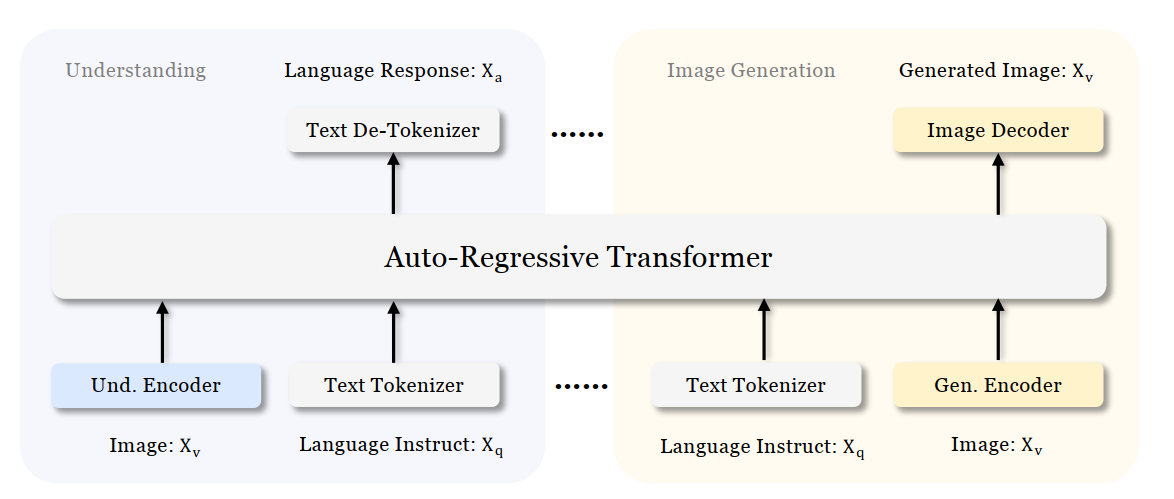
Figure 1 shows the architecture of Janus-Pro, which decouples visual encoding for multimodal understanding and visual generation. “Und. Encoder” and “Gen. Encoder” are abbreviations for “Understanding Encoder” and “Generation Encoder”. For the multimodal understanding task, SigLIP vision encoder used to extract high-dimensional semantic features from the image, while for the vision generation task, VQ tokenizer used to map images to discrete IDs. Both the understanding adaptor and the generation adaptor are two-layer MLPs to map the embeddings to the input space of LLM.
In this blog, we will introduce how to deploy Janus-Pro model with OpenVINOTM runtime on the intel platform.
2. Janus-Pro Pytorch Model to OpenVINOTM Model Conversion
2.1. Setup Python Environment
2.2 Download Janus Pytorch model (Optional)
2.3. Convert Pytorch Model to OpenVINOTM INT4 Model
The converted OpenVINO will be saved in Janus-Pro-1B-OV directory for deployment.
3. Janus-Pro Inference with OpenVINOTM Demo
In this section, we provide several examples to show Janus-Pro for multimodal understanding and vision generation tasks.
3.1. Multimodal Understanding Task – Image Caption with OpenVINOTM
Prompt: Describe image in details
Input image:

Generated Output:
3.2. Multimodal Understanding Task – Equation Description with OpenVINOTM
Prompt: Generate the latex code of this formula
Input Image:
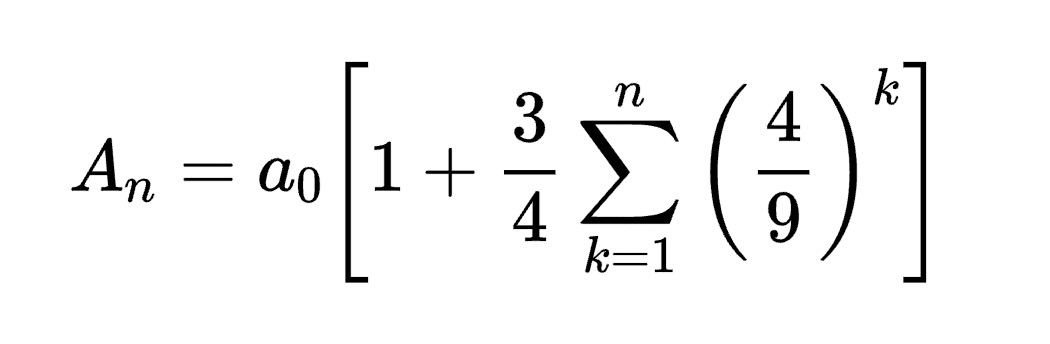
Generated Output:
3.3. Multimodal Understanding Task – Code Generation with OpenVINOTM
Prompt: Generate the matplotlib pyplot code for this plot
Input Image:
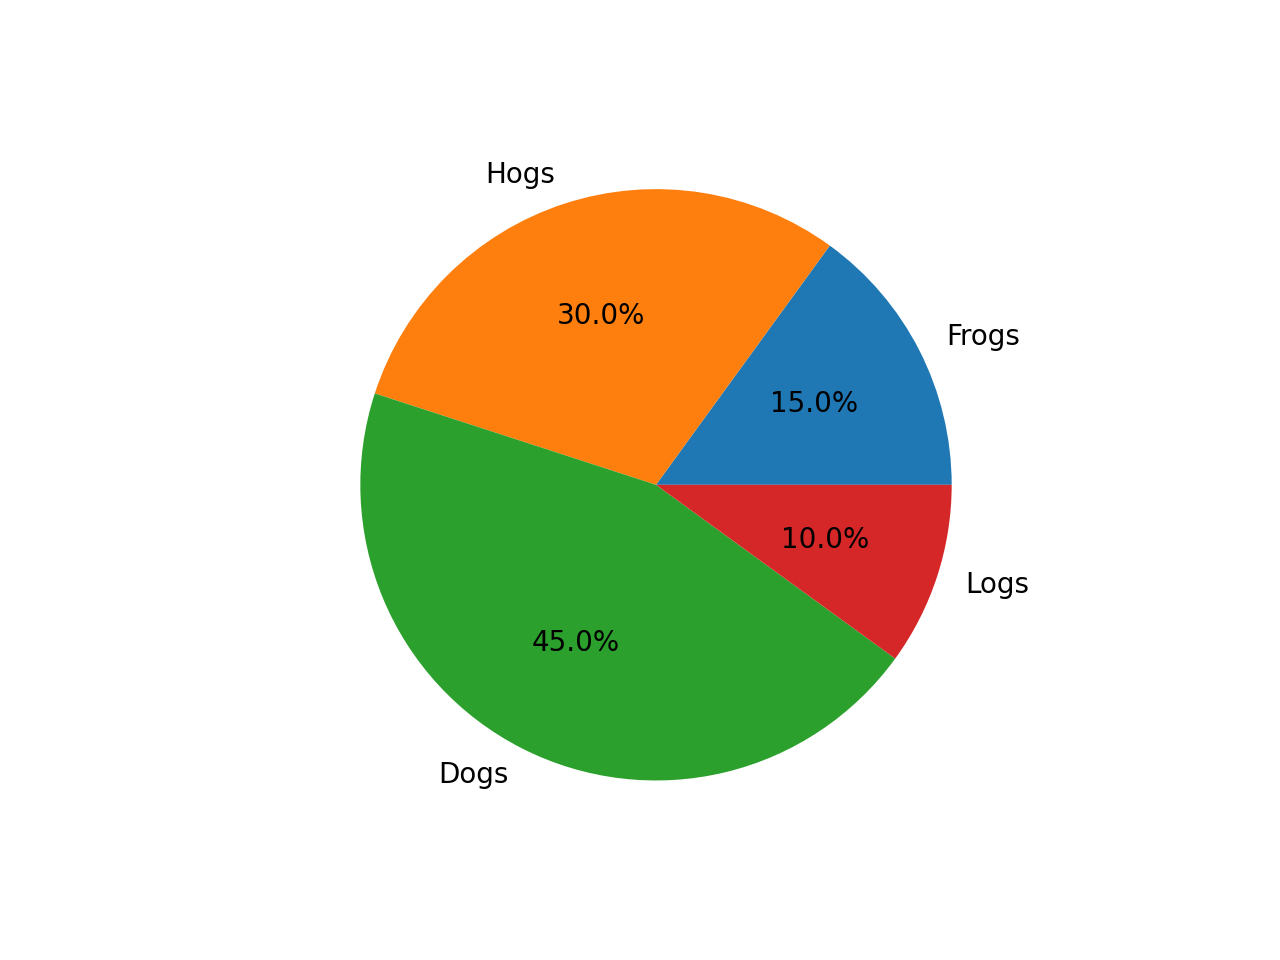
Generated Output:
3.4. Vision Generation Task with OpenVINOTM
Input Prompt: A cute and adorable baby fox with big brown eyes, autumn leaves in the background enchanting, immortal, fluffy, shiny mane, Petals, fairyism, unreal engine 5 and Octane Render, highly detailed, photorealistic, cinematic, natural colors.
Generated image:


4. Performance Evaluation & Memory Usage Analysis
We also provide benchmark scripts to evaluate Janus-Pro model performance and memory usage with OpenVINOTM inference, you may specify model name and device for your target platform.
4.1. Benchmark Janus-Pro for Multimodal Understanding Task with OpenVINOTM
Here are some arguments for benchmark script for Multimodal Understanding Task:
--model_id: specify the Janus OpenVINOTM model directory
--prompt: specify input prompt for multimodal understanding task
--image_path: specify input image for multimodal understanding task
--niter: specify number of test iteration, default is 5
--device: specify which device to run inference
--max_new_tokens: specify max number of generated tokens
By default, the benchmark script will run 5 round multimodal understanding tasks on target device, then report pipeline initialization time, average first token latency (including preprocessing), 2nd+ token throughput and max RSS memory usage.
4.2. Benchmark Janus-Pro for Text-to-Image Task with OpenVINOTM
Here are some arguments for benchmark scripts for Text-to-Image Task
--model_id: specify the Janus OpenVINO TM model directory
--prompt: specify input prompt for text-to-image generation task
--niter: specify number of test iteration
--device: specify which device to run inference
By default, the benchmark script will run 5 round image generation tasks on target device, then report the pipeline initialization time, average image generation latency and max RSS memory usage.
5. Conclusion
In this blog, we introduced how to enable Janus-Pro model with OpenVINOTM runtime, then we demonstrated the Janus-Pro capability for various multimodal understanding and image generation tasks. In the end, we provide python script for performance & memory usage evaluation for both multimodal understanding and image generation task on target platform.
OpenVINO GenAI Serving (OGS) update
Authors: Xiake Sun, Su Yang, Tianmeng Chen, Tong Qiu
OpenVINO GenAI Server (OGS) Update:
-Update LLM: stream generation, reset handle, multi-round chat, model cache config
-Support VLM
-Support Reranker for RAG sample
-Support BLIP image embedding for photo search with DB
-Support C++ GUI with imgui for photo search
Now we scale the text embedding to image embedding for RAG sample and support multi-Vector Retriever for RAG.
- Multi-Vector Retriever for RAG on text: QA over Document
- Multi-Vector Retriever for RAG on image: Photo search with DB retrieval
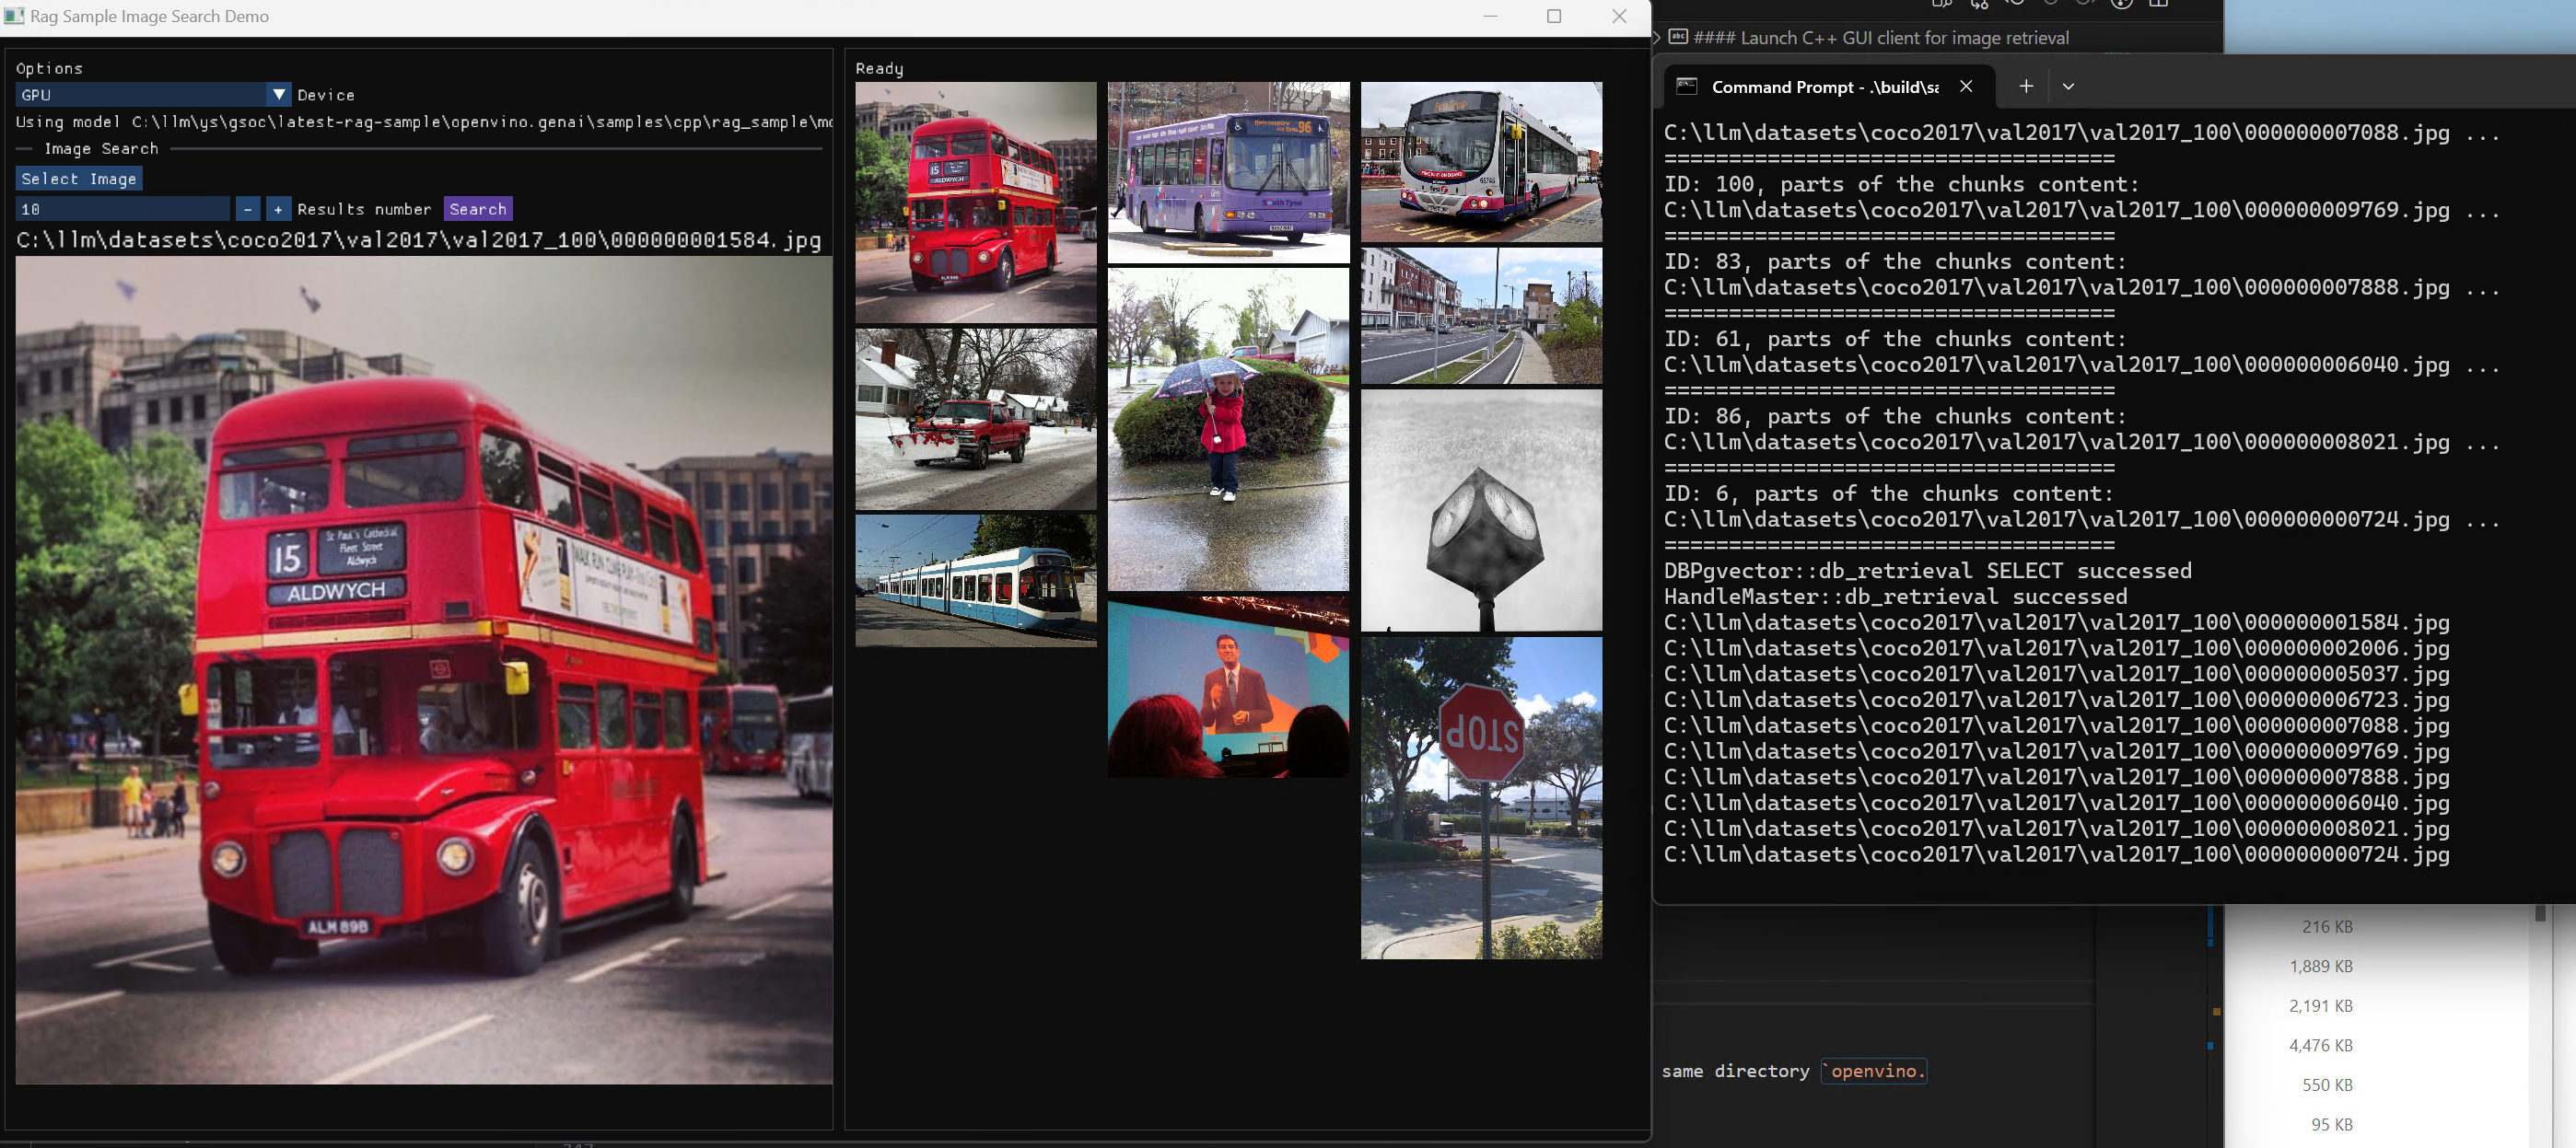
Here is a photo search sample with image embedding.
Usage 2: Photo Search with DB retrieval
Steps:
1.use python client to create image vector DB (PostgreSQL)
2.use GUI to search image
Here is a sample image to demonstrate GUI usage on client platform. we search the bus photo with top 10 similar images from the 100 images which are embedded into Vector DB.
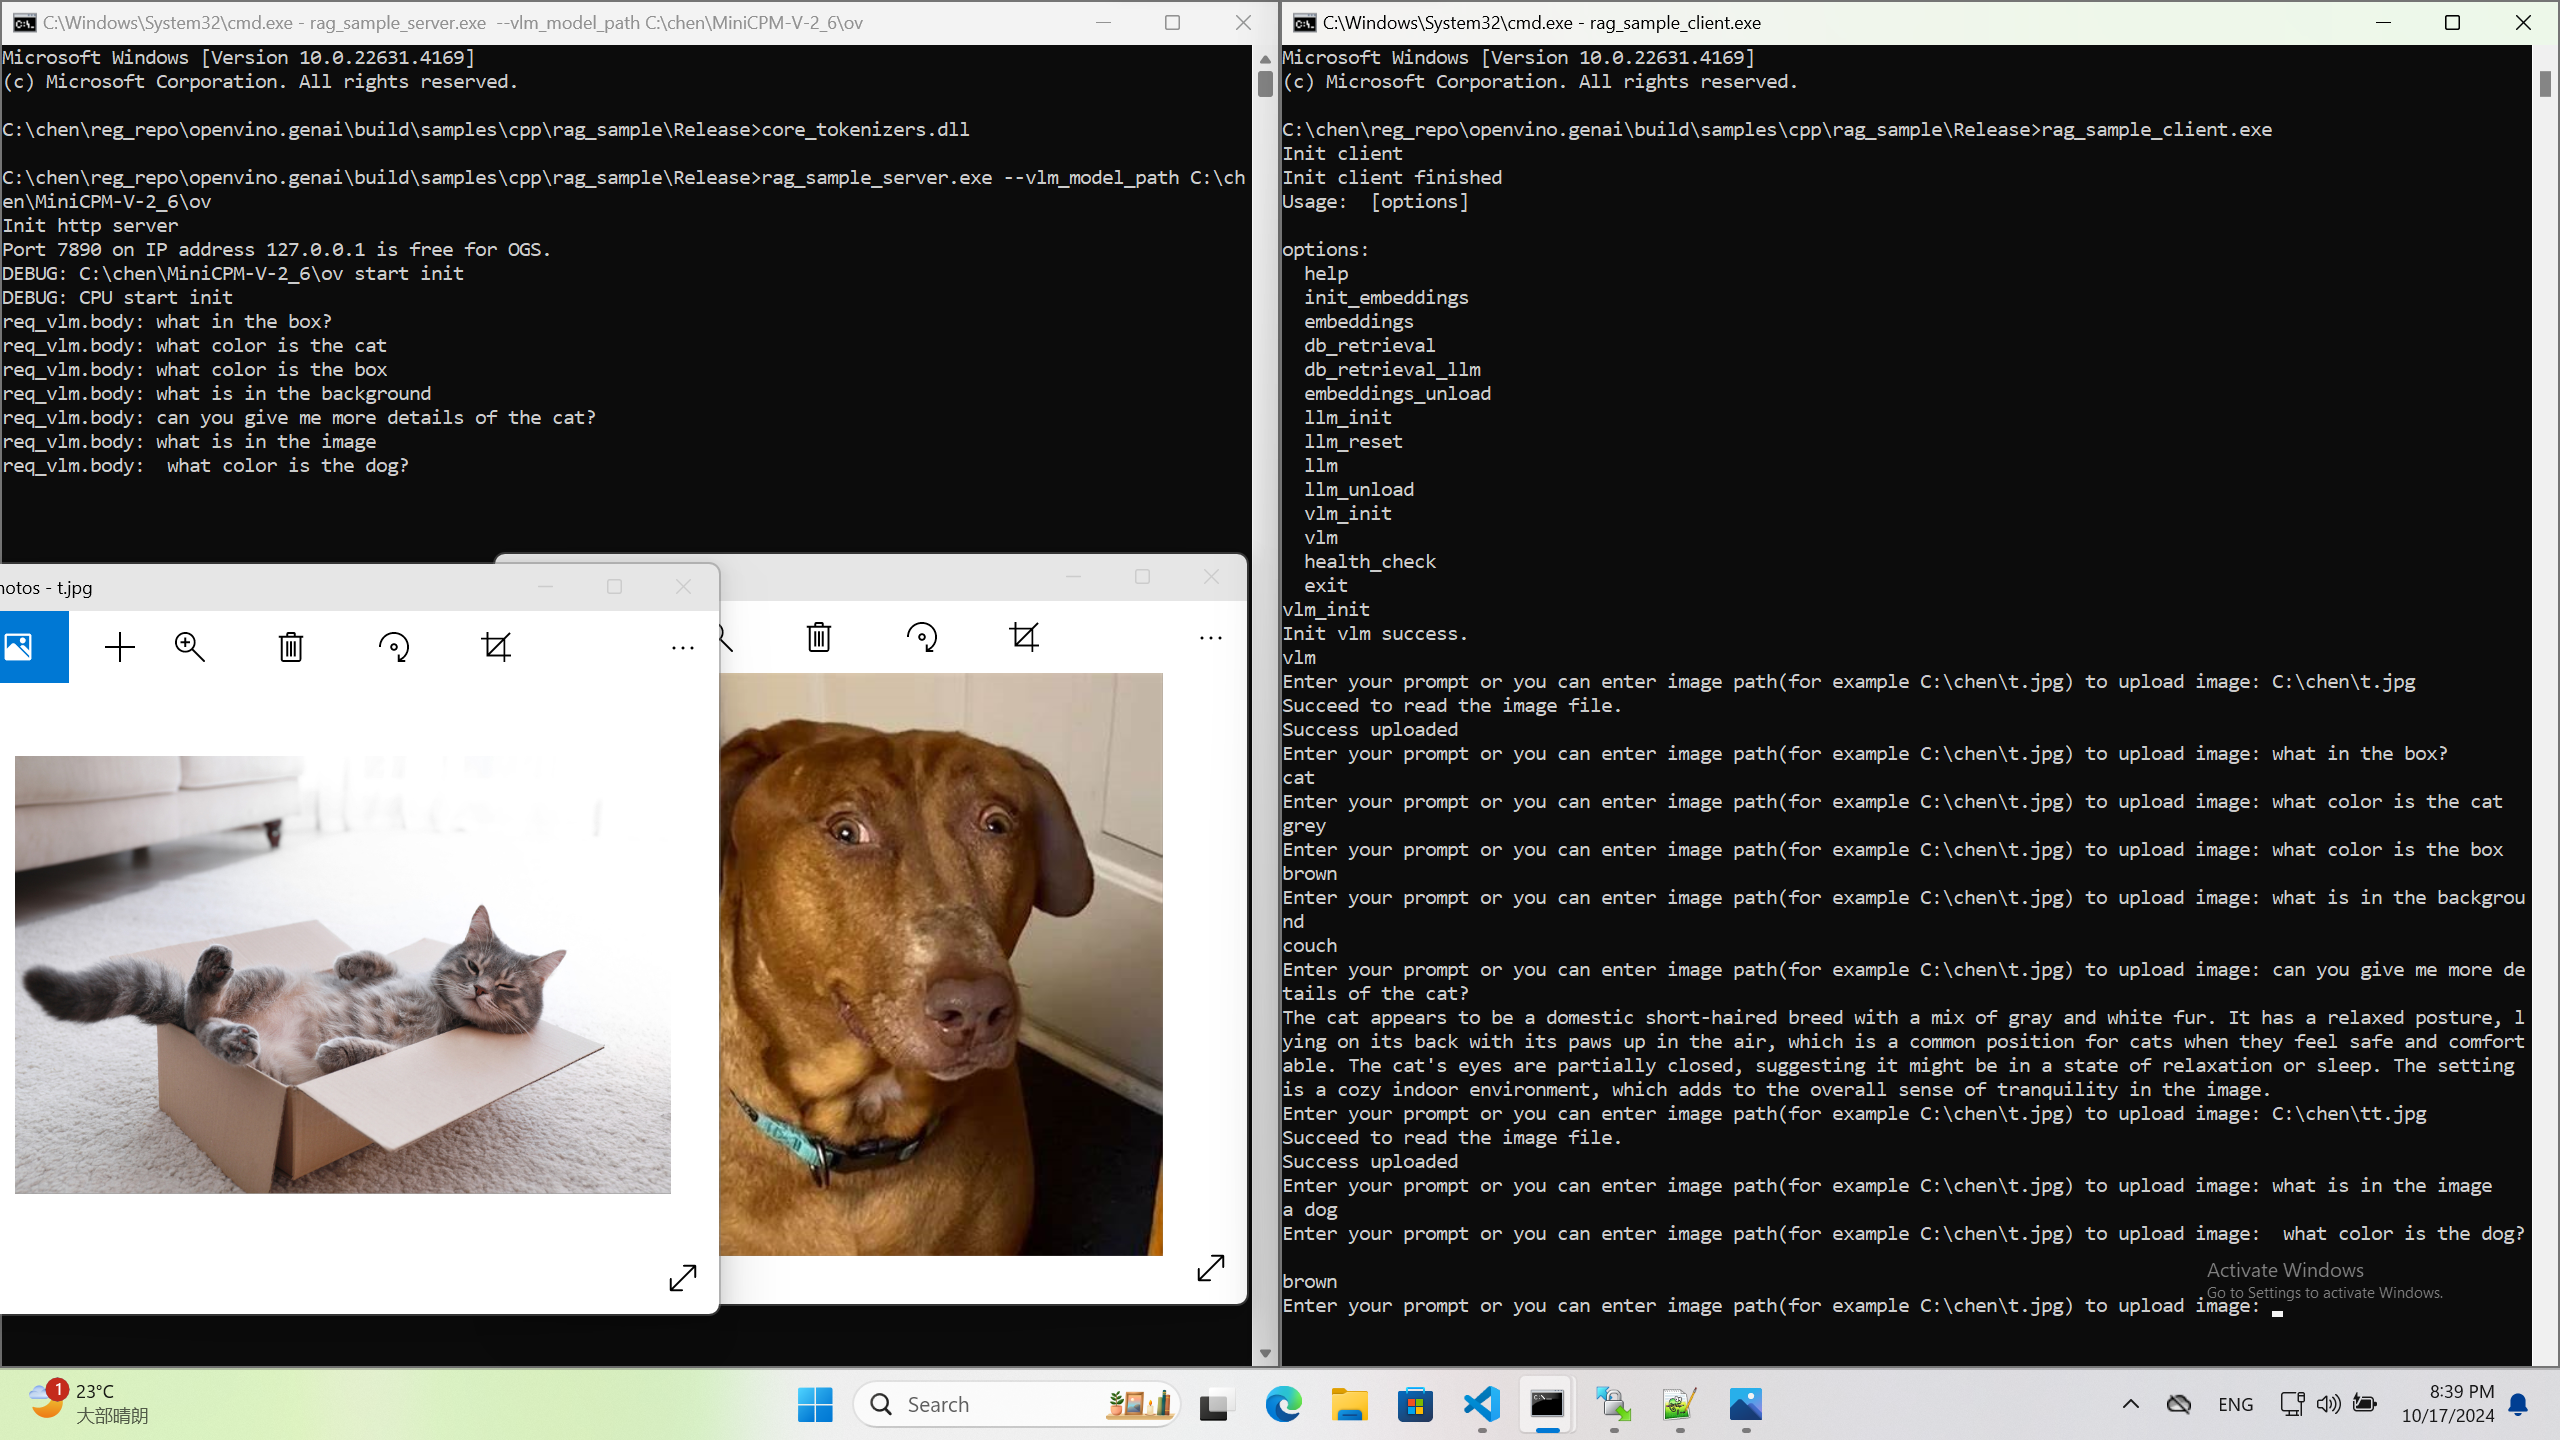
Usage 3: Chat with images via MiniCPM-V
Once we have created a multimodal vector DB through image embedding, we can further communicate with the image through VLM.
We integrate the C++ GenAI sample visual_language_chat with openbmb/MiniCPM-V-2_6.
Here is the demo image on client platform.
OpenVINO GenAI Serving (OGS)
Authors: Fiona Zhao, Xiake Sun, Wenyi Zou, Su Yang, Tianmeng Chen
Model Server reference implementation based on OpenVINO GenAI Package for Edge/Client AI PC Use Case.
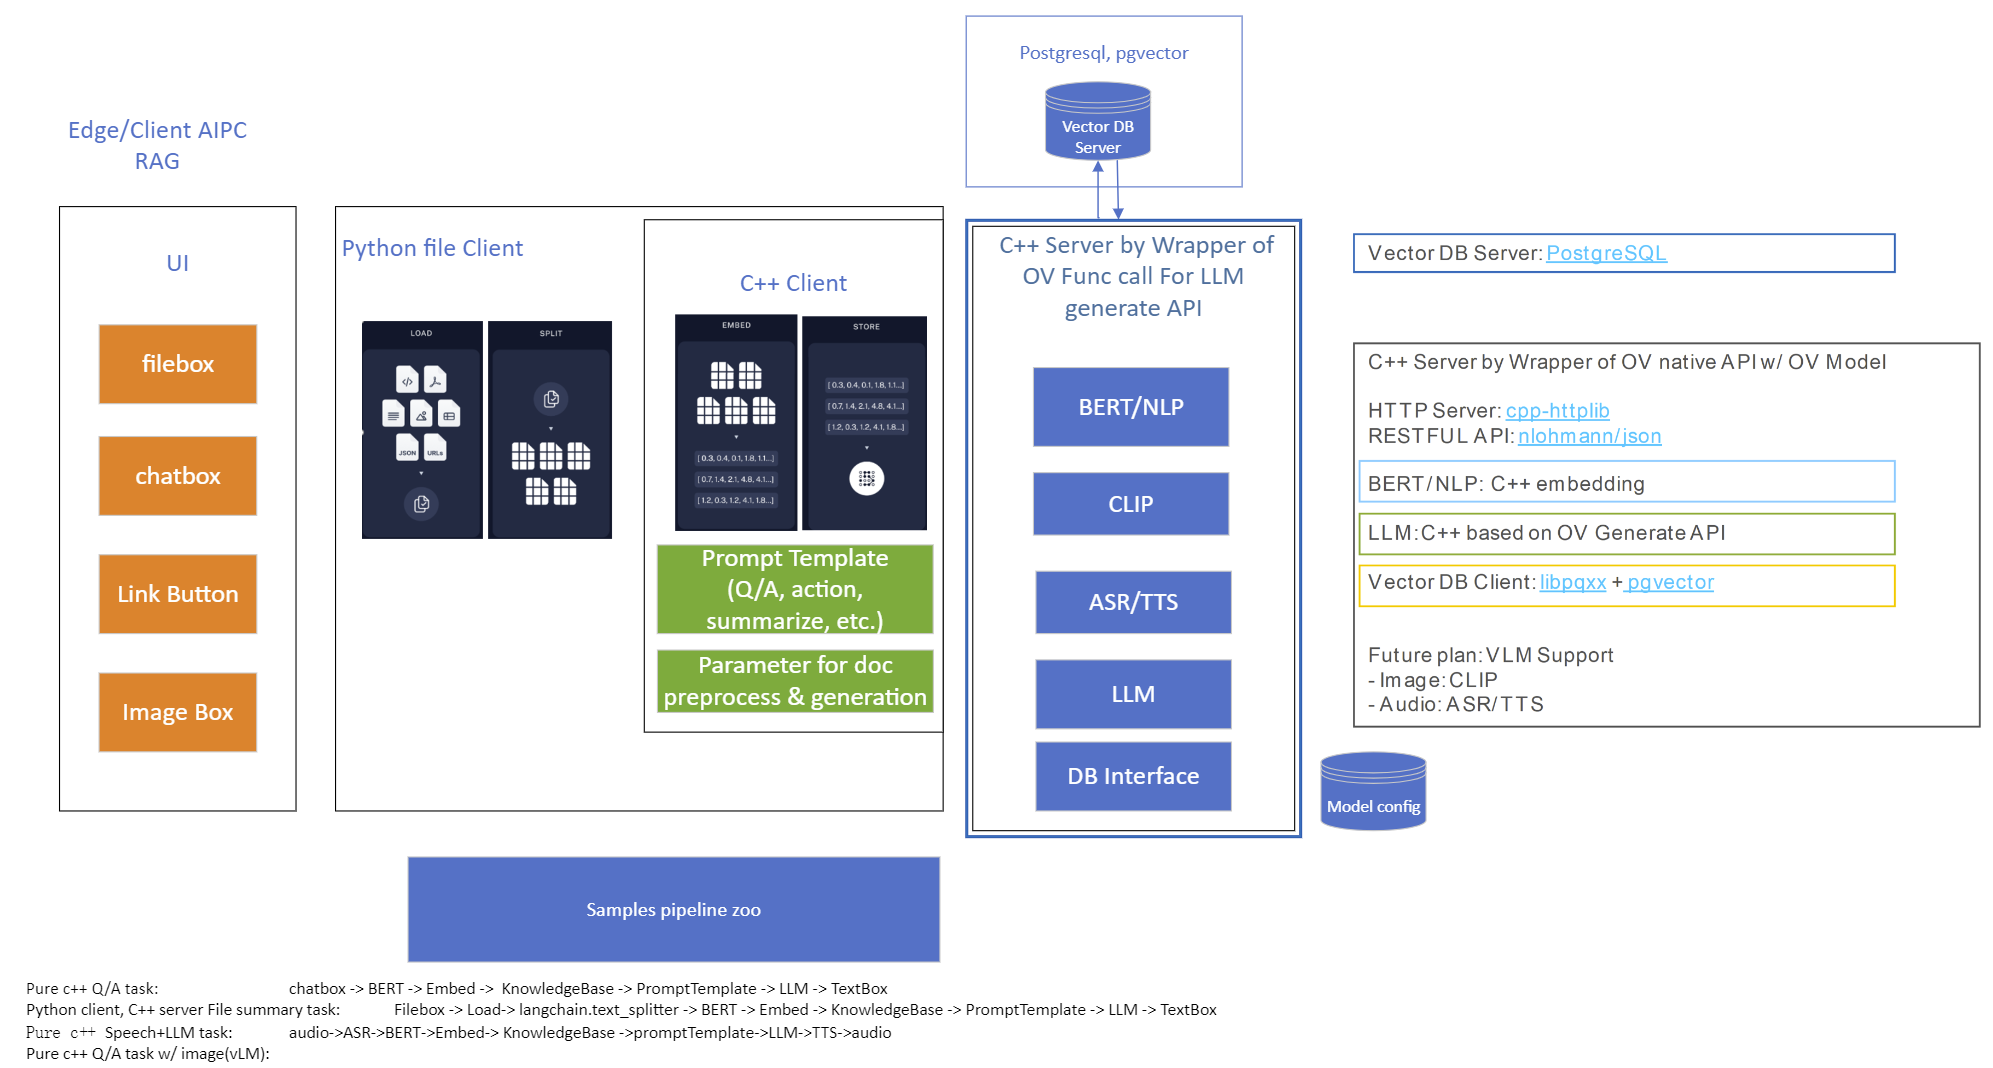
Use Case 1: C++ RAG Sample that supports most popular models like LLaMA 2
This example showcases for Retrieval-Augmented Generation based on text-generation Large Language Models (LLMs): chatglm, LLaMA, Qwen and other models with the same signature and Bert model for embedding feature extraction. The sample fearures ov::genai::LLMPipeline and configures it for the chat scenario. There is also a Jupyter notebook which provides an example of LLM-powered RAG in Python.
Download and convert the model and tokenizers
The --upgrade-strategy eager option is needed to ensure optimum-intel is upgraded to the latest version.
Setup of PostgreSQL, Libpqxx and Pgvector
Langchain's document Loader and Spliter
- Load: document_loaders is used to load document data.
- Split: text_splitter breaks large Documents into smaller chunks. This is useful both for indexing data and for passing it in to a model, since large chunks are harder to search over and won’t in a model’s finite context window.
PostgreSQL
Download postgresql from enterprisedb.(postgresql-16.2-1-windows-x64.exe is tested)
Install PostgreSQL with postgresqltutorial.
Setup of PostgreSQL:
1. Open pgAdmin 4 from Windows Search Bar.
2. Click Browser (left side) > Servers > Postgre SQL 10.
3. Create the user postgres with password openvino (or your own setting)
4. Open SQL Shell from Windows Search Bar to check this setup. 'Enter' to set Server, Database, Port, Username as default and type Password.
libpqxx
'Official' C++ client library (language binding), built on top of C library
Update the source code from https://github.com/jtv/libpqxx in deps\libpqxx
The pipeline connects with DB based on Libpqxx.
pgvector
Open-source vector similarity search for Postgres.
By default, pgvector performs exact nearest neighbor search, which provides perfect recall. It also supports approximate nearest neighbor search (HNSW), which trades some recall for speed.
For Windows, Ensure C++ support in Visual Studio 2022 is installed, then use nmake to build in Command Prompt for VS 2022(run as Administrator). Please follow with the pgvector
Enable the extension (do this once in each database where you want to use it), run SQL Shell from Windows Search Bar with "CREATE EXTENSION vector;".
Printing CREATE EXTENSION shows successful setup of Pgvector.
pgvector-cpp
pgvector support for C++ (supports libpqxx). The headers (pqxx.hpp, vector.hpp, halfvec.hpp) are copied into the local folder rag_sample\include. Our pipeline does the vector similarity search for the chunks embeddings in PostgreSQL, based on pgvector-cpp.
Install OpenVINO, VS2022 and Build this pipeline
Download 2024.2 release from OpenVINO™ archives*. This OV built package is for C++ OpenVINO pipeline, no need to build the source code. Install latest Visual Studio 2022 Community for the C++ dependencies and LLM C++ pipeline editing.
Extract the zip file in any location and set the environment variables with dragging this setupvars.bat in the terminal Command Prompt. setupvars.ps1 is used for terminal PowerShell. <INSTALL_DIR> below refers to the extraction location. Run the following CMD in the terminal Command Prompt.
Notice:
- Install on Windows: Copy all the DLL files of PostgreSQL, OpenVINO and tbb and openvino-genai into the release folder. The SQL DLL files locate in the installed PostgreSQL path like "C:\Program Files\PostgreSQL\16\bin".
- If cmake not installed in the terminal Command Prompt, please use the terminal Developer Command Prompt for VS 2022 instead.
- The openvino tokenizer in the third party needs several minutes to build. Set 8 for -j option to specify the number of parallel jobs.
- Once the cmake finishes, check rag_sample_client.exe and rag_sample_server.exe in the relative path .\build\samples\cpp\rag_sample\Release.
- If Cmake completed without errors, but not find exe, please open the .\build\OpenVINOGenAI.sln in VS2022, and set the solution configuration as Release instead of Debug, then build the llm project within VS2022 again.
Run
Launch RAG Server
rag_sample_server.exe --llm_model_path TinyLlama-1.1B-Chat-v1.0 --llm_device CPU --embedding_model_path bge-large-zh-v1.5 --embedding_device CPU --db_connection "user=postgres host=localhost password=openvino port=5432 dbname=postgres"
Lanuch RAG Client
rag_sample_client.exe
Lanuch python Client
Use python client to send the message of DB init and send the document chunks to DB for embedding and storing.
python client_get_chunks_embeddings.py --docs test_document_README.md
Large Language Model Graph Customization with OpenVINO™ Transformations API
Authors: Xiake Sun, Wenyi Zou, Fiona Zhao
Introduction
A Large Language Model (LLM) is a type of artificial intelligence algorithm that uses deep learning techniques and massively large data sets to understand, summarize, generate and predict new content.
OpenVINO™ optimizes the deployment of LLMs, enhancing their performance and integration into various applications. We already provide general guide to use LLMs with OpenVINO™, from model loading and conversion to advanced use cases.
In this blog, we will introduce some useful method to customize Large Language model’s graph with OpenVINO™ transformation API.
OpenVINO™ Runtime has three main transformation types:
- Modelpass: straightforward way to work with ov::Model directly
- Matcherpass: pattern-based transformation approach
- Graphrewrite pass: container for matcher passes needed for efficient execution.
In this blog, we mainly use ov::pass::MatcherPassto customize model subgraph via pattern-based transformation.
Here are common steps to implement graph customization using ov::pass::MatcherPass.
- Create a pattern
- Implement a callback
- Register the pattern and Matcher
- Execute MatcherPass
In this blog, we will use an open-source LLMs Qwen1.5-7B-Chat-GPTQ-Int4 from Alibaba Cloud with guide for model conversion and graph customization methods.
Qwen Pytorch to OpenVINO™ Model conversion
Here we can use openvino.genai repo to convert Qwen1.5 GPTQ INT4 Pytroch model to OpenVINO™model.
Converted model can be find in path “Qwen1.5-7B-Chat-GPTQ-Int4-OV/pytorch/dldt/GPTQ_INT4-FP16/".
Insert custom layer to OpenVINO™ model
Vocabularysize in the context of LLMs refers to the total number of unique words, or tokens, that the model can recognize and use. The larger the vocabulary size,the more nuanced and detailed the model’s understanding of language can be,however, it also requires more computational and memory resources for deployment. E.g. Qwen’s vocabulary size(151936) is almost 5x that Llama2 (32000), therefore additional optimization is required for efficient deployment.
We found that the following pattern existed in the Qwen model in Figure 2:
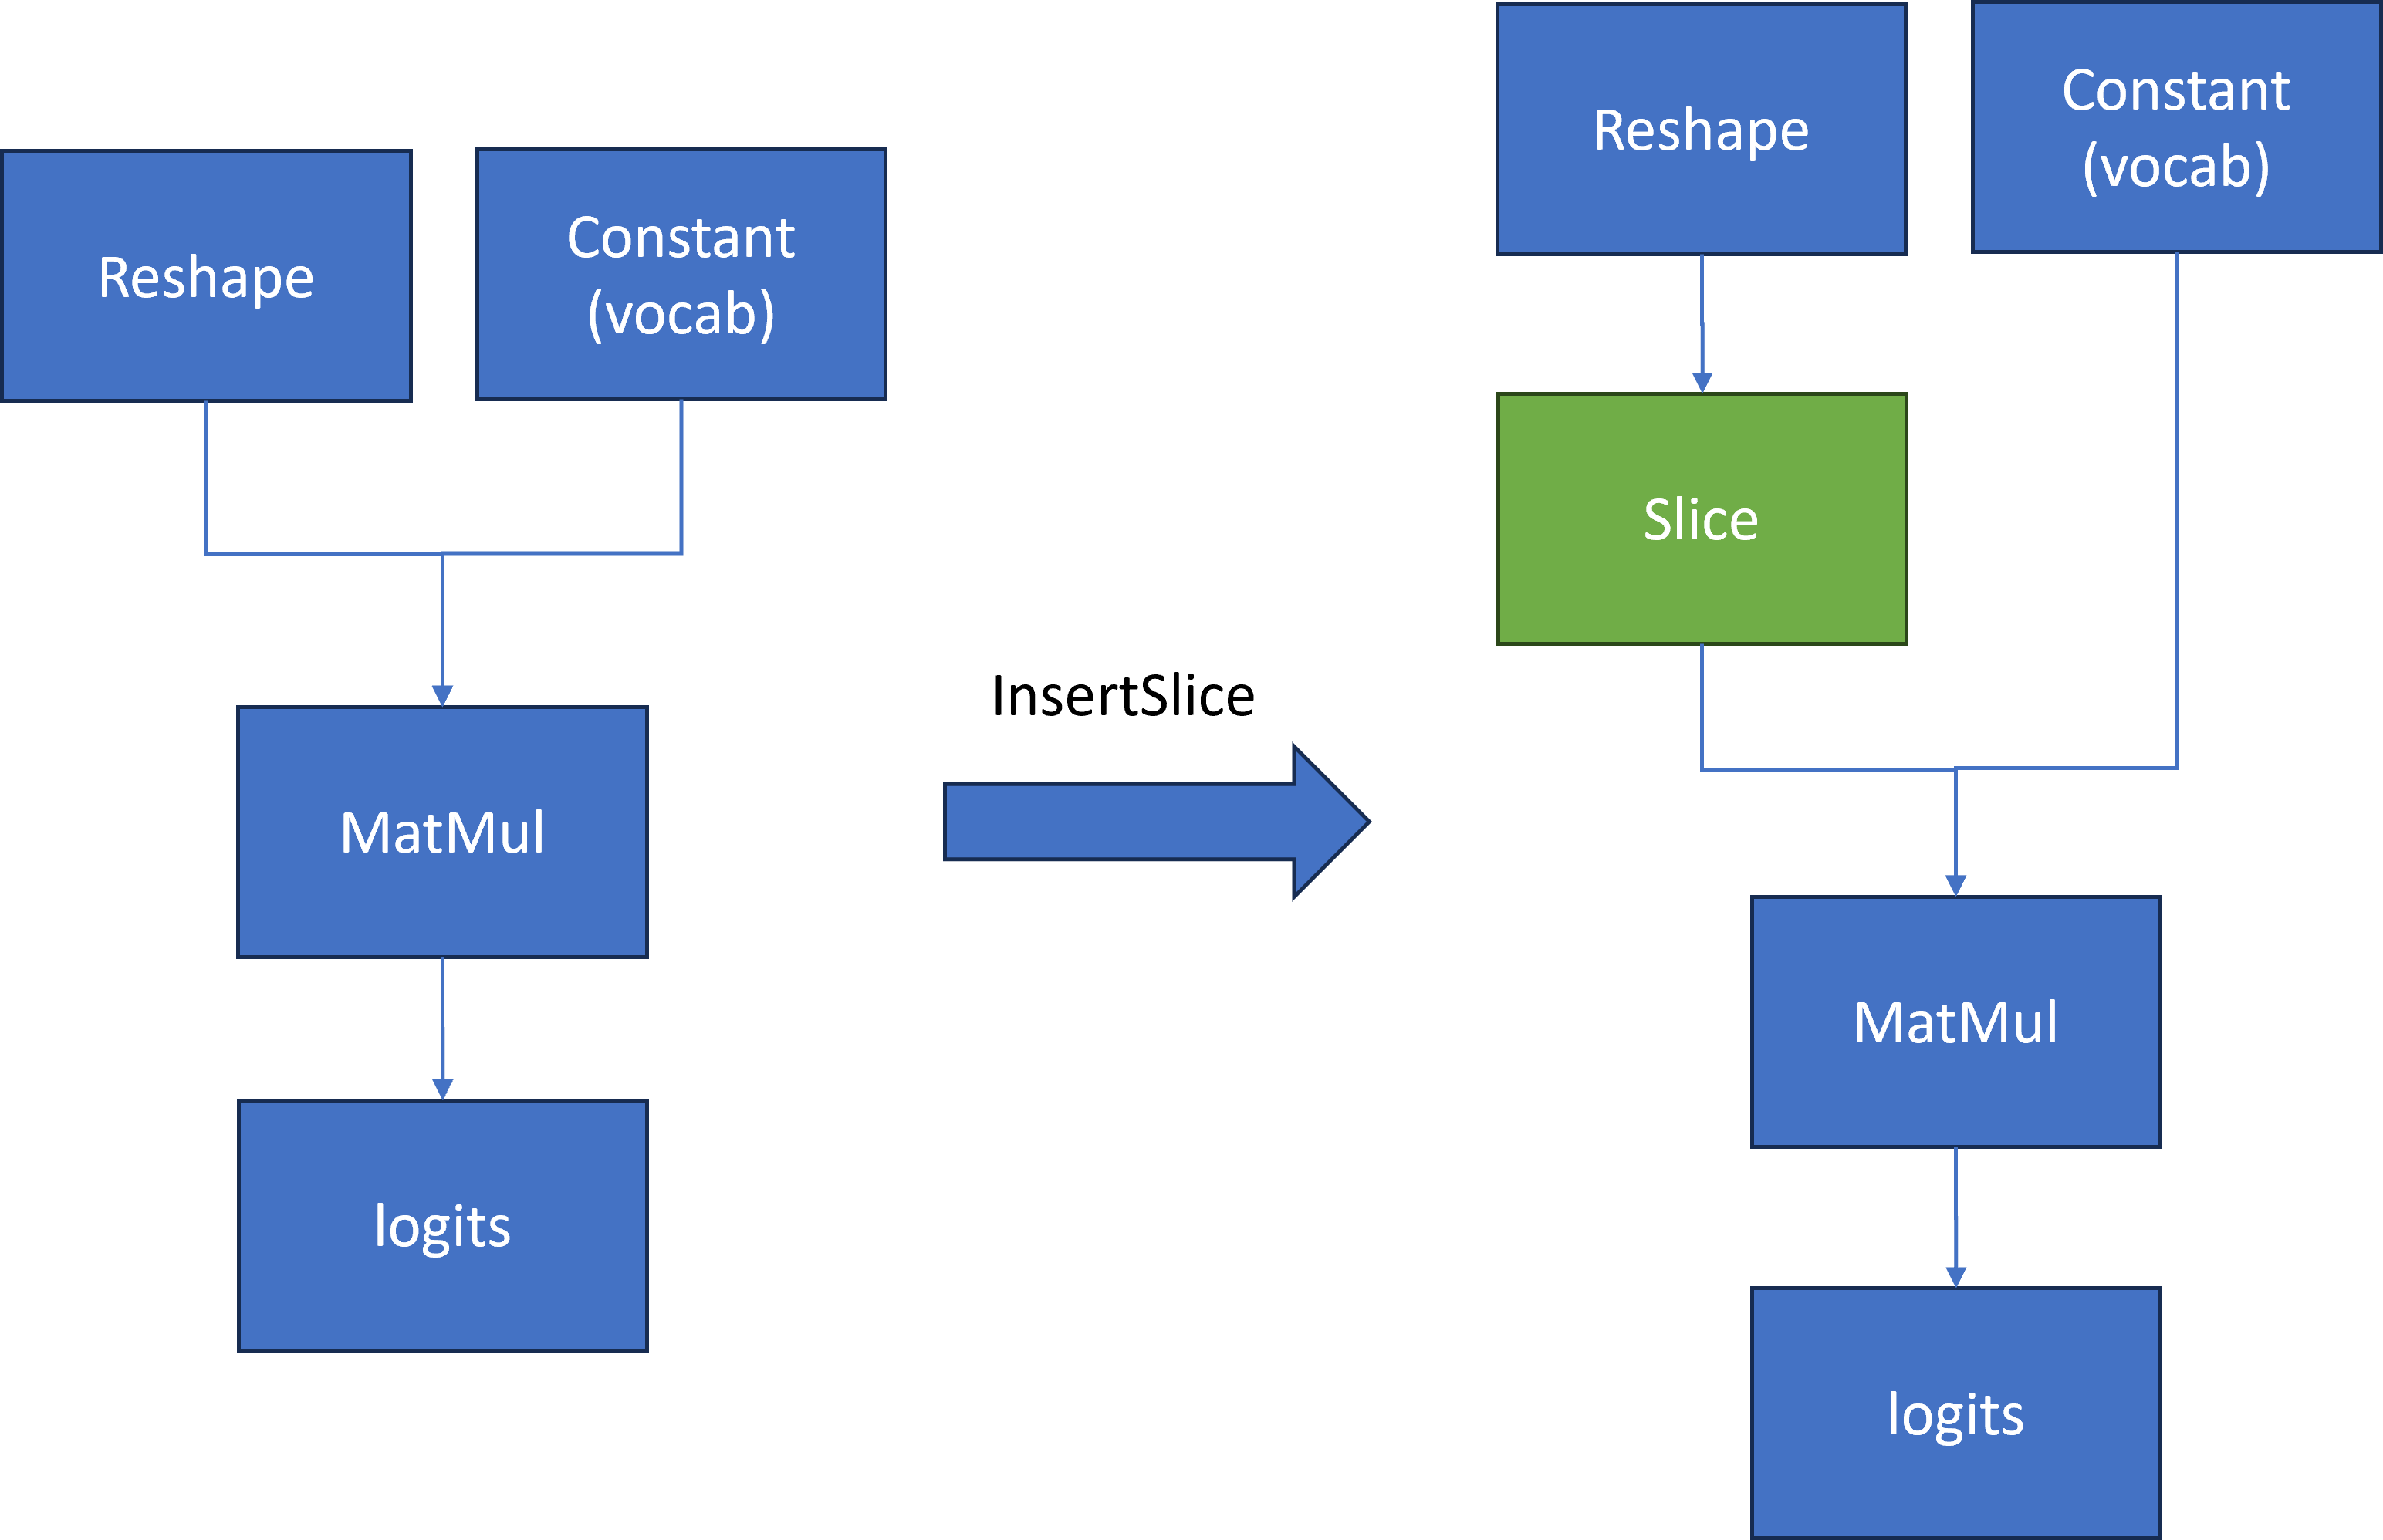
To compute the first token generation for the input prompt with shape [1, seq_length], we need to calculate a MatMul operation based on two inputs.
- First input is a reshape node output with shape[1, seq_length, 4096]
- Second input is a constant value that contains the model’s vocabulary with shape [4096,151936]
Then Matmul calculates two inputs [1, seq_length, 4096] * [4096,151936] to output large logits [1, seq_length,151936]. However, for the next token prediction, we only need the last element [1,4096] in 1st dimension from logits for sampling.
The main idea is to insert a slice operation between Reshape and Matmul nodes to extract only the last element in 2nd dimension of reshape node output as the first input with shape [1,4096] for computation. Therefore, Matmul computation can be reduced from [1, seq_len, 4096] * [1, 4096, 151936] = [1, seq_len, 151936] to [1, 1, 4096] *[4096, 151936] = [1, 1, 151936], which can reduce first token latency and memory consumption.
Here is a sample code to implement the workflow defined in Figure2 to reduce Qwen's last Matmul computation and memory usage:
We defined a OpenVINO™ transformation "InsertSlice" to find the logits (Results) node via ov::pass::MatchPass, then search along root->parent->grandparent node to find the Reshape node. Afterward, we insert a Slice node between the Reshape and Matmul nodes to extract the last element of seq_length with shape [1,1,4096]. In the end, we apply "InsertSlice" transformation to original OpenVINO™ model and save modified model on disk for deployment.
Modify model weights of specified layer in OpenVINO™ model
In case you want to update certain model layer weights after model training or fine-tuning/compression.
E.g. if you have an INT4 weight-compressed model using another model compression method, e.g. AWQ, you may want to transfer model weights optimized with the quantization method.
The most general method will be to convert the original model to OpenVINO™ model if the model direct conversion works. However, if first option is not works out of box, an alternative option is to replace the model weights from OpenVINO™ models with external fine-tuning model weights.
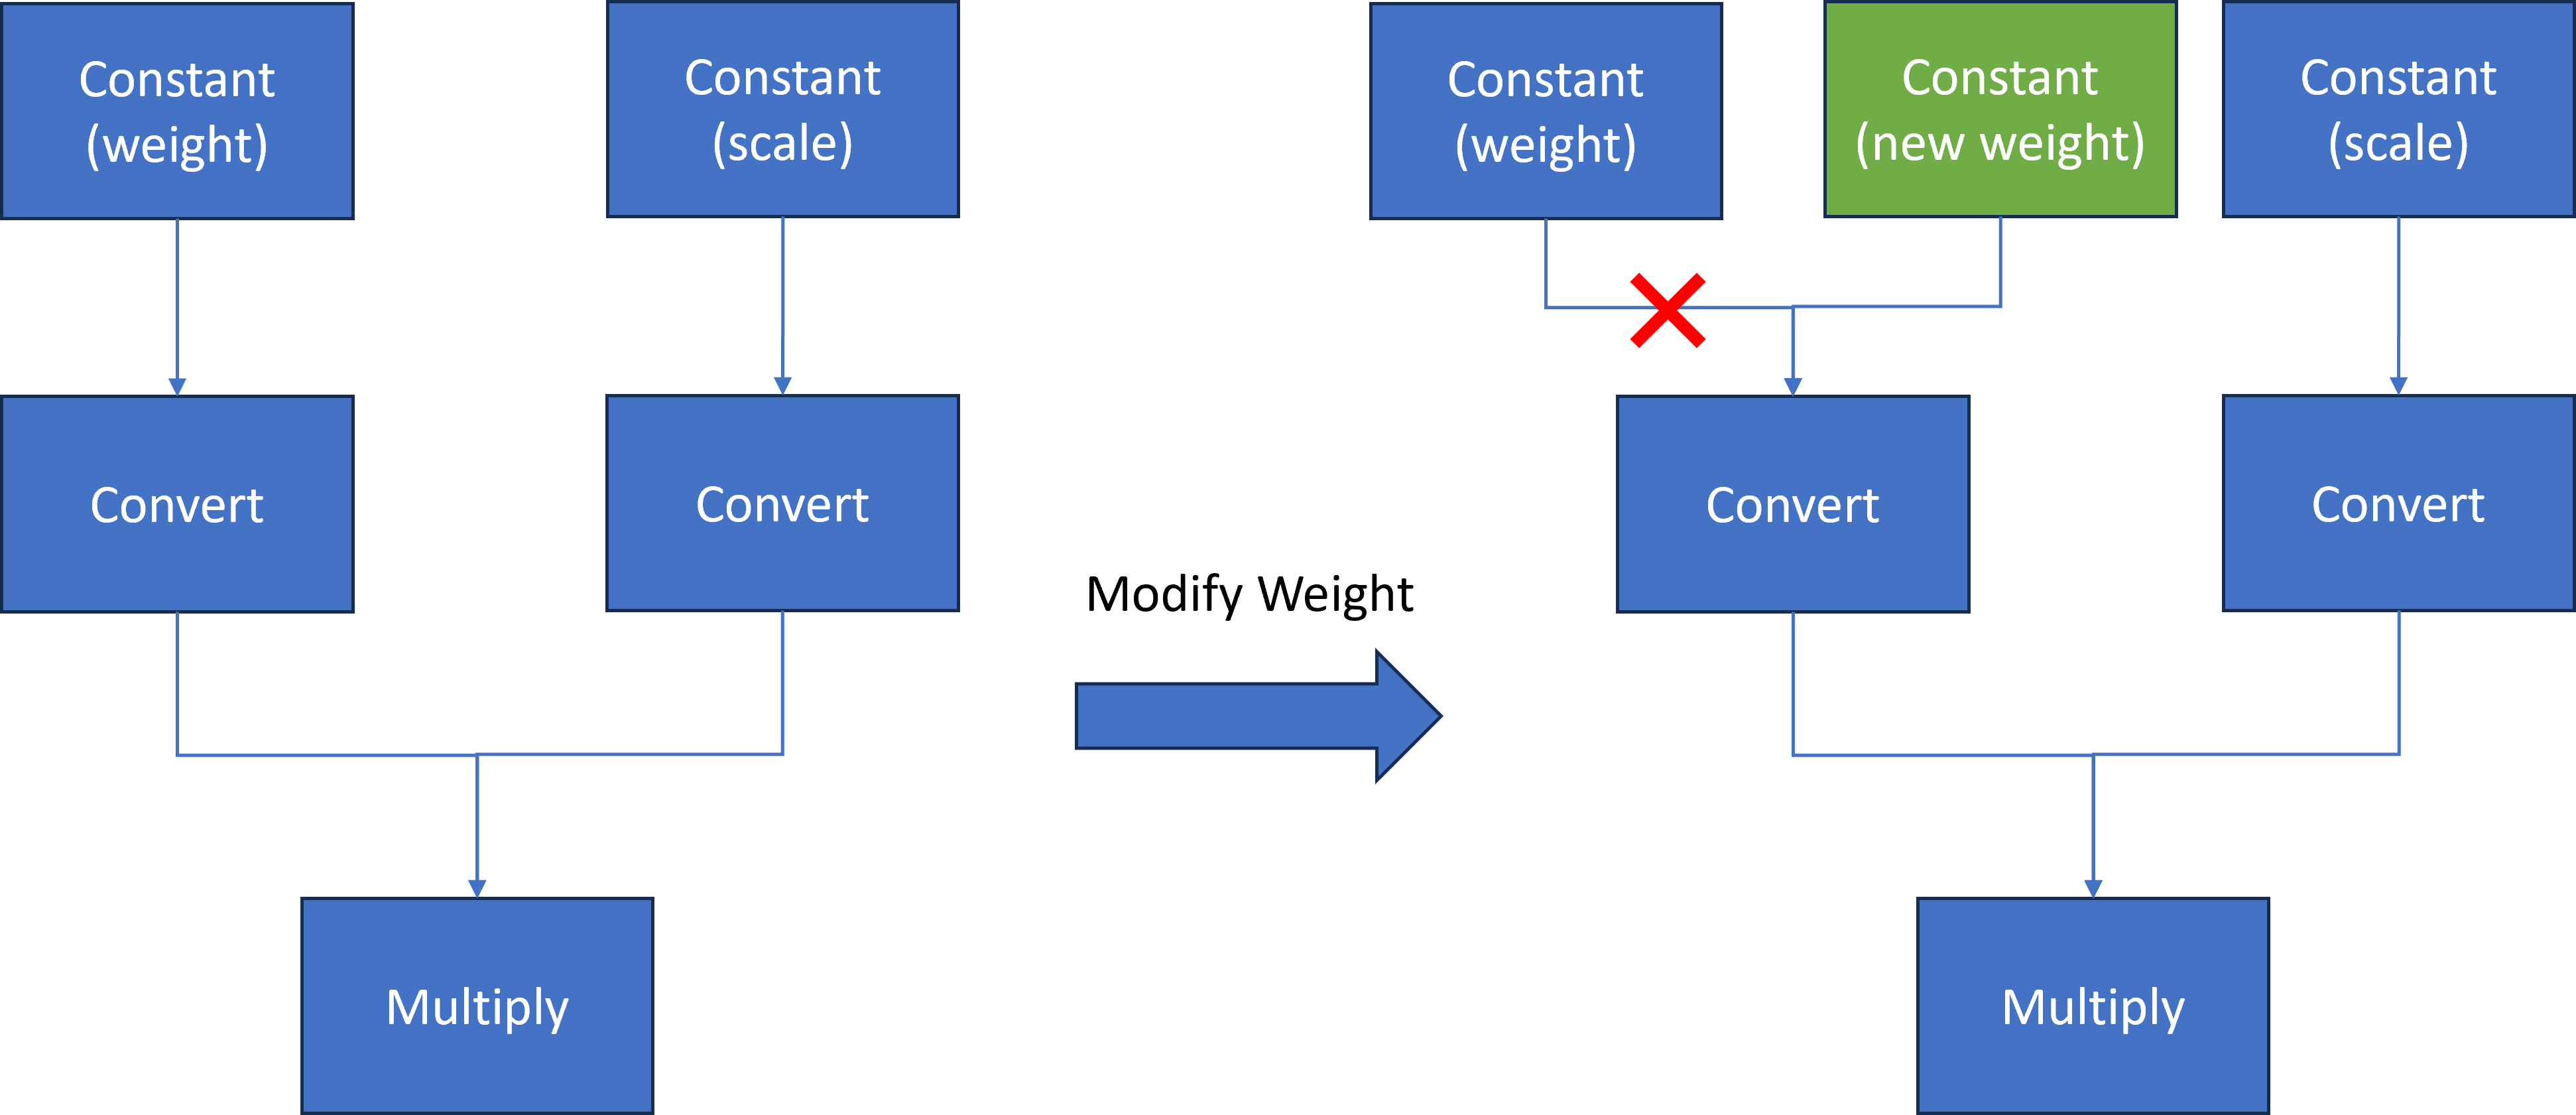
Here we introduce a common method to modify layer weights of Qwen model via OpenVINO™ transformation API.
As Figure 3 shows, the goal is to replace model weights and scale of the original Constant node with external fine-tuned weights and scale data.
At first, we use ov::pass::MatchPass method to find the Convert node after the target node. Then we create a new constant node with external weight saved as a numpy array. Please note, GPTQ int4 model weight is saved asuint4 (U4) binary format, while numpy can only represent data with numpy.uint8. Therefore, we use a help function to pack 2 uint4 binary data as 1 uint8 binary data. Then we replace the Convert input port from the original Constant node to the new Constant node. Since the old constant node has no consumers and is neither the Result nor the Sink operation whose shared pointer counter is zero, the operation will be destructed and not be accessible anymore.
Here is a sample code to implement the workflow defined in Figure3 to replace Qwen Constant node via the new Constant node with external data:
We defined a OpenVINO™ transformation "InsertWeights" to find the target constant node via ov::pass::MatchPass, then we create a new Constat node with external numpy data and pack it as uint4 OpenVINO™ Tensor to replace original constant node in graph. In the end, we apply "InsertWeights" transformation to original OpenVINO™ model and save modified model on disk for deployment.
Conclusion
In this blog, we introduce how to apply graph customization based on OpenVINO™ model with OpenVINO™ transformation API. Furthermore, we show two examples of inserting layers & modifying layer weights based on Qwen LLM model with simple Python code.
Reference
IntegrateOpenVINO™ with Your Application – Model Representation
Enable Textual Inversion with Stable Diffusion Pipeline via Optimum-Intel
Introduction
Stable Diffusion (SD) is a state-of-the-art latent text-to-image diffusion model that generates photorealistic images from text. Recently, many fine-tuning technologies proposed to create custom Stable Diffusion pipelines for personalized image generation, such as Textual Inversion, Low-Rank Adaptation (LoRA). We’ve already published a blog for enabling LoRA with Stable Diffusion + ControlNet pipeline.
In this blog, we will focus on enabling pre-trained textual inversion with Stable Diffusion via Optimum-Intel. The feature is available in the latest Optimum-Intel, and documentation is available here.
Textual Inversion is a technique for capturing novel concepts from a small number of example images in a way that can later be used to control text-to-image pipelines. It does so by learning new “words” in the embedding space of the pipeline’s text encoder.
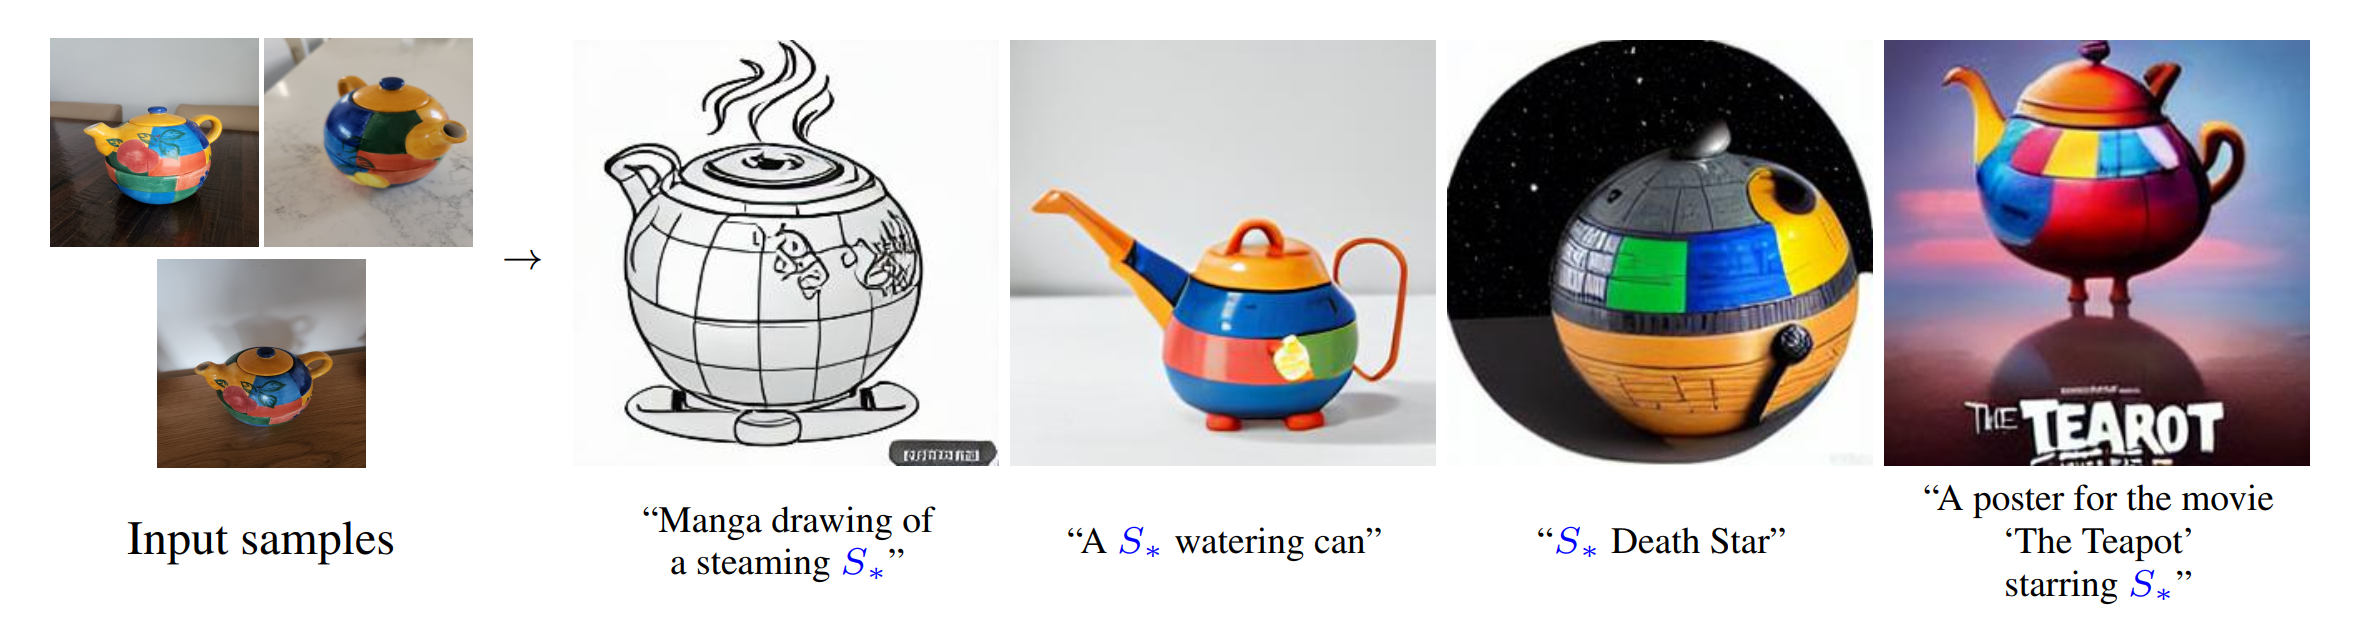
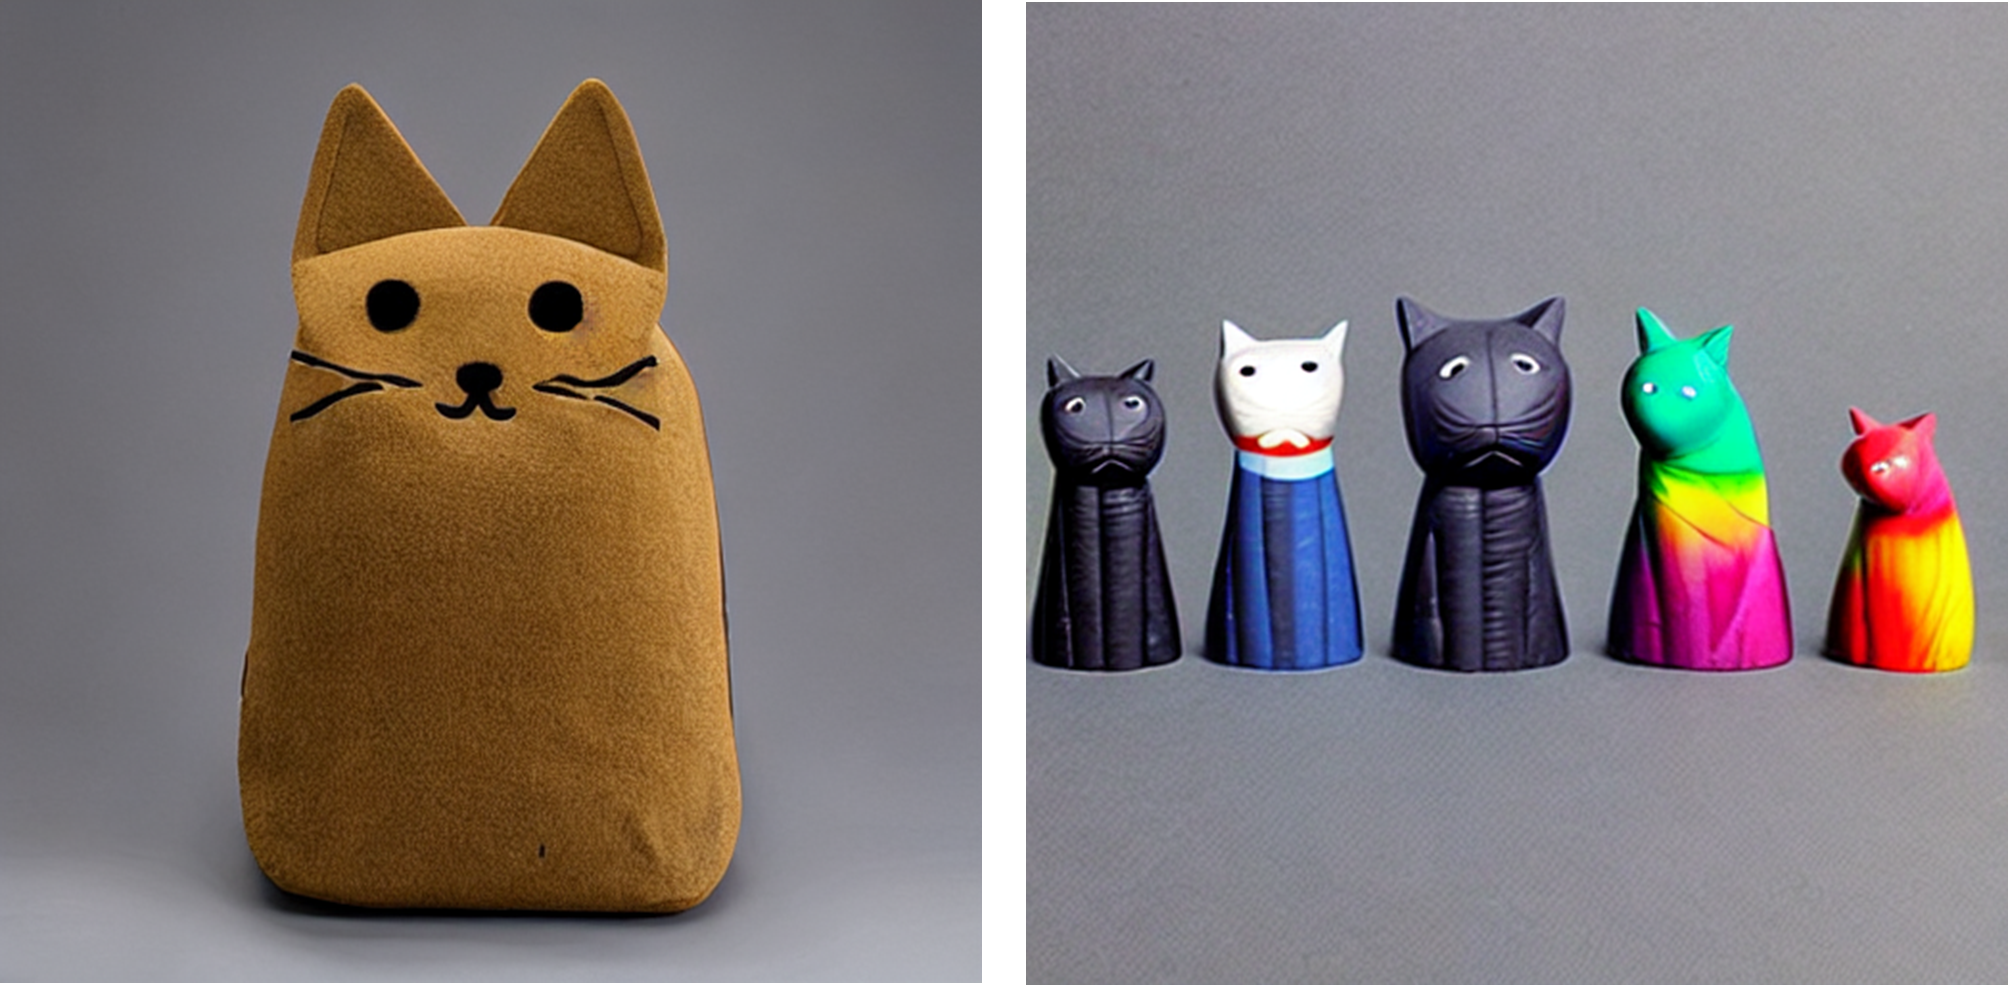
As Figure 1 shows, you can teach new concepts to a model such as Stable Diffusion for personalized image generation using just 3-5 images.
Hugging Face Diffusers and Stable Diffusion Web UI provides useful tools and guides to train and save custom textual inversion embeddings. The pre-trained textual inversion embeddings are widely available in sd-concepts-library and civitai, which can be loaded for inference with the StableDiffusionPipeline using Pytorch as the runtime backend.
Here is an example to load pre-trained textual inversion embedding sd-concepts-library/cat-toy to inference with Pytorch backend.
Optimum-Intel provides the interface between the Hugging Face Transformers and Diffusers libraries to leverage OpenVINOTM runtime to accelerate end-to-end pipelines on Intel architectures.
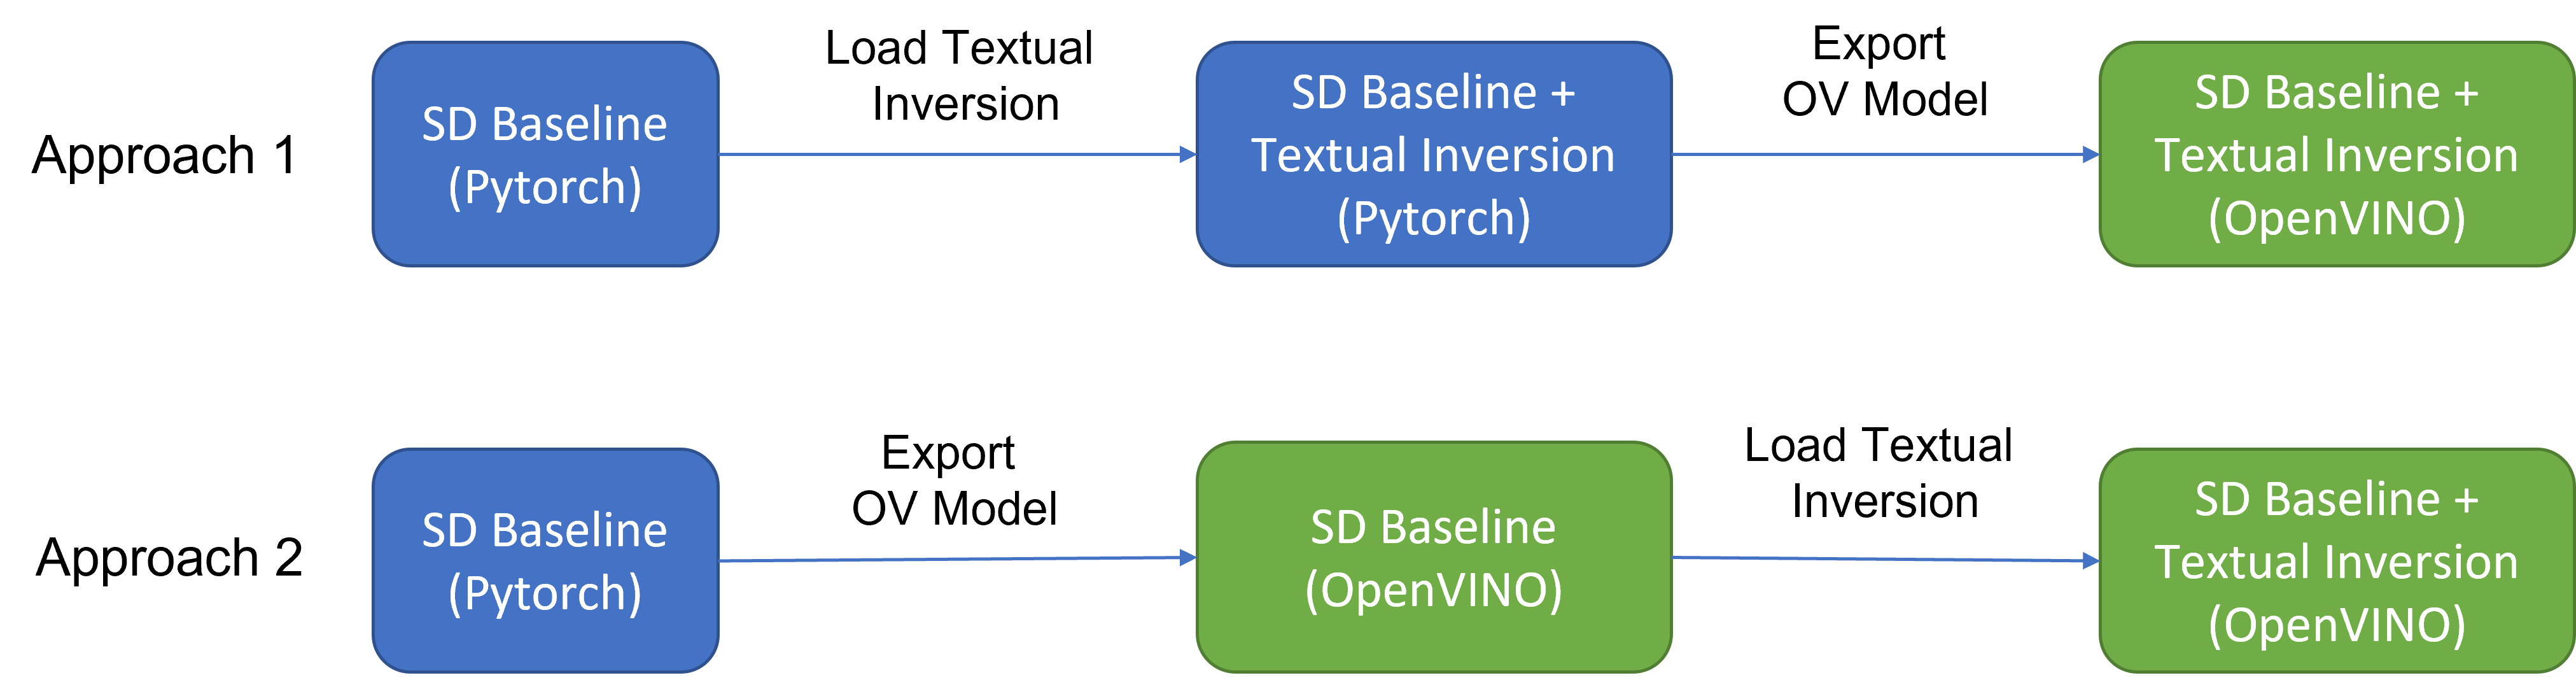
As Figure 2 shows that two approaches are available to enable textual inversion with Stable Diffusion via Optimum-Intel.
Although approach 1 seems quite straightforward and does not need any code modification in Optimum-Intel, the method requires the re-export ONNX model and then model conversion to the OpenVINOTM IR model whenever the SD baseline model is merged with anew textual inversion.
Instead, we propose approach 2 to support OVStableDiffusionPipelineBase to load pre-trained textual inversion embeddings in runtime to save disk storage while keeping flexibility.
- Save disk storage: We only need to save an SD baseline model converted to OpenVINOTM IR (e.g.: SD-1.5 ~5GB) and multiple textual embeddings (~10KB-100KB), instead of multiple SD OpenVINOTM IR with textual inversion embeddings merged (~n *5GB), since disk storage is limited, especially for edge/client use case.
- Flexibility: We can load (multiple) pre-trained textual inversion embeddings in the SD baseline model in runtime quickly, which supports the combination of embeddings and avoid messing up the baseline model.
How to enable textual inversion in runtime?
We implemented OVTextualInversionLoaderMixinbased on diffusers.loaders.TextualInversionLoaderMixin with the following features:
- Load and parse textual embeddings saved as*.bin, *.pt, *.safetensors as a list of Tensors.
- Update tokenizer for new “words” using new token id and expand vocabulary size.
- Update text encoder embeddings via InsertTextEmbedding class based on OpenVINOTM ngraph transformation.
For the implementation details of OVTextualInversionLoaderMixin, please refer to here.
Here is the sample code for InsertTextEmbedding class:
InsertTextEmbeddingclass utilizes OpenVINOTM ngraph MatcherPass function to insert subgraph into the model. Please note, the MacherPass function can only filter layers by type, so we run two phases of filtering to find the layer that matched with the pre-defined key in the model:
- Filter all Constant layers to trigger the callback function.
- Filter layer name with pre-defined key “TEXTUAL_INVERSION_EMBEDDING_KEY” in the callback function
If the root name matched the pre-defined key, we will loop all parsed textual inversion embedding and token id pair and create a subgraph (Constant + Unsqueeze + Concat) by OpenVINOTM operation sets to insert into the text encoder model. In the end, we update the root output node with the last node in the subgraph.
Figure 3 demonstrates the workflow of InsertTextEmbedding OpenVINOTM ngraph transformation. The left part shows the subgraph in SD 1.5 baseline text encoder model, where text embedding has a Constant node with shape [49408, 768], the 1st dimension is consistent with the original tokenizer (vocab size 49408), and the second dimension is feature length of each text embedding.
When we load (multiple) textual inversion, all textual inversion embeddings will be parsed as a list of tensors with shape[768], and each textual inversion constant will be unsqueezed and concatenated with original text embeddings. The right part is the result of applying InsertTextEmbedding ngraph transformation on the original text encoder, the green rectangle represents merged textual inversion subgraph.
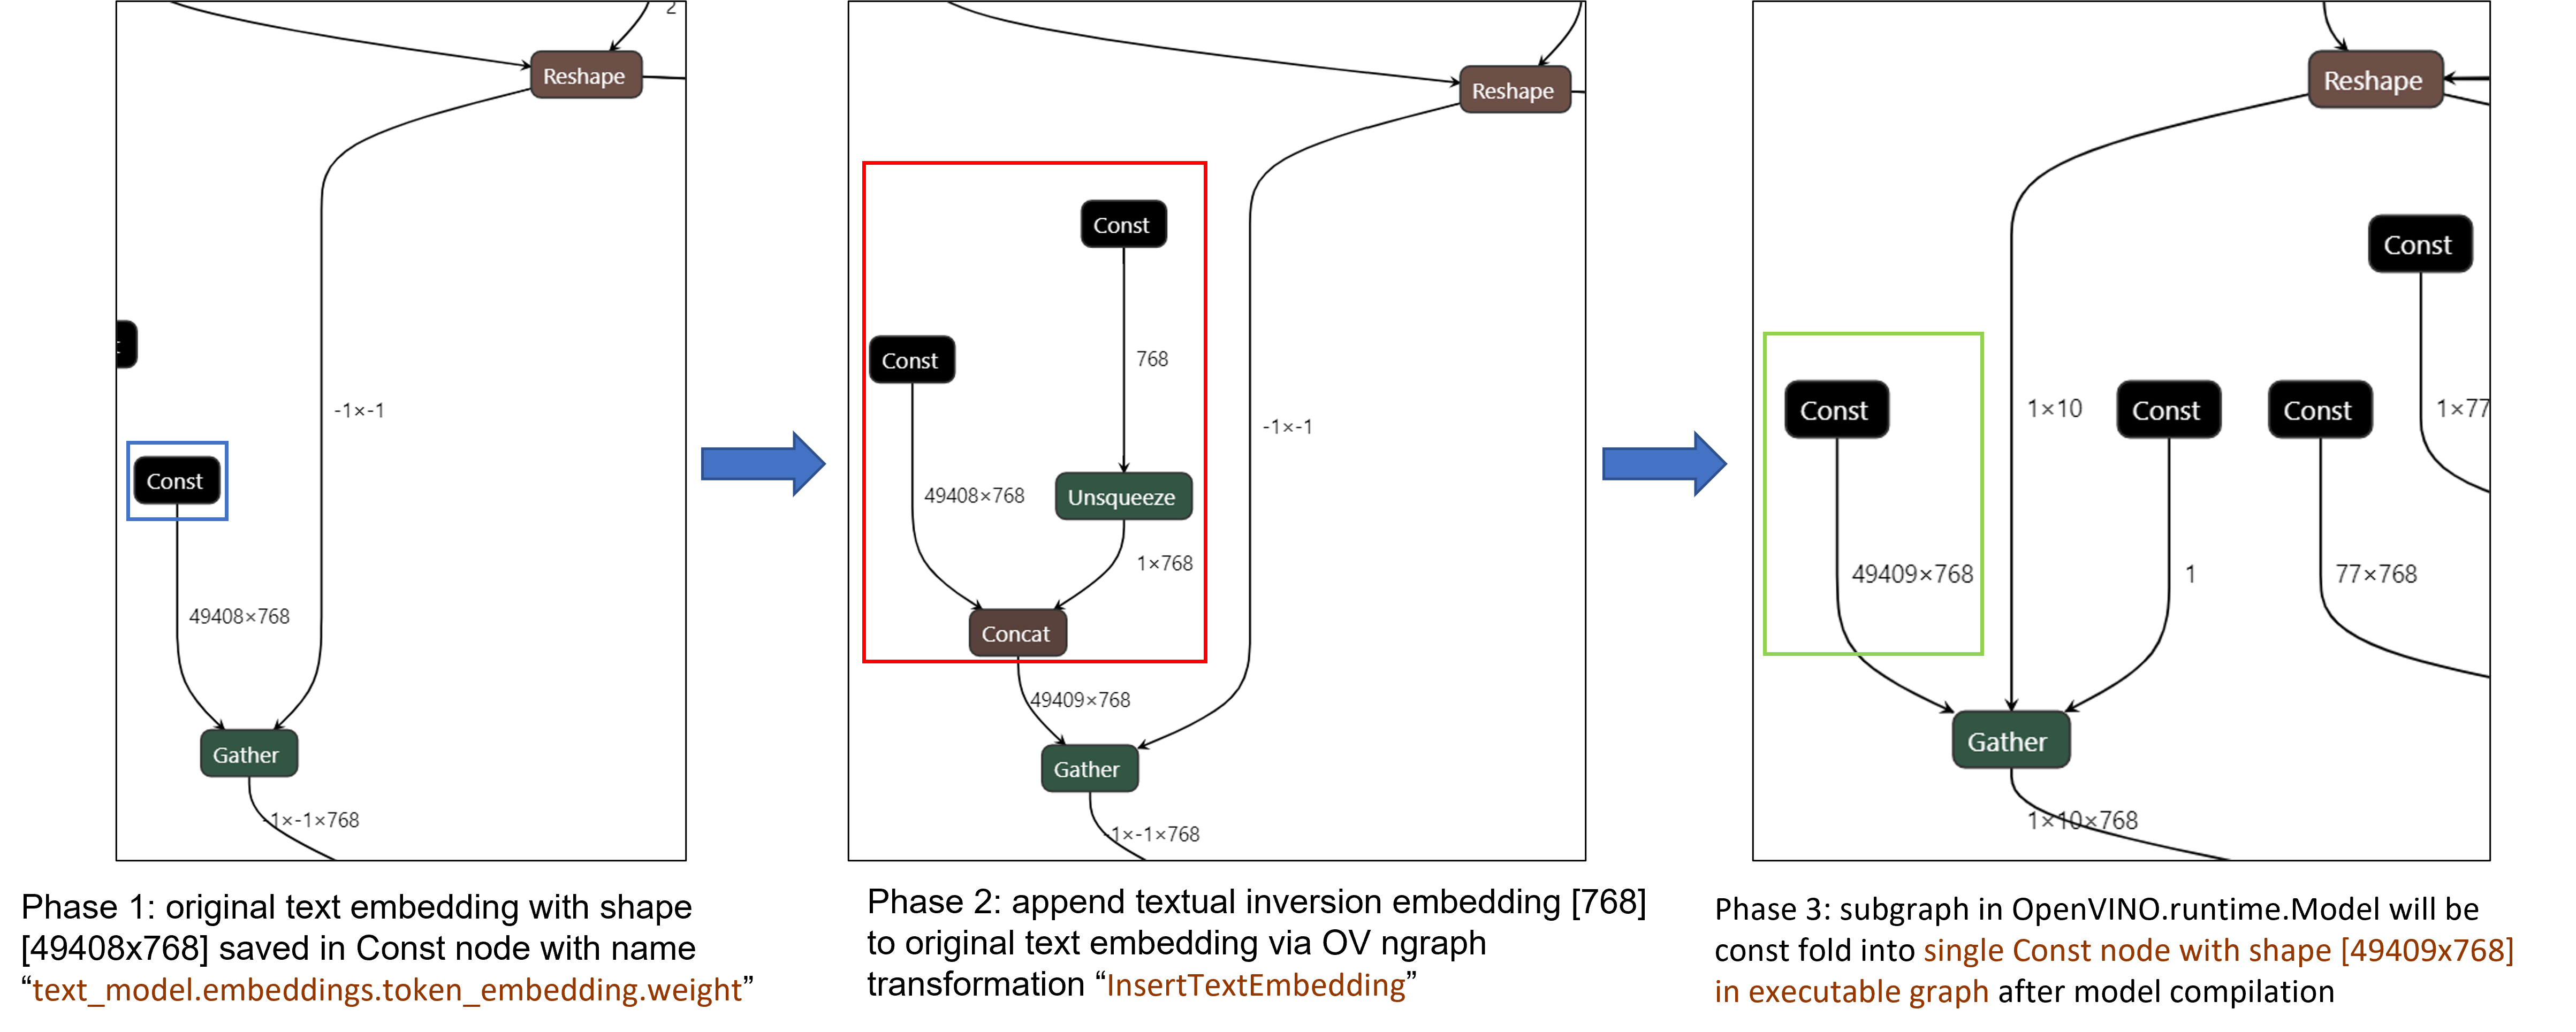
As Figure 4 shows, In the first phase, the original text embedding (marked as blue rectangle) is saved in Const node “text_model.embeddings.token_embedding.weight” with shape [49408,768], after InsertTextEmbedding ngraph transformation, new subgraph (marked as red rectangle) will be created in 2nd phase. In the 3rd phase, during model compilation, the new subgraph will be const folding into a single const node (marked as green rectangle) with a new shape [49409,768] by OpenVINOTM ConstantFolding transformation.
Stable Diffusion Textual Inversion Sample
Here are textual inversion examples verified with Stable Diffusion v1.5, Stable Diffusion v2.1 and Stable Diffusion XL 1.0 Base pipeline with latest optimum-intel
Setup Environment
Run SD 1.5 + Cat-Toy Textual Inversion Example
Run SD 2.1 + Midjourney 2.0 Textual Inversion Example

Run SDXL 1.0 Base + CharTurnerV2 Textual Inversion Example

Conclusion
In this blog, we proposed to load textual inversion embedding in the stable diffusion pipeline in runtime to save disk storage while keeping flexibility.
- Implemented OVTextualInversionLoaderMixin to update tokenizer with additional token id and update text encoder with InsertTextEmbedding OpenVNO ngraph transformation.
- Provides sample code to load textual inversion with SD 1.5, SD 2.1, and SDXL 1.0 Base and inference with Optimum-Intel
Reference
An Image is Worth One Word: Personalizing Text-to-Image Generation using Textual Inversion
Enable LoRA weights with Stable Diffusion Controlnet Pipeline
Authors: Zhen Zhao(Fiona), Kunda Xu
Low-Rank Adaptation(LoRA) is a novel technique introduced to deal with the problem of fine-tuning Diffusers and Large Language Models (LLMs). In the case of Stable Diffusion fine-tuning, LoRA can be applied to the cross-attention layers for the image representations with the latent described. You can refer HuggingFace diffusers to understand the basic concept and method for model fine-tuning: https://huggingface.co/docs/diffusers/training/lora
In this blog, we aimed to introduce the method building up the pipeline for Stable Diffusion + ControlNet with OpenVINO™ optimization, and enable LoRA weights for Unet model of Stable Diffusion to generate images with different styles. The demo source code is based on: https://github.com/FionaZZ92/OpenVINO_sample/tree/master/SD_controlnet
Stable Diffusion ControlNet Pipeline
Step 1: Environment preparation
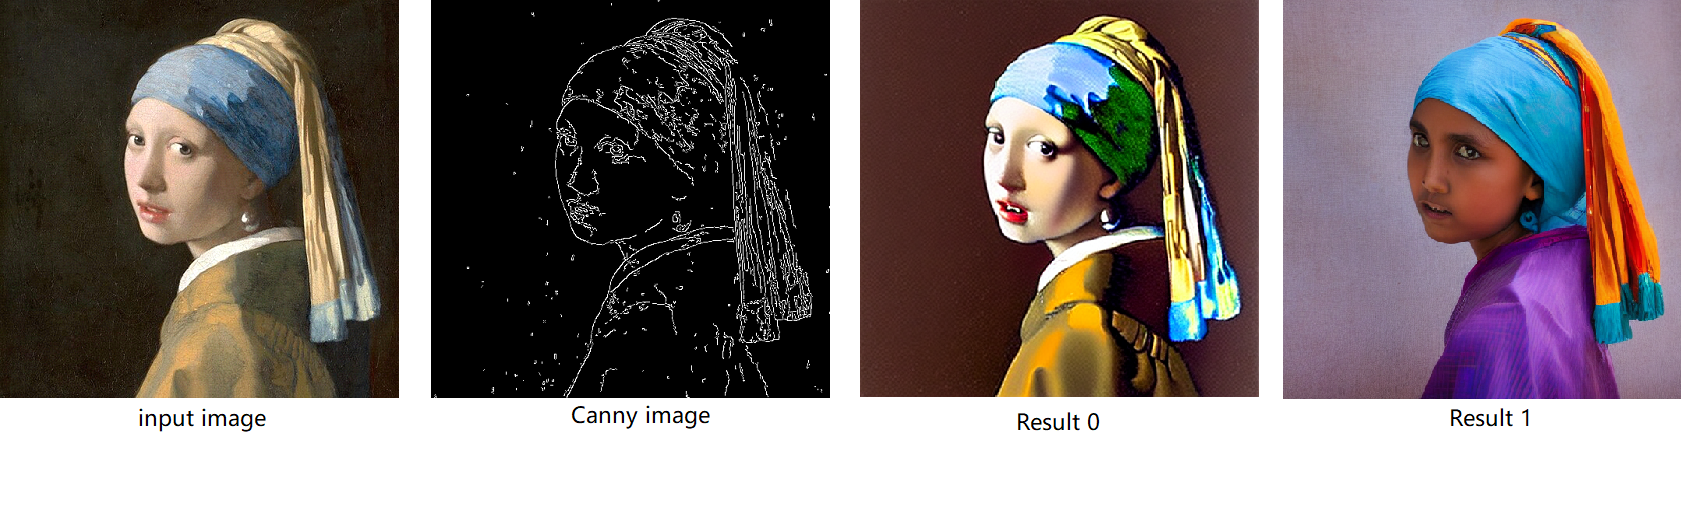
First, please follow below method to prepare your development environment, you can choose download model from HuggingFace for better runtime experience. In this case, we choose controlNet for canny image task.
* Please note, the diffusers start to use `torch.nn.functional.scaled_dot_product_attention` if your installed torch version is >= 2.0, and the ONNX does not support op conversion for “Aten:: scaled_dot_product_attention”. To avoid the error during the model conversion by “torch.onnx.export”, please make sure you are using torch==1.13.1.
Step 2: Model Conversion
The demo provides two programs, to convert model to OpenVINO™ IR, you should use “get_model.py”. Please check the options of this script by:
In this case, let us choose multiple batch size to generate multiple images. The common application of vison generation has two concepts of batch:
- `batch_size`: Specify the length of input prompt or negative prompt. This method is used for generating N images with N prompts.
- `num_images_per_prompt`: Specify the number of images that each prompt generates. This method is used to generate M images with 1 prompts.
Thus, for common user application, you can well use these two attributes in diffusers to generate N*M images by N prompts with increased random seed values. For example, if your basic seed is 42, to generate N(2)*M(2) images, the actual generation is like below:
- N=1, M=1: prompt_list[0], seed=42
- N=1, M=2: prompt_list[0], seed=43
- N=2, M=1: prompt_list[1], seed=42
- N=2, M=2: prompt_list[1], seed=43
In this case, let’s use N=2, M=1 as a quick example for demonstration, thus the use`--batch 2`. This script will generate static shape model by default. If you are using different value of N and M, please specify `--dynamic`.
Please check your current path, make sure you already generated below models currently. Other ONNX files can be deleted for saving space.
- controlnet-canny.<xml|bin>
- text_encoder.<xml|bin>
- unet_controlnet.<xml|bin>
- vae_decoder.<xml|bin>
* If your local path already exists ONNX or IR model, the script will jump tore-generate ONNX/IR. If you updated the pytorch model or want to generate model with different shape, please remember to delete existed ONNX and IR models.
Step 3: Runtime pipeline test
The provided demo program `run_pipe.py` is manually build-up the pipeline for StableDiffusionControlNet which refers to the original source of `diffusers.StableDiffusionControlNetPipeline`
The difference is we simplify the pipeline with 4 models’ inference by OpenVINO™ runtime API which can make sure the model inference can be accelerated on Intel® CPU and GPU platform.
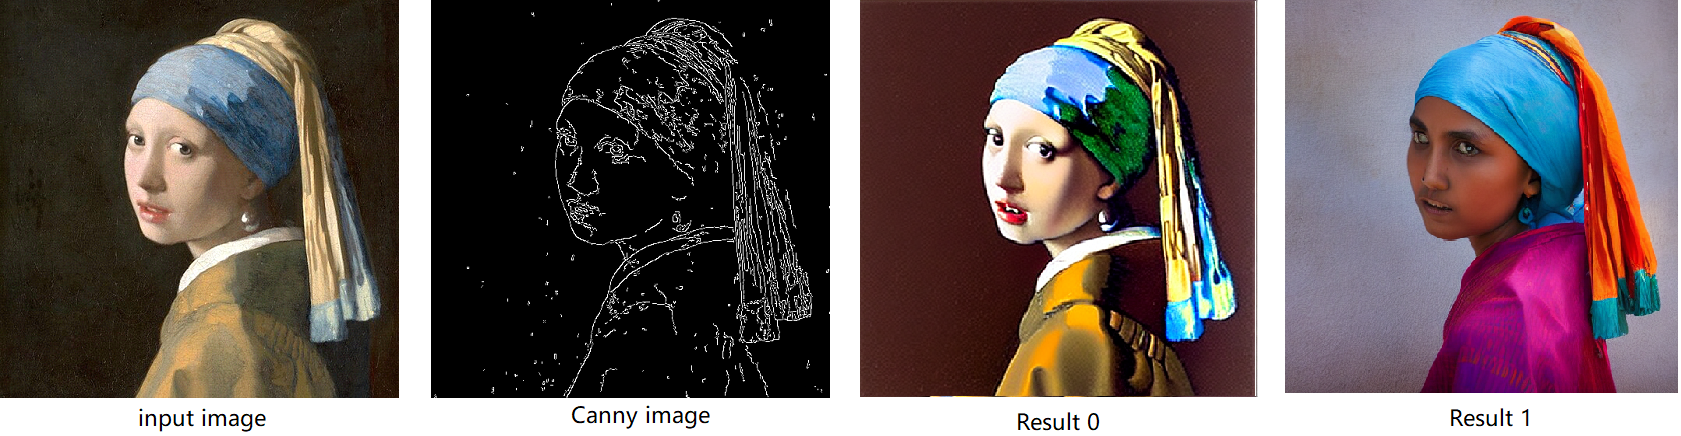
The default iteration is 20, image shape is 512*512, seed is 42, and the input image and prompt is for “Girl with Pearl Earring”. You can adjust or custom your own pipeline attributes for testing.
In the case with batch_size=2, the generated image is like below:
Enable LoRA weights for Stable Diffusion
Normal LoRA weights has two types, one is ` pytorch_lora_weights.bin`,the other is using safetensors. In this case, we introduce both methods for these two LoRA weights.
The main idea for LoRA weights enabling, is to append weights onto the original Unet model of Stable Diffusion, then export IR model of Unet which remains LoRA weights.
There are various LoRA models on https://civitai.com/tag/lora , we choose some public models on HuggingFace as an example, you can consider toreplace with your owns.
Step 4-1: Enable LoRA by pytorch_lora_weights.bin
This step introduces the method to add lora weights to Unet model of Stable Diffusion by `pipe.unet.load_attn_procs(...)` function. By using this way, the LoRA weights will be loaded into the attention layers of Unet model of Stable Diffusion.
* Remember to delete exist Unet model to generate the new IR with LoRA weights.
Then, run pipeline inference program to check results.
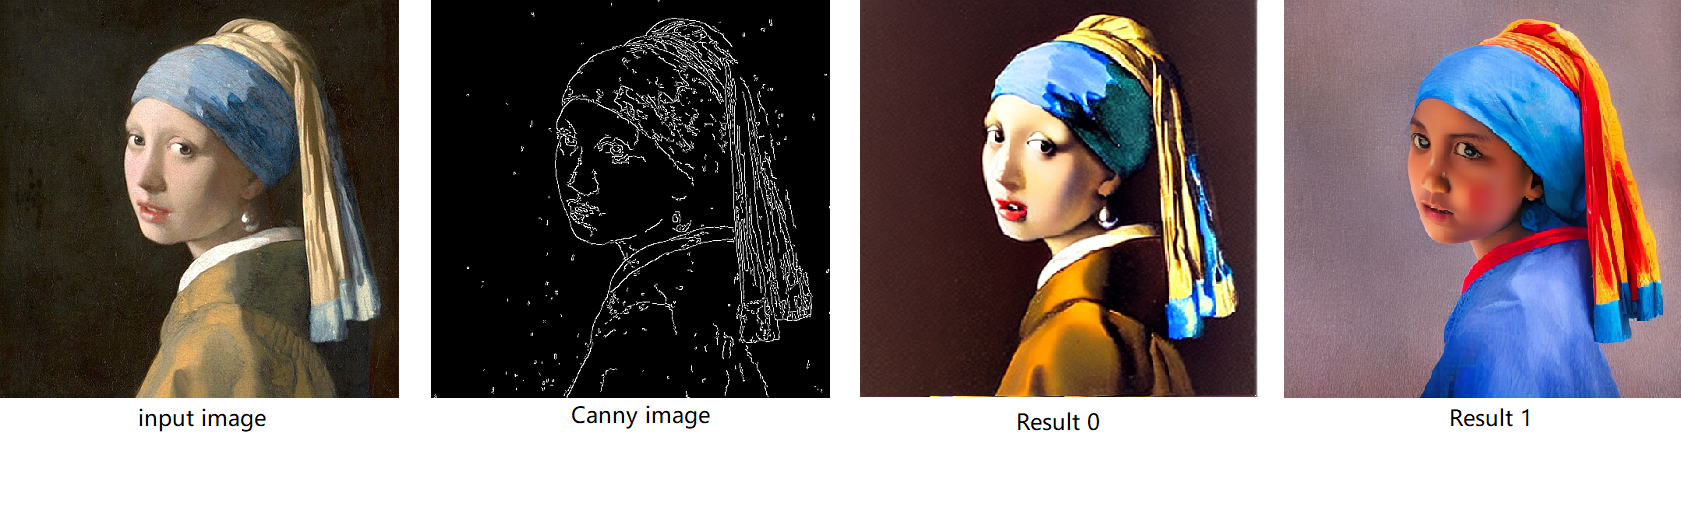
The LoRA weights appended Stable Diffusion model with controlNet pipeline can generate image like below:
Step 4-2: Enable LoRA by safetensors typed weights
This step introduces the method to add LoRA weights to Stable diffusion Unet model by `diffusers/scripts/convert_lora_safetensor_to_diffusers.py`. Diffusers provide the script to generate new Stable Diffusion model by enabling safetensors typed LoRA model. By this method, you will need to replace the weight path to new generated Stable Diffusion model with LoRA. You can adjust value of `alpha` option to change the merging ratio in `W = W0 + alpha * deltaW` for attention layers.
Then, run pipeline inference program to check results.
The LoRA weights appended SD model with controlnet pipeline can generate image like below:
Step 4-3: Enable runtime LoRA merging by MatcherPass
This step introduces the method to add lora weights in runtime before Unet or text_encoder model compiling. It will be helpful to client application usage with multiple different LoRA weights to change the image style by reusing the same Unet/text_encoder structure.
This method is to extract lora weights in safetensors file and find the corresponding weights in Unet model and insert lora weights bias. The common method to add lora weights is like:
W = W0 + W_bias(alpha * torch.mm(lora_up, lora_down))
I intend to insert Add operation for Unet's attentions' weights by OpenVINO™ `opset10.add(W0,W_bias)`. The original attention weights in Unet model is loaded by `Const` op, the common processing path is `Const->Convert->Matmul->...`, if we add the lora weights, we should insert the calculated lora weight bias as `Const->Convert->Add->Matmul->...`. In this function, we adopt `openvino.runtime.passes.MatcherPass` to insert `opset10.add()` with call_back() function iteratively.
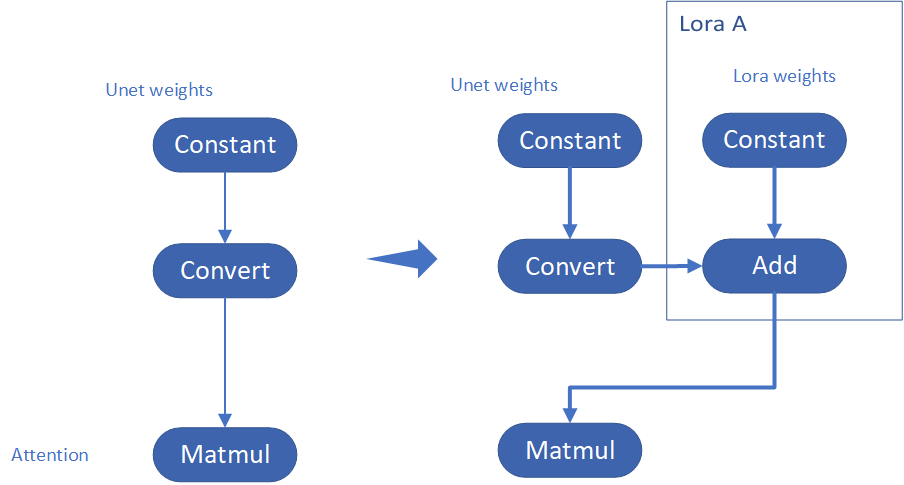
Your own transformation operations will insert opset.Add() firstly, then during the model compiling with device. The graph will do constant folding to combine the Add operation with following MatMul operation to optimize the model runtime inference. Thus, this is an effective method to merge LoRA weights onto original model.
You can check with the implementation source code, and find out the definition of the MatcherPass function called `InsertLoRA(MatcherPass)`:
The `InsertLoRA(MatcherPass)` function will be registered by `manager.register_pass(InsertLoRA(lora_dict_list))`, and invoked by `manager.run_passes(ov_unet)`. After this runtime MatcherPass operation, the graph compile with device plugin and ready for inference.
Run pipeline inference program to check the results. The result is same as Step 4-2.
The LoRA weights appended Stable Diffusion model with controlNet pipeline can generate image like below:
Step 4-4: Enable multiple LoRA weights
There are many different methods to add multiple LoRA weights. I list two methods here. Assume you have two LoRA weigths, LoRA A and LoRA B. You can simply follow the Step 4-3 to loop the MatcherPass function to insert between original Unet Convert layer and Add layer of LoRA A. It's easy to implement. However, it is not good at performance.
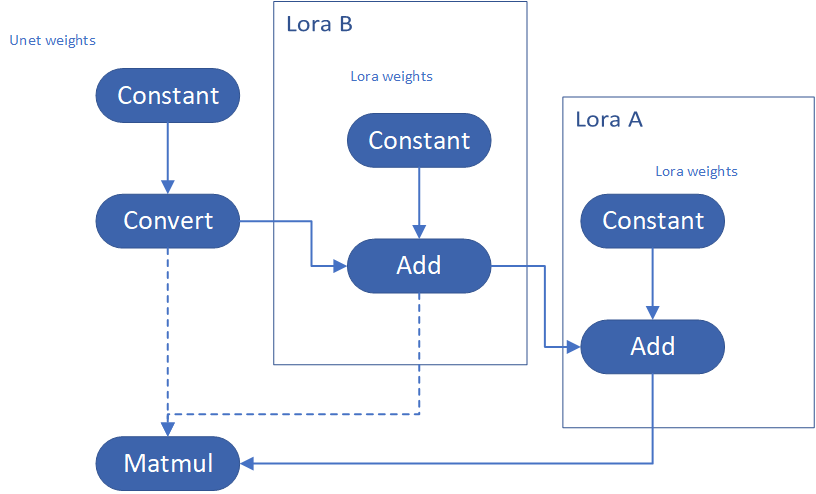
Please consider about the Logic of MatcherPass function. This fucntion required to filter out all layer with the Convert type, then through the condition judgement if each Convert layer connected by weights Constant has been fine-tuned and updated in LoRA weights file. The main costs of LoRA enabling is costed by InsertLoRA() function, thus the main idea is to just invoke InsertLoRA() function once, but append multiple LoRA files' weights.
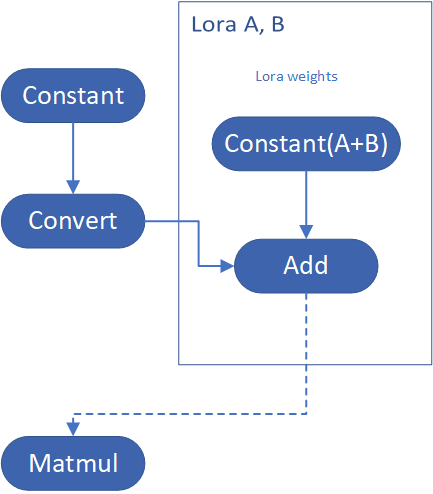
By above method to add multiple LoRA, the cost of appending 2 or more LoRA weights almost same as adding 1 LoRA weigths.
Now, let's change the Stable Diffusion with dreamlike-anime-1.0 to generate image with styles of animation. I pick two LoRA weights for SD 1.5 from https://civitai.com/tag/lora.
- soulcard: https://civitai.com/models/67927?modelVersionId=72591
- epi_noiseoffset: https://civitai.com/models/13941/epinoiseoffset
You probably need to do prompt engineering work to generate a useful prompt like below:
- prompt: "1girl, cute, beautiful face, portrait, cloudy mountain, outdoors, trees, rock, river, (soul card:1.2), highly intricate details, realistic light, trending on cgsociety,neon details, ultra realistic details, global illumination, shadows, octane render, 8k, ultra sharp"
- Negative prompt: "3d, cartoon, lowres, bad anatomy, bad hands, text, error"
- Seed: 0
- num_steps: 30
- canny low_threshold: 100
You can get a wonderful image which generate an animated girl with soulcard typical border like below:

Additional Resources
Provide Feedback & Report Issues
Notices & Disclaimers
Intel technologies may require enabled hardware, software, or service activation.
No product or component can be absolutely secure.
Your costs and results may vary.
Intel does not control or audit third-party data. You should consult other sources to evaluate accuracy.
Intel disclaims all express and implied warranties, including without limitation, the implied warranties of merchantability, fitness for a particular purpose, and non-infringement, as well as any warranty arising from course of performance, course of dealing, or usage in trade.
No license (express or implied, by estoppel or otherwise) to any intellectual property rights is granted by this document.
© Intel Corporation. Intel, the Intel logo, and other Intel marks are trademarks of Intel Corporation or its subsidiaries. Other names and brands may be claimed as the property of others.
AquilaChat-7B Language Model Enabling with Hugging Face Optimum Intel
Introduction
What is AquilaChat-7B Language Model?

Aquila Language Model is a set of open-source large language models (LLMs) developed by the Beijing Academy of Artificial Intelligence (BAAI). Aquila models support both Chinese and English, commercial license agreements, and compliance with Chinese domestic data regulations.
AquilaChat-7B is a conversational language model that supports Chinese and English dialogue. It is based on the Aquila-7B foundation model and fine-tuned using supervised fine-tuning (SFT). AquilaChat-7B original Pytorch model and configurations are publicly available here.
Hugging Face Optimum Intel

Hugging Face is one of the most popular open-source data science and machine learning platforms. It acts as a hub for AI experts and enthusiasts—like a GitHub for AI. Over 200,000 models are available across Natural language processing, Multimodal models, Computer Vision, and Audio domains.
Hugging Face provides wide support for model optimization and deployment of open-sourced LLMs such as LLaMA, Bloom, GPT-Neox, Dolly 2.0, to name a few. More details please refer to Open LLM Leaderboard.
Optimum-Intel provides a simple interface between the Hugging Face and OpenVINOTM ecosystem to leverage high-performance inference capabilities for Intel architecture. Here is a simple example to show how to run Dolly 2.0 models with OVModelForCausalLM using OpenVINOTM runtime.
Hola! So, for LLMs already supported by Hugging Face transformers and optimum, we can smoothly switch the model inference backend from Pytorch to OpenVINOTM by changing only two lines of code.
However, what if an LLM from an open-source community that not native supported by Hugging Face Transformers library? How can we still leverage the tools of Hugging Face and OpenVINOTM ecosystem for model optimization and deployment?
Indeed, AquilaChat-7B is a custom model for the Hugging Face Transformers. So, we use it as an example to elaborate the custom model enabling methodology step by step.
How to Enable a Custom Model on Hugging Face?
To leverage the Hugging Face ecosystem and optimization for AquilaChat-7B model, we need to convert the original Pytorch model to Hugging Face Format. Before we dive into conversion details, we need to figure out what is AquilaChat-7B’s model structure, tokenizer, and configurations.
According to Aquila’s official model description:
“The Aquila language model inherits the architectural design advantages of GPT-3 and LLaMA, replacing a batch of more efficient underlying operator implementations and redesigning the tokenizer for Chinese-English bilingual support. The Aquila language model is trained from scratch on high-quality Chinese and English corpora. “
Model Structure and Tokenizer
For model structure, Aquila Model adopts the original Meta LLaMA pytorch implementation, which combines RMSNorm (GPT-3) to improve training stability and Rotary Position Embedding (GPT-NeoX)to incorporate explicit relative position dependency in self-attention.
For tokenizer, instead of using byte-pair encoding (BPE) algorithms implemented by Sentence Piece, Aquila re-trained HuggingFace GPT-NeoX tokenizer with extended vocabulary (vocab_size =100008, including 8 special tokens, e.g. bos_token=100006, eos_token=100007, unk=0, pad=0 used for inference based on here.
Rotary Position Embedding
Rotary Position Embedding (RoPE) encodes the absolute position with a rotation matrix and meanwhile incorporates the explicit relative position dependency in the self-attention formulation. Compare to other position embedding methods, RoPE provides valuable properties such as flexibility of sequence length, long-term decay, and linear self-attention with relative position embedding. Based on the original paper, there are two mainstream implementations of RoPE:
As show in Figure 3, Meta LLaMA’s implementation directly use complex number to calculate rotary position embedding.

As show in Figure 4, Google PaLM’s implementation expands the complex number operation and calculate sinusoidal functions in matrix equation of real numbers.
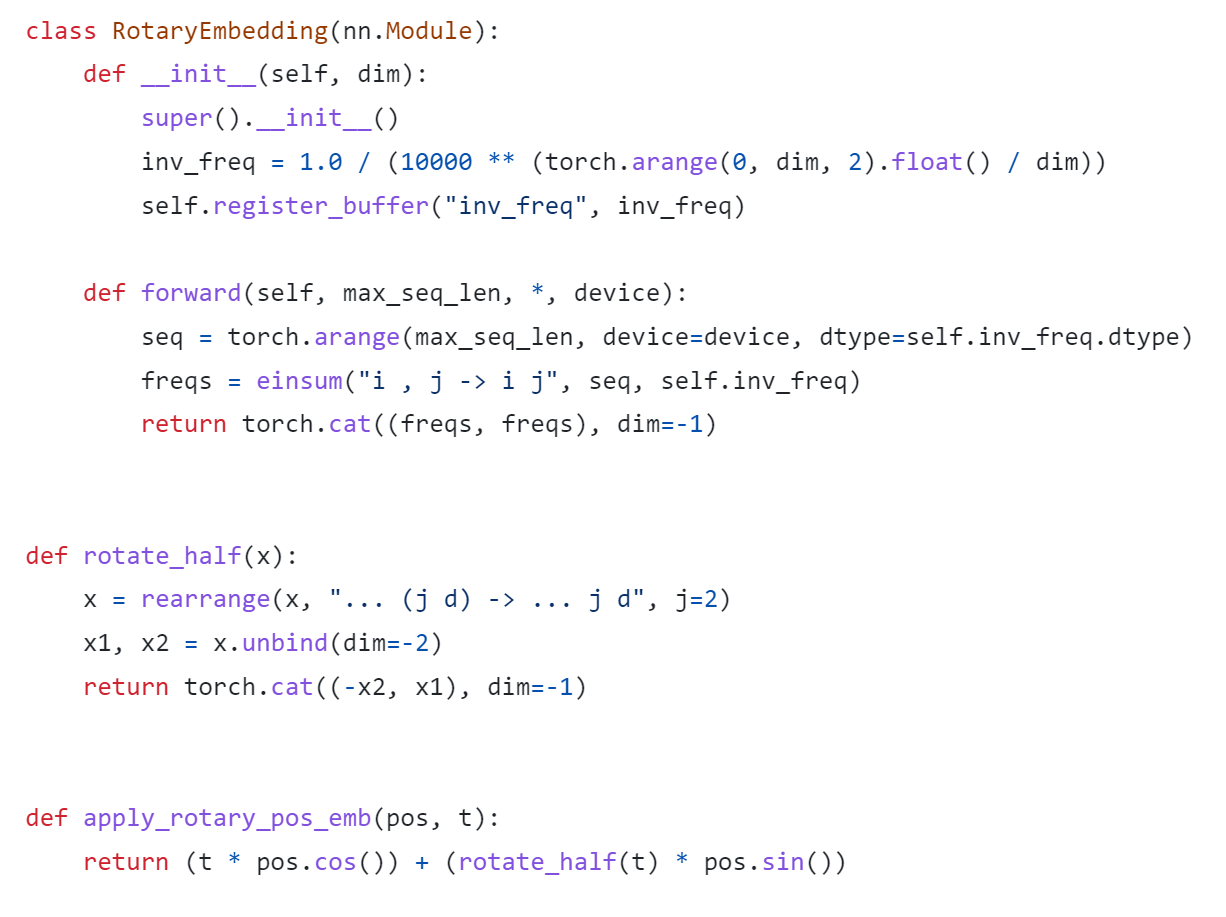
Both RoPE implementations are valid for the Pytorch model. Hugging Face LLaMA implementation adopts PaLM’s RoPE implementation due to the limitation of complex type support for ONNX export.
Besides, Hugging Face provides a useful script convert_llama_weights_to_hf.py to convert the original Meta LLaMA Pytorch Model to Hugging Face Format as follows:
- Extract Pytorch weights and convert Meta LlaMA RoPE implementation to Hugging Face RoPE implementation.
- Convert tokenizer.model trained with Sentence Piece to Hugging Face LLaMA tokenizer.
Convert AquilaChat-7B Model to Hugging Face Format
Similarly, we provide a convert_aquila_weights_to_hf.py to convert AquilaChat-7B Model to Hugging Face Format.
- Extract Pytorch weights and convert Aquila RoPE implementation to Hugging Face RoPE implementation
- Initialize and save a Hugging Face GPT-NeoX Tokenizer with extended vocabulary based on original tokenizer configurations provided by Aquila.
- Add a modeling_aquila.py to enable support forAutoModelForCausalLM and AutoTokenizer
Here is the converted Hugging Face version of AquilaChat-7B v0.6 model uploaded in Hugging Face.
You may convert pytorch weights to Hugging Face format in two steps:
- Download AquilaChat-7B Pytorch Model and configurations here
- Convert AquilaChat-7B Pytorch Model and configurations to Hugging Face Format
Hugging Face AquilaChat-7B Demo
Setup Environment
Run inference with AutoModelForCausalLM
Run inference with OVModelForCausalLM
Conclusion
In this blog, we show how to convert a custom Large Language Model (LLM) to Hugging Face format to leverage efficient optimization and deployment with Hugging Face and OpenVINOTM Ecosystem.
Please note, this is the initial model enabling step for AquilaChat-7B model with OpenVINOTM. We will continue to optimize performance along with upgrading OpenVINOTM for LLM scaling. Please refer to OpenVINOTM and Optimum-Intel official release to get latest efficient support for LLMs with OpenVINOTM backend.
Reference
- FlagAI AquilaChat-7B
- AquilaChat-7B Hugging Face Model
- Hugging Face Optimum Intel
- LLaMA:Open and Efficient Foundation Language Models
- RoFormer:Enhanced Transformer with Rotary Position Embedding
- RotaryEmbeddings: A Relative Revolution
Enable chatGLM by creating OpenVINO™ stateful model and runtime pipeline
Authors: Zhen Zhao(Fiona), Cheng Luo, Tingqian Li, Wenyi Zou
Introduction
Since the Large Language Models (LLMs) become the hot topic, a lot Chinese language models have been developed and actively deployed in optimization platforms. chatGLM is one of the popular Chinese LLMs which are widely been evaluated. However, ChatGLM model is not yet a native model in Transformers, which means there remains support gap in official optimum. In this blog, we provide a quick workaround to re-construct the model structure by OpenVINO™ opset contains custom optimized nodes for chatGLM specifically and these nodes has been highly optimized by AMX intrinsic and MHA fusion.
*Please note, this blog only introduces a workaround of optimization method by creating OpenVINO™ stateful model for chatGLM. This workaround has limitation of platform, which requires to use Intel® 4th Xeon Sapphire Rapids with AMX optimization. We do not promise the maintenance of this workaround.
Source link: https://github.com/luo-cheng2021/openvino/tree/luocheng/chatglm_custom/tools/gpt
To support more LLMs, including llama, chatglm2, gpt-neox/dolly, gpt-j and falcon. You can refer this link which not limited on SPR platform, also can compute from Core to Xeon:
Source link: https://github.com/luo-cheng2021/ov.cpu.llm.experimental
ChatGLM model brief
If we check with original model source of chatGLM, we can find that the ChatGLM is not compatible with Optimum ModelForCasualML, it defines the new class ChatGLMForConditionalGeneration. This model has 3 main modules (embedding, GLMBlock layers and lm_logits) during the pipeline loop, the structure is like below:
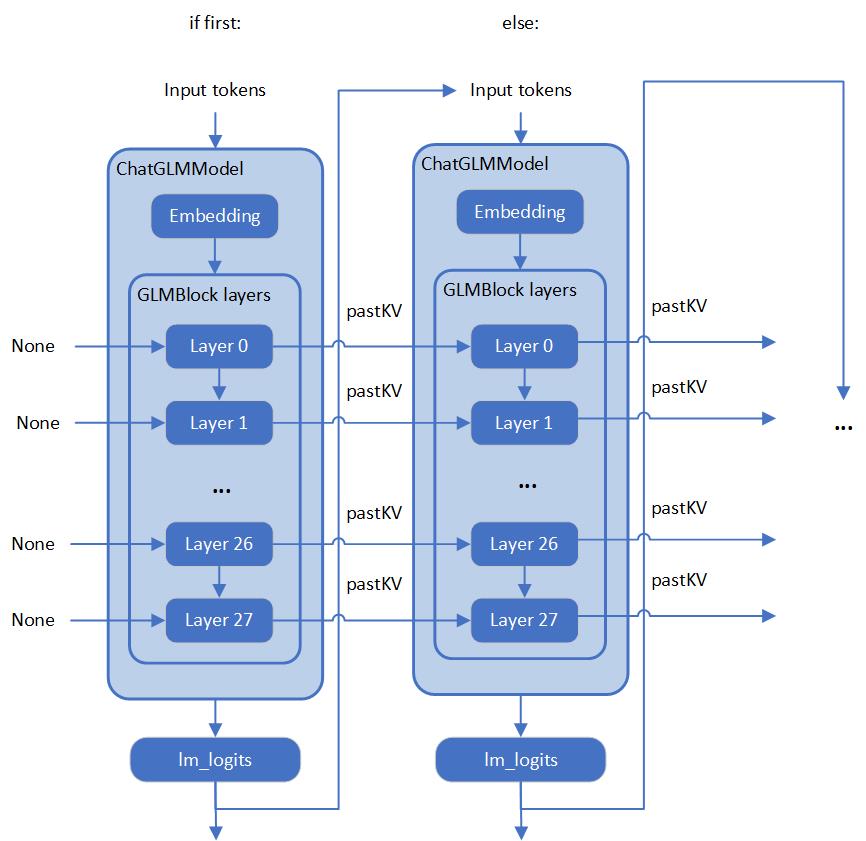
As you can see, the whole pipeline actually require model with two different graphs, the first-time inference with input prompt tokens do not require KV cache as inputs for GLMBlock layers. Since the second iteration, the previous results of QKV Attention should become the inputs of current round model inference. Along with the length of generated token increased, there will remain a lot of large sized memory copies between model inputs and outputs during pipeline inference. We can use ChatGLM6b default model configurations as an example, the memory copies between input and output arrays are like below pseudocode:
Therefore, two topics is the most important:
- How we can optimize model inference pipeline to eliminate memory copy between model inputs and outputs
- How we can put optimization efforts on GLMBlock module by reinvent execution graph
Extremely optimization by OpenVINO™ stateful model
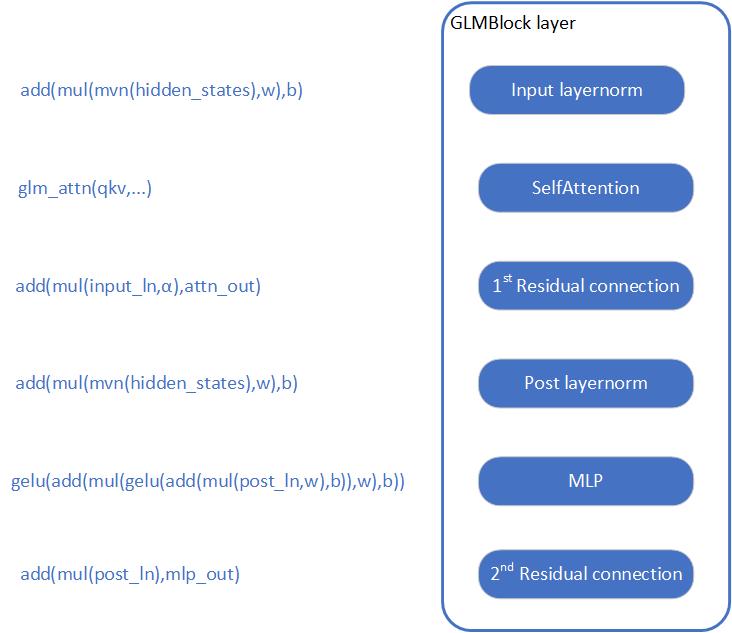
Firstly, we need to analyze the structure of GLMBlock layer, and try to encapsulate a class to invoke OpenVINO™ opset with below workflow. Then serialize the graph to IR model(.xml, .bin).
To build an OpenVINO™ stateful model, you can refer to this document to learn.
https://docs.openvino.ai/2022.3/openvino_docs_OV_UG_network_state_intro.html
OpenVINO™ also provide model creation sample to show how to build a model by opset.
https://github.com/openvinotoolkit/openvino/blob/master/samples/cpp/model_creation_sample/main.cpp
It is clear to show that the emphasized optimization block is the custom op of Attention for chatGLM. The main idea is to build up a global context to store and update pastKV results internally, and then use intrinsic optimization for Rotary Embedding and Multi-Head Attentions. In this blog, we provide an optimized the attention structure of chatGLM with AMX intrinsic operators.
At the same time, we use int8 to compress the weights of the Fully Connected layer, you are not required to compress the model by Post Training Quantization (PTQ) or process with framework for Quantization Aware Training(QAT).
Create OpenVINO™ stateful model for chatGLM
Please prepare your hardware and software environment like below and follow the steps to optimize the chatGLM:
Hardware requirements
Intel® 4th Xeon platform(codename Sapphire Rapids) and above
Software Validation Environment
Ubuntu 22.04.1 LTS
python 3.10.11 for OpenVINO™ Runtime Python API
GCC 11.3.0 to build OpenVINO™ Runtime
cmake 3.26.4
Building OpenVINO™ Source
- Install system dependency and setup environment
- Create and enable python virtual environment
- Install python dependency
- Build OpenVINO™ with GCC 11.3.0
- Clone OpenVINO™ and update submodule
- Install python dependency for building python wheels
- Create build directory
- Build OpenVINO™ with CMake
- Install built python wheel for OpenVINO™ runtime and openvino-dev tools
- Check system gcc version and conda runtime gcc version. If the system gcc version is higher than conda gcc version like below, you should update conda gcc version for OpenVINO runtime. (Optional)
- convert pytorch model to OpenVINO™ IR
Use OpenVINO Runtime API to build Inference pipeline for chatGLM
We provide a demo by using transformers and OpenVINO™ runtime API to build the inference pipeline. In test_chatglm.py, we create a new class which inherit from transformers.PreTrainedModel. And we update the forward function by build up model inference pipeline with OpenVINO™ runtime Python API. Other member functions are migrated from ChatGLMForConditionalGeneration from modeling_chatglm.py, so that, we can make sure the input preparation work, set_random_seed, tokenizer/detokenizer and left pipelined operation can be totally same as original model source.
To enable the int8 weights compress, you just need a simple environment variable USE_INT8_WEIGHT=1. That is because during the model generation, we use int8 to compress the weights of the Fully Connected layer, and then it can use int8 weights to inference on runtime, you are not required to compress the model by framework or quantization tools.
Please follow below steps to test the chatGLM with OpenVINO™ runtime pipeline:
- Run bf16 model
- Run int8 model
Weights compression reduces memory bandwidth utilization to improve inference speed
We use VTune for performance comparison analysis of model weights bf16 and int8. Comparative analysis of memory bandwidth and CPI rate (Table 1). When model weight is compressed to int8, it can reduce memory bandwidth utilization and CPI rate.
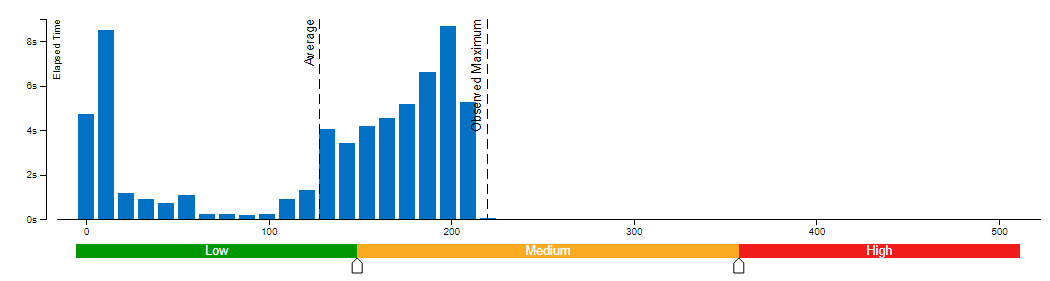

Clockticks per Instructions Retired(CPI) event ratio, also known as Cycles per Instructions, is one of the basic performance metrics for the hardware event-based sampling collection, also known as Performance Monitoring Counter (PMC) analysis in the sampling mode. This ratio is calculated by dividing the number of unhalted processor cycles(Clockticks) by the number of instructions retired. On each processor the exact events used to count clockticks and instructions retired may be different, but VTune Profiler knows the correct ones to use.
A CPI < 1 is typical for instruction bound code, while a CPI > 1 may show up for a stall cycle bound application, also likely memory bound.
Conclusion
Along with the upgrading of OpenVINO™ main branch, the optimization work in this workaround will be generalized and integrated into official release. It will be helpful to scale more LLMs model usage. Please refer OpenVINO™ official release and Optimum-intel OpenVINO™ backend to get official and efficient support for LLMs.
Apply dynamic LoRA into Stable Diffusion v1.5 with OpenVINO
LoRA, or Low-Rank Adaptation, reduces the number of trainable parameters by learning pairs of rank-decompostion matrices while freezing the original weights. This vastly reduces the storage requirement for large language models adapted to specific tasks and enables efficient task-switching during deployment all without introducing inference latency. Thus for a basic large model, the task scenarios of the model can be changed by different LoRAs. In a previous blog, it has been described how to convert the LoRAs-fused base model from pytorch to OpenVINO IR, but this method has the shortcoming of not being able to dynamically switch between LoRAs, which happen to be famous for their flexibility.
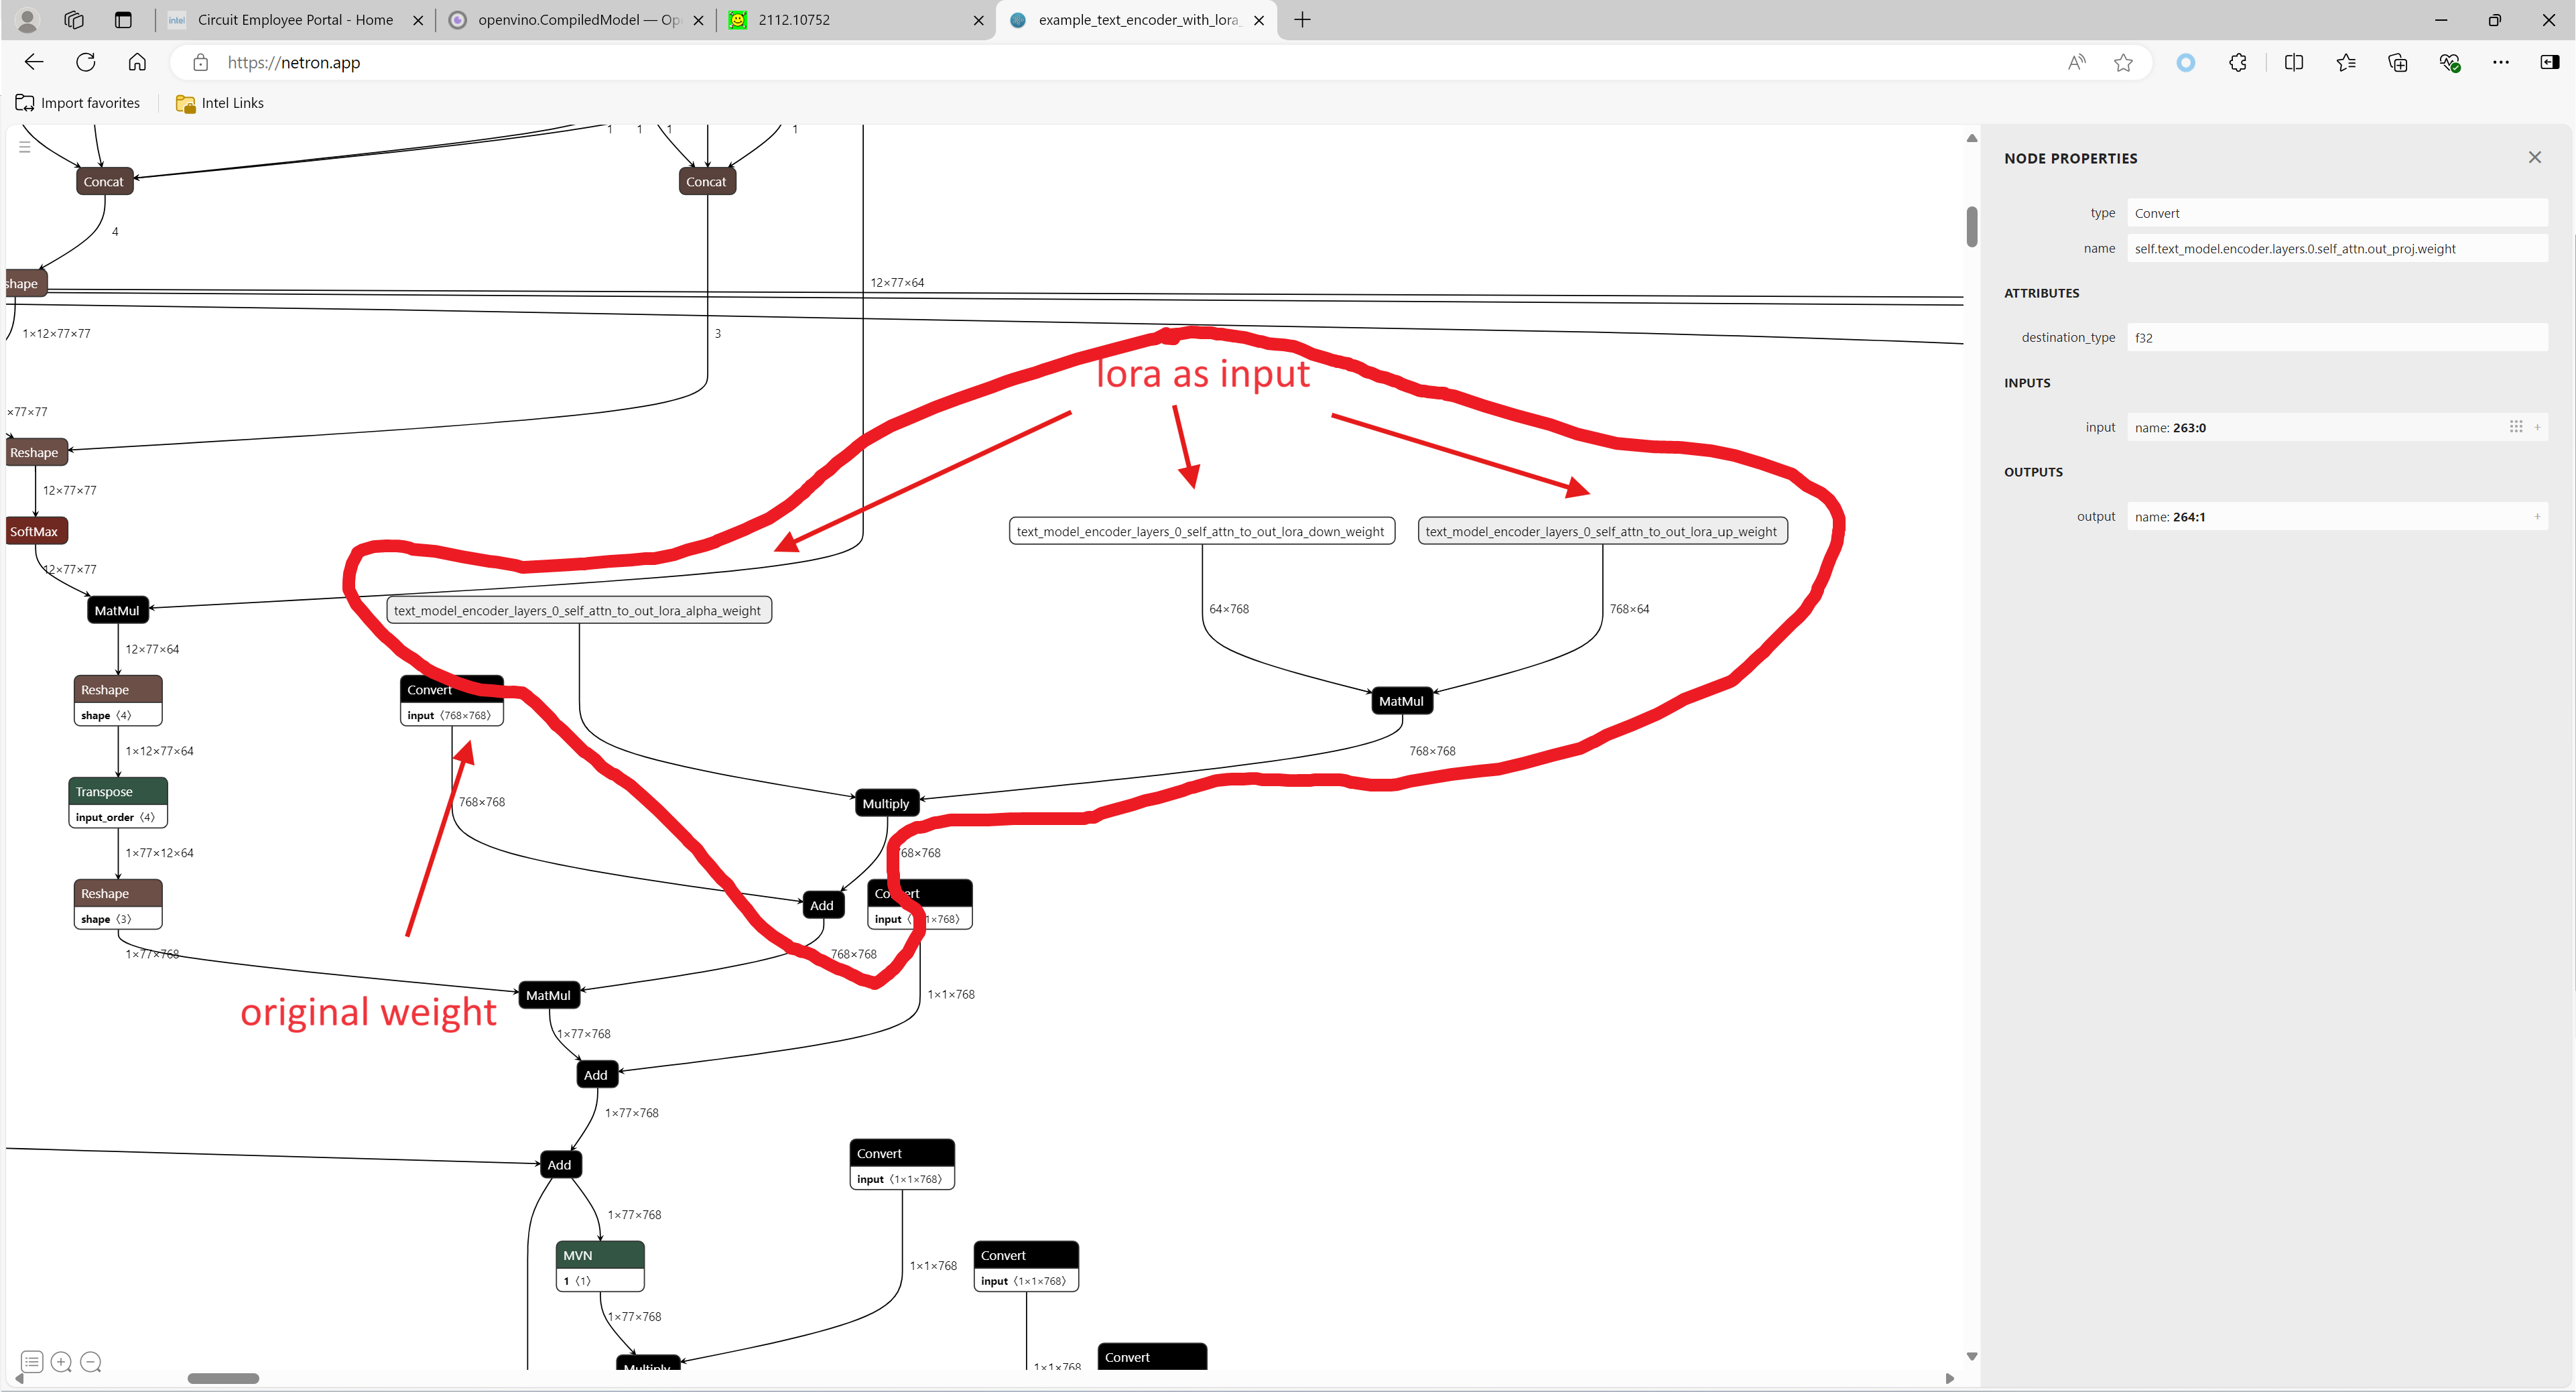
This blog will introduce how to implement the dynamic switching of LoRAs in a trick way. Specifically, for most of the tasks, the structure of the base model and LoRAs is unchanged, what changes is the task-specific LoRAs weights, and we can use these LoRAs weights as inputs to the model to achieve the dynamic switching function. All the code involved in this blog can be found here.
1. Environment preparation
# %python -m venv stable-diffusion-lora
# %source stable-diffusion-lora/bin/activate
git clone https://github.com/TianmengChen/sd1.5_controlnet_lora.git
pip install -r requirements.txt
2. Convert and inference
you should first change the lora file path and configs at first around line 478 in ov_model_export.py, after run python ov_model_ export.py, you will get related OpenVINO IR model. Then you can run ov_model_infer.py.
python ov_model_export.py
python ov_model_infer.py
3. Codes explanation
The most important part is the code in util.py, which is used to modify the model graph and load lora.
Function load_lora(lora_path, DEVICE_NAME) is used to load lora, get lora's shape and weights per layers and modify each layer's name.
def load_lora(lora_path, DEVICE_NAME):
    state_dict = load_file(lora_path)
    if DEVICE_NAME =="CPU":
        for key, value in state_dict.items():
            if isinstance(value, torch.Tensor):
                    value_fp32 = value.type(torch.float32)
                    state_dict[key] = value_fp32

    layers_per_block = 2#TODO
    state_dict = _maybe_map_sgm_blocks_to_diffusers(state_dict, layers_per_block)
    state_dict, network_alphas = _convert_non_diffusers_lora_to_diffusers(state_dict)

    # now keys in format like: "unet.up_blocks.0.attentions.2.transformer_blocks.8.ff.net.2.lora.down.weight"'
    new_state_dict = {}
    for key , value in state_dict.items():
        if len(value.shape)==4:
            # new_value = torch.reshape(value, (value.shape[0],value.shape[1]))
            new_value = torch.squeeze(value)
        else:
            new_value = value
        new_state_dict[key.replace('.', '_').replace('_processor','')] = new_value
    # now keys in format like: "unet_up_blocks_0_attentions_2_transformer_blocks_8_ff_net_2_lora_down_weight"'

    LORA_PREFIX_UNET = "unet"
    LORA_PREFIX_TEXT_ENCODER = "text_encoder"
    LORA_PREFIX_TEXT_2_ENCODER = "text_encoder_2"

    lora_text_encoder_input_value_dict = {}
    lora_text_encoder_2_input_value_dict = {}
    lora_unet_input_value_dict = {}

    lora_alpha = collections.Counter(network_alphas.values()).most_common()[0][0]

    for key in new_state_dict.keys():
        if LORA_PREFIX_TEXT_ENCODER in key and "lora_down" in key and LORA_PREFIX_TEXT_2_ENCODER not in key:
            layer_infos = key.split(LORA_PREFIX_TEXT_ENCODER + "_")[-1]
            lora_text_encoder_input_value_dict[layer_infos] = new_state_dict[key]
            lora_text_encoder_input_value_dict[layer_infos.replace("lora_down", "lora_up")] = new_state_dict[key.replace("lora_down", "lora_up")]

        elif LORA_PREFIX_TEXT_2_ENCODER in key and "lora_down" in key:
            layer_infos = key.split(LORA_PREFIX_TEXT_2_ENCODER + "_")[-1]
            lora_text_encoder_2_input_value_dict[layer_infos] = new_state_dict[key]
            lora_text_encoder_2_input_value_dict[layer_infos.replace("lora_down", "lora_up")] = new_state_dict[key.replace("lora_down", "lora_up")]

        elif LORA_PREFIX_UNET in key and "lora_down" in key:
            layer_infos = key.split(LORA_PREFIX_UNET + "_")[-1]
            lora_unet_input_value_dict[layer_infos] = new_state_dict[key]
            lora_unet_input_value_dict[layer_infos.replace("lora_down", "lora_up")] = new_state_dict[key.replace("lora_down", "lora_up")]

    #now the keys in format without prefix

    return lora_text_encoder_input_value_dict, lora_text_encoder_2_input_value_dict, lora_unet_input_value_dict, lora_alpha
Function add_param(model, lora_input_value_dict) is used to add input parameter per names of related layers, which will be connected to model with manager.register_pass(InsertLoRAUnet(input_param_dict)) and manager.register_pass(InsertLoRATE(input_param_dict)), in these two classes, we search the whole model graph to find the related layers by their names and connect them with lora.
def add_param(model, lora_input_value_dict):
        param_list = []
        for key, value in lora_input_value_dict.items():
            if '_lora_down' in key:
                key_down = key
                key_up = key_down.replace('_lora_down','_lora_up')
                name_alpha = key_down.replace('_lora_down','_lora_alpha')
                lora_alpha = ops.parameter(shape='',name=name_alpha)
                lora_alpha.output(0).set_names({name_alpha})
                # lora_down = ops.parameter(shape=[-1, lora_input_value_dict[key_down].shape[-1]], name=key_down)
                lora_down = ops.parameter(shape=lora_input_value_dict[key_down].shape, name=key_down)
                lora_down.output(0).set_names({key_down})
                # lora_up = ops.parameter(shape=[lora_input_value_dict[key_up].shape[0], -1], name=key_up)
                lora_up = ops.parameter(shape=lora_input_value_dict[key_up].shape, name=key_up)
                lora_up.output(0).set_names({key_up})
                param_list.append(lora_alpha)
                param_list.append(lora_down)
                param_list.append(lora_up)
        model.add_parameters(param_list)
class InsertLoRAUnet(MatcherPass):
    def __init__(self, input_param_dict):
        MatcherPass.__init__(self)
        self.model_changed = False
        param = WrapType("opset10.Convert")

        def callback(matcher: Matcher) -> bool:
            root = matcher.get_match_root()
            root_output = matcher.get_match_value()
            for key in input_param_dict.keys():
                if root.get_friendly_name().replace('.','_').replace('self_unet_','') == key.replace('_lora_down','').replace('to_out','to_out_0'):

                    key_down = key
                    key_up = key_down.replace('_lora_down','_lora_up')
                    key_alpha = key_down.replace('_lora_down','_lora_alpha')

                    consumers = root_output.get_target_inputs()

                    lora_up_node = input_param_dict.pop(key_up)
                    lora_down_node = input_param_dict.pop(key_down)
                    lora_alpha_node = input_param_dict.pop(key_alpha)

                    lora_weights = ops.matmul(data_a=lora_up_node, data_b=lora_down_node, transpose_a=False, transpose_b=False, name=key.replace('_down',''))
                    lora_weights_alpha = ops.multiply(lora_alpha_node, lora_weights)
                    if len(root.shape)!=len(lora_weights_alpha.shape):
                        # lora_weights_alpha_reshape = ops.reshape(lora_weights_alpha, root.shape, special_zero=False)
                        lora_weights_alpha_reshape = ops.unsqueeze(lora_weights_alpha, axes=[2, 3])
                        add_lora = ops.add(root,lora_weights_alpha_reshape,auto_broadcast='numpy')
                    else:
                        add_lora = ops.add(root,lora_weights_alpha,auto_broadcast='numpy')
                    for consumer in consumers:
                        consumer.replace_source_output(add_lora.output(0))

                    return True
            # Root node wasn't replaced or changed
            return False

        self.register_matcher(Matcher(param,"InsertLoRAUnet"), callback)
class InsertLoRATE(MatcherPass):
    def __init__(self, input_param_dict):
        MatcherPass.__init__(self)
        self.model_changed = False
        param = WrapType("opset10.Convert")

        def callback(matcher: Matcher) -> bool:
            root = matcher.get_match_root()
            root_output = matcher.get_match_value()
            root_name = None
            if 'Constant_' in root.get_friendly_name() and root.shape == ov.Shape([768,768]):
                target_input = root.output(0).get_target_inputs()
                for v in target_input:
                    for input_of_MatMul in v.get_node().inputs():
                        if input_of_MatMul.get_shape()== ov.Shape([1,77,768]):
                            Add_Node = input_of_MatMul.get_source_output().get_node()
                            for Add_Node_output in Add_Node.output(0).get_target_inputs():
                                if 'k_proj' in Add_Node_output.get_node().get_friendly_name():
                                    for i in Add_Node_output.get_node().inputs():
                                        if i.get_shape() == ov.Shape([768,768]) and 'k_proj' in i.get_source_output().get_node().get_friendly_name():
                                            root_name = i.get_source_output().get_node().get_friendly_name().replace('k_proj', 'q_proj')

            root_friendly_name = root_name if root_name else root.get_friendly_name()

            for key in input_param_dict.keys():
                if root_friendly_name.replace('.','_').replace('self_','') == key.replace('_lora_down','_proj').replace('_to','').replace('_self',''):
                    # print(root_friendly_name)
                    key_down = key
                    key_up = key_down.replace('_lora_down','_lora_up')
                    key_alpha = key_down.replace('_lora_down','_lora_alpha')

                    consumers = root_output.get_target_inputs()

                    lora_up_node = input_param_dict.pop(key_up)
                    lora_down_node = input_param_dict.pop(key_down)
                    lora_alpha_node = input_param_dict.pop(key_alpha)

                    lora_weights = ops.matmul(data_a=lora_up_node, data_b=lora_down_node, transpose_a=False, transpose_b=False, name=key.replace('_down',''))
                    lora_weights_alpha = ops.multiply(lora_alpha_node, lora_weights)
                    add_lora = ops.add(root,lora_weights_alpha,auto_broadcast='numpy')
                    for consumer in consumers:
                        consumer.replace_source_output(add_lora.output(0))

                    return True

            if len(input_param_dict) == 0:
                print("All loras are added")
            # Root node wasn't replaced or changed
            return False

        self.register_matcher(Matcher(param,"InsertLoRATE"), callback)
4. GenAI
In addition to this, the latest OpenVINO GenAI provides the Cpp API for LoRA. You can find it here.