Enable LoRA weights with Stable Diffusion Controlnet Pipeline
Authors: Zhen Zhao(Fiona), Kunda Xu
Low-Rank Adaptation(LoRA) is a novel technique introduced to deal with the problem of fine-tuning Diffusers and Large Language Models (LLMs). In the case of Stable Diffusion fine-tuning, LoRA can be applied to the cross-attention layers for the image representations with the latent described. You can refer HuggingFace diffusers to understand the basic concept and method for model fine-tuning: https://huggingface.co/docs/diffusers/training/lora
In this blog, we aimed to introduce the method building up the pipeline for Stable Diffusion + ControlNet with OpenVINO™ optimization, and enable LoRA weights for Unet model of Stable Diffusion to generate images with different styles. The demo source code is based on: https://github.com/FionaZZ92/OpenVINO_sample/tree/master/SD_controlnet
Stable Diffusion ControlNet Pipeline
Step 1: Environment preparation
First, please follow below method to prepare your development environment, you can choose download model from HuggingFace for better runtime experience. In this case, we choose controlNet for canny image task.
* Please note, the diffusers start to use `torch.nn.functional.scaled_dot_product_attention` if your installed torch version is >= 2.0, and the ONNX does not support op conversion for “Aten:: scaled_dot_product_attention”. To avoid the error during the model conversion by “torch.onnx.export”, please make sure you are using torch==1.13.1.
Step 2: Model Conversion
The demo provides two programs, to convert model to OpenVINO™ IR, you should use “get_model.py”. Please check the options of this script by:
In this case, let us choose multiple batch size to generate multiple images. The common application of vison generation has two concepts of batch:
- `batch_size`: Specify the length of input prompt or negative prompt. This method is used for generating N images with N prompts.
- `num_images_per_prompt`: Specify the number of images that each prompt generates. This method is used to generate M images with 1 prompts.
Thus, for common user application, you can well use these two attributes in diffusers to generate N*M images by N prompts with increased random seed values. For example, if your basic seed is 42, to generate N(2)*M(2) images, the actual generation is like below:
- N=1, M=1: prompt_list[0], seed=42
- N=1, M=2: prompt_list[0], seed=43
- N=2, M=1: prompt_list[1], seed=42
- N=2, M=2: prompt_list[1], seed=43
In this case, let’s use N=2, M=1 as a quick example for demonstration, thus the use`--batch 2`. This script will generate static shape model by default. If you are using different value of N and M, please specify `--dynamic`.
Please check your current path, make sure you already generated below models currently. Other ONNX files can be deleted for saving space.
- controlnet-canny.<xml|bin>
- text_encoder.<xml|bin>
- unet_controlnet.<xml|bin>
- vae_decoder.<xml|bin>
* If your local path already exists ONNX or IR model, the script will jump tore-generate ONNX/IR. If you updated the pytorch model or want to generate model with different shape, please remember to delete existed ONNX and IR models.
Step 3: Runtime pipeline test
The provided demo program `run_pipe.py` is manually build-up the pipeline for StableDiffusionControlNet which refers to the original source of `diffusers.StableDiffusionControlNetPipeline`
The difference is we simplify the pipeline with 4 models’ inference by OpenVINO™ runtime API which can make sure the model inference can be accelerated on Intel® CPU and GPU platform.
The default iteration is 20, image shape is 512*512, seed is 42, and the input image and prompt is for “Girl with Pearl Earring”. You can adjust or custom your own pipeline attributes for testing.
In the case with batch_size=2, the generated image is like below:

Enable LoRA weights for Stable Diffusion
Normal LoRA weights has two types, one is ` pytorch_lora_weights.bin`,the other is using safetensors. In this case, we introduce both methods for these two LoRA weights.
The main idea for LoRA weights enabling, is to append weights onto the original Unet model of Stable Diffusion, then export IR model of Unet which remains LoRA weights.
There are various LoRA models on https://civitai.com/tag/lora , we choose some public models on HuggingFace as an example, you can consider toreplace with your owns.
Step 4-1: Enable LoRA by pytorch_lora_weights.bin
This step introduces the method to add lora weights to Unet model of Stable Diffusion by `pipe.unet.load_attn_procs(...)` function. By using this way, the LoRA weights will be loaded into the attention layers of Unet model of Stable Diffusion.
* Remember to delete exist Unet model to generate the new IR with LoRA weights.
Then, run pipeline inference program to check results.
The LoRA weights appended Stable Diffusion model with controlNet pipeline can generate image like below:

Step 4-2: Enable LoRA by safetensors typed weights
This step introduces the method to add LoRA weights to Stable diffusion Unet model by `diffusers/scripts/convert_lora_safetensor_to_diffusers.py`. Diffusers provide the script to generate new Stable Diffusion model by enabling safetensors typed LoRA model. By this method, you will need to replace the weight path to new generated Stable Diffusion model with LoRA. You can adjust value of `alpha` option to change the merging ratio in `W = W0 + alpha * deltaW` for attention layers.
Then, run pipeline inference program to check results.
The LoRA weights appended SD model with controlnet pipeline can generate image like below:

Step 4-3: Enable runtime LoRA merging by MatcherPass
This step introduces the method to add lora weights in runtime before Unet or text_encoder model compiling. It will be helpful to client application usage with multiple different LoRA weights to change the image style by reusing the same Unet/text_encoder structure.
This method is to extract lora weights in safetensors file and find the corresponding weights in Unet model and insert lora weights bias. The common method to add lora weights is like:
W = W0 + W_bias(alpha * torch.mm(lora_up, lora_down))
I intend to insert Add operation for Unet's attentions' weights by OpenVINO™ `opset10.add(W0,W_bias)`. The original attention weights in Unet model is loaded by `Const` op, the common processing path is `Const->Convert->Matmul->...`, if we add the lora weights, we should insert the calculated lora weight bias as `Const->Convert->Add->Matmul->...`. In this function, we adopt `openvino.runtime.passes.MatcherPass` to insert `opset10.add()` with call_back() function iteratively.
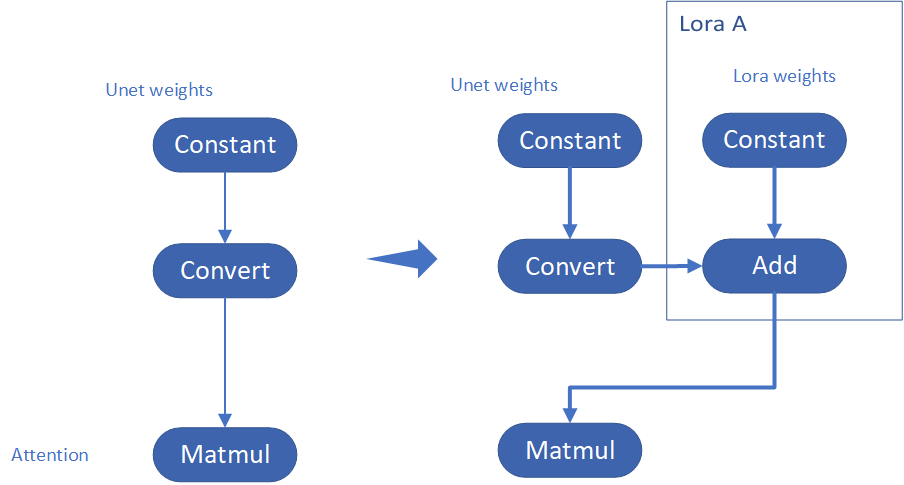
Your own transformation operations will insert opset.Add() firstly, then during the model compiling with device. The graph will do constant folding to combine the Add operation with following MatMul operation to optimize the model runtime inference. Thus, this is an effective method to merge LoRA weights onto original model.
You can check with the implementation source code, and find out the definition of the MatcherPass function called `InsertLoRA(MatcherPass)`:
The `InsertLoRA(MatcherPass)` function will be registered by `manager.register_pass(InsertLoRA(lora_dict_list))`, and invoked by `manager.run_passes(ov_unet)`. After this runtime MatcherPass operation, the graph compile with device plugin and ready for inference.
Run pipeline inference program to check the results. The result is same as Step 4-2.
The LoRA weights appended Stable Diffusion model with controlNet pipeline can generate image like below:

Step 4-4: Enable multiple LoRA weights
There are many different methods to add multiple LoRA weights. I list two methods here. Assume you have two LoRA weigths, LoRA A and LoRA B. You can simply follow the Step 4-3 to loop the MatcherPass function to insert between original Unet Convert layer and Add layer of LoRA A. It's easy to implement. However, it is not good at performance.
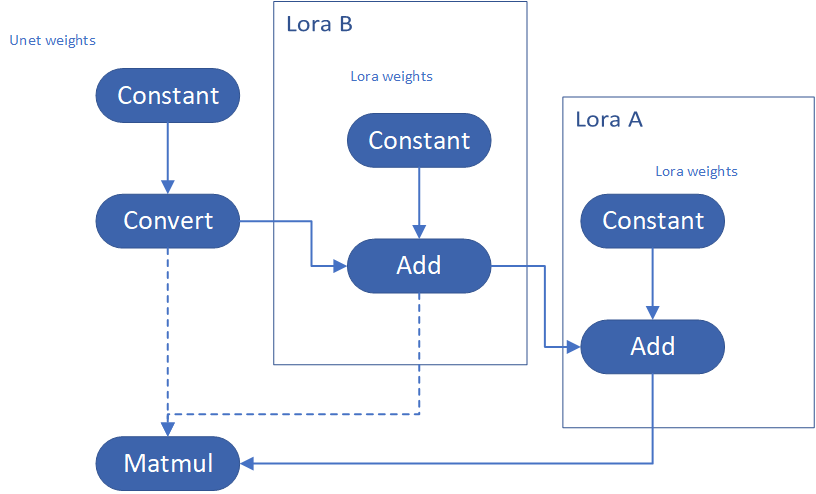
Please consider about the Logic of MatcherPass function. This fucntion required to filter out all layer with the Convert type, then through the condition judgement if each Convert layer connected by weights Constant has been fine-tuned and updated in LoRA weights file. The main costs of LoRA enabling is costed by InsertLoRA() function, thus the main idea is to just invoke InsertLoRA() function once, but append multiple LoRA files' weights.
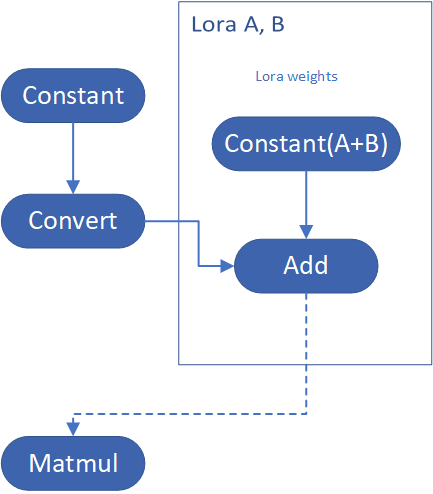
By above method to add multiple LoRA, the cost of appending 2 or more LoRA weights almost same as adding 1 LoRA weigths.
Now, let's change the Stable Diffusion with dreamlike-anime-1.0 to generate image with styles of animation. I pick two LoRA weights for SD 1.5 from https://civitai.com/tag/lora.
- soulcard: https://civitai.com/models/67927?modelVersionId=72591
- epi_noiseoffset: https://civitai.com/models/13941/epinoiseoffset
You probably need to do prompt engineering work to generate a useful prompt like below:
- prompt: "1girl, cute, beautiful face, portrait, cloudy mountain, outdoors, trees, rock, river, (soul card:1.2), highly intricate details, realistic light, trending on cgsociety,neon details, ultra realistic details, global illumination, shadows, octane render, 8k, ultra sharp"
- Negative prompt: "3d, cartoon, lowres, bad anatomy, bad hands, text, error"
- Seed: 0
- num_steps: 30
- canny low_threshold: 100
You can get a wonderful image which generate an animated girl with soulcard typical border like below:

Additional Resources
Provide Feedback & Report Issues
Notices & Disclaimers
Intel technologies may require enabled hardware, software, or service activation.
No product or component can be absolutely secure.
Your costs and results may vary.
Intel does not control or audit third-party data. You should consult other sources to evaluate accuracy.
Intel disclaims all express and implied warranties, including without limitation, the implied warranties of merchantability, fitness for a particular purpose, and non-infringement, as well as any warranty arising from course of performance, course of dealing, or usage in trade.
No license (express or implied, by estoppel or otherwise) to any intellectual property rights is granted by this document.
© Intel Corporation. Intel, the Intel logo, and other Intel marks are trademarks of Intel Corporation or its subsidiaries. Other names and brands may be claimed as the property of others.

.png)
