
Hugging Face

AquilaChat-7B Language Model Enabling with Hugging Face Optimum Intel
Introduction
What is AquilaChat-7B Language Model?

Aquila Language Model is a set of open-source large language models (LLMs) developed by the Beijing Academy of Artificial Intelligence (BAAI). Aquila models support both Chinese and English, commercial license agreements, and compliance with Chinese domestic data regulations.
AquilaChat-7B is a conversational language model that supports Chinese and English dialogue. It is based on the Aquila-7B foundation model and fine-tuned using supervised fine-tuning (SFT). AquilaChat-7B original Pytorch model and configurations are publicly available here.
Hugging Face Optimum Intel

Hugging Face is one of the most popular open-source data science and machine learning platforms. It acts as a hub for AI experts and enthusiasts—like a GitHub for AI. Over 200,000 models are available across Natural language processing, Multimodal models, Computer Vision, and Audio domains.
Hugging Face provides wide support for model optimization and deployment of open-sourced LLMs such as LLaMA, Bloom, GPT-Neox, Dolly 2.0, to name a few. More details please refer to Open LLM Leaderboard.
Optimum-Intel provides a simple interface between the Hugging Face and OpenVINOTM ecosystem to leverage high-performance inference capabilities for Intel architecture. Here is a simple example to show how to run Dolly 2.0 models with OVModelForCausalLM using OpenVINOTM runtime.
Hola! So, for LLMs already supported by Hugging Face transformers and optimum, we can smoothly switch the model inference backend from Pytorch to OpenVINOTM by changing only two lines of code.
However, what if an LLM from an open-source community that not native supported by Hugging Face Transformers library? How can we still leverage the tools of Hugging Face and OpenVINOTM ecosystem for model optimization and deployment?
Indeed, AquilaChat-7B is a custom model for the Hugging Face Transformers. So, we use it as an example to elaborate the custom model enabling methodology step by step.
How to Enable a Custom Model on Hugging Face?
To leverage the Hugging Face ecosystem and optimization for AquilaChat-7B model, we need to convert the original Pytorch model to Hugging Face Format. Before we dive into conversion details, we need to figure out what is AquilaChat-7B’s model structure, tokenizer, and configurations.
According to Aquila’s official model description:
“The Aquila language model inherits the architectural design advantages of GPT-3 and LLaMA, replacing a batch of more efficient underlying operator implementations and redesigning the tokenizer for Chinese-English bilingual support. The Aquila language model is trained from scratch on high-quality Chinese and English corpora. “
Model Structure and Tokenizer
For model structure, Aquila Model adopts the original Meta LLaMA pytorch implementation, which combines RMSNorm (GPT-3) to improve training stability and Rotary Position Embedding (GPT-NeoX)to incorporate explicit relative position dependency in self-attention.
For tokenizer, instead of using byte-pair encoding (BPE) algorithms implemented by Sentence Piece, Aquila re-trained HuggingFace GPT-NeoX tokenizer with extended vocabulary (vocab_size =100008, including 8 special tokens, e.g. bos_token=100006, eos_token=100007, unk=0, pad=0 used for inference based on here.
Rotary Position Embedding
Rotary Position Embedding (RoPE) encodes the absolute position with a rotation matrix and meanwhile incorporates the explicit relative position dependency in the self-attention formulation. Compare to other position embedding methods, RoPE provides valuable properties such as flexibility of sequence length, long-term decay, and linear self-attention with relative position embedding. Based on the original paper, there are two mainstream implementations of RoPE:
As show in Figure 3, Meta LLaMA’s implementation directly use complex number to calculate rotary position embedding.

As show in Figure 4, Google PaLM’s implementation expands the complex number operation and calculate sinusoidal functions in matrix equation of real numbers.
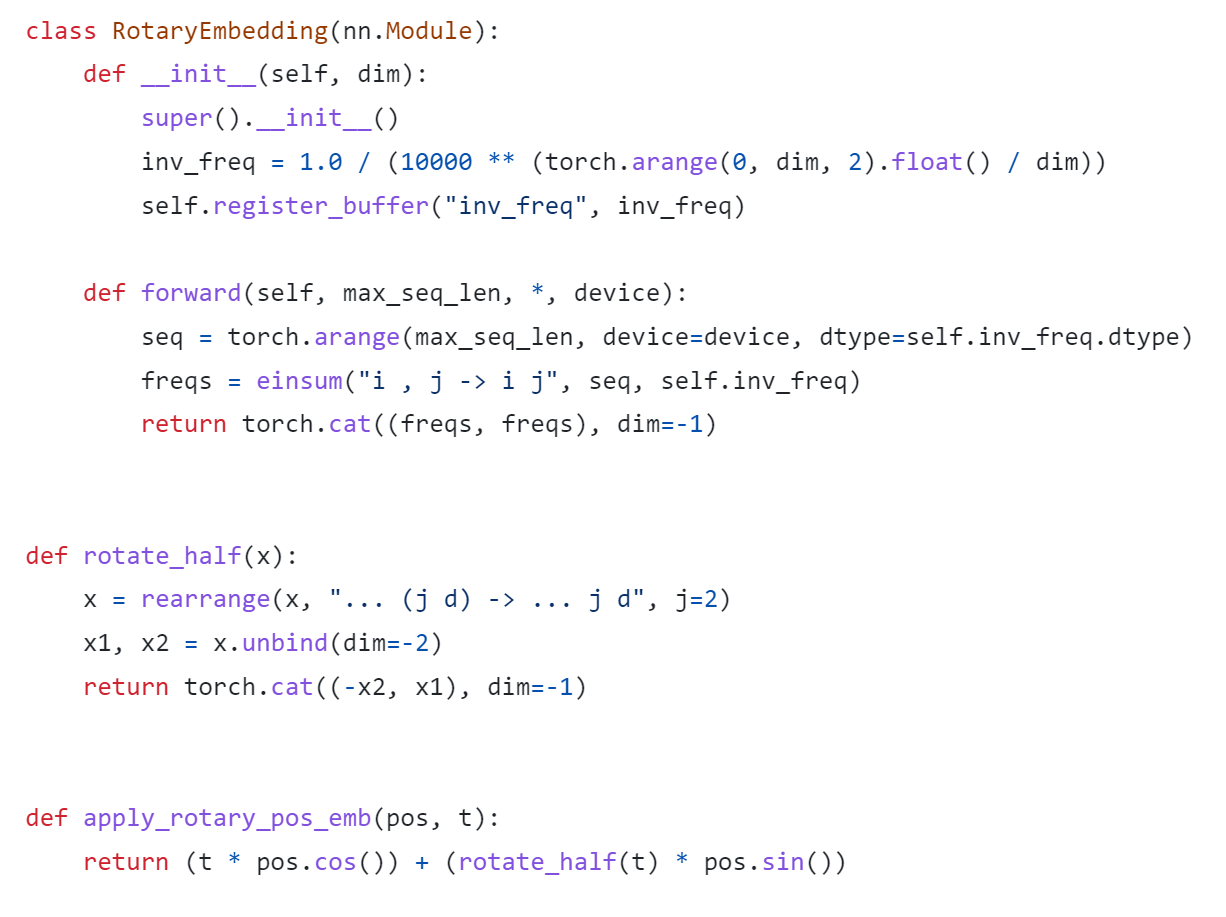
Both RoPE implementations are valid for the Pytorch model. Hugging Face LLaMA implementation adopts PaLM’s RoPE implementation due to the limitation of complex type support for ONNX export.
Besides, Hugging Face provides a useful script convert_llama_weights_to_hf.py to convert the original Meta LLaMA Pytorch Model to Hugging Face Format as follows:
- Extract Pytorch weights and convert Meta LlaMA RoPE implementation to Hugging Face RoPE implementation.
- Convert tokenizer.model trained with Sentence Piece to Hugging Face LLaMA tokenizer.
Convert AquilaChat-7B Model to Hugging Face Format
Similarly, we provide a convert_aquila_weights_to_hf.py to convert AquilaChat-7B Model to Hugging Face Format.
- Extract Pytorch weights and convert Aquila RoPE implementation to Hugging Face RoPE implementation
- Initialize and save a Hugging Face GPT-NeoX Tokenizer with extended vocabulary based on original tokenizer configurations provided by Aquila.
- Add a modeling_aquila.py to enable support forAutoModelForCausalLM and AutoTokenizer
Here is the converted Hugging Face version of AquilaChat-7B v0.6 model uploaded in Hugging Face.
You may convert pytorch weights to Hugging Face format in two steps:
- Download AquilaChat-7B Pytorch Model and configurations here
- Convert AquilaChat-7B Pytorch Model and configurations to Hugging Face Format
Hugging Face AquilaChat-7B Demo
Setup Environment
Run inference with AutoModelForCausalLM
Run inference with OVModelForCausalLM
Conclusion
In this blog, we show how to convert a custom Large Language Model (LLM) to Hugging Face format to leverage efficient optimization and deployment with Hugging Face and OpenVINOTM Ecosystem.
Please note, this is the initial model enabling step for AquilaChat-7B model with OpenVINOTM. We will continue to optimize performance along with upgrading OpenVINOTM for LLM scaling. Please refer to OpenVINOTM and Optimum-Intel official release to get latest efficient support for LLMs with OpenVINOTM backend.
Reference
- FlagAI AquilaChat-7B
- AquilaChat-7B Hugging Face Model
- Hugging Face Optimum Intel
- LLaMA:Open and Efficient Foundation Language Models
- RoFormer:Enhanced Transformer with Rotary Position Embedding
- RotaryEmbeddings: A Relative Revolution
Joint Pruning, Quantization and Distillation for Efficient Inference of Transformers
Introduction
Pre-trained transformer models are widely deployed for various NLP tasks such as text classification, question answering, and generation task. The recent trend is that models continue to scale while yielding improved performance. However, growth of transformers also leads to great amount of compute resources and energy needed for deployment. The goal of model compression is to achieve model simplification from the original without significantly diminished accuracy. Pruning, quantization, and knowledge distillation are the three most popular model compression techniques for deep learning models. Pruning is a technique for reducing the size of a model to improve efficiency or performance. By reducing the number of bits needed to represent data, quantization can significantly reduce storage and computational requirements. Knowledge distillation involves training a small model to imitate the behavior of a larger model.
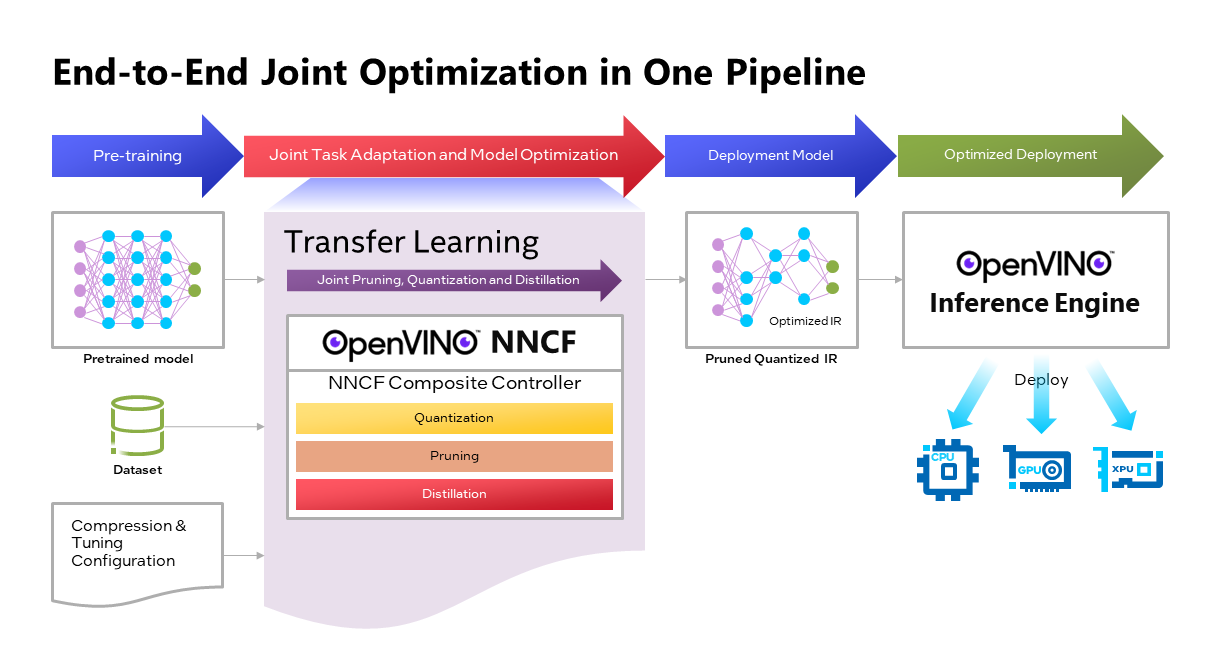
OpenVINOTM Neural Network Compression Framework (NNCF) develops Joint Pruning, Quantization and Distillation (JPQD) as a single joint-optimization pipeline to improve transformer inference performance by pruning, quantization, and distillation in parallel during transfer learning of a pretrained transformer. JPQD alleviates the developer complexity of sequential optimization of different compression techniques, resulting in an optimized model with significant efficiency improvement while preserving good task accuracy. The output of JPQD is a structurally pruned, quantized model in OpenVINOTM IR, which is ready to deploy with OpenVINOTM runtimes optimized on Intel platforms. Optimum intel provides simple API to integrate JPQD into training pipeline for Hugging Face Transformers.
JPQD of BERT-base Model with Optimum Intel
In this blog, we introduce how to apply JPQD to BERT-base model on GLUE benchmark for SST-2 text classification task.
Here is a compression config example with the format that follows NNCF specifications. We specify pruning and quantization in a list of compression algorithms with hyperparameters. The pruning method closely resembles the work of Movement Pruning (Sanh et al., 2020) and Block Pruning For Faster Transformers (Lagunas et al., 2021) for unstructured and structured movement sparsity. Quantization refers to Quantization-aware Training (QAT), see details for QAT in previous blog. At the beginning of training, the model under optimization will be initialized with pruning and quantization operators with this configuration.
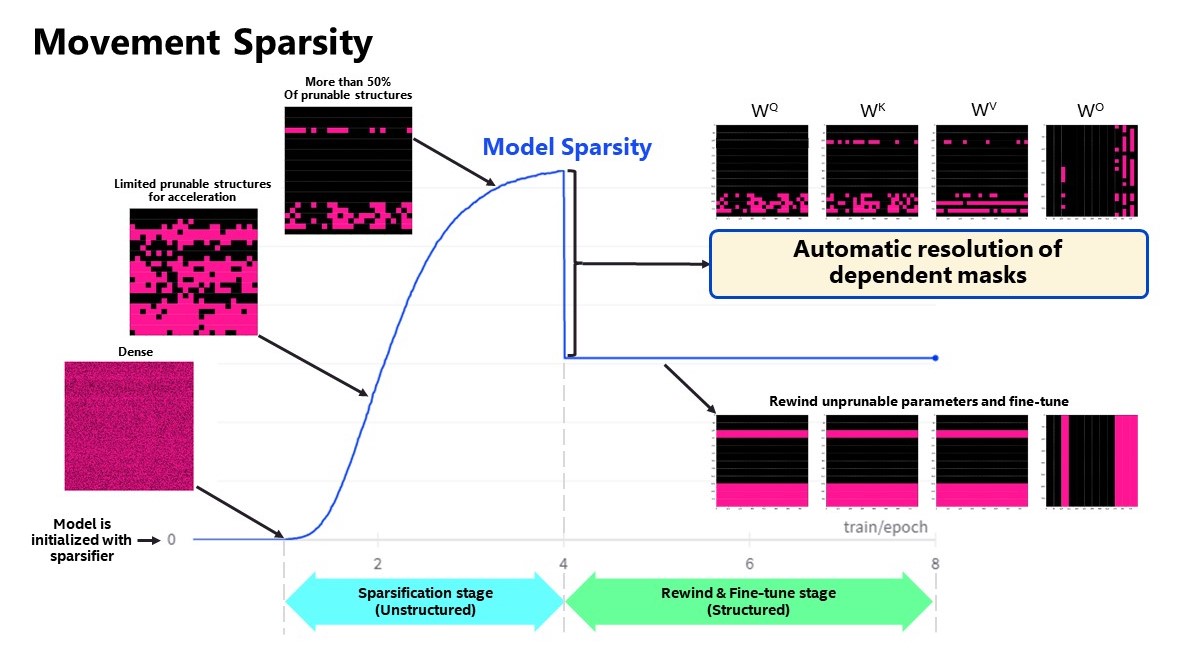
Figure 2 shows the sparsity level of BERT-base model over the optimization lifecycle, including two major stages:
- Unstructured sparsification: In the first stage, model weights are gradually sparsified in the grain size specified by "sparse_structure_by_scopes". The BertAttention layers (Multi-Head Attention: MHA) will be sparsified in 32x32 block size, while BertIntermediate, and BertOutput layers (Feed-Forward Network: FFN) will be sparsified in its row or column respectively. The first stage serves as a warmup stage defined by parameter “warmup_start_epoch” and “warmup_end_epoch”. The “importance_regularization_factor” defines regularization factor onweight importance scores. The factor stays zero before warmup stage, and gradually increases during warmup, finally stays at the fixed value after warmup, users might need some heuristics to find a satisfactory trade-off between sparsity and task accuracy.
- Structured masking and fine-tuning: The first warm-up stage will produce the unstructured sparsified model. Currently, unstructured sparsity optimized inference is only supported on 4th Gen Intel® Xeon® Scalable Processors with OpenVINO 2022.3 or a later version, for details, please refer to Accelerate Inference of Sparse Transformer Models with OpenVINO™ and 4th Gen Intel® Xeon®Scalable Processors. But it is possible to discard some sparse structure entirely from the model to save compute and memory footprint. NNCF provides a mechanism to achieve structured masking by “enable_structured_masking”: true, where it automatically resolves the structured masking between dependent layers and rewinds the sparsified parameters that do not participate in acceleration for task modeling. As Figure 2 shows, the sparsity level has dropped after “warmup_end_epoch” due to structured masking and the model will continue to be fine-tuned.
Known limitation: currently structured pruning with movement sparsity only supports BERT, Wav2vec2, and Swin family of models. See here for more information.
For distillation, the teacher model can be loaded with transformer API, e.g., a BERT-large pre-trained model from Hugging Face Hub. OVTrainingArguments extends transformers’ TrainingArguments with distillation hyperparameters, i.e., distillation weight and temperature for ease of use. The snippet below shows how we load a teacher model and create training arguments with OVTrainingArguments. Subsequently, the teacher model, with the instantiated OVConfig and OVTrainingArguments is fed to OVTrainer. The rest of the pipeline is identical to the native transformers' training, while internally the training is applied with pruning, quantization, and distillation.
Besides, NNCF provides JPQD examples of othertasks, e.g., question answering. Please refer to the examples provided here.
End-to-End JPQD of BERT-base Demo
Set up Python environment with necessary dependencies.
Run text classification example with JPQD of BERT on GLUE
All JPQD configurations and results are saved in ./jpqd-bert-base-ft-$TASK_NAME directory. Optimized OpenVINOTM IR is generated for efficient inference on intel platforms.
BERT-base Performance Evaluation and Accuracy Verification on Xeon

Table 1 shows BERT-base model for text classification task performance evaluation and accuracy verification results on 4th Gen Intel® Xeon® Scalable Processors. BERT-base FP32 model serves as the baseline. BERT-base INT8 (QAT) refers to the model optimized with the 8-bit quantization method only. BERT-base INT8 (JPQD) refers to the model optimized by pruning, quantization, and distillation method.
Here we use benchmark app with performance hint “throughput” to evaluate model performance with input sequence length=128.
As results shows, BERT-base INT8 (QAT) can already reach a 2.39x compression rate and 3.17x performance gain without significant accuracy drop (1.3%) on SST-2 compared with baseline. BERT-base INT8 (JPQD) can further increase compression rate to 5.24x to reach 4.19x performance improvement while keeping minimal accuracy drop (<1%) on SST-2 compared with baseline.

With proper fine-tuning, JPQD can even improve model accuracy while increasing performance in the meantime. Table 2 shows BERT-base model for question answering task performance evaluation and accuracy verification results on 4th Gen Intel® Xeon® Scalable Processors. BERT-base INT8 (JPQD) can increase compression rate to 5.15x to reach 4.25x performance improvement while improving Exact Match (1.35%) and F1 score (1.15%) metric on SQuAD compared with FP32 baseline.
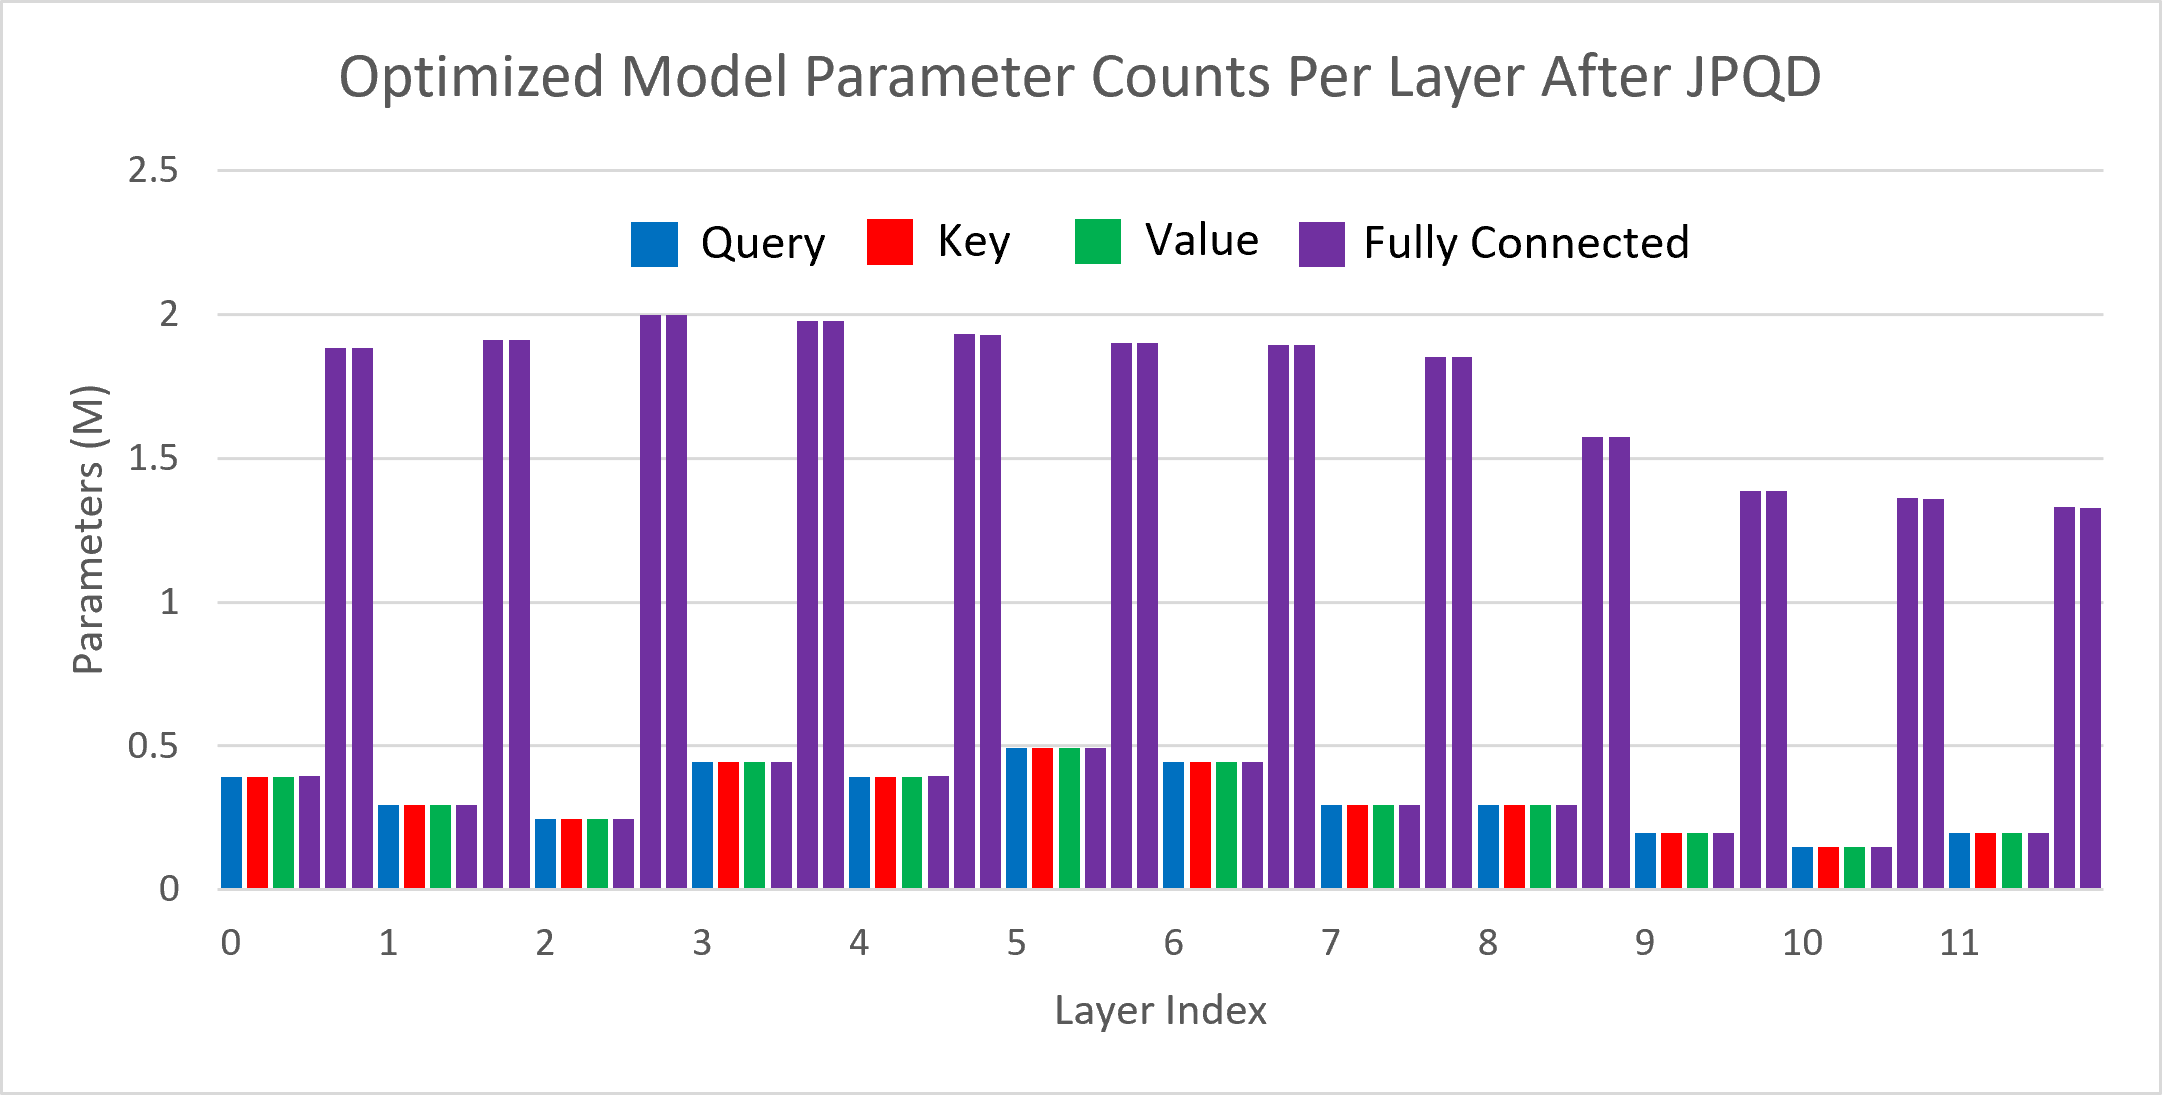
Figure 3 shows the visualization of parameter counts per layer in the BERT-base model optimized by JPQD for the text classification task. You can find that fully connected layers are actually “dense”, while most (Multi-Head Attention) MHA layers will be much sparser compared to the original model.
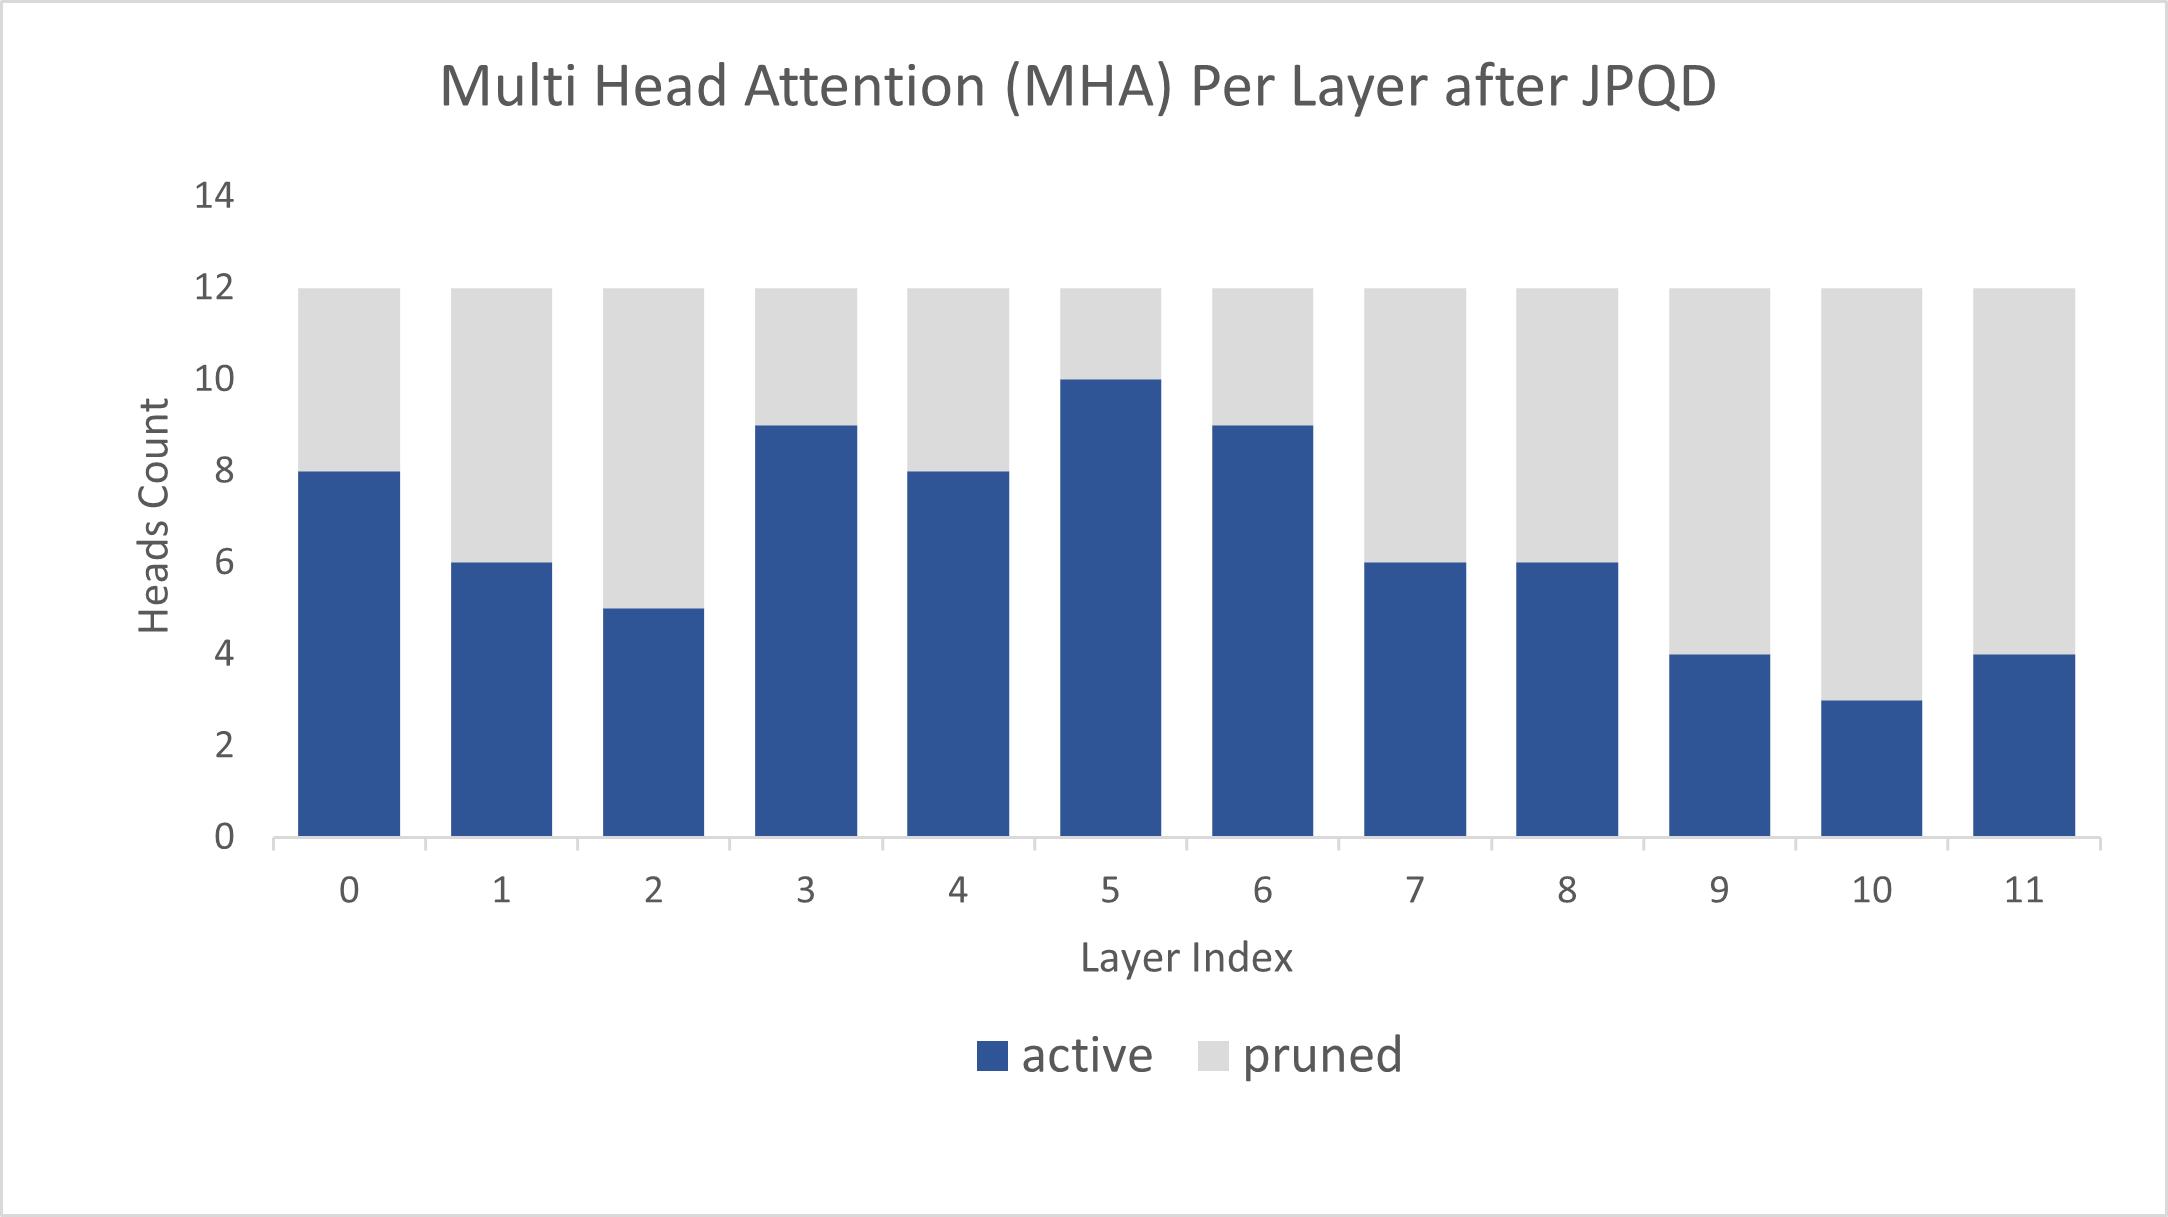
Figure 4 shows MHA head counts per layer in the BERT-base model optimized by JPQD for the text classification task, where active (blue) refer to remaining MHA head counts, while pruned (grey) refers to removed MHA head counts. Instead of pruning uniformly across all MHA heads in transformer layers, we observed that JPQD tends to preserve the weight to the lower layers while heavily pruning the highest layers, similar to experimental results from Movement Pruning (Sanh et al., 2020).
Conclusion
In this blog, we introduce a Joint Pruning, Quantization, and Distillation (JPQD) method to accelerate transformers inference on intel platforms. Here are three key takeaways:
- Optimum Intel provides simple API to integrate JPQD into training pipeline to enable pruning, quantization, and distillation in parallel during transfer learning of a pre-trained transformer. Optimized OpenVINOTM IR will be generated for efficient inference on intel architecture.
- BERT-base INT8 (JPQD) model for text classification task can reach 5.24x compression rate, leading to 4.19x performance improvement on 4th Gen Intel® Xeon® Scalable Processors while keeping minimal accuracy drop (<1%) on SST-2 compared with BERT-base FP32 models.
- BERT-base INT8 (JPQD) model for question answering task can reach 5.15x compression rate to achieve 4.25x performance improvement on 4th Gen Intel® Xeon® Scalable Processors while improving Exact Match (1.35%) and F1 score (1.15%) metric on SQuAD compared with BERT-base FP32 model.
Reference
- Hugging Face Optimum Intel
- Hugging Face Neural Networks Block Movement Pruning
- Intel®Xeon® Processors Are Still the Only CPU With MLPerf Results, Raising the Bar By5x
Additional Resources
Provide Feedback & Report Issues
Notices & Disclaimers
Intel technologies may require enabled hardware, software, or service activation.
No product or component can be absolutely secure.
Your costs and results may vary.
Intel does not control or audit third-party data. You should consult other sources to evaluate accuracy.
Intel disclaims all express and implied warranties, including without limitation, the implied warranties of merchantability, fitness for a particular purpose, and non-infringement, as well as any warranty arising from course of performance, course of dealing, or usage in trade.
No license (express or implied, by estoppel or otherwise) to any intellectual property rights is granted by this document.
© Intel Corporation. Intel, the Intel logo, and other Intel marks are trademarks of Intel Corporation or its subsidiaries. Other names and brands may be claimed as the property of others.
OpenVINO optimizer Latent Diffusion Models (LDM) for super-resolution
OpenVINO optimizer Latent Diffusion Models(LDM) for super-resolution
Introduction
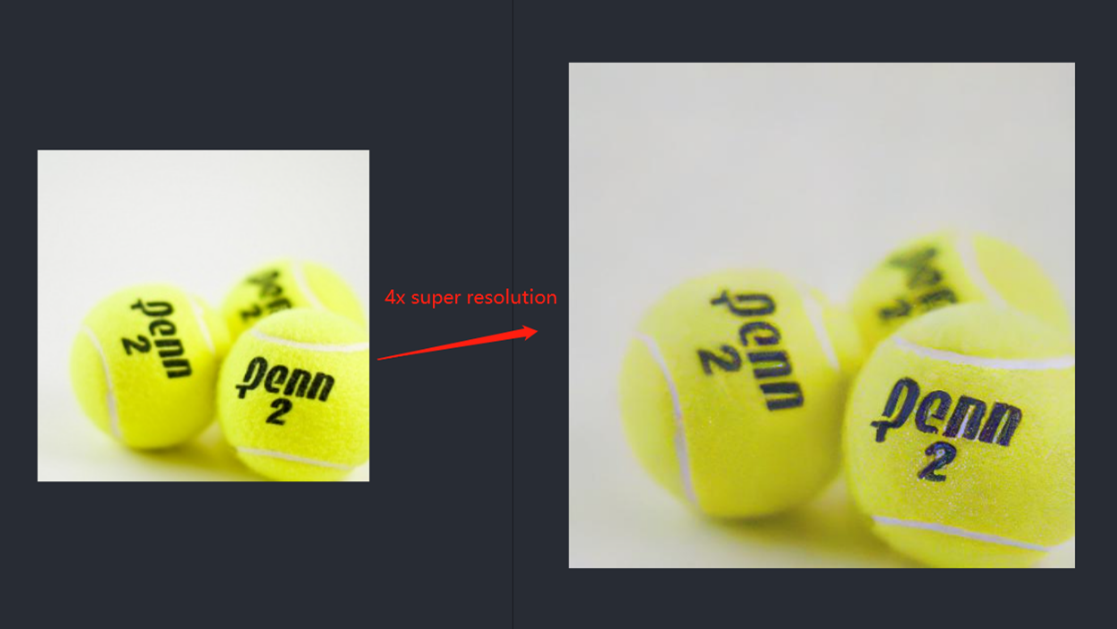
A computer vision approach called image super-resolution aims to increase the resolution of low-resolution images so that they are clearer and more detailed. Applicationsfor super-resolution include the processing of medical images, surveillancefootage, and satellite images.
The LDM (LatentDiffusion Models) Super Resolution model, a deep learning-based approach to photo super-resolution, was developed by the Hugging Face Research team. The residual network (ResNet) architecture, a type of convolutional neural network(CNN) created to address the issue of vanishing gradients in deep neuralnetworks.
Diffusion models are generative models,meaning that they are used to generate data similar to the data on which they are trained. Fundamentally, Diffusion Models work by destroying training data through the successive addition of Gaussian noise, andthen learning to recover the data by reversing this noising process. After training, we can use the Diffusion Model to generatedata by simply passing randomly sampled noise through the learned denoising process.
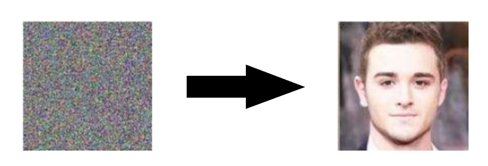
Diffusion Model is a latent variable model which maps to the latent space using a fixed Markov chain. This chain gradually adds noise to thedata in order to obtain the approximate posterior.

Ultimately, the image is asymptotically transformed to pure Gaussian noise. The goal of training a diffusion model is to learn the reverse process. By traversing backward along this chain, we can generate new data.

Requirement
- Optimum-intel Optimum Intel is the interface betweenthe HuggingFace Transformers and Diffusers libraries and the differenttools and libraries provided by Intel to accelerate end-to-end pipelines onIntel architectures.
Intel Neural Compressor is an open-source library enabling the usageof the most popular compression techniques such as quantization, pruning and knowledge distillation
- OpenVINO™ is an open-sourcetoolkit for optimizing and deploying AI inference which can boost deep learningperformance in computer vision, automatic speech recognition, natural language processing and other common task.
- optimum-intel==1.5.2(include openvino)
- openvino
- openvino-dev
- diffusers
- pytorch >= 1.9.1
- onnx >= 1.13.0
Reference: optimum-intel-ldm-super-resolution-4x
QuickStart Demo
Original repo is from HuggingFace CompVis/ldm-super-resolution-4x-openimages,we are reference to build our pipeline to implement super-resolution related function.
To transformand acceleration optimize the pipeline by openvino, there are 3 steps need to do.
- Step1. Install the requirement package and initial environment.
- Step2. Convert original model to openvino IR model.
- Step3. Build OpenVINO super resolution pipeline.
Now, Let’s start with the content of our tutorial.
Step 1. Install the requirementpackage and initial environment
OpenVINO has the standard installation process, we can directly refer tothe official OpenVINO documentation to install.
Reference: Install OpenVINO by source code for Linux
Reference: Install OpenVINO by release package
Optimum Intel also can refer the standard guide.
Reference: Optimum-intel install guide
(Optional) Install the latest stable release by pipe :
# pip install openvino, openvino-dev
# pip install"optimum[openvino,nncf]"
Step 2. Convert originalmodel to OpenVINO IR model
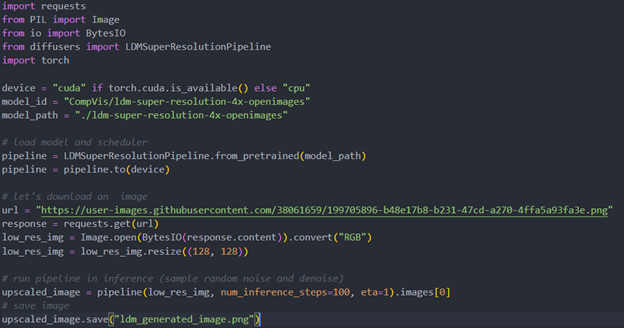
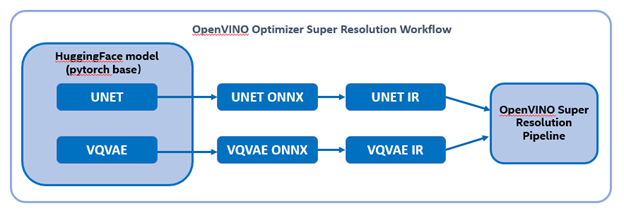
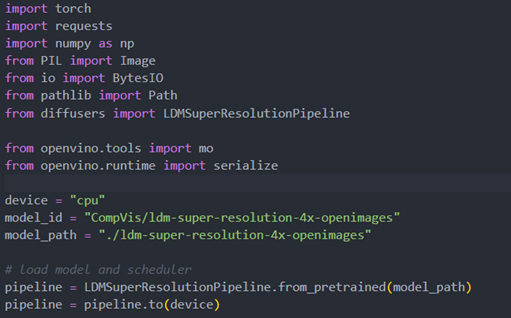
Firstly, run pipe the HuggingFace pipeline, it will automate download the models, and we need to convert them from pytorch->onnx->IR, to enable the model by OpenVINO.
%20workflow.png)
The LDM (LatentDiffusion Models) Super Resolution model has two part of sub-models: unet and vqvae,we should convert each of them in to IR model.
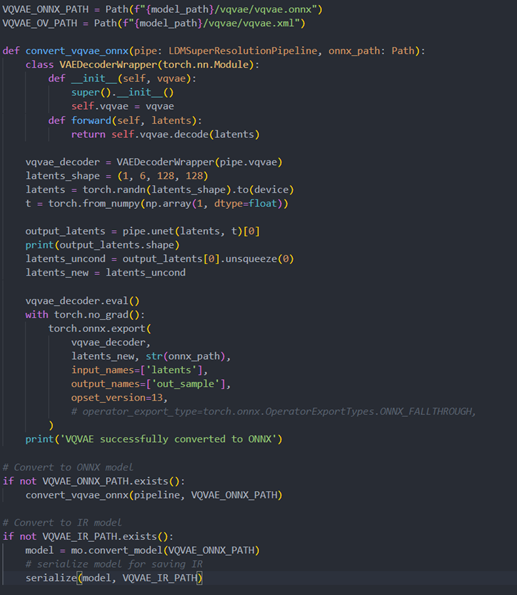
The reference source code for model convert,also we provide the script in the GitHub repo : ov-ldm4x-model-convert.py
Initial parameter and the ov-pipeline
Unet sub-model convert to IR

Vqvae sub-model convert to IR
Step 3. Build OpenVINOsuper resolution pipeline
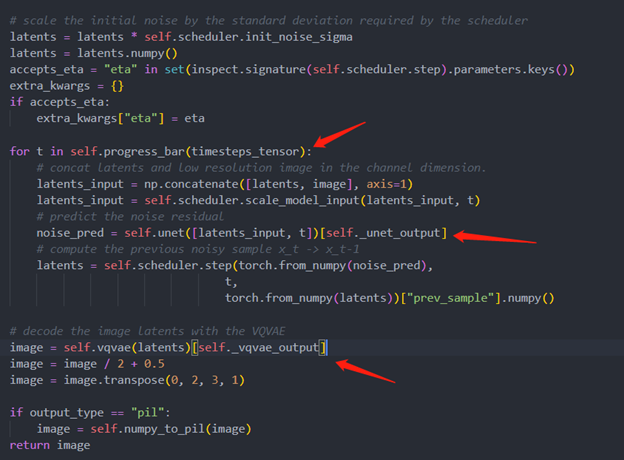
The LDM (Latent Diffusion Models) Super Resolution OpenVINO pipeline main function part code, the whole pipeline script is provided in GitHub repo: ov-ldm4x-pipeline.py
Inference Result
Accelerate Inference of Hugging Face Transformer Models with Optimum Intel and OpenVINO™
Authors: Xiake Sun, Kunda Xu
1. Introduction
Hugging Face is a large open-source community that quickly became an enticing hub for pre-trained deep learning models across Natural Language Processing (NLP), Automatic Speech Recognition(ASR), and Computer Vision (CV) domains.
Optimum Intel provides a simple interface to optimize Transformer models and convert them to OpenVINO™ Intermediate Representation (IR) format to accelerate end-to-end pipelines on Intel® architectures using OpenVINO™ runtime.
Sentimental classification, as one of the popular NLP tasks, is the automated process of identifying opinions in the text and labeling them as positive or negative. In this blog, we use DistilBERT for the sentimental classification task as an example to show how Optimum Intel helps to optimize the model with Neural Network Compression Framework (NNCF) and accelerate inference with OpenVINO™ runtime.
2. Setup Environment
Install optimum-intel and its dependency in a new python virtual environment as follow:
3. Model Inference with OpenVINO™ Runtime
The Optimum inference models are API compatible with Hugging Face Transformers models; which means you could simply replace Hugging Face Transformer “AutoModelXXX” class with the “OVModelXXX” class to switch model inference with OpenVINO™ runtime. You could set “from_transformers=True” when loading the model with the from_pretrained() method, the loaded model will be automatically converted to an OpenVINO™ IR for inference with OpenVINO™ runtime.
Here is an example of how to perform inference with OpenVINO™ runtime for a sentimental classification task, the output of the pipeline consists of classification label (positive/negative) and corresponding confidence.
4. Model Quantization with NNCF framework
Most deep learning models are built using 32 bits floating-point precision (FP32). Quantization is the process to represent the model using less memory with minimal accuracy loss. To further optimize model performance on Intel® architecture via Intel® Deep Learning Boost, model quantization as 8 bits integer precision (INT8) is required.
Optimum Intel enables you to apply quantization on Hugging Face Transformer Models using the NNCF. NNCF provides two mainstream quantization methods - Post-Training Quantization (PTQ) and Quantization-Aware Training (QAT).
- Post-Training Quantization (PTQ) refers to quantizing a model with a representative calibration dataset without fine-tuning.
- Quantization-Aware Training (QAT) is applied to simulate the effects of quantization during training to mitigate its effect on the model’s accuracy
4.1. Model Quantization with NNCF PTQ
NNCF Post-training static quantization introduces an additional calibration step where data is fed through the network to compute the activations quantization parameters. Here is how to apply static quantization on a pre-trained DistilBERT using General Language Understanding Evaluation (GLUE) dataset as the calibration dataset:
The quantize() method applies post-training static quantization and export the resulting quantized model to the OpenVINO™ Intermediate Representation (IR), which can be deployed on any target Intel® architecture.
4.2. Model Quantization with NNCF QAT
Quantization-Aware Training (QAT) aims to mitigate model accuracy issue by simulating the effects of quantization during training. If post-training quantization results in accuracy degradation, QAT can be used instead.
NNCF provides an “OVTrainer” class to replace Hugging Face Transformer’s “Trainer” class to enable quantization during training with additional quantization configuration. Here is an example on how to fine-tune a DistilBERT with Stanford Sentiment Treebank (SST) dataset while applying quantization aware training (QAT):
4.3. Comparison of FP32 and INT8 model outputs
“OVModelForXXX” class provided the same API to load FP32 and quantized INT8 OpenVINO™ models by setting “from_transformers=False”. Here is an example of how to load quantized INT8 models optimized by NNCF and inference with OpenVINO™ runtime.
Here is an example for sentimental classification output of FP32 and INT8 models:

5. Mitigation of accuracy issue cause by saturation
8-bit instructions of old CPU generations (based on SSE,AVX-2, AVX-512 instruction sets) are prone to so-called saturation(overflow) of the intermediate buffer when calculating the dot product, which is an essential part of Convolutional or MatMul operations. This saturation can lead to a drop in accuracy when running inference of 8-bit quantized models on the mentioned architectures. The problem does not occur on GPUs or CPUs with Intel® Deep Learning Boost (VNNI) technology and further generations.
In the case a significant difference in accuracy (>1%) occurs after quantization with NNCF default quantization configuration, here is an example code to check if deployed platform supports Intel® Deep Learning Boost (VNNI) and further generations:
While quantizing activations use the full range of 8-bit data types, there is a workaround using only 7 bits to represent weights (of Convolutional or Fully-Connected layers) to mitigate saturation issue for many models on old CPU platform.
NNCF provides three options to deal with the saturation issue. The options can be enabled in the NNCF quantization configuration using the “overflow_fix” parameter:
- "disable": (default) option do not apply saturation fix at all
- "enable": option to apply for all layers in the model
- "first_layer_only": option to fix saturation issue for the first layer
Here is an example to enable overflow fix in quantization configuration to mitigate accuracy issue on old CPU platform:
After model quantization with updated quantization configuration with NNCF PTQ/NNCF, you can repeat step 4.3 to verify if quantized INT8 model inference results are consistent with FP32 model outputs.
Additional Resources
Provide Feedback & Report Issues
Notices & Disclaimers
Intel technologies may require enabled hardware, software, or service activation.
No product or component can be absolutely secure.
Your costs and results may vary.
Intel does not control or audit third-party data. You should consult other sources to evaluate accuracy.
Intel disclaims all express and implied warranties, including without limitation, the implied warranties of merchantability, fitness for a particular purpose, and non-infringement, as well as any warranty arising from course of performance, course of dealing, or usage in trade.
No license (express or implied, by estoppel or otherwise) to any intellectual property rights is granted by this document.
© Intel Corporation. Intel, the Intel logo, and other Intel marks are trademarks of Intel Corporation or its subsidiaries. Other names and brands may be claimed as the property of others.