GroundingDINO introduces a language-guided query selection module to enhance object detection using input text. This module selects relevant features from image and text inputs and uses them as decoder queries. In this blog, we provide the OpenVINO™ optimization for GroundingDINO on Intel® platforms.
The public GroundingDINO project is referenced from: GroundingDINO
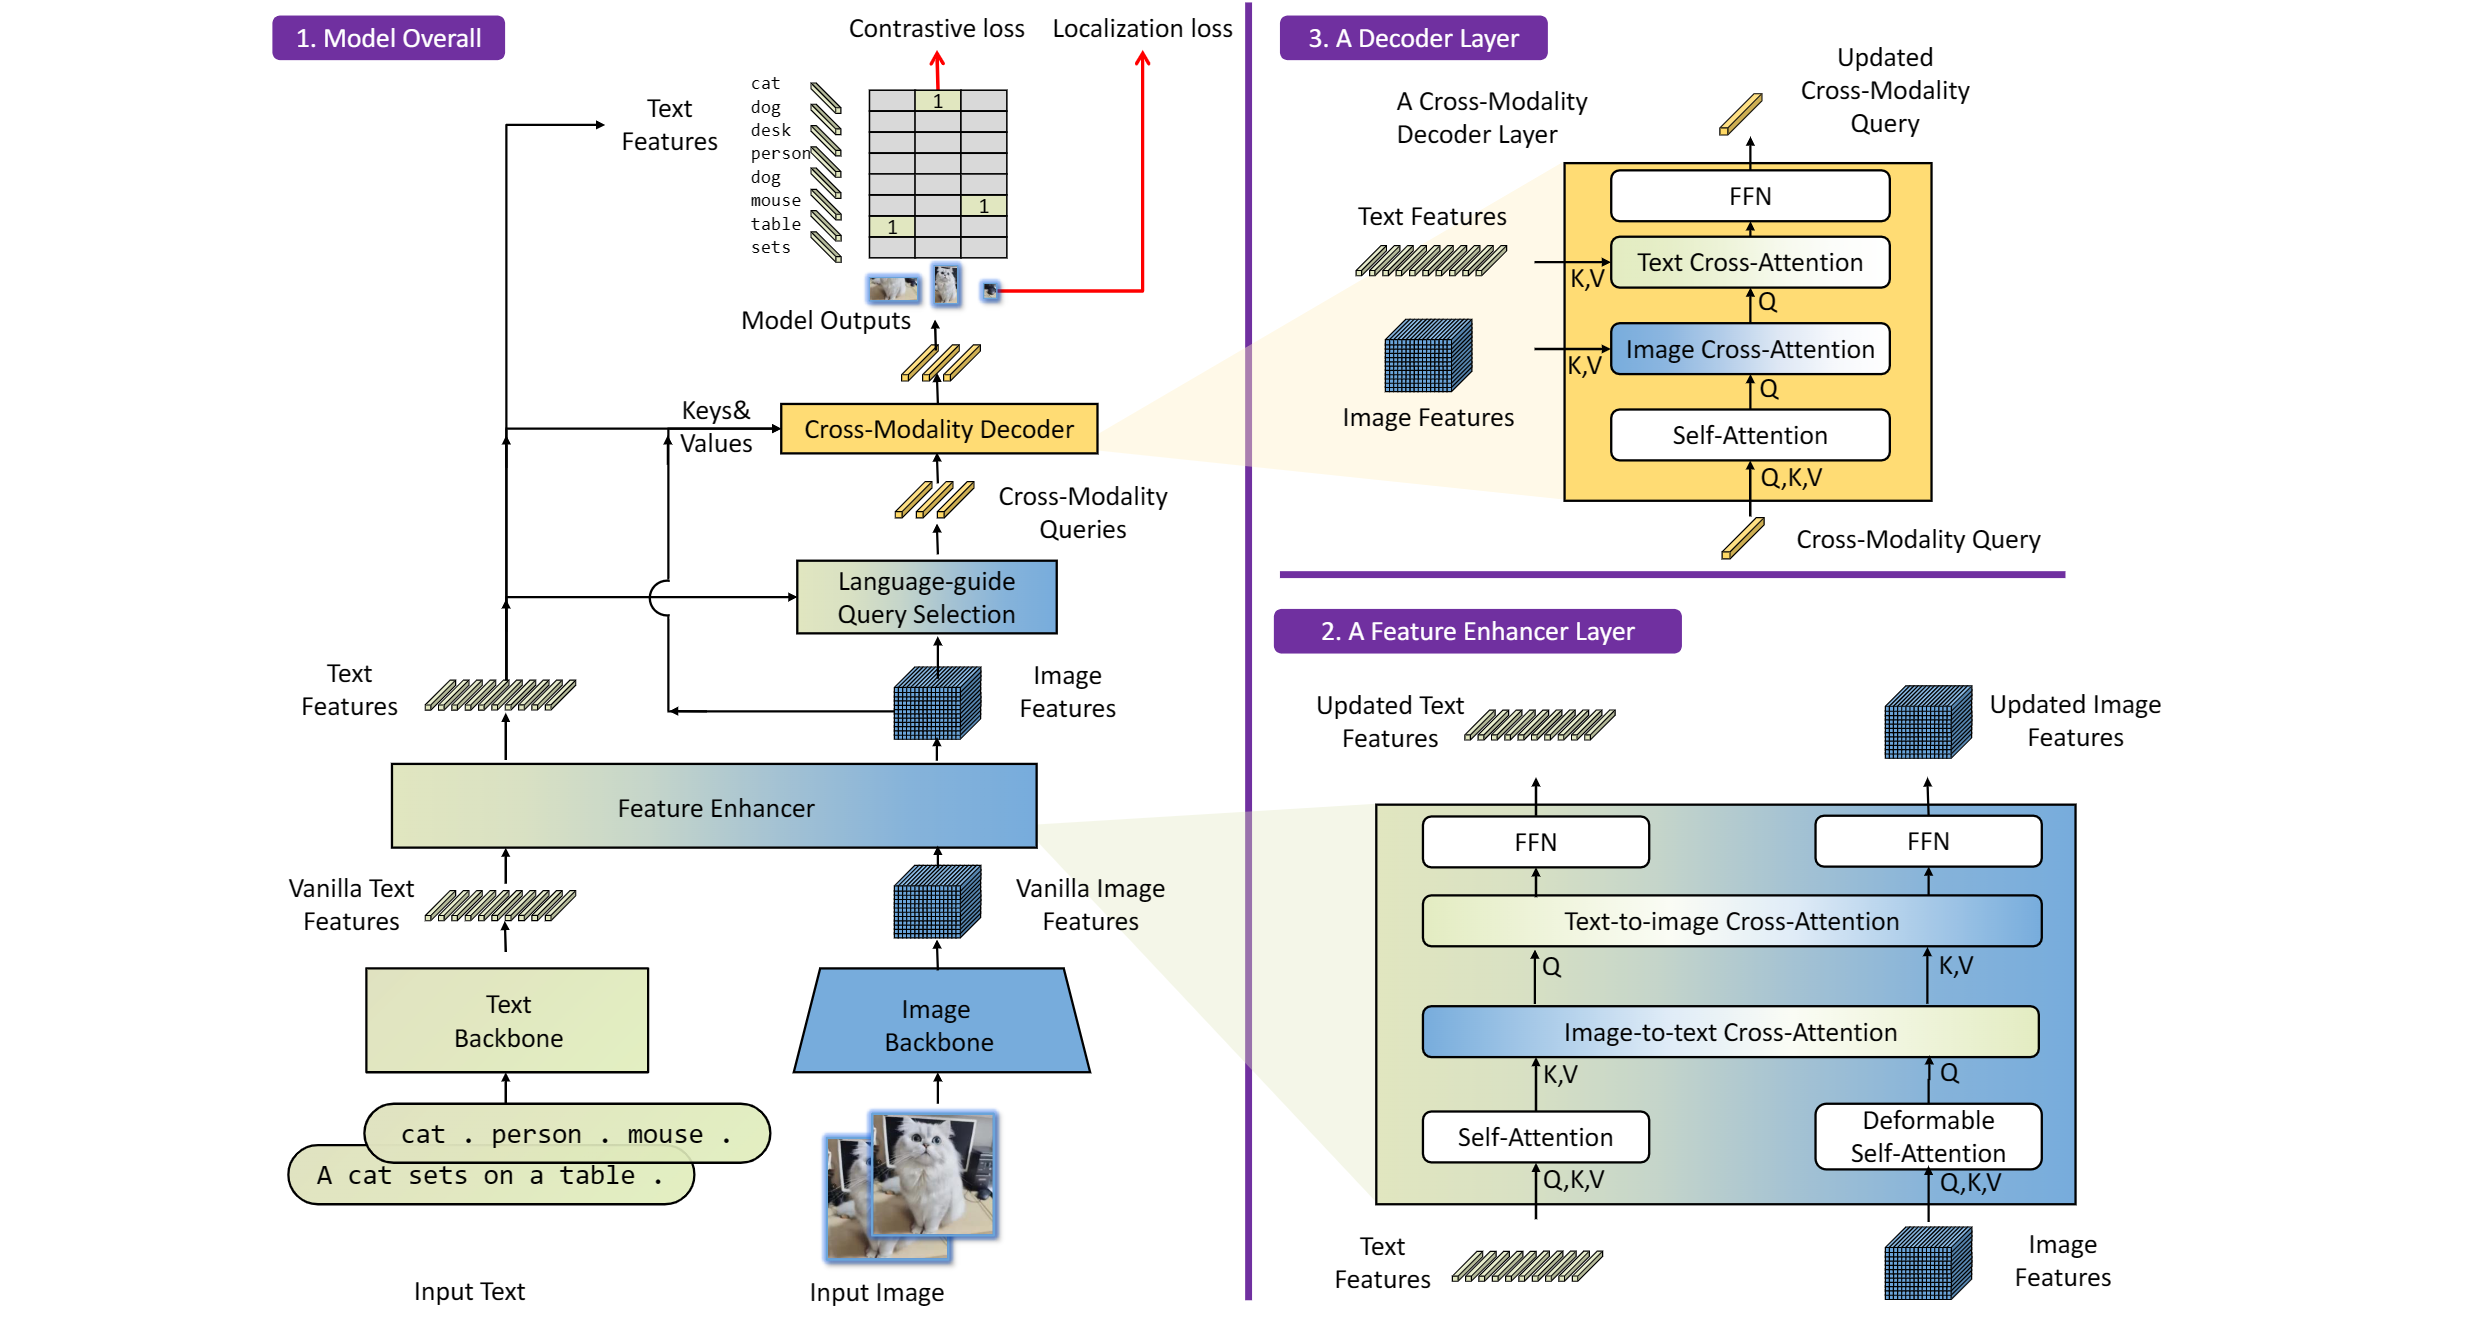
The GroundingDINO refer the model structure in below picture:
Figure 1. The framework of Grounding DINO. We present the overall framework, a feature enhancer layer, and a decoder layer in block 1,block 2, and block 3,respectively.
OpenVINO™ backend on GroundingDINO
In this project, you do not require to download OpenVINO™ and build the library with GroundingDINO project manually. It’s already fully integrated with OpenVINO™ runtime library for downloading, program compiling and linking.
At present, this repository already optimized and validated by OpenVINO™ 2023.1.0.dev20230811 version. Check the operating system which can support OpenVINO™ runtime library directly:
Ubuntu 22.04 long-term support (LTS), 64-bit (Kernel 5.15+)
Ubuntu 20.04 long-term support (LTS), 64-bit (Kernel 5.15+)
Ubuntu 18.04 long-term support (LTS) with limitations, 64-bit (Kernel 5.4+)
Windows* 10
Windows* 11
macOS* 10.15 and above, 64-bit
Red Hat Enterprise Linux* 8, 64-bit
Step 1: Install system dependency and setup environment
The integration of Ollama and OpenVINO delivers a powerful dual-engine solution for the management and inference of large language models (LLMs). Ollama offers a streamlined model management toolchain, while OpenVINO provides efficient acceleration capabilities for model inference across Intel hardware (CPU/GPU/NPU). This combination not only simplifies the deployment and invocation of models but also significantly enhances inference performance, making it particularly suitable for scenarios demanding high performance and ease of use.
You can find more information on github repository:
1. Streamlined LLM Management Toolchain: Ollama provides a user-friendly command-line interface, enabling users to effortlessly download, manage, and run various LLM models.
2. One-Click Model Deployment: With simple commands, users can quickly deploy and invoke models without complex configurations.
3. Unified API Interface: Ollama offers a unified API interface, making it easy for developersto integrate into various applications.
4. Active Open-Source Community: Ollama boasts a vibrant open-source community, providing users with abundant resources and support.
Limitations of Ollama
Currently, Ollama only supports llama.cpp as itsbackend, which presents some inconveniences:
1. Limited Hardware Compatibility: llama.cpp is primarily optimized for CPUs and NVIDIA GPUs, and cannot fully leverage the acceleration capabilities of Intel GPUs or NPUs, resulting in suboptimal performance in high-performance computing scenarios.
2.Performance Bottlenecks: For large-scale models or high-concurrency scenarios, the performance of llama.cpp may fall short, especially when handling complex tasks, leading to slower inference speeds.
Breakthrough Capabilities of OpenVINO
1. Deep Optimization for Intel Hardware (CPU/iGPU/Arc dGPU/NPU): OpenVINO is deeply optimized for Intel hardware, fully leveraging the performance potential of CPUs, iGPUs, dGPUs, and NPUs.
2. Cross-Platform Heterogeneous Computing Support: OpenVINO supports cross-platform heterogeneous computing, enabling efficient model inference across different hardware platforms.
3. Model Quantization and Compression Toolchain: OpenVINO provides a comprehensive toolchain for model quantization and compression, significantly reducing model size and improving inference speed.
4. Significant Inference Performance Improvement: Through OpenVINO's optimizations, model inference performance can be significantly enhanced, especially for large-scale models and high-concurrency scenarios.
5. Extensibility and Flexibility Support: OpenVINO GenAI offers robust extensibility and flexibility for Ollama-OV, supporting pipeline optimization techniques such as speculative decoding, prompt-lookup decoding, pipeline parallelization, and continuous batching, laying a solid foundation for future pipeline serving optimizations.
Developer Benefits of Integration
1.Simplified Development Experience: Retains Ollama's CLI interaction features, allowing developers to continue using familiar command-line tools for model management and invocation.
2.Performance Leap: Achieves hardware-level acceleration through OpenVINO, significantly boosting model inference performance, especially for large-scale models and high-concurrency scenarios.
3.Multi-Hardware Adaptation and Ecosystem Expansion: OpenVINO's support enables Ollama to adapt to multiple hardware platforms, expanding its application ecosystem and providing developers with more choices and flexibility.
For Windows systems, first extract the downloaded OpenVINO GenAI package to the directory openvino_genai_windows_2025.2.0.0.dev20250320_x86_64, then execute the following commands:
cd openvino_genai_windows_2025.2.0.0.dev20250320_x86_64
setupvars.bat
3. Set Up cgocheck
Windows:
set GODEBUG=cgocheck=0
Linux:
export GODEBUG=cgocheck=0
At this point, the executable files have been downloaded, and the OpenVINO GenAI, OpenVINO, and CGO environments have been successfully configured.
Custom Model Deployment Guide
Since the Ollama Model Library does not support uploading non-GGUF format IR models, we will create an OCI image locally using OpenVINO IR that is compatible with Ollama. Here, we use the DeepSeek-R1-Distill-Qwen-7B model as an example:
With these steps, we have successfully created the DeepSeek-R1-Distill-Qwen-7B-int4-ov:v1 model, which is now ready for use with the Ollama OpenVINO backend.
InternVL2.0 is a series of multimodal large language models available in various sizes. The InternVL2-4B model comprises InternViT-300M-448px, an MLP projector, and Phi-3-mini-128k-instruct. It delivers competitive performance comparable to proprietary commercial models across a range of capabilities, including document and chart comprehension, infographics question answering, scene text understanding and OCR tasks, scientific and mathematical problem solving, as well as cultural understanding and integrated multimodal functionalities.
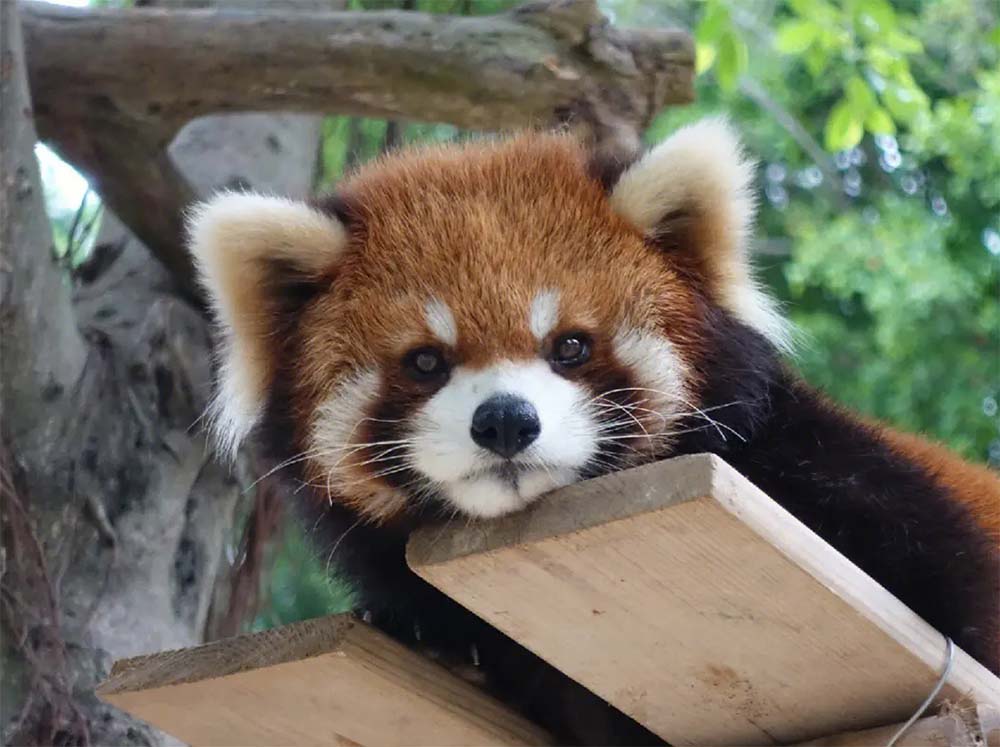
The image features a close-up view of a red panda resting on a wooden platform. The panda is characterized by its distinctive red fur, white face, and ears. The background shows a natural setting with green foliage and a wooden structure.
Here are the parameters with descriptions:
python test_ov_internvl2.py --help
usage: Export InternVL2 Model to IR [-h] [-m MODEL_ID] -ov OV_IR_DIR [-d DEVICE] [-pic PICTURE] [-p PROMPT] [-max MAX_NEW_TOKENS] [-llm_int4_com] [-vision_int8] [-llm_int8_quant] [-convert_model_only]
options:
  -h, --help   show this help message and exit
  -m MODEL_ID, --model_id MODEL_ID   model_id or directory for loading
  -ov OV_IR_DIR, --ov_ir_dir OV_IR_DIR     output directory for saving model
  -d DEVICE, --device DEVICE   inference device
  -pic PICTURE, --picture PICTURE  picture file
  -p PROMPT, --prompt PROMPT    prompt
  -max MAX_NEW_TOKENS, --max_new_tokens MAX_NEW_TOKENS    max_new_tokens
  -llm_int4_com, --llm_int4_compress  llm int4 weight scompress
  -vision_int8, --vision_int8_quant  vision int8 weights quantize
  -llm_int8_quant, --llm_int8_quant      llm int8 weights dynamic quantize
  -convert_model_only, --convert_model_only      convert model to ov only, do not do inference test
Supported optimizations
1. Vision model INT8 quantization and SDPA optimization enabled
2. LLM model INT4 compression
3. LLM model INT8 dynamic quantization
4. LLM model with SDPA optimization enabled
Summary
This blog introduces how to use the OpenVINO™ python API to run the pipeline of the Internvl2-4B model, and uses a variety of acceleration methods to improve the inference speed.
moondream2 is a small vision language model designed to run efficiently on edge devices. Although the model has a small number of parameters, it provides high-performance visual processing capabilities. It can quickly understand and process input images and respond to user queries. The model was developed by VikhyatK and is released under the permissive Apache 2.0 license, allowing for commercial use.

.png)