This AI pipeline implements zero-copy between SYCL and OpenVINO through the Remote Tensor API of the GPU Plugin.
Introduction
The development of SYCL simplifies the use of OpenCL, which can fully exploit the computing power of GPU in the pipeline. Meanwhile, SYCL has more flexibility to do customized pre- and post-processing of OpenVINO. To further optimize the pipeline, developers can use GPU Plugin to avoid the memory copy overhead between SYCL and OpenVINO. The GPU plugin provides the ov::RemoteContext and ov::RemoteTensor interfaces for video memory sharing and interoperability with existing native APIs, such as OpenCL, Microsoft DirectX, or VAAPI. For details, please refer to the online documentation of OpenVINO.
Based on the pseudocode of the online documentation, here we provide a simple pipeline sample with Remote Tensor API. Because in the rapid iteration of oneAPI, sometimes customers need quick verification so that this sample can be used for testing. OneAPI also provides a real-world, end-to-end example, which optimizes PointPillars for lidar object detection.
Components
SYCL preprocessing is based on the Sepia Filter sample, which demonstrates how to convert a color image to a Sepia tone image, a monochromatic image with a distinctive Brown Gray color. The sample program works by offloading the compute-intensive conversion of each pixel to Sepia tone using SYCL*-compliant code for CPU and GPU.
OpenVINO inferencing is based on the OpenVINO classification sample, the input from SYCL filtered image in the device will be sent into OpenVINO as a remote tensor without a memory copy.
Remote Tensor API: Create RemoteContext from SYCL pre-processing’s native handle. After model compiling, do memory sharing between the application and GPU plugin with from cl::Buffer to remote tensor.
auto cl_queue = get_native<backend::opencl>(sycl_queue);
auto remote_context = ov::intel_gpu::ocl::ClContext(core, cl_queue);
ov::CompiledModel compiled_model = core.compile_model(model, remote_context);
auto cl_buffers = get_native<backend::opencl>(image_buf_out);
auto remote_tensor = remote_context.create_tensor(ov::element::u8, {batch, input_height, input_width, 3}, cl_buffers);
infer_request.set_tensor(input_tensor_name, remote_tensor);
Build Sample on Linux
Download the source code from the link. Prepare the model and images.
To run the sample, you need to specify a model and image:
Use pre-trained models from the Open Model Zoo. The models can be downloaded using the Model Downloader. Use images from the media files collection.
 source setupvars.sh
mkdir build
cd build
cmake ..
make
Run on Intel NUC Core 11 iGPU with OpenVINO 2022.2 and oneAPI 2022.3.
  Loaded image with a width of 512, a height of 512 and 3 channels
[ INFO ] OpenVINO Runtime version ......... 2022.2.0
[ INFO ] Build ........... 2022.2.0-7713-af16ea1d79a-releases/2022/2
[ INFO ]
[ INFO ] Loading model files: ../model/FP32/alexnet.xml
Running on Intel(R) Iris(R) Xe Graphics [0x9a49]
---Load model - 1126ms
---Create an infer request - 0.515ms
Use remote tensor API and set_tensor
No 1. do inf:
---sycl buffer  - 0.005ms
---sycl filter total time - 93.342ms
---kernel time: 0.051822 milliseconds
---Set tensor - 0.138ms
---Run infer req - 4.725ms
---get tensor - 0.062ms

Top 3 results:

Image ../image/dog512.bmp

classid probability label
------- ----------- -----
176     0.4579958   "Saluki, gazelle hound"
212     0.2727944   "English setter"
169     0.0513433   "borzoi, Russian wolfhound"

---sum of inference - 98.268ms
No 2. do inf:
---sycl buffer  - 0.001ms
---sycl filter total time - 0.582ms
---kernel time: 0.05177 milliseconds
---Set tensor - 0.086ms
---Run infer req - 4.162ms
---get tensor - 0.049ms

Top 3 results:

Image ../image/dog512.bmp

classid probability label
------- ----------- -----
176     0.4579958   "Saluki, gazelle hound"
212     0.2727944   "English setter"
169     0.0513433   "borzoi, Russian wolfhound"

---sum of inference - 4.881ms
Warning: With the updating of OpenVINO and oneAPI, different versions may cause problems with the tools in the common directory or the new SYCL header name. Please use the same version or debug following the corresponding release instructions.
This article explains the behavior of dynamic quantization on GPUs with XMX, such as Lunar Lake, Arrow lake and discrete GPU family(Alchemist, Battlemage).
It does not cover CPUs or GPUs without XMX(such as Meteor Lake). While the dynamic quantization is supported on these platforms as well, the behavior may differ slightly.
What is dynamic quantization?
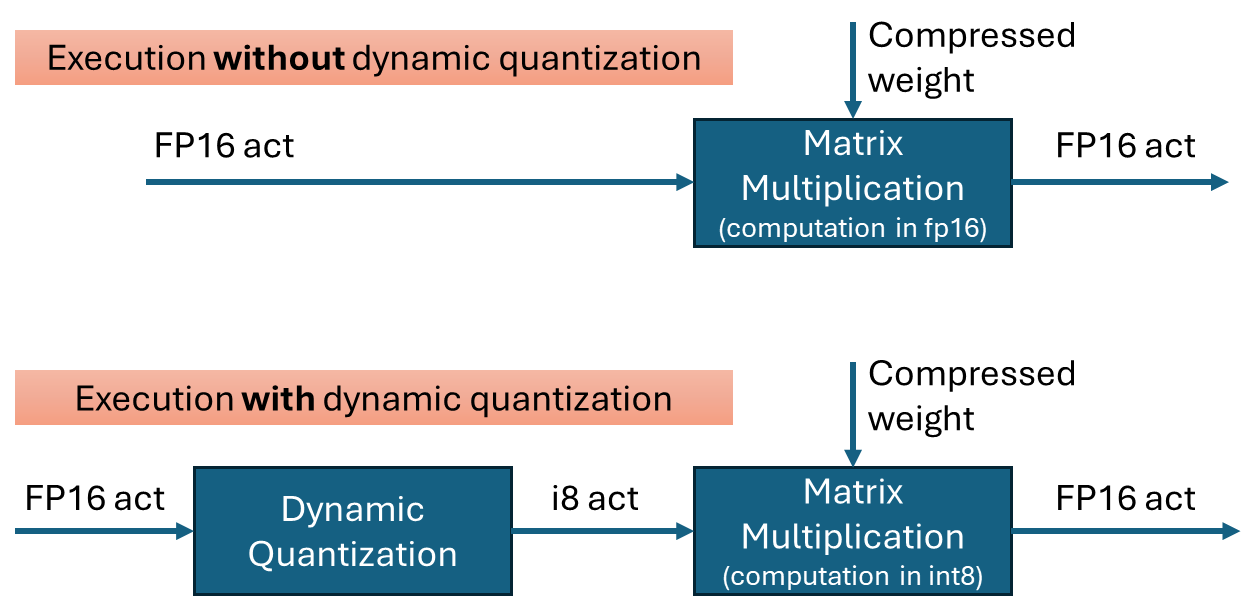
Dynamic quantization is a technique to improve the performance of transformer networks by quantizing the inputs to matrix multiplications. It is effective when weights are already quantized into int4 or int8. By performing the multiplication in int8 instead of fp16, computations can be executed faster with minimal loss in accuracy.
To perform quantization, the data is grouped, and the minimum and maximum values within each group are used to calculate the scale(and zero-point) for quantization. In OpenVINO’s dynamic quantization, this grouping occurs along the embedding axis (i.e., the innermost axis). The group size is configurable, as it impacts both performance and accuracy.
Default behavior on GPU with XMX for OpenVINO 2025.2
In the OpenVINO 2025.2 release, dynamic quantization is enabled by default for GPUs with XMX support. When a model contains a suitable matrix multiplication layer, OpenVINO automatically inserts a dynamic quantization layer before the MatMul operation. No additional configuration is required to activate dynamic quantization.
By default, dynamic quantization is applied per-token, meaning a unique scale value is generated for each token. This per-token granularity is chosen to maximize performance benefits.
However, dynamic quantization is applied conditionally based on input characteristics. Specifically, it is not applied when the token length is short—64 tokens or fewer.(That is, the row size of the matrix multiplication)
For example:
-If you run a large language model (LLM) with a short input prompt (≤ 64 tokens), dynamic quantization is disabled.
-If the prompt exceeds 64 tokens, dynamic quantization is enabled and may improve performance.
Note: Even in the long-input case, the second token is currently not dynamically quantized because row-size in matrix multiplication is small with KV cache.
Performance and Accuracy Impact
The impact of dynamic quantization on performance and accuracy can vary depending on the target model.
Performance
In general, dynamic quantization is expected to improve the performance of transformer models, including large language models (LLMs) with long input sequences—often by several tens of percent. However, the actual gain depends on several factors:
-Low MatMul Contribution: If the MatMul operation constitutes only a small portion of the model's total execution time, the performance benefit will be limited. For instance, in very long-context inputs, scaled-dot-product-attention may dominate the runtime, reducing the relative impact of MatMul optimization.
-Short Token Lengths: Performance gains diminish with shorter token lengths. While dynamic quantization improves compute efficiency, shorter inputs tend to be dominated by weight I/O overhead rather than compute cost.
Accuracy
Accuracy was evaluated using an internal test set and found to be within acceptable limits. However, depending on the model and workload, users may observe noticeable accuracy degradation.
If accuracy is a concern, you may:
-Disable dynamic quantization, or
-Use a smaller group size (e.g., 256), which can improve accuracy at some cost to performance.
How to Verify If dynamic quantization is Enabled on GPU with XMX
Since dynamic quantization occurs automatically under the hood, you may want to verify whether it is active. There are two main methods to check:
-Execution graph (exec-graph): The transformed graph generated by OpenVINO will include an additional "dynamic_quantize" layer if dynamic quantization is applied. You can inspect this by dumping the execution graph using the benchmark_app tool, assuming your model can be run with it. Please see the documentation for details: https://docs.openvino.ai/nightly/get-started/learn-openvino/openvino-samples/benchmark-tool.html
-Opencl-intercept-layer: You can view the list of executed kernels using the opencl-intercept-layer. Both call logging and device performance timing modes will show the "dynamic_quantize" kernel if it is executed. https://github.com/intel/opencl-intercept-layer
GraphTransformation with Dynamic Quantization
When dynamic quantization is enabled (i.e., dynamic_quantization_group_size != 0), a dynamic_quantize node is inserted before the target matrix multiplication nodes. (See the diagram above) Since the input length for LLMs is only known at inference time, the execution path is determined dynamically. If the input length is short (≤ 64 tokens), the dynamic_quantize node is skipped. For longer inputs, the node is executed to apply quantization.
If dynamic quantization is disabled (dynamic_quantization_group_size == 0), the dynamic_quantize node is not added to the graph at all.
-OV_GPU_ASYM_DYNAMIC_QUANTIZATION: Enables asymmetric dynamic quantization. This means that in addition to the scale, a zero-point value is also computed during quantization. This setting is configured via an environment variable.
-OV_GPU_DYNAMIC_QUANTIZATION_THRESHOLD: Defines the minimum token length (or row size of the matrix) required to apply dynamic quantization. If the input token length is less than or equal to this value, dynamic quantization is not applied. The default value is 64. This setting can also be configured via an environment variable.
The integration of Ollama and OpenVINO delivers a powerful dual-engine solution for the management and inference of large language models (LLMs). Ollama offers a streamlined model management toolchain, while OpenVINO provides efficient acceleration capabilities for model inference across Intel hardware (CPU/GPU/NPU). This combination not only simplifies the deployment and invocation of models but also significantly enhances inference performance, making it particularly suitable for scenarios demanding high performance and ease of use.
You can find more information on github repository:
1. Streamlined LLM Management Toolchain: Ollama provides a user-friendly command-line interface, enabling users to effortlessly download, manage, and run various LLM models.
2. One-Click Model Deployment: With simple commands, users can quickly deploy and invoke models without complex configurations.
3. Unified API Interface: Ollama offers a unified API interface, making it easy for developersto integrate into various applications.
4. Active Open-Source Community: Ollama boasts a vibrant open-source community, providing users with abundant resources and support.
Limitations of Ollama
Currently, Ollama only supports llama.cpp as itsbackend, which presents some inconveniences:
1. Limited Hardware Compatibility: llama.cpp is primarily optimized for CPUs and NVIDIA GPUs, and cannot fully leverage the acceleration capabilities of Intel GPUs or NPUs, resulting in suboptimal performance in high-performance computing scenarios.
2.Performance Bottlenecks: For large-scale models or high-concurrency scenarios, the performance of llama.cpp may fall short, especially when handling complex tasks, leading to slower inference speeds.
Breakthrough Capabilities of OpenVINO
1. Deep Optimization for Intel Hardware (CPU/iGPU/Arc dGPU/NPU): OpenVINO is deeply optimized for Intel hardware, fully leveraging the performance potential of CPUs, iGPUs, dGPUs, and NPUs.
2. Cross-Platform Heterogeneous Computing Support: OpenVINO supports cross-platform heterogeneous computing, enabling efficient model inference across different hardware platforms.
3. Model Quantization and Compression Toolchain: OpenVINO provides a comprehensive toolchain for model quantization and compression, significantly reducing model size and improving inference speed.
4. Significant Inference Performance Improvement: Through OpenVINO's optimizations, model inference performance can be significantly enhanced, especially for large-scale models and high-concurrency scenarios.
5. Extensibility and Flexibility Support: OpenVINO GenAI offers robust extensibility and flexibility for Ollama-OV, supporting pipeline optimization techniques such as speculative decoding, prompt-lookup decoding, pipeline parallelization, and continuous batching, laying a solid foundation for future pipeline serving optimizations.
Developer Benefits of Integration
1.Simplified Development Experience: Retains Ollama's CLI interaction features, allowing developers to continue using familiar command-line tools for model management and invocation.
2.Performance Leap: Achieves hardware-level acceleration through OpenVINO, significantly boosting model inference performance, especially for large-scale models and high-concurrency scenarios.
3.Multi-Hardware Adaptation and Ecosystem Expansion: OpenVINO's support enables Ollama to adapt to multiple hardware platforms, expanding its application ecosystem and providing developers with more choices and flexibility.
For Windows systems, first extract the downloaded OpenVINO GenAI package to the directory openvino_genai_windows_2025.2.0.0.dev20250320_x86_64, then execute the following commands:
cd openvino_genai_windows_2025.2.0.0.dev20250320_x86_64
setupvars.bat
3. Set Up cgocheck
Windows:
set GODEBUG=cgocheck=0
Linux:
export GODEBUG=cgocheck=0
At this point, the executable files have been downloaded, and the OpenVINO GenAI, OpenVINO, and CGO environments have been successfully configured.
Custom Model Deployment Guide
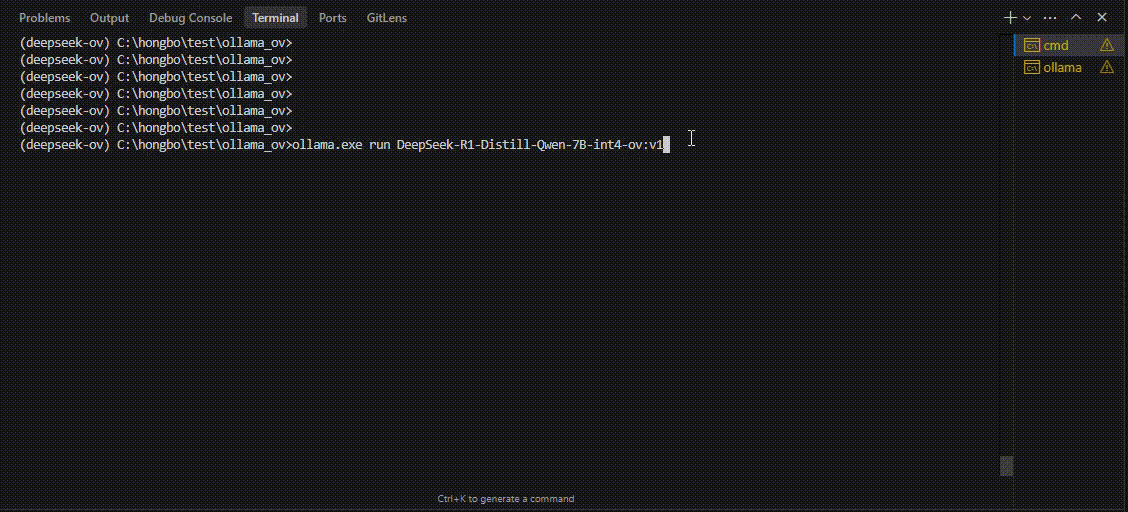
Since the Ollama Model Library does not support uploading non-GGUF format IR models, we will create an OCI image locally using OpenVINO IR that is compatible with Ollama. Here, we use the DeepSeek-R1-Distill-Qwen-7B model as an example:
With these steps, we have successfully created the DeepSeek-R1-Distill-Qwen-7B-int4-ov:v1 model, which is now ready for use with the Ollama OpenVINO backend.
Janus is a unified multimodal understanding and generation model developed by DeepSeek. Janus proposed decoupling visual encoding to alleviate the conflict between multimodal understanding and generation tasks. Janus-Pro further scales up the Janus model to larger model size (deepseek-ai/Janus-Pro-1B & deepseek-ai/Janus-Pro-7B) with optimized training strategy and training data, achieving significant advancements in both multimodal understanding and text-to-image tasks.
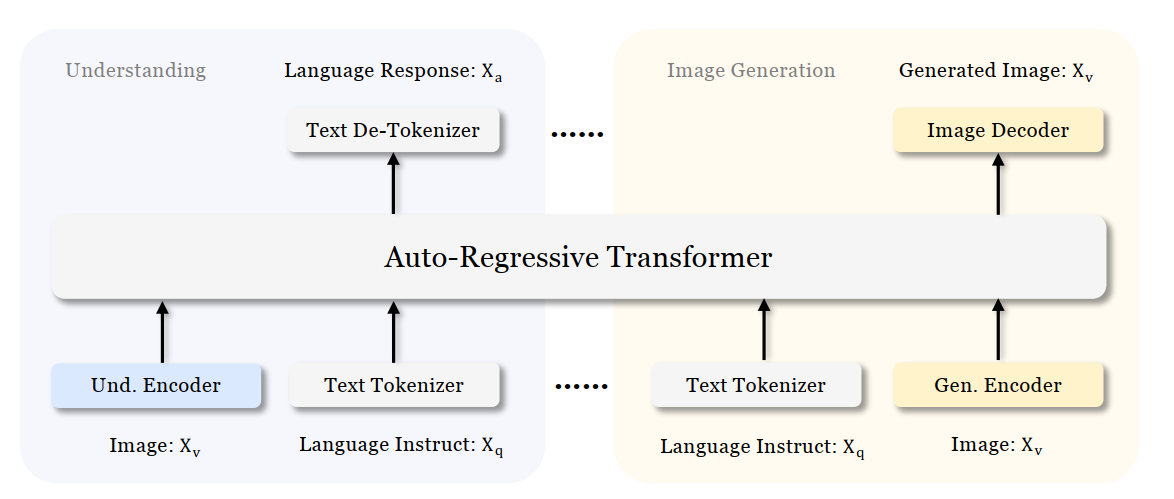
Figure 1: Overview of Janus-Pro Architecture
Figure 1 shows the architecture of Janus-Pro, which decouples visual encoding for multimodal understanding and visual generation. “Und. Encoder” and “Gen. Encoder” are abbreviations for “Understanding Encoder” and “Generation Encoder”. For the multimodal understanding task, SigLIP vision encoder used to extract high-dimensional semantic features from the image, while for the vision generation task, VQ tokenizer used to map images to discrete IDs. Both the understanding adaptor and the generation adaptor are two-layer MLPs to map the embeddings to the input space of LLM.
In this blog, we will introduce how to deploy Janus-Pro model with OpenVINOTM runtime on the intel platform.
2. Janus-Pro Pytorch Model to OpenVINOTM Model Conversion
The converted OpenVINO will be saved in Janus-Pro-1B-OV directory for deployment.
3. Janus-Pro Inference with OpenVINOTM Demo
In this section, we provide several examples to show Janus-Pro for multimodal understanding and vision generation tasks.
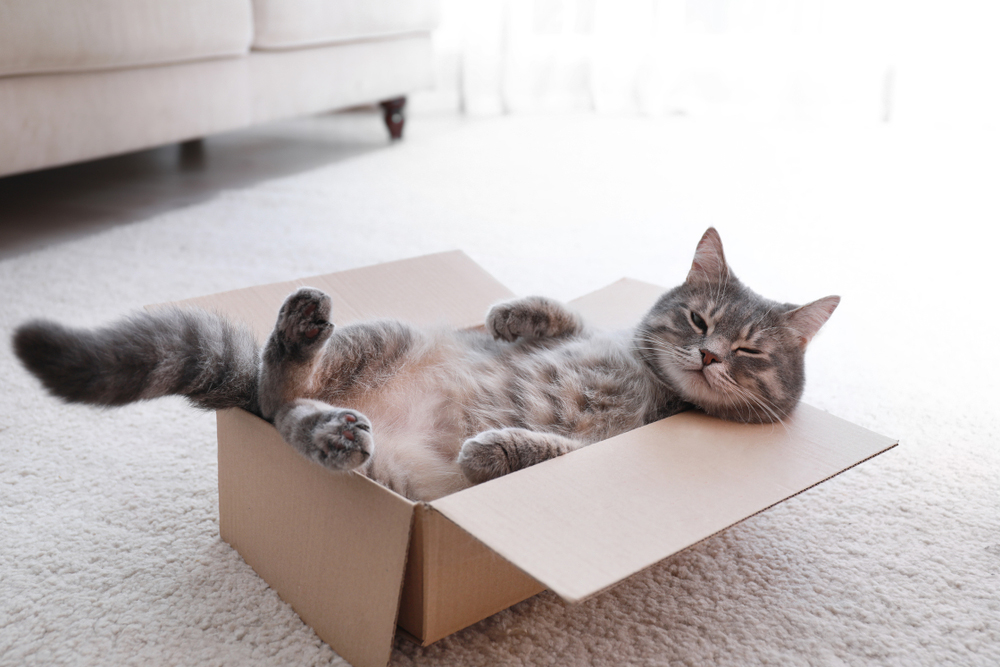
3.1. Multimodal Understanding Task – Image Caption with OpenVINOTM
$ python run_janus_vlm_ov.py -m Janus-Pro-1B-OV -p "Describe image in det
ails" -i images/cat_in_box.png -d GPU
Prompt: Describe image in details
Input image:
Generated Output:
The image shows a gray tabby cat lying inside an open cardboard box on a carpeted floor. The cat is lying on its back with its belly exposed, looking relaxed and comfortable. The background includes a beige-colored sofa and a light-colored curtain,
 suggesting a cozy indoor setting. The cat's tail is curled around its body, and it appears to be enjoying itself.
3.2. Multimodal Understanding Task – Equation Description with OpenVINOTM
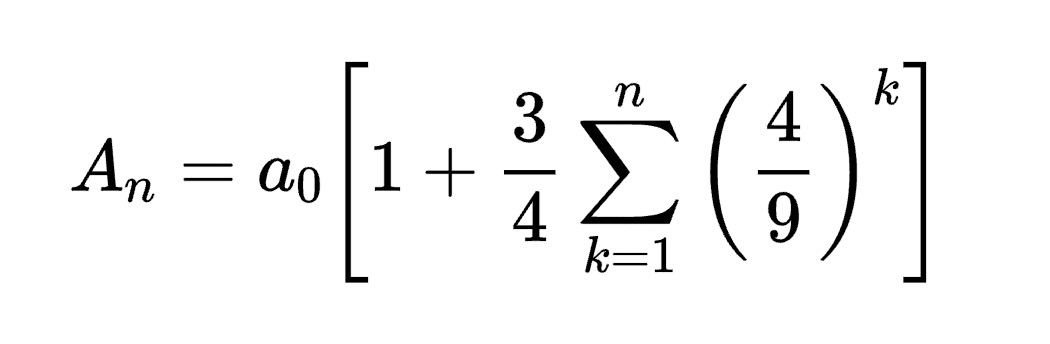
$ python run_janus_vlm_ov.py -m Janus-Pro-1B-OV -p "Generate the latex code of this formula" -i images/equation.png -d GPU
Prompt: Generate the latex code of this formula
Input Image:
Generated Output:
\[ A_n = a_0 \begin{bmatrix} 1 & + \frac{3}{4} \sum_{k=1}^{n} \begin{bmatrix} 4 \\ 9 \end{bmatrix}^k \end{bmatrix} \]

This formula represents the cumulative sum of the first \( n \) terms of the sequence \( a_n \), where \( a_n \) is the sequence of \( a_0 \), \( \frac{3}{4} \), and \( \begin{bmatrix} 4 \\ 9 \end{bmatrix}^k \). The first term \( a_0 \) is the first term of the sequence, the second term is the sum of the first \( n-1 \) terms, and the third term is the sum of the first \( n \) terms. The sequence \( \begin{bmatrix} 4 \\ 9 \end{bmatrix}^k \) represents the \( k \)-th term of the sequence. The
 formula calculates the cumulative sum of the sequence \( a_n \).

This formula can be used to calculate the cumulative sum of the sequence \( a_n \) for any given \( n \).
3.3. Multimodal Understanding Task – Code Generation with OpenVINOTM
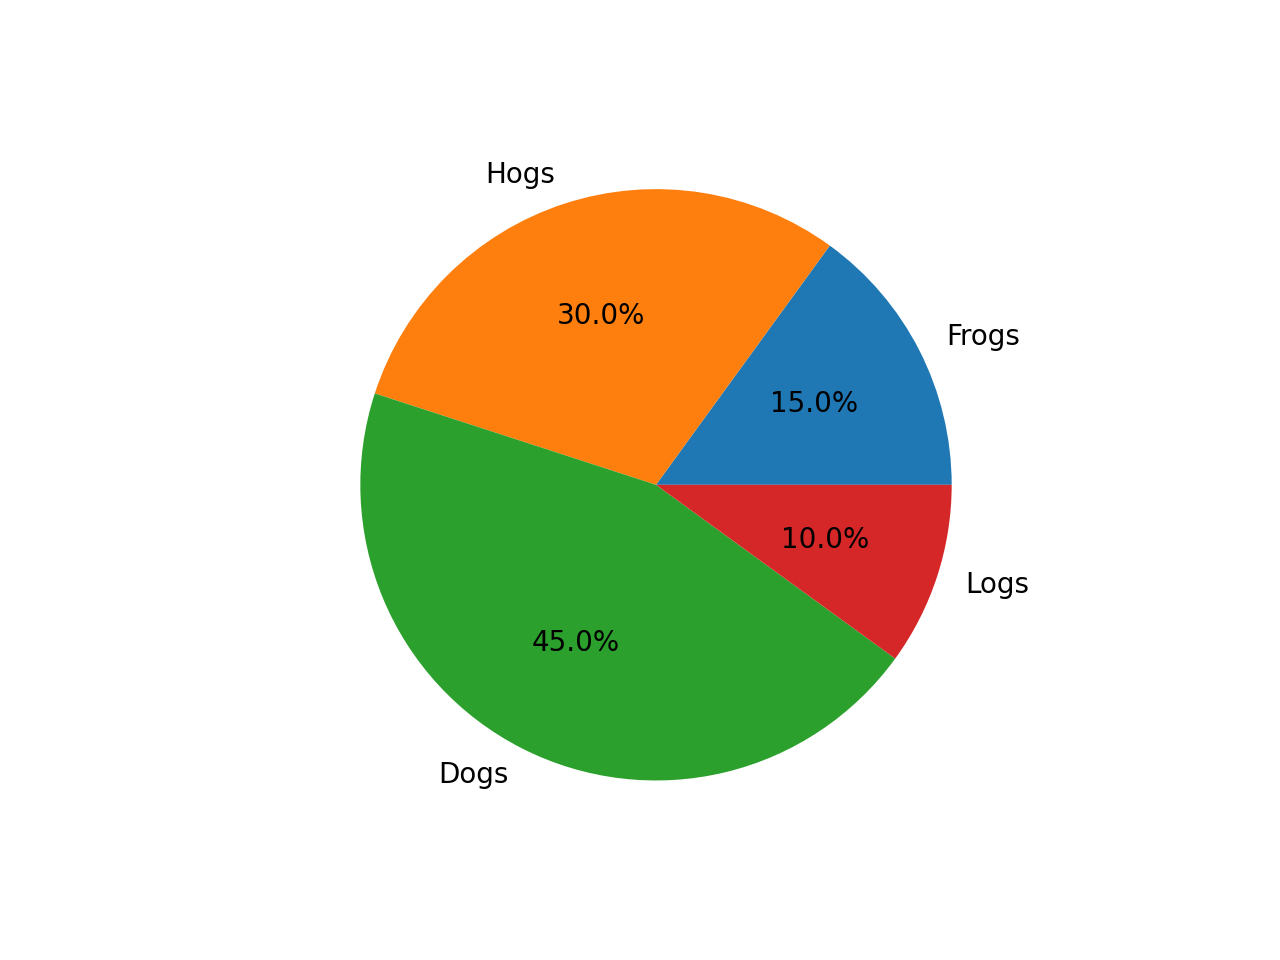
$ python run_janus_vlm_ov.py -m Janus-Pro-1B-OV -p "Generate the matplotlib pyplot code for this plot" -i images\pie_chart.png -d GPU
Prompt: Generate the matplotlib pyplot code for this plot
Input Image:
Generated Output:
The attention mask is not set and cannot be inferred from input because pad token is same as eos token. As a consequence, you may observe unexpected behavior. Please pass your input's `attention_mask` to obtain reliable results.
Sure, here is the code to generate the matplotlib plot based on the information in the image:

```python
import matplotlib.pyplot as plt

# Data
data = {
    'Hogs': 30,
    'Frogs': 15,
    'Logs': 10,
    'Dogs': 45
}

# Create the plot
plt.figure(figsize=(10, 6))

# Pie chart
for key, value in data.items():
    # Calculate the percentage of the pie chart
    percentage = value / 100

    # Add the pie slice
    plt.pie(percentage, labels=data.keys(), autopct='%1.1f%%')

# Title and labels
plt.title('Pie chart')
plt.xlabel('Categories')
plt.ylabel('Percentage')

# Show the plot
plt.show()
```

This code will create a pie chart based on the data provided in the image.
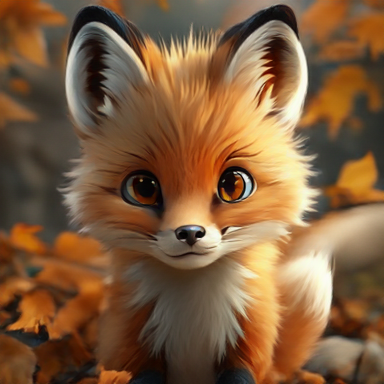
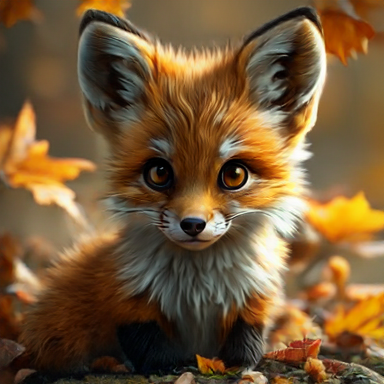
Input Prompt: A cute and adorable baby fox with big brown eyes, autumn leaves in the background enchanting, immortal, fluffy, shiny mane, Petals, fairyism, unreal engine 5 and Octane Render, highly detailed, photorealistic, cinematic, natural colors.
We also provide benchmark scripts to evaluate Janus-Pro model performance and memory usage with OpenVINOTM inference, you may specify model name and device for your target platform.
4.1. Benchmark Janus-Pro for Multimodal Understanding Task with OpenVINOTM
Here are some arguments for benchmark script for Multimodal Understanding Task:
--model_id: specify the Janus OpenVINOTM model directory
--prompt: specify input prompt for multimodal understanding task
--image_path: specify input image for multimodal understanding task
--niter: specify number of test iteration, default is 5
--device: specify which device to run inference
--max_new_tokens: specify max number of generated tokens
By default, the benchmark script will run 5 round multimodal understanding tasks on target device, then report pipeline initialization time, average first token latency (including preprocessing), 2nd+ token throughput and max RSS memory usage.
4.2. Benchmark Janus-Pro for Text-to-Image Task with OpenVINOTM
Here are some arguments for benchmark scripts for Text-to-Image Task
--model_id: specify the Janus OpenVINO TM model directory
--prompt: specify input prompt for text-to-image generation task
--niter: specify number of test iteration
--device: specify which device to run inference
By default, the benchmark script will run 5 round image generation tasks on target device, then report the pipeline initialization time, average image generation latency and max RSS memory usage.
5. Conclusion
In this blog, we introduced how to enable Janus-Pro model with OpenVINOTM runtime, then we demonstrated the Janus-Pro capability for various multimodal understanding and image generation tasks. In the end, we provide python script for performance & memory usage evaluation for both multimodal understanding and image generation task on target platform.

.png)