

OpenVINO Blog

Joint Pruning, Quantization and Distillation for Efficient Inference of Transformers
Introduction
Pre-trained transformer models are widely deployed for various NLP tasks such as text classification, question answering, and generation task. The recent trend is that models continue to scale while yielding improved performance. However, growth of transformers also leads to great amount of compute resources and energy needed for deployment. The goal of model compression is to achieve model simplification from the original without significantly diminished accuracy. Pruning, quantization, and knowledge distillation are the three most popular model compression techniques for deep learning models. Pruning is a technique for reducing the size of a model to improve efficiency or performance. By reducing the number of bits needed to represent data, quantization can significantly reduce storage and computational requirements. Knowledge distillation involves training a small model to imitate the behavior of a larger model.
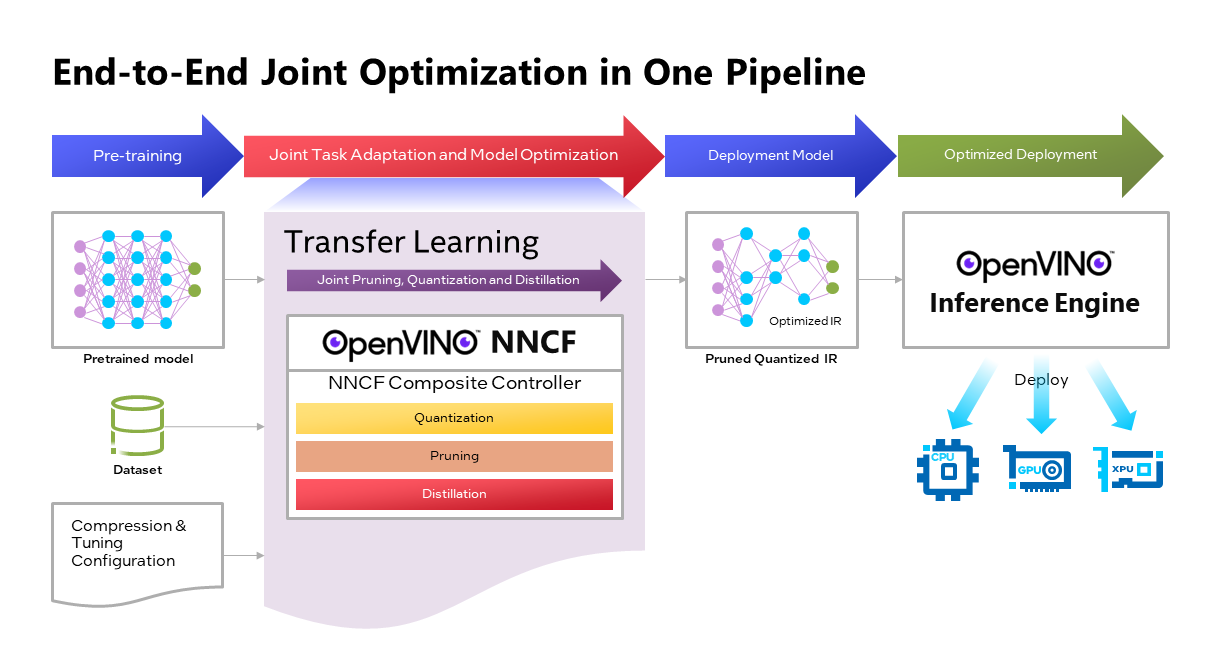
OpenVINOTM Neural Network Compression Framework (NNCF) develops Joint Pruning, Quantization and Distillation (JPQD) as a single joint-optimization pipeline to improve transformer inference performance by pruning, quantization, and distillation in parallel during transfer learning of a pretrained transformer. JPQD alleviates the developer complexity of sequential optimization of different compression techniques, resulting in an optimized model with significant efficiency improvement while preserving good task accuracy. The output of JPQD is a structurally pruned, quantized model in OpenVINOTM IR, which is ready to deploy with OpenVINOTM runtimes optimized on Intel platforms. Optimum intel provides simple API to integrate JPQD into training pipeline for Hugging Face Transformers.
JPQD of BERT-base Model with Optimum Intel
In this blog, we introduce how to apply JPQD to BERT-base model on GLUE benchmark for SST-2 text classification task.
Here is a compression config example with the format that follows NNCF specifications. We specify pruning and quantization in a list of compression algorithms with hyperparameters. The pruning method closely resembles the work of Movement Pruning (Sanh et al., 2020) and Block Pruning For Faster Transformers (Lagunas et al., 2021) for unstructured and structured movement sparsity. Quantization refers to Quantization-aware Training (QAT), see details for QAT in previous blog. At the beginning of training, the model under optimization will be initialized with pruning and quantization operators with this configuration.
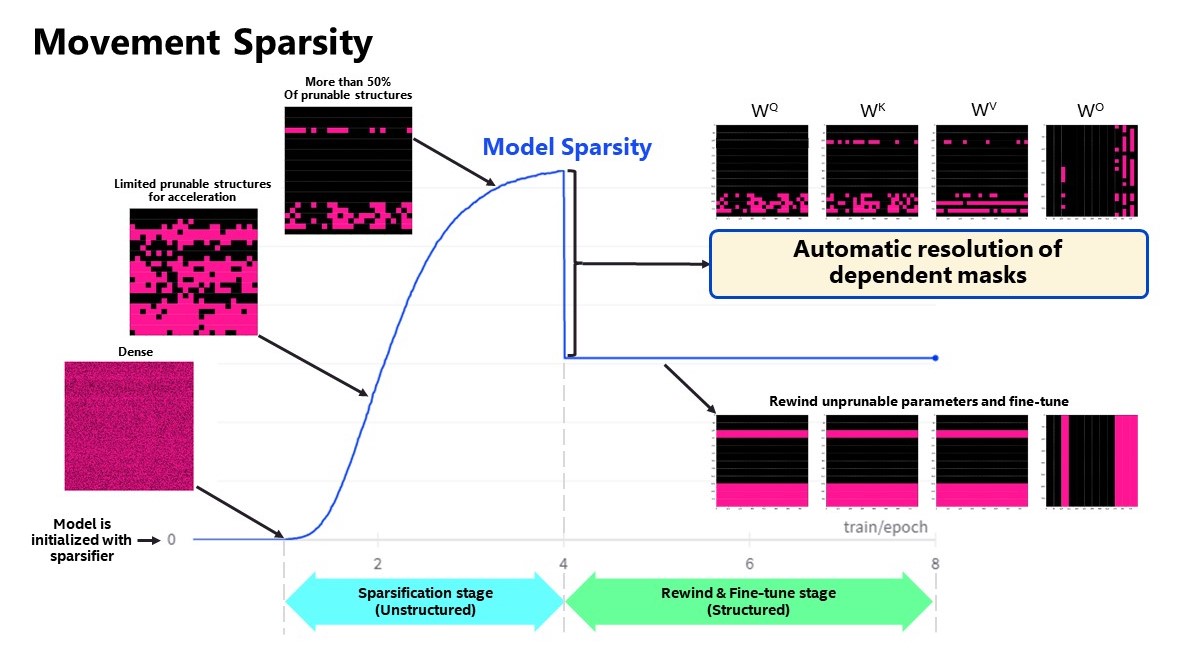
Figure 2 shows the sparsity level of BERT-base model over the optimization lifecycle, including two major stages:
- Unstructured sparsification: In the first stage, model weights are gradually sparsified in the grain size specified by "sparse_structure_by_scopes". The BertAttention layers (Multi-Head Attention: MHA) will be sparsified in 32x32 block size, while BertIntermediate, and BertOutput layers (Feed-Forward Network: FFN) will be sparsified in its row or column respectively. The first stage serves as a warmup stage defined by parameter “warmup_start_epoch” and “warmup_end_epoch”. The “importance_regularization_factor” defines regularization factor onweight importance scores. The factor stays zero before warmup stage, and gradually increases during warmup, finally stays at the fixed value after warmup, users might need some heuristics to find a satisfactory trade-off between sparsity and task accuracy.
- Structured masking and fine-tuning: The first warm-up stage will produce the unstructured sparsified model. Currently, unstructured sparsity optimized inference is only supported on 4th Gen Intel® Xeon® Scalable Processors with OpenVINO 2022.3 or a later version, for details, please refer to Accelerate Inference of Sparse Transformer Models with OpenVINO™ and 4th Gen Intel® Xeon®Scalable Processors. But it is possible to discard some sparse structure entirely from the model to save compute and memory footprint. NNCF provides a mechanism to achieve structured masking by “enable_structured_masking”: true, where it automatically resolves the structured masking between dependent layers and rewinds the sparsified parameters that do not participate in acceleration for task modeling. As Figure 2 shows, the sparsity level has dropped after “warmup_end_epoch” due to structured masking and the model will continue to be fine-tuned.
Known limitation: currently structured pruning with movement sparsity only supports BERT, Wav2vec2, and Swin family of models. See here for more information.
For distillation, the teacher model can be loaded with transformer API, e.g., a BERT-large pre-trained model from Hugging Face Hub. OVTrainingArguments extends transformers’ TrainingArguments with distillation hyperparameters, i.e., distillation weight and temperature for ease of use. The snippet below shows how we load a teacher model and create training arguments with OVTrainingArguments. Subsequently, the teacher model, with the instantiated OVConfig and OVTrainingArguments is fed to OVTrainer. The rest of the pipeline is identical to the native transformers' training, while internally the training is applied with pruning, quantization, and distillation.
Besides, NNCF provides JPQD examples of othertasks, e.g., question answering. Please refer to the examples provided here.
End-to-End JPQD of BERT-base Demo
Set up Python environment with necessary dependencies.
Run text classification example with JPQD of BERT on GLUE
All JPQD configurations and results are saved in ./jpqd-bert-base-ft-$TASK_NAME directory. Optimized OpenVINOTM IR is generated for efficient inference on intel platforms.
BERT-base Performance Evaluation and Accuracy Verification on Xeon

Table 1 shows BERT-base model for text classification task performance evaluation and accuracy verification results on 4th Gen Intel® Xeon® Scalable Processors. BERT-base FP32 model serves as the baseline. BERT-base INT8 (QAT) refers to the model optimized with the 8-bit quantization method only. BERT-base INT8 (JPQD) refers to the model optimized by pruning, quantization, and distillation method.
Here we use benchmark app with performance hint “throughput” to evaluate model performance with input sequence length=128.
As results shows, BERT-base INT8 (QAT) can already reach a 2.39x compression rate and 3.17x performance gain without significant accuracy drop (1.3%) on SST-2 compared with baseline. BERT-base INT8 (JPQD) can further increase compression rate to 5.24x to reach 4.19x performance improvement while keeping minimal accuracy drop (<1%) on SST-2 compared with baseline.

With proper fine-tuning, JPQD can even improve model accuracy while increasing performance in the meantime. Table 2 shows BERT-base model for question answering task performance evaluation and accuracy verification results on 4th Gen Intel® Xeon® Scalable Processors. BERT-base INT8 (JPQD) can increase compression rate to 5.15x to reach 4.25x performance improvement while improving Exact Match (1.35%) and F1 score (1.15%) metric on SQuAD compared with FP32 baseline.
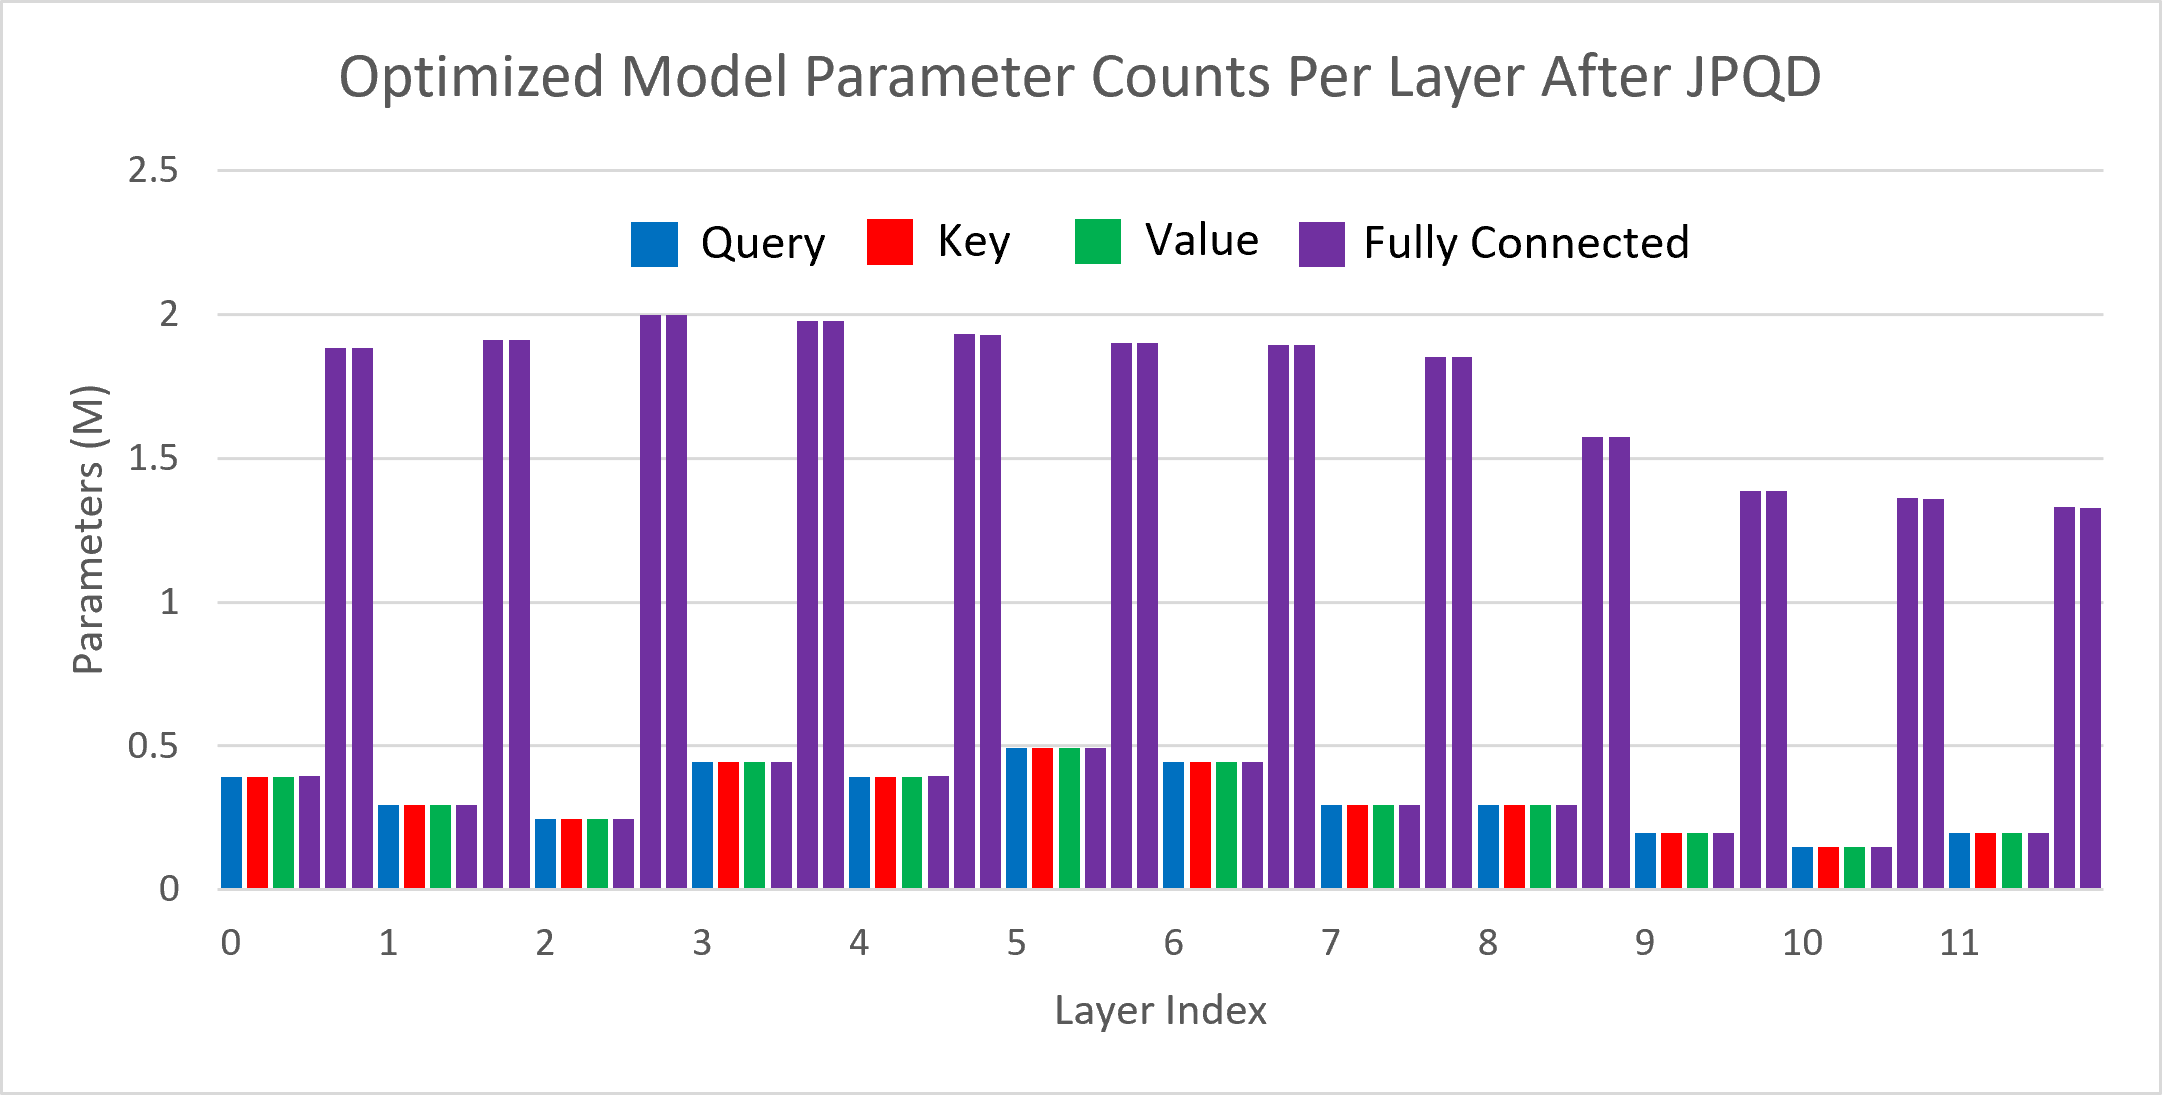
Figure 3 shows the visualization of parameter counts per layer in the BERT-base model optimized by JPQD for the text classification task. You can find that fully connected layers are actually “dense”, while most (Multi-Head Attention) MHA layers will be much sparser compared to the original model.
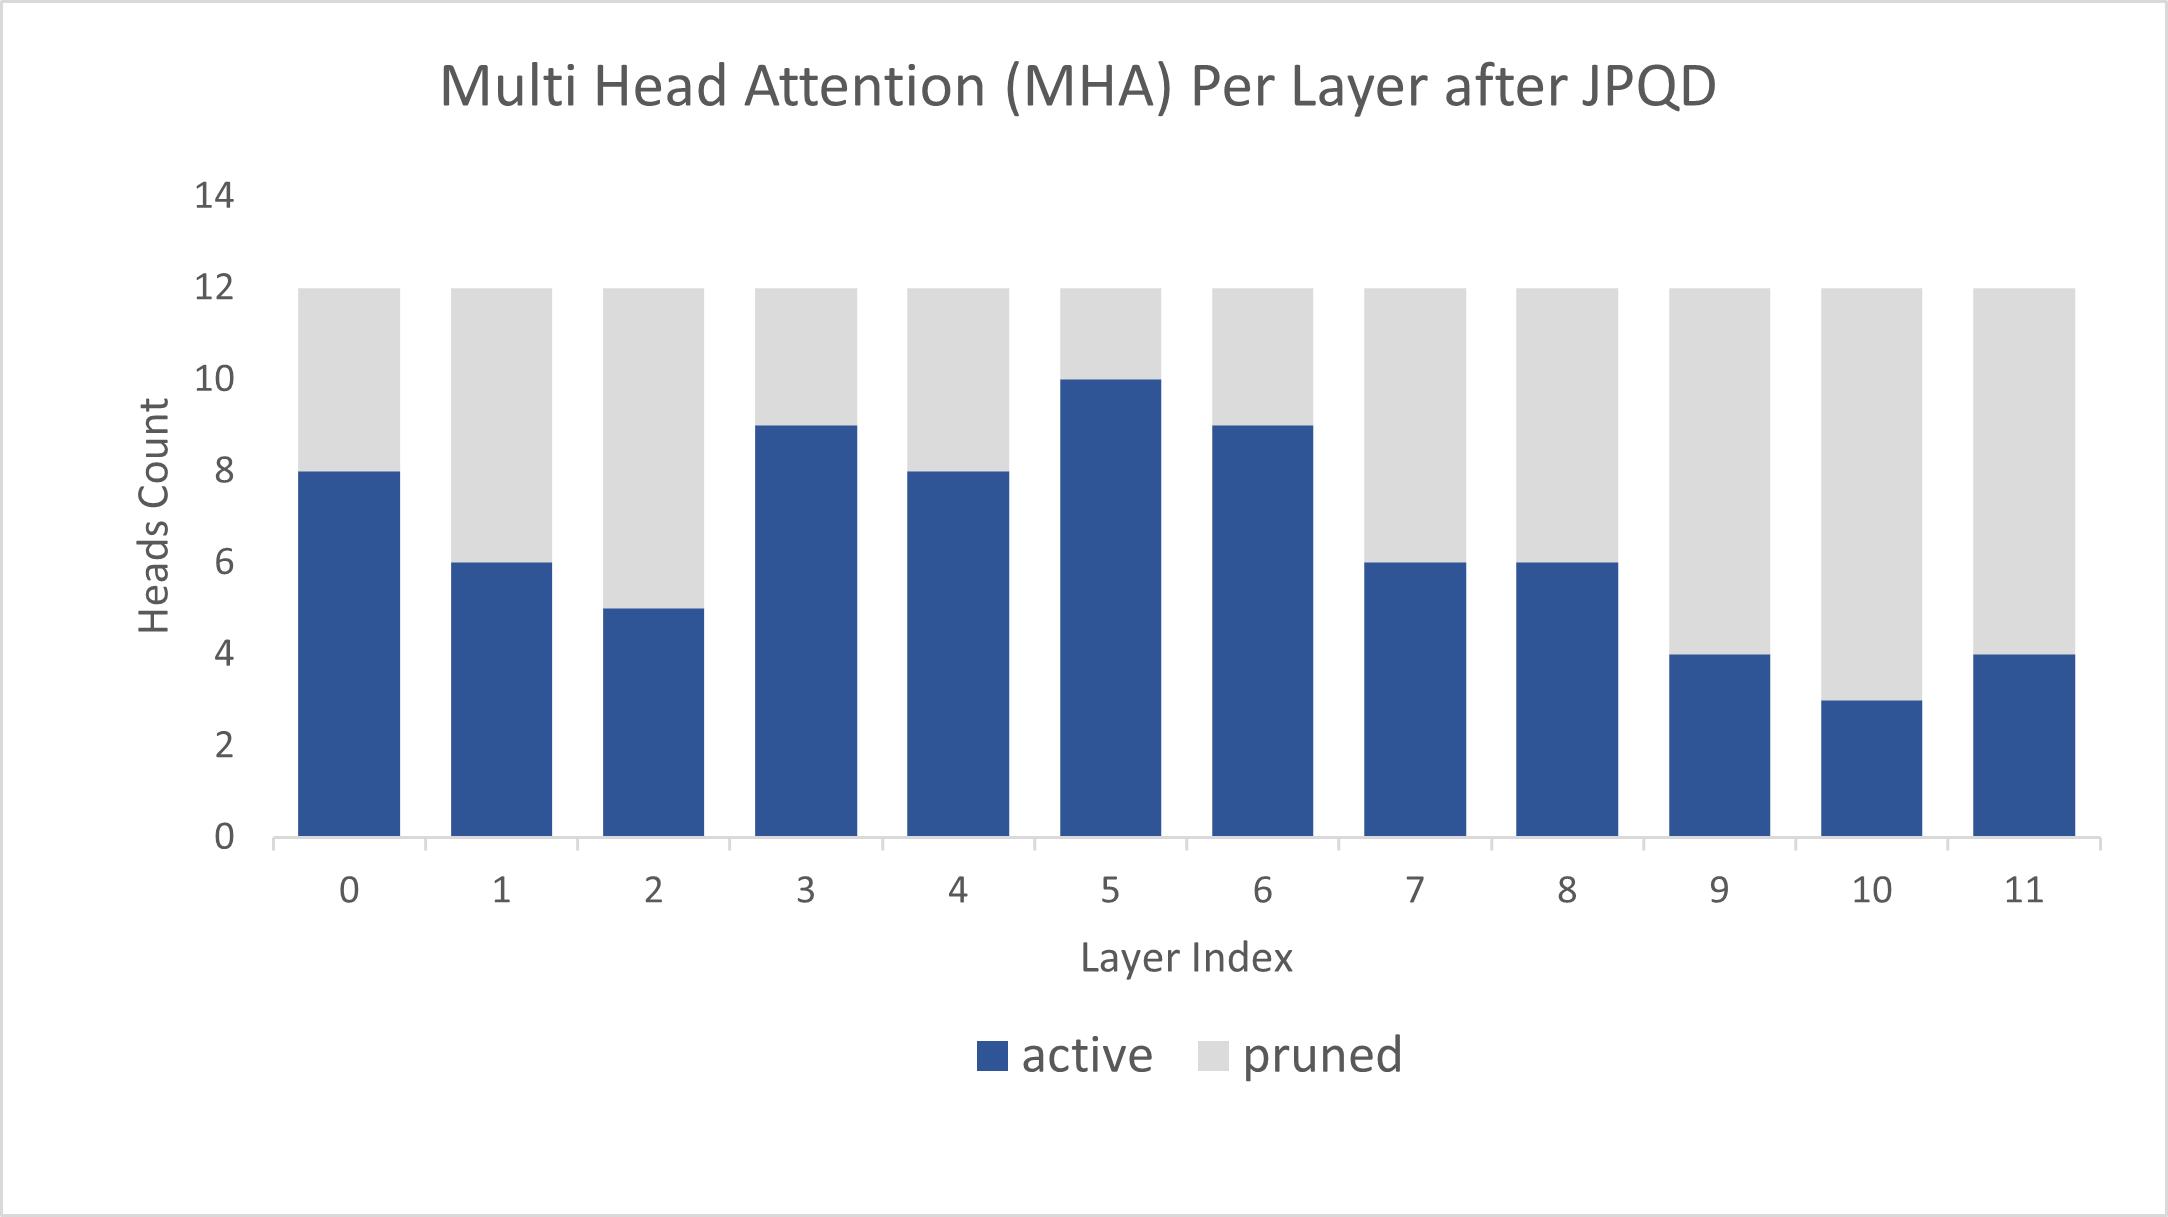
Figure 4 shows MHA head counts per layer in the BERT-base model optimized by JPQD for the text classification task, where active (blue) refer to remaining MHA head counts, while pruned (grey) refers to removed MHA head counts. Instead of pruning uniformly across all MHA heads in transformer layers, we observed that JPQD tends to preserve the weight to the lower layers while heavily pruning the highest layers, similar to experimental results from Movement Pruning (Sanh et al., 2020).
Conclusion
In this blog, we introduce a Joint Pruning, Quantization, and Distillation (JPQD) method to accelerate transformers inference on intel platforms. Here are three key takeaways:
- Optimum Intel provides simple API to integrate JPQD into training pipeline to enable pruning, quantization, and distillation in parallel during transfer learning of a pre-trained transformer. Optimized OpenVINOTM IR will be generated for efficient inference on intel architecture.
- BERT-base INT8 (JPQD) model for text classification task can reach 5.24x compression rate, leading to 4.19x performance improvement on 4th Gen Intel® Xeon® Scalable Processors while keeping minimal accuracy drop (<1%) on SST-2 compared with BERT-base FP32 models.
- BERT-base INT8 (JPQD) model for question answering task can reach 5.15x compression rate to achieve 4.25x performance improvement on 4th Gen Intel® Xeon® Scalable Processors while improving Exact Match (1.35%) and F1 score (1.15%) metric on SQuAD compared with BERT-base FP32 model.
Reference
- Hugging Face Optimum Intel
- Hugging Face Neural Networks Block Movement Pruning
- Intel®Xeon® Processors Are Still the Only CPU With MLPerf Results, Raising the Bar By5x
Additional Resources
Provide Feedback & Report Issues
Notices & Disclaimers
Intel technologies may require enabled hardware, software, or service activation.
No product or component can be absolutely secure.
Your costs and results may vary.
Intel does not control or audit third-party data. You should consult other sources to evaluate accuracy.
Intel disclaims all express and implied warranties, including without limitation, the implied warranties of merchantability, fitness for a particular purpose, and non-infringement, as well as any warranty arising from course of performance, course of dealing, or usage in trade.
No license (express or implied, by estoppel or otherwise) to any intellectual property rights is granted by this document.
© Intel Corporation. Intel, the Intel logo, and other Intel marks are trademarks of Intel Corporation or its subsidiaries. Other names and brands may be claimed as the property of others.
Optimize the Post-processing of GPT2 with PPP Custom Operation
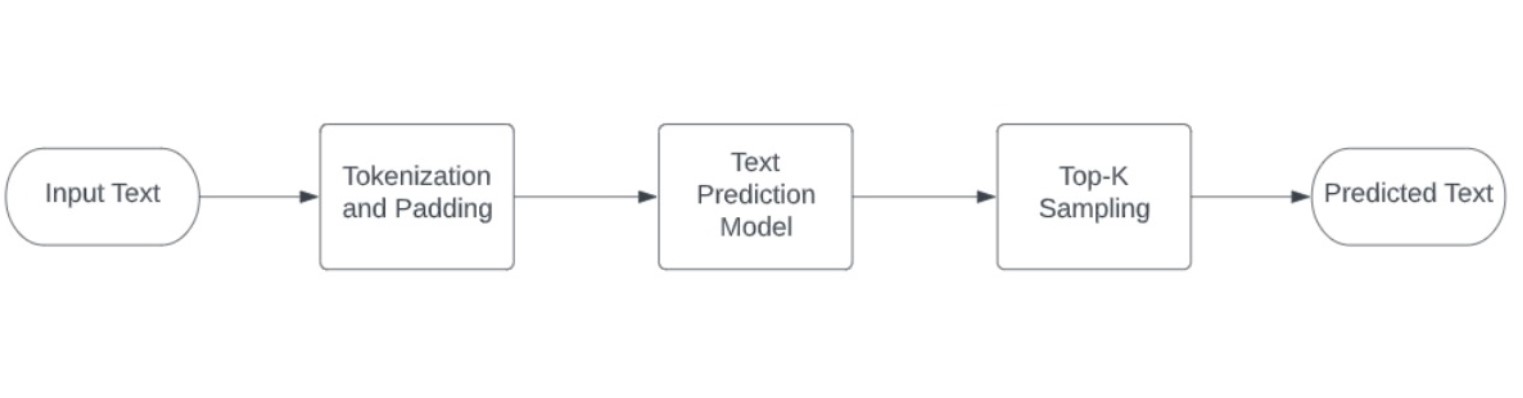
Here we provide a C++ demo about GPT2. Optimize the post-processing through the custom node of the OpenVINO PPP API, that is, insert some custom operations like TopK. Thereby reducing the latency of the pipeline.
GPT2 introduction
We use the GPT-2 model, which is a part of the Generative Pre-trained Transformer (GPT)family. GPT-2 is pre-trained on a large corpus of English text using unsupervised training. The model is available from HuggingFace. GPT-2 displays a broad set of capabilities, including the ability to generate conditional synthetic text samples of unprecedented quality, where we can prime the model with an input and have it generate a lengthy continuation.
The following image illustrates complete demo pipeline used for this scenario:
The OpenVINO notebook provide the Python implementation.
To deploy the model, we provide a C++ implementation with the post-processing optimization.
C++implementation
GPT2 Tokenizer:
The C++ implementation of the GPT2 tokenizer is from the repo gpt2-cpp.
OpenVINO Model:
The ONNX model is downloaded during the build process from the ONNX Model Zoo repo.
- Download ONNX model with Git LFS
- Use the python script to export the ONNX Model with ORT 1.10.
- The model is 634 MB large, so it may take a while to download it.
- Use python openvino-dev to convert ONNX model to OpenVINO IR model via "mo -m gpt2-lm-head-10.onnx -o IR_FP32"
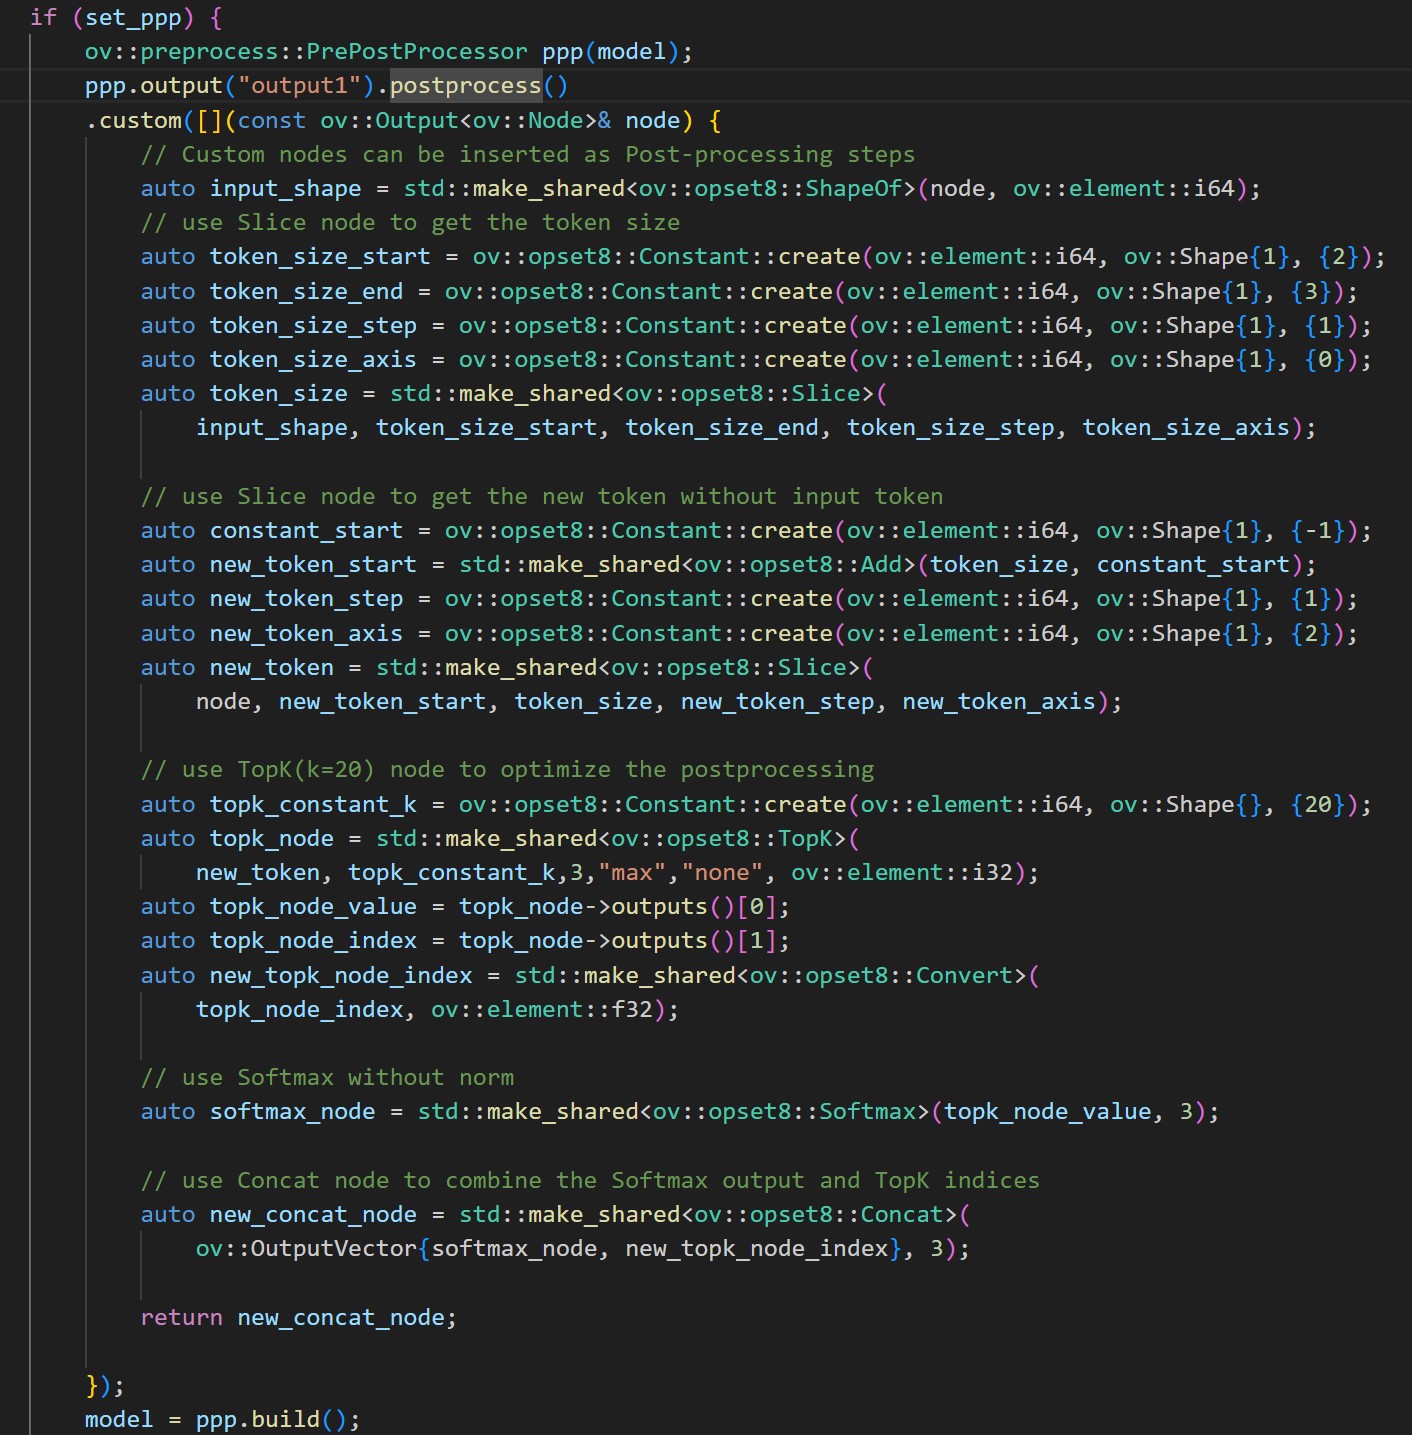
OpenVINO PPP Custom Operation:
Post-processing steps can be added to model outputs. As for pre-processing, these steps will be also integrated into a graph and executed on a selected device. Compared to pre-processing, there are not as many operations needed for the post-processing stage.
Here we use the customize operations:
1. use Slice node to get the token size
2. use Slice node to get the new token tensor without input token
3. use TopK(k=20) node to get the values and indices
4. use Softmax for TopK values
5. use Concat node to combine the Softmax output and TopK indices
The following image shows the details:
Notice:
- The Topk sampling of GPT-2 still needs a C++ post-process with probabilities distribution. It is difficult to implement this part with OpenVINO Operation of RandomUniform. .
- The PPP custom operation is verified on CPU.
Installation
Download the source code from the repo.
Prepare the OpenVINO env and modify the cmake file.
Download and convert the ONNX model.
Usage:
Run with PPP:
Run without PPP:
The optimization of PPP post-processing significantly improves the performance, which reduces the time of Intel CPU TGL by about 40% (the time of model inference plus post-processing).
The accuracy of GPT-2 C++ inference is intuitively like Python demo.
Accelerate Inference of Hugging Face Transformer Models with Optimum Intel and OpenVINO™
Authors: Xiake Sun, Kunda Xu
1. Introduction

Hugging Face is a large open-source community that quickly became an enticing hub for pre-trained deep learning models across Natural Language Processing (NLP), Automatic Speech Recognition(ASR), and Computer Vision (CV) domains.
Optimum Intel provides a simple interface to optimize Transformer models and convert them to OpenVINO™ Intermediate Representation (IR) format to accelerate end-to-end pipelines on Intel® architectures using OpenVINO™ runtime.
Sentimental classification, as one of the popular NLP tasks, is the automated process of identifying opinions in the text and labeling them as positive or negative. In this blog, we use DistilBERT for the sentimental classification task as an example to show how Optimum Intel helps to optimize the model with Neural Network Compression Framework (NNCF) and accelerate inference with OpenVINO™ runtime.
2. Setup Environment
Install optimum-intel and its dependency in a new python virtual environment as follow:
3. Model Inference with OpenVINO™ Runtime
The Optimum inference models are API compatible with Hugging Face Transformers models; which means you could simply replace Hugging Face Transformer “AutoModelXXX” class with the “OVModelXXX” class to switch model inference with OpenVINO™ runtime. You could set “from_transformers=True” when loading the model with the from_pretrained() method, the loaded model will be automatically converted to an OpenVINO™ IR for inference with OpenVINO™ runtime.
Here is an example of how to perform inference with OpenVINO™ runtime for a sentimental classification task, the output of the pipeline consists of classification label (positive/negative) and corresponding confidence.
4. Model Quantization with NNCF framework
Most deep learning models are built using 32 bits floating-point precision (FP32). Quantization is the process to represent the model using less memory with minimal accuracy loss. To further optimize model performance on Intel® architecture via Intel® Deep Learning Boost, model quantization as 8 bits integer precision (INT8) is required.
Optimum Intel enables you to apply quantization on Hugging Face Transformer Models using the NNCF. NNCF provides two mainstream quantization methods - Post-Training Quantization (PTQ) and Quantization-Aware Training (QAT).
- Post-Training Quantization (PTQ) refers to quantizing a model with a representative calibration dataset without fine-tuning.
- Quantization-Aware Training (QAT) is applied to simulate the effects of quantization during training to mitigate its effect on the model’s accuracy
4.1. Model Quantization with NNCF PTQ
NNCF Post-training static quantization introduces an additional calibration step where data is fed through the network to compute the activations quantization parameters. Here is how to apply static quantization on a pre-trained DistilBERT using General Language Understanding Evaluation (GLUE) dataset as the calibration dataset:
The quantize() method applies post-training static quantization and export the resulting quantized model to the OpenVINO™ Intermediate Representation (IR), which can be deployed on any target Intel® architecture.
4.2. Model Quantization with NNCF QAT
Quantization-Aware Training (QAT) aims to mitigate model accuracy issue by simulating the effects of quantization during training. If post-training quantization results in accuracy degradation, QAT can be used instead.
NNCF provides an “OVTrainer” class to replace Hugging Face Transformer’s “Trainer” class to enable quantization during training with additional quantization configuration. Here is an example on how to fine-tune a DistilBERT with Stanford Sentiment Treebank (SST) dataset while applying quantization aware training (QAT):
4.3. Comparison of FP32 and INT8 model outputs
“OVModelForXXX” class provided the same API to load FP32 and quantized INT8 OpenVINO™ models by setting “from_transformers=False”. Here is an example of how to load quantized INT8 models optimized by NNCF and inference with OpenVINO™ runtime.
Here is an example for sentimental classification output of FP32 and INT8 models:

5. Mitigation of accuracy issue cause by saturation
8-bit instructions of old CPU generations (based on SSE,AVX-2, AVX-512 instruction sets) are prone to so-called saturation(overflow) of the intermediate buffer when calculating the dot product, which is an essential part of Convolutional or MatMul operations. This saturation can lead to a drop in accuracy when running inference of 8-bit quantized models on the mentioned architectures. The problem does not occur on GPUs or CPUs with Intel® Deep Learning Boost (VNNI) technology and further generations.
In the case a significant difference in accuracy (>1%) occurs after quantization with NNCF default quantization configuration, here is an example code to check if deployed platform supports Intel® Deep Learning Boost (VNNI) and further generations:
While quantizing activations use the full range of 8-bit data types, there is a workaround using only 7 bits to represent weights (of Convolutional or Fully-Connected layers) to mitigate saturation issue for many models on old CPU platform.
NNCF provides three options to deal with the saturation issue. The options can be enabled in the NNCF quantization configuration using the “overflow_fix” parameter:
- "disable": (default) option do not apply saturation fix at all
- "enable": option to apply for all layers in the model
- "first_layer_only": option to fix saturation issue for the first layer
Here is an example to enable overflow fix in quantization configuration to mitigate accuracy issue on old CPU platform:
After model quantization with updated quantization configuration with NNCF PTQ/NNCF, you can repeat step 4.3 to verify if quantized INT8 model inference results are consistent with FP32 model outputs.
Additional Resources
Provide Feedback & Report Issues
Notices & Disclaimers
Intel technologies may require enabled hardware, software, or service activation.
No product or component can be absolutely secure.
Your costs and results may vary.
Intel does not control or audit third-party data. You should consult other sources to evaluate accuracy.
Intel disclaims all express and implied warranties, including without limitation, the implied warranties of merchantability, fitness for a particular purpose, and non-infringement, as well as any warranty arising from course of performance, course of dealing, or usage in trade.
No license (express or implied, by estoppel or otherwise) to any intellectual property rights is granted by this document.
© Intel Corporation. Intel, the Intel logo, and other Intel marks are trademarks of Intel Corporation or its subsidiaries. Other names and brands may be claimed as the property of others.
Make Your Own YOLOv8 OpenVINO™ Model from Any Data Format with Datumaro
Authors: Vinnam Kim, Wonju Lee, Mark Byun, Minje Park
Introduction
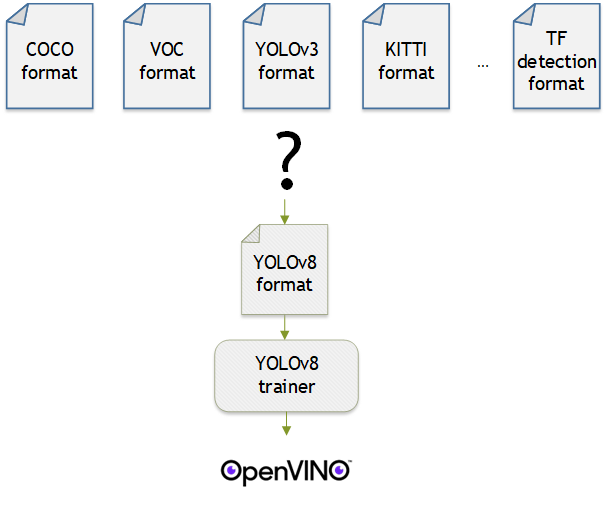
OpenVINO™ provides an easy way to deploy your model with the best inference performance on any Intel hardwares. However, to train your own model for deployment you need to prepare a training framework and dataset. Fortunately, there are many ready-to-use training frameworks and implementations. Then, what about the dataset? A specific training framework requires a specific data format, but there are many data formats in the world. For example, in object detection tasks there are data formats such as YOLO, COCO, and Pascal VOC that are widely used. These formats have different directory structures and annotation file formats as well as different extensions such as txt, json, and, xml, respectively. It's tedious task to convert dataset from one format to another whenever you adopt different training framework.
Let's assume you choose Detectron2, which only supports COCO format datasets. If your dataset is formatted as VOC, you have to convert it into COCO format. Below, we compare the directory structures and annotation file formats of both datasets, VOC and COCO. These datasets have distinct formats and you need to implement codes for format conversion at each time of handling different formats. Of course, this is not technically challenging but this may require tedious code work and debugging for several days. It won't be good to repeat this process if you intend to add more datasets with different formats.
Dataset Management Framework (Datumaro) is a framework that provides Python API and CLI tools to convert, transform, and analyze datasets. Among the many features of Datumaro, we would like to introduce the data format conversion feature on this blog, which is one of the fundamental feature for handling many datasets with different training frameworks. Datumaro supports the import and export of over 40 computer vision data formats (please take a look at supported formats for details!). This means that you can easily change your data format through Datumaro. If your model training framework can only read specific formats, don't worry. Use Datumaro and convert it!
Train YOLOv8 model and export it to OpenVINO™ model
- Prepare dataset
- Convert dataset with Datumaro
- Train with YOLOv8 and export to OpenVINO™ IR
YOLOv8 is a well-known model training framework for object detection and tracking, instance segmentation, image classification, and pose estimation tasks. It provides simple CLI commands to train, test, and export a model to OpenVINO™ Intermediate Representation (IR). However, the data format consumed by YOLOv8 is slightly different from the YOLO format itself. Datumaro named it refers to it as YOLO-Ultralytics format. As you can see here, it requires a special meta file to indicate annotation files for each subset and subset files to list subset image files. It further requires them to be placed in an appropriate directory structure. It can be very tedious to go through these details and implement dataset preprocessing when you want to train a model on your custom dataset.
On this blog, we provide an end-to-end example that covers the complete process of converting your dataset, training a model with the converted dataset, and exporting the trained model to OpenVINO™ IR. We understand that dataset conversion can be a tricky process, especially if you have annotated and built your own dataset. Therefore, we will provide an example of converting the dataset created by the popular CVAT annotation tool. By following our step-by-step guide, you will be able to convert your data format easily and accelerate the inference of your trained model with OpenVINO™.
Prepare dataset
In this section, we introduce the steps to export the project annotated by CVAT for the following workflows. You can skip this section if your dataset is formatted as a different data format and is ready to be imported by Datumaro.
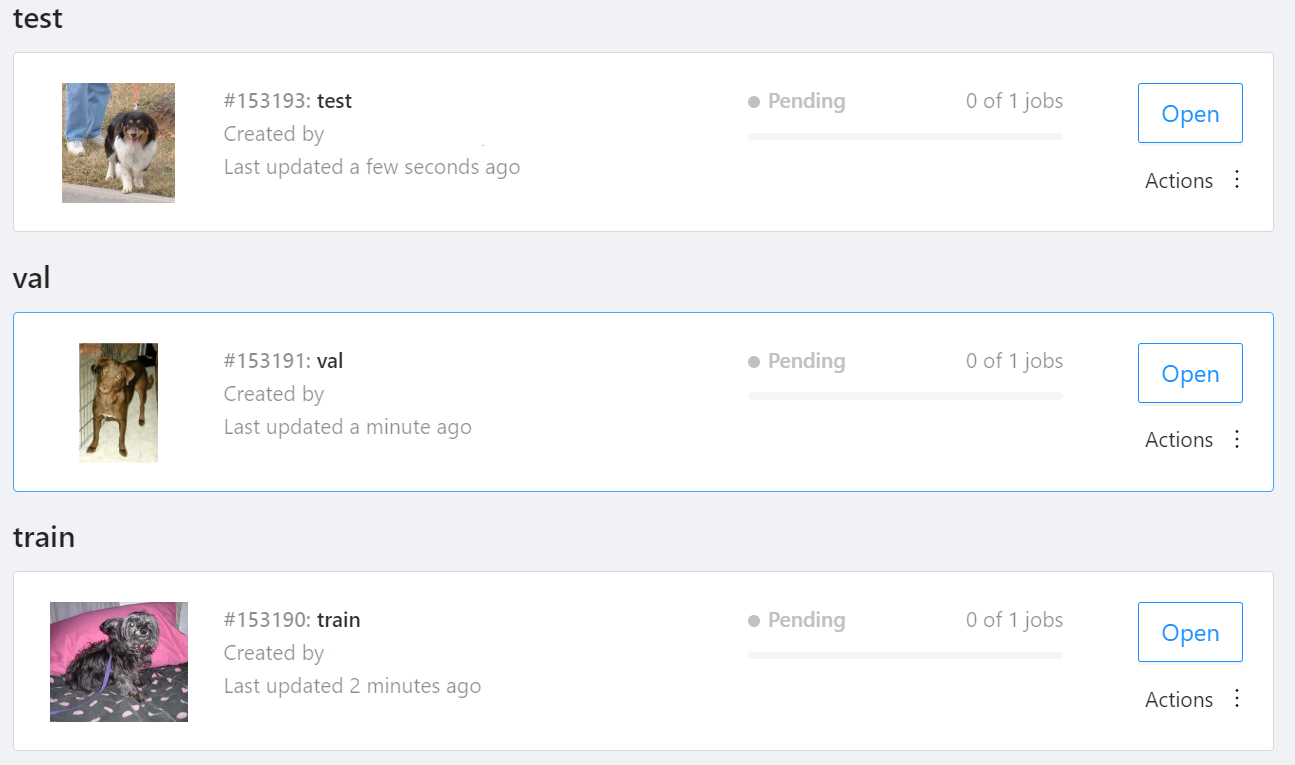
NOTE: We used the cats-and-dogs dataset for this example. You can find the reference for this dataset here.
NOTE: You should have three subsets in your project: "train", "val", and "test" (optional). If your dataset has different subset names, you have to rename them. You can do this by using Datumaro's MapSubsets transform.
We export this project to CVAT for images 1.1 data format. Datumaro can import this data format and export it to YOLO-Ultralytics format which can be consumed by YOLOv8.
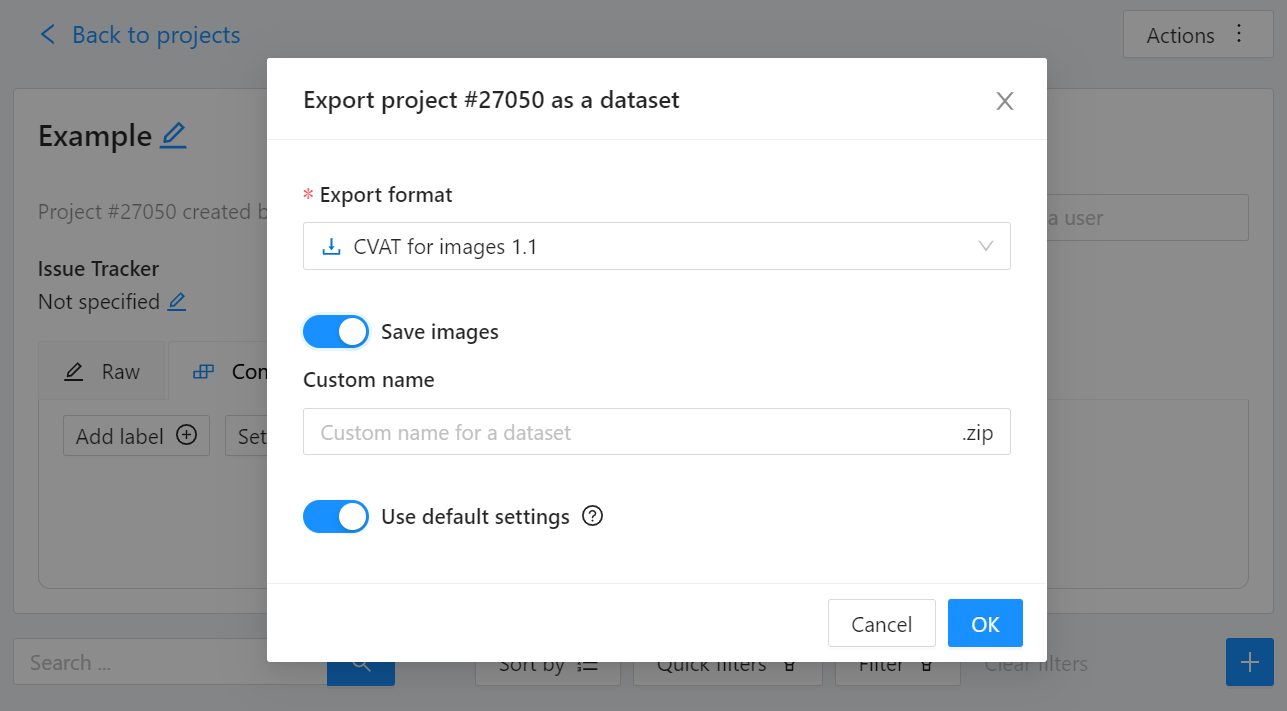
Export CVAT project to CVAT for images 1.1 data format. After exporting the dataset, extract it to the cvat_dataset directory.
You can see the following directory structure:
Convert your dataset using Datumaro
You can convert the dataset located in cvat_dataset using Datumaro's CLI command as follows. For a detailed explanation of the input arguments, see here.
NOTE: If your dataset is not CVAT for images 1.1 format, you can replace -if cvat with the different input format as -if INPUT_FORMAT. Use datum detect CLI command to figure out what format your dataset is.
After the conversion, you can see that yolo_v8_dataset directory is created.
This directory is structured as follows.
Train with YOLOv8 Trainer and Export to OpenVINO™ IR
In this section, we will train the YOLOv8 detector with the dataset converted in the previous section. To train a YOLOv8 detector, please execute the following command.
NOTE: We use data=$(realpath yolo_v8_dataset/data.yaml) to convert the relative path yolo_v8_dataset/data.yaml to the absolute path. This is because YOLOv8 needs the absolute path for the custom dataset.
After the training, the following command enables testing on the test dataset.
Lastly, we will export your YOLOv8 detector to OpenVINO™ IR for inference acceleration on Intel devices.
Using this command, the exported IR is created at this directory path, my-project/train/weights/best_openvino_model.
Conclusion
This post provided an example of training a YOLOv8 detector on an arbitrary data format by utilizing the data format conversion feature of Datumaro and exporting the model to OpenVINO™ IR. You can refer to the executable Jupyter notebook example provided on this blog post here for step-by-step guide. Datumaro offers a range of useful features for managing datasets beyond data format conversion. You can find examples of other Datumaro features, such as noisy label detection during training with OpenVINO™ Training Extensions, in the Jupyter examples directory. For more information about Datumaro and its capabilities, you can visit the Datumaro documentation page. If you have any questions or requests about using Datumaro, feel free to open an issue here.
OpenVINO is powered by OneDNN for the best performance on discrete GPU
OpenVINO and OneDNN
OpenVINO™ is a framework designed to accelerate deep-learning models from DL frameworks like Tensorflow or Pytorch. By using OpenVINO, developers can directly deploy inference application without reconstructing the model by low-level API. It consists of various components, and for running inference on a GPU, a key component is the highly optimized deep-learning kernels, such as convolution, pooling, or matrix multiplication.
On the other hand, Intel® oneAPI Deep Neural Network Library (oneDNN), is a library that provides basic deep-learning building blocks, mainly kernels. It differs from OpenVINO in a way that OneDNN provides APIs for running deep-learning nodes like convolution, but not for running deep-learning models such as Resnet-50.
OpenVINO utilizes OneDNN GPU kernels for discrete GPUs, in addition to its own GPU kernels. It is to accelerate compute-intensive workloads to an extreme level on discrete GPUs. While OpenVINO already includes highly-optimized and mature deep-learning kernels for integrated GPUs, discrete GPUs include a new hardware block called a systolic array, which accelerates compute-intensive kernels. OneDNN provides these kernels with systolic array usage.
If you want to learn more about the systolic array and the advancements in discrete GPUs, please refer to this article.
How does OneDNN accelerates DL workloads for OpenVINO?
When you load deep-learning models in OpenVINO, they go through multiple stages called graph compilation. The purpose of graph compilation is to create the "execution plan" for the model on the target hardware.
During graph compilation, OpenVINO GPU plugin checks the target hardware to determine whether it has a systolic array or not. If the hardware has a systolic array(which means you have a discrete GPU like Arc, Flex, or GPU Max series), OpenVINO compiles the model so that compute-intensive layers are processed using OneDNN kernels.
OpenVINO kernels and OneDNN kernels use a single OpenCL context and shared buffers, eliminating the overhead of buffer-copying. For example, OneDNN layer computes a layers and fills a buffer, which then may be read by OpenVINO kernels because both kernels run in a single OpenCL context.
You may wonder why only some of the layers are processed by OneDNN while others are still processed by OpenVINO kernels. This is due to the variety of required kernels. OneDNN includes only certain key kernels for deep learning while OpenVINO contains many kernels to cover a wide range of models.
OneDNN is statically linked to OpenVINO GPU Plugin, which is why you cannot find the OneDNN library from released OpenVINO binary. The dynamic library of OpenVINO GPU Plugin includes OneDNN.
The GPU plugin and the CPU plugin have separate versions of OneDNN. To reduce the compiled binary size, the OpenVINO GPU plugin contains only the GPU kernels of OneDNN, and the OpenVINO CPU plugin contains only the CPU kernels of OneDNN.
Hands-on Tips and FAQs
What should an application developer do to take advantage of OneDNN?
If the hardware supports a systolic array and the model has layers that can be accelerated by OneDNN, it will be accelerated automatically without any action required from application developers.
How can I determine whether OneDNN kernels are being used or not?
You can check the OneDNN verbose log or the executed kernel names.
Set `ONEDNN_VERBOSE=1` to see the OneDNN verbose log. Then you will see a bunch of OneDNN kernel execution log, which means that OneDNN kernels are properly executed. Each execution of OneDNN kernel will print a line. If all kernels are executed without OneDNN, you will not see any of such log line.
Alternatively, you can check the kernel names from performance counter option from benchmark_app. (--pc)
OneDNN layers include colon in the `execType` field as shown below. In this case, convolutions are handled by OneDNN jit:ir kernels. MaxPool is also handled by OneDNN kernel that is implemented with OpenCL.(and in this case, the systolic array is not used)
Can we run networks without Onednn on discrete GPU?
It is not supported out-of-box and it is not recommended to do so because systolic array will not be used and the performance will be very different.
If you want to try without OneDNN still, you can follow this documentation and use `OV_GPU_DisableOnednn`.
How to know whether my GPU will be accelerated with OneDNN(or it has systolic array or not)?
You can use hello_query_device from OpenVINO sample app to check whether it has `GPU_HW_MATMUL` in `OPTIMIZATION_CAPABILITIES`.
How to check the version of OneDNN?
You can set `ONEDNN_VERBOSE=1` to check see the verbose log. Below, you can see that OneDNN version is v3.1 as an example. (OnnDNN 3.1 was used for OpenVINO 23.0 release)
Please note that it is shown only when OneDNN is actually used in the target hardware. If the model is not accelerated through OneDNN, OneDNN version will not be shown.
Is it possible to try different OneDNN version?
As it is statically linked, you cannot try different OneDNN version from single OpenVINO version. It is also not recommended to build OpenVINO with different OneDNN version than it is originally built because we do not guarantee that it works properly.
How to profile OneDNN execution time?
Profiling is also integrated to OpenVINO. So you can use profiling feature of OpenVINO, such as --pc and --pcsort option from benchmark_app. However, it includes some additional overhead for OneDNN and it may report higher execution time than actual time especially for small layers. More reliable method is to use DevicePerformanceTiming with opencl-intercept-layers.
How to Install Intel GPU Drivers on Windows and Ubuntu
Introduction
OpenVINO is an open-source toolkit for optimization and deployment of AI inference. OpenVINO results in more efficient inference of deep learning models at the edge or in data centers. OpenVINO compiles models to run on many different devices, meaning you will have the flexibility to write code once and deploy your model across CPUs, GPUs, VPUs and other accelerators.
The new family of Intel discrete GPUs are not just for gaming, they can also run AI at the edge or on servers. Use this guide to install drivers and setup your system before using OpenVINO for GPU-based inference.
OpenVINO and GPU Compatibility
To get the best possible performance, it’s important to properly set up and install the current GPU drivers on your system. Below, I provide some recommendations for installing drivers on Windows and Ubuntu. This article was tested on Intel® Arc™ graphics and Intel® Data Center GPU Flex Series on systems with Ubuntu 22.04 LTS and Windows 11. To use the OpenVINO™ GPU plugin and offload inference to Intel® GPU, the Intel® Graphics Driver must be properly configured on your system.
Recommended Configuration for Ubuntu 22.04 LTS
The driver for Ubuntu 22.04 works out of the box with Kernel 5.15.0-57. However, if you upgraded/downgraded your kernel or upgraded from Ubuntu 20.04 LTS to 22.04, I suggest updating the kernel version to linux-image-5.19.0-43-generic.
After updating the kernel, check for the latest driver release. I updated my Ubuntu machine to version 23.13.26032.30, which was the latest version at the time of publishing this article, however OpenVINO could be run on discrete GPU with older or newer driver versions.
NOTE: If you upgraded Ubuntu 20.04 to 22.04, please verify your kernel version `uname –r` before updating the driver.
Recommended Configuration for Windows 11
Many driver versions are available for Windows. To run AI workloads, I suggest using the latest beta driver.
Getting Help
Even if you are using the latest available driver, you should always check if your AI models are running properly and generating the expected results. If you discover a bug for a particular model or failure to run a specific model, please file an issue on GitHub. Before reporting an issue, please check whether using the latest Beta version of the driver and latest version of OpenVINO solves the issue.
NOTE: Always refer to the official GPU driver documentation when setting up your system. This blog provides additional recommendations for the best results when using OpenVINO but it is not a replacement for documentation.
Conclusion
Checking the system requirements in Ubuntu 22.04 LTS and Windows 11 resolves some issues running Generative AI models like Stable Diffusion with OpenVINO on discrete GPUs. These updates prevent crashes and compilation errors or poor performance with Stable Diffusion. I suggest testing your AI models with the new driver installation, as it will likely improve the performance of your application. Try out this Stable Diffusion notebook for testing purposes.
Resources
https://github.com/intel/compute-runtime/
https://www.intel.com/content/www/us/en/products/docs/discrete-gpus/arc/software/drivers.html
https://www.intel.com/content/www/us/en/download/729157/intel-arc-iris-xe-graphics-beta-windows.html
https://docs.openvino.ai/2023.0/openvino_docs_OV_UG_supported_plugins_GPU.html
https://github.com/openvinotoolkit/openvino_notebooks/tree/main/notebooks/108-gpu-device
Q2'23: Technology update – low precision and model optimization
Authors
Alexander Kozlov, Nikita Savelyev, Nikolay Lyalyushkin, Vui Seng Chua, Pablo Munoz, Alexander Suslov, Andrey Anufriev, Liubov Talamanova, Yury Gorbachev, Nilesh Jain
Summary
This quarter we observed tremendous interest and breakthroughs in the Large Language Models optimization. Most research is basically focusing on low-bit weights quantization (INT4/INT3) which leads to a substantial reduction in model footprint and significant inference performance improvement in the case if corresponding HW kernels are available. There is also increased interest in low-bit floating-point data types such as FP8 and NF4. In addition, we reviewed relevant papers published on the recent CVPR conference and put them into a separate subsections for your convenience.
Highlights
- FP8 versus INT8 for efficient deep learning inference by Qualcomm AI Research (https://arxiv.org/pdf/2303.17951.pdf).A comprehensive study and comparison between FP8 and INT8 precisions for inference. Authors consider various modifications of FP8 data type and they fit inference of different DL models including Transformer and Convolutional networks. They also consider post-training and quantization-aware training settings and how models are mapped to the inference of the data types under consideration in terms of accurate results. The paper also contains an analysis of the HW efficiency of FP8 and INT8. The main conclusion of this paper is thatFP8 types do not provide an optimal solution for low-precision inference compared to INT8 types, especially, in edge scenarios. All the existing problems of INT8 inference can be worked around with mixed integer precisionINT4-INT8-INT16.
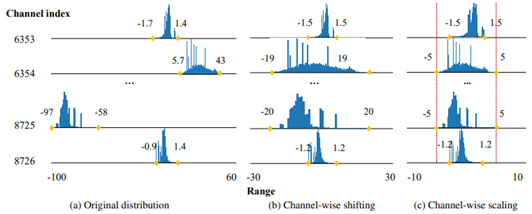
- Outlier Suppression+:Accurate quantization of large language models by equivalent and optimal shifting and scaling by SenseTime and universities of China and US (https://arxiv.org/pdf/2304.09145.pdf).The method represents a continuation of the idea described in Smooth Quant method. Besides the per-channel scaling of activations, authors also adopt the shift operation. They show how these additional operations can be incorporated into the optimizing model in a way that does not hurt performance after quantization. Experiments show that applying the method to various Language models including large OPT-family models allows quantizing them accurately even to the precisions lower than 8-bit, e.g. 6 or 4 bits.
- AWQ: Activation-aware Weight Quantization for LLM Compression and Acceleration by Song Han Lab (https://arxiv.org/pdf/2306.00978.pdf).Authors propose a weights quantization method for Large Language models that is able to achieve 4, 3 and 2 bit compression with a moderate accuracy degradation. In the paper, they claim the importance of the small portion weights (salient weights) which is usually 0.1-1%. The method focuses on the accurate representation of these salient weights by searching for a quantization scaling factor. It also aligns all the weights using a trick similar to the Smooth Quant method but with a focus on weights unification within each channel. The authors also conduct a comparison with the latest GPTQ method and provide a way how to combine these two methods to achieve ultra-low-bit weight compression (2 bits). The method shows significant improvement in the inference speed (1.45x) compared to vanilla GPTQ. Code is available at: https://github.com/mit-han-lab/llm-awq
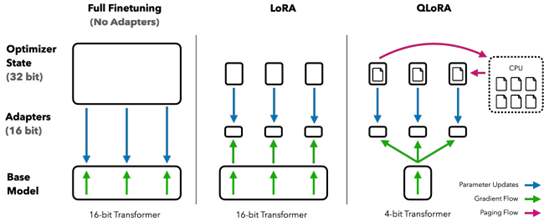
- QLORA: Efficient Finetuning of Quantized LLMs by University of Washington (https://arxiv.org/pdf/2305.14314.pdf).The paper proposes an effective way to reduce memory footprint during the Large Language Models fine-tuning by quantizing most of the weights to 4 bits. A new NormalFloat 4-bit (NF4) data type, that is information-theoretically optimal for normally distributed weights, is introduced for this purpose. Authors also use the so-called double quantization to compress weight quantization parameters and further reduce the model footprint. Most of the workflow is similar to LoRA method. The authors also provide CUDA kernels for fast training. The method is used to tune various LLMs and shows good results(sometimes even better than baselines). It is already integrated with Hugging Face: https://huggingface.co/blog/4bit-transformers-bitsandbytes.
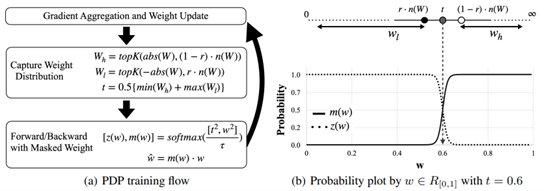
- PDP: Parameter-free Differentiable Pruning is All You Need by Apple Inc. (https://arxiv.org/pdf/2305.11203.pdf).The paper introduces a very simple and compelling idea on how to compute differentiable threshold to obtain the pruning mask based on the desired pruning ratio. The method allows to do it on-fly in a more efficient and stable way for the training so that the decision about which way to prune and which not is being taken during almost the whole training process. The method can be applied in a structured an unstructured way and achieves superior results on both Conv and Transformer-based models.
Papers with notable results
Quantization
- Memory-Efficient Fine-Tuning of Compressed Large Language Models via sub-4-bit Integer Quantization by NAVER Cloud, University of Richmond, SNU AI Center, KAIST AI (https://arxiv.org/pdf/2305.14152.pdf).The paper presents Parameter-Efficient and Quantization-aware Adaptation(PEQA), a quantization-aware PEFT technique that facilitates model compression and accelerates inference. PEQA operates through a dual-stage process: initially, the parameter matrix of each fully-connected layer undergoes quantization into a matrix of low-bit integers and a scalar vector subsequently, fine-tuning occurs on the scalar vector for each downstream task. This compresses the size of the model considerably, leading to a lower inference latency upon deployment and a reduction in the overall memory required. The method demonstrates scalability, task-specific adaptation performance for several well-known models, including LLaMA and GPT-Neo and -J.
- Integer or Floating Point? New Outlooks for Low-Bit Quantization on Large Language Models by Microsoft and universities of China (https://arxiv.org/pdf/2305.12356.pdf).Authors analyze the effectiveness and applicability of INT8/INT4 and FP8/FP4precision to quantization of Large Language Models. They conclude that there is no winner for both weight-only and weights-activations quantization settings. Thus they propose a relatively simple method that selects the optimal per-layer precision for LLM quantization. They provide an extensive comparison on different LLaMA models and compare results with the recent GPTQ (for weight-only) and vanilla FP8/INT8 (for weights-activations) quantization. The proposed method surpasses or outperforms baselines.
- PTQD: Accurate Post-Training Quantization for Diffusion Models by Zhejiang University and Monash University (https://arxiv.org/pdf/2305.10657.pdf). The paper is a post-training quantization framework for diffusion models and unifies a formulation for quantization noise and diffusion perturbed noise. The authors disentangle the quantization noise into correlated and uncorrelated parts regarding its full-precision counterpart. They propose how to correct the correlated part by estimating the correlation coefficient and propose Variance Schedule Calibration to rectify the residual uncorrelated part. The authors also introduce a Step-aware Mixed Precision scheme, which dynamically selects the appropriate bit-widths for synonymous steps, guaranteeing adequate SNR throughout the denoising process. Experiments demonstrate that the method reaches a good performance for mixed-precision post-training quantization of diffusion models on certain tasks.
- LLM-QAT: Data-Free Quantization Aware Training for Large Language Models by Meta AI and Reality Labs (https://arxiv.org/pdf/2305.17888.pdf).The paper proposes a data-free distillation method that leverages generations produced by the pre-trained model, which allows quantizing generative models independent of its training data, similar to post-training quantization methods. The method quantizes both weights and activations, and in addition the KV cache, which can be helpful for increasing throughput and support long sequence dependencies at current model sizes. Authors experiment with LLaMA models of sizes 7B, 13B, and 30B, at quantization levels down to 4- bits. They provide quite an extensive evaluation and compare results with modern quantization methods such as SmoothQuant.
- ZeroQuant-V2: Exploring Post-training Quantization in LLMs from Comprehensive Study to Low Rank Compensation by Microsoft (https://arxiv.org/pdf/2303.08302.pdf). The paper provides a thorough analysis of how the quantization of weights, activations, and weights-activations to different precisions (INT8 andINT4) impacts the accuracy of LLMs of different sizes and architectures (OPT and BLOOM). It states that weight quantization is less sensitive which aligns with common understanding. The authors also compare popular methods round-to-nearest (RTN), GPTQ, ZeroQuant with various quantization settings (per-row, per-group, per-block). Finally, they introduce a technique called Low Rank Compensation (LoRC), which employs low-rank matrix factorization on the quantization error matrix and achieves good accuracy results while being applied on top of other PTQ methods.
- NF4 Isn’t Information Theoretically Optimal (and that’s Good) by Toyota Technological Institute at Chicago (https://arxiv.org/pdf/2306.06965.pdf).Interesting research where the author studies a new NormalFloat4 data type proposed in QLoRA paper. He came up with the following conclusions: (1) The distribution of values to be quantized depends on the quantization block size, so an optimal code should vary with block size (2) NF4 does not assign an equal proportion of inputs to each code value (3) Codes which do have that property are not as good as NF4 for quantizing language models. He attempts to apply these insights to derive an improved code based on minimizing the expected L1 reconstruction error, rather than the quantile-based method. This leads to improved performance for larger quantization block sizes.
- SqueezeLLM: Dense-and-Sparse Quantization by BAIR UC Berkeley (https://arxiv.org/pdf/2306.07629.pdf). The paper shows that LLM (GPT) inference suffers from low arithmetic intensity and is a memory-bound problem. The authors then propose a non-uniform weight quantization method to trade computation for memory footprint. Two novel techniques are introduced. To deal with the outlying weight values, the Dense-and-Sparse decomposition factorizes a layer weight into a pair of matrices with the same shape as original – one for outliers which will be very sparse due to only~0.5% of large values, and the remaining elements are kept in another dense matrix. Since the sparse matrix has little non-zero elements, it can be stored as compressed sparse row (CSR) format without quantization and GEMM/GEMV can be realized via sparse library. As for the dense matrix with its range significantly narrowed than original, the authors formulate a Sensitivity-Based K-means Clustering that find 2bitwidth centroids by minimizing Fisher information metric, an approximate perturbation to the loss function that can be computed efficiently without the expensive 2nd order backprop. Across LLaMa 7B, 13B, 30B and its instruction-following derivatives Vicuna, SqueezeLLM in 4 or 3 bit consistently outperforms SOTA methods GPTQ,AWQ in perplexity evaluated on C4, WikiText-2 and zero-shot MMLU task. On A6000GPU, SqueezeLLM inference with a tailored LUT dequantization kernel show comparable latency to GPTQ.
- Towards Accurate for Vision Transformer by Meituan and Beihang University (https://arxiv.org/pdf/2303.14341.pdf).A practical study where authors highlight the problems of quantization for Vision Transformer models. They propose a bottom-elimination block wise calibration scheme to optimize the calibration metric to perceive the overall quantization disturbance in a block wise manner and prioritize the crucial quantization errors that influence more on the final output more. They also design a quantization scheme for Softmax to maintain the power-law character and keep the function of the attention mechanism. Experiments on various Vision Transformer architectures and tasks (Image Classification, Object Detection, Instance Segmentation) show that accurate 8-bit quantization is achievable for most of the models.
CVPR 2023 conference
- NIPQ: Noise proxy-based Integrated Pseudo-Quantization by Postech and Seoul National University (https://openaccess.thecvf.com/content/CVPR2023/papers/Shin_NIPQ_Noise_Proxy-Based_Integrated_Pseudo-Quantization_CVPR_2023_paper.pdf). Authors highlight a problem with straight-through estimator (STE) represented by a fact that it results in unstable convergence during quantization-aware training (QAT) leading in notable quality degradation. To resolve this issue, they suggest a novel approach called noise proxy-based integrated pseudo-quantization (NIPQ) that updates all quantization parameters (e.g., bit-width and truncation boundary)as well as the network parameters via gradient descent without STE instability. Experiments show that NIPQ outperforms existing quantization algorithms in various vision and language applications by a large margin. This approach is rather general and can be used to improve any QAT pipeline.
- One-Shot Model for Mixed-Precision Quantization by Huawei (https://openaccess.thecvf.com/content/CVPR2023/papers/Koryakovskiy_One-Shot_Model_for_Mixed-Precision_Quantization_CVPR_2023_paper.pdf). Authors focus on a problem of mixed precision quantization where an optimal bit width needs to be selected for every layer of a model. The suggested method, One-Shot MPS, learns optimal bit widths in a gradient-based manner and finds a diverse set of Pareto-front architectures in O(1) time. Authors claim that for large models the proposed method find optimal bit width partition 5 times faster than existing methods.
- Boost Vision Transformer with GPU-Friendly Sparsity and Quantization by Fudan University and Nvidia (https://openaccess.thecvf.com/content/CVPR2023/papers/Yu_Boost_Vision_Transformer_With_GPU-Friendly_Sparsity_and_Quantization_CVPR_2023_paper.pdf). In this paper authors suggest an approach to maximally utilize the GPU-friendly fine-grained 2:4 structured sparsity and quantization. Method consists of first pruning an FP16 vision transformer to a sparse representation and then quantizing it further to INT8/INT4 data types. his is done using multiple distillation losses in supervised or even unsupervised regimes. Experiments show about 3x performance boost for INT4quantization with less than 0.5% accuracy drop for classification, detection, and segmentation tasks.
- Q-DETR: An Efficient Low-Bit Quantized Detection Transformer by Beihang University, Zhongguancun Laboratory, Tencent and others (https://openaccess.thecvf.com/content/CVPR2023/papers/Xu_Q-DETR_An_Efficient_Low-Bit_Quantized_Detection_Transformer_CVPR_2023_paper.pdf). Authors show that during quantization of DETR detection transformer its accuracy is significantly degraded because of the information loss occurring in across-attention module. This issue it tackled by (1) distribution alignment of detection queries to maximize the self-information entropy and (2)foreground-aware query matching scheme to effectively transfer the teacher information to distillation-desired features. The resulting 4-bit Q-DETR can theoretically accelerate DETR with ResNet-50 backbone by 6.6x with only 2.6%accuracy drop.
- It also may be seen that some academic effort is targeted at data-free quantization. The following CVPR works suggest improvements in this direction: GENIE: Show Me the Data for Quantization (https://arxiv.org/pdf/2212.04780.pdf) by Samsung Research; Hard Sample Matters a Lot in Zero-Shot Quantization (https://arxiv.org/pdf/2303.13826.pdf) by South China University of Technology and others; Adaptive Data-FreeQuantization (https://arxiv.org/pdf/2303.06869.pdf) by Key Laboratory of Knowledge Engineering with Big Data and others.
Pruning
- DepGraph: Towards Any Structural Pruning by NUS, Zhejiang University and Huawei (https://arxiv.org/pdf/2301.12900.pdf). This paper tackles the highly challenging yet rarely explored aspects of structured pruning - generalized identification of dependent structures across layers for joint sparsification and removal. This problem is non-trivial, stemming from varying dependency in different model architectures, choice of pruning schemes as well as implementation. The authors start with all-to-all layer dependency, detailing the considerations and design decisions, gradually arriving at an intra and inter-layer dependency graph (DepGraph). The paper later shows how to use DepGraph to resolve grouping of dependent layer and structures. In experiments, norm-based regularization (L2) on derived groups is employed for sparsification training. The speedup and accuracy on CNN/CIFAR are competitive with many SOTA works. Most importantly, it shows the applicability of DepGraph not only for CNN but also for transformer, GNN and RNN, also the challenging DenseNet which has nested shortcut connection. This work is a good reference for any model optimization SW framework as structural dependency also exists for quantization and NAS. https://github.com/VainF/Torch-Pruning.
- Structural Pruning for Diffusion Models by NUS (https://arxiv.org/pdf/2305.10924.pdf).The paper introduces a method for Diffusion models pruning. The essence of the method is encapsulated in a Taylor expansion over pruned timesteps, a process that disregards non-contributory diffusion steps and ensembles informative gradients to identify important weights. Empirical assessment, undertaken across four diverse datasets shows that: the method enables approximately a 50%reduction in FLOPs at a mere 10% to 20% of the original training expenditure the pruned diffusion models inherently preserve generative behavior congruent with their pre-trained progenitors at low resolution. The code is available at https://github.com/VainF/Diff-Pruning.
- LLM-Pruner: On the Structural Pruning of Large Language Models by NUS (https://arxiv.org/pdf/2305.11627.pdf).The paper introduces a framework for the task-agnostic structural pruning of the large language model. The main advantage of the framework is the automatic structural pruning framework, where all the dependent structures are grouped without the need for any manual design. To evaluate the effectiveness of LLM-Pruner, authors conduct experiments on three large language models:LLaMA-7B, Vicuna-7B, and ChatGLM-6B. The compressed models are evaluated using nine datasets to assess both the generation quality and the zero-shot classification performance of the pruned models. The experimental results demonstrate that with the removal of 20% of the parameters, the pruned model maintains 93.6% of the performance of the original model after the light-weight fine-tuning.
- SpQR: A Sparse-Quantized Representation for Near-Lossless LLM Weight Compression by Neural Magic, Yandex, and universities of US, Europe and Russia (https://arxiv.org/pdf/2306.03078.pdf).The paper introduces new compressed format and quantization technique which enables near-lossless compression of LLMs across model scales, while reaching similar compression levels to previous methods. The method works by identifying and isolating outlier weights, which cause particularly large quantization errors, and storing them in higher precision, while compressing all other weights to 3-4 bits, and achieves relative accuracy losses of less than 1% in perplexity for highly-accurate LLaMA and Falcon LLMs. This makes it possible to run 33B parameter LLM on a single 24 GB consumer GPU without any performance degradation at 15% speedup. Code is available at: https://github.com/Vahe1994/SpQR.
- Dynamic Context Pruning for Efficient and Interpretable Autoregressive Transformers by ETH, CSEM, University of Basel (https://arxiv.org/pdf/2305.15805.pdf).The paper aims to overcome the length-quadratic complexity of the global causal attention and argues that static sparse attention (such as Big Bird, Sparse Attention) is sub-optimal in modeling, requiring pretraining from scratch, and has limited memory benefit during generation. The authors propose a fine-tuning method to learn layer-specific sparse attention which adaptively prune tokens in the context during deployment. Essentially, auxiliary modules are introduced a teach layer to learn the interactions between query and key to predict the retention of tokens. Although additional cost is incurred, high sparsity in long context results in overall memory benefit by reducing storage and retrieval from key-value cache, as well as compute benefit from lesser tokens for attention computation. As compared to adapting GPT2 with local and sparse attention, online context pruning shows lower (better) perplexity and retains perplexity when up to 60% of tokens pruned from context. Mean zero-shot accuracy across a number of tasks is shown maintained at a high level of sparsity.
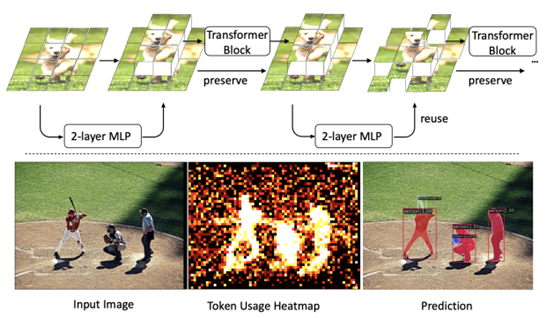
- Revisiting Token Pruning for Object Detection and Instance Segmentation by University of Zurich (https://arxiv.org/pdf/2306.07050.pdf).In this paper, authors investigate token pruning to accelerate inference for object detection and instance segmentation, extending prior works from image classification. Through the experiments, they offer four insights for dense tasks: (i) tokens should not be completely pruned and discarded, but rather preserved in the feature maps for later use. (ii) reactivating previously pruned tokens can further enhance model performance. (iii) a dynamic prunin grate based on images is better than a fixed pruning rate. (iv) a lightweight,2-layer MLP can effectively prune tokens, achieving accuracy comparable with complex gating networks with a simpler design. Authors evaluate the impact of these design choices on COCO dataset and present a method integrating these insights that outperforms prior art token pruning models, significantly reducing performance drop from ∼1.5 mAP to ∼0.3 mAP for both boxes and masks.
- PRUNING MEETS LOW-RANK PARAMETER-EFFICIENT FINE-TUNING by Zhejiang University and Monash University (https://arxiv.org/pdf/2305.18403.pdf).The paper introduces a parameter importance criterion for large pre-trained models that works with LoRA. With the gradients of the low-rank decomposition, it can approximate the importance of pre-trained parameters without a need to compute their gradients. Based on this, authors introduce LoRA Prune, an approach that unifies PEFT with pruning. Experiments on computer vision and natural language processing tasks demonstrate that LoRA Prune outperforms the compared pruning methods and achieves competitive performance with other (quantization-based) PEFT methods.
CVPR 2023 conference
- Integral Neural Networks by Thestage.ai and Huawei (https://openaccess.thecvf.com/content/CVPR2023/papers/Solodskikh_Integral_Neural_Networks_CVPR_2023_paper.pdf). A new family of deep neural networks called Integral Neural Networks (INN) is introduced in this paper. The weights of INNs are represented as continuous N-dimensional functions, and they are applied by continuous integration operation. During inference, continuous layers can be discretized into fixed representation with an arbitrary resolution. This can be used to prune the model to a desired degree without any fine-tuning and suffering only a small performance loss. Authors also suggest how a pre-trained CNN can be converted to INN. Results show that INNs achieve the same accuracy as CNNs while performing much better when pruned without fine-tuning. For example, a 30% pruned Integral ResNet18 has a 2% accuracy drop on ImageNet compared to 65% accuracy drop for a regular ResNet18.
- Joint Token Pruning and Squeezing Towards More Aggressive Compression of Vision Transformers by MEGVII Technology and Tsinghua University (https://openaccess.thecvf.com/content/CVPR2023/papers/Wei_Joint_Token_Pruning_and_Squeezing_Towards_More_Aggressive_Compression_of_CVPR_2023_paper.pdf). Authors attempt to improve vision transformer computational costs by pruning redundant tokens. Unlike traditional token pruning methods, the proposed Token Pruning & Squeezing module (TPS)approach also squeezes the pruned tokens into the kept ones according to their similarity. Experiments on various ViTs demonstrate the effectiveness of the method and higher robustness to the errors of the token pruning policy .Especially, for DeiT-tiny and -small TPS shrinks computational budget by 35% while improving the accuracy by 1-6% compared to baselines on ImageNet classification.
- Global Vision Transformer Pruning with Hessian-Aware Saliency by Nvidia, Berkeley and Duke University (https://arxiv.org/pdf/2110.04869.pdf). Authors propose a first systematic approach to global structural pruning of vision transformers by redistributing the parameters both across transformer blocks and between different structures within the block. Pruning is performed according to a novel Hessian-based criteria comparable across all layers and structures. A new architecture of ViT is proposed called Novel ViT (NViT) obtained by iterative pruning of DeiT-Base. NViT-Base achieves 2.5x FLOPs reduction and 1.9x performance speedup with almost no accuracy degradation. Based on this and other results authors claim outperforming prior state of the art by a large margin.
Neural Architecture Search
- PreNAS: Preferred One-Shot Learning Towards Efficient Neural Architecture Search by Alibaba Group (https://arxiv.org/pdf/2304.14636.pdf ). The authors demonstrate the use of zero-cost proxies to accelerate the training and improve the sample efficiency of weight-sharing NAS. Their method groups Transformer isomers and discards a subset of each group based on each architecture configuration zero-cost score. The reduced search space is then used during training. Pre-NAS outperforms alternative state-of-the-start NAS methods for both Vision Transformers and architectures based on convolution operations.
- Mixture-of-Supernets: Improving Weight-Sharing Supernet Training with Architecture-Routed Mixture-of-Experts by Meta and the University of British Columbia (https://arxiv.org/abs/2306.04845). Authors tackle several issues in traditional weight-sharing NAS, i.e., in NLP tasks, there is an observed performance gap between the selected architectures and training the same architectures from scratch, and additional training is required to improve the final accuracy of the Pareto front. The proposed method uses Mixture of Experts (MoE) to improve the underlying weight-sharing mechanisms. The authors demonstrate the approach using machine translation models, which achieve state-of-the-art performance.
- LayerNAS: Neural architecture search in polynomial complexity by Google Research (https://arxiv.org/pdf/2304.11517.pdf). Authors propose LayerNAS, an algorithm that enforces a sequential search process, transforming multi-objective NAS into a combinatorial optimization problem. LayerNAS outperforms several NAS baseline models in top 1 accuracy. However, it often obtains these improvements with models that have a larger number of parameters and MAdds. LayerNAS is not as efficient as One-shot NAS, but future work will attempt the application of LayerNAS insights into One-shot NAS approaches.
Other
- Inference with Reference: Lossless Acceleration of Large Language Models by Microsoft (https://arxiv.org/pdf/2304.04487.pdf). Authors study accelerating LLM’s inference by improving the efficiency of auto regressive decoding. Authors observe what in many real-world applications an LLM’s output tokens often come from its context and they propose LLMA, inference-with-reference decoding mechanism to accelerate LLM inference by exploiting the overlap between an LLM’s output and reference that is available for many practical scenarios. Experiments show that LLMA method can generate identical results as greedy decoding but achieve over 2x speed-up across different model sizes in practical application scenarios like retrieval-augmented and cache-assisted generation.
- Scaling Down to Scale Up: A guide to Parameter-Efficient Fine-Tuning by The University of Massachusetts (https://arxiv.org/pdf/2303.15647.pdf).This survey summarizes over 40 papers related to parameter-efficient fine-tuning methods between February 2019 and February 2023. It provides taxonomy (see figure 2) and highlights key methods in each category with pseudocodes, and compares qualitatively in the aspects of storage, backprop, and inference efficiency (Table 1). It is a good time-saving paper to keep up with the space.
- On Architectural Compression of Text-to-Image Diffusion Models by Nota Inc. Korea (https://arxiv.org/pdf/2305.15798.pdf).This work compresses pretrained Stable Diffusion (v1.4) by handpicked removal of multiple residual and attention blocks in the denoising UNet. The derived models are subsequently trained with diffusion loss in conjunction with knowledge distillation to match teacher’s noise prediction and intermediate feature maps. Authors produce 3 models (base, small, tiny) with each training only utilizing a single A100 GPU and 0.1% of text-image pairs from LAION AestheticsV2 6.5+. On Xeon Cascade Lake and RTX3090, latency of a single 512x512 text-to-image generation (25-step denoising) has been shown to improve by 30-45%. Authors also show the applicability of the distilled models for Dream Booth personalization, demonstrating up to 99% performance of Dream Booth with original Stable Diffusion model.
Deep Learning Software
- JaxPruner: A Concise Library for Sparsity Research by Google Research (https://arxiv.org/pdf/2304.14082.pdf). Google Research open-sources weight pruning framework for the research of network sparsification and sparse network training in Jax ecosystem. JaxPruner works seamlessly with popular Jax Optimizer (Optax) and provides a common abstraction for weight masking, mask update scheduler, pruning regularity, sparse training (straight through estimator) and sparse model storage format. In the companion paper, JaxPruner implements a set of baseline sparsity algorithms and demonstrates easy integration to Jax framework of various domains such as FedJax (Federated Learning), t5x (NLP), Dopamine & Acme(Deep RL). See https://github.com/google-research/jaxpruner for more details.
Q1'23: Technology update – low precision and model optimization
Authors
Alexander Kozlov, Nikolay Lyalyushkin, Pablo Munoz, Vui Seng Chua, Alexander Suslov, Yury Gorbachev, Nilesh Jain
Summary
We continue following the trends and reviewing papers and posts for your convenience. This quarter we observed quite a lot of new methods, and one of the main focuses is the optimization of Large Language Models which are started being adopted by the industry. Please pay attention to Token Merging, GPTQ, and FlexGen works which introduce interesting methods and show very promising results.
Papers with notable results
Quantization
- CSMPQ: CLASS SEPARABILITYBASED MIXED-PRECISION QUANTIZATION by universities of China (https://arxiv.org/pdf/2212.10220.pdf). The paper introduces the class separability of layer-wise feature maps to search for optimal quantization bit-width. Essentially, authors leverage the TF-IDF metric from NLP to measure the class separability of layer-wise feature maps that are averaged across spatial dimensions. The method can be applied on top of the existing quantization algorithms, such as BRECQ and delivers good results, e.g., 71.30% top-1 acc with only 1.5Mb on MobileNetV2.
- Understanding INT4 Quantization for Transformer Models: Latency Speedup, Composability, and Failure Cases by Microsoft (https://arxiv.org/abs/2301.12017). Show that INT4 quantization for LM does not greatly reduce the quality of encoder-only and encoder-decoder models (e.g. BERT, BART). Even with 50%sparsity accuracy drop is within 1% on MNLI. The authors provide an analysis of problems with decoder-only models (e.g., GPT). The method will be part of DeepSpeed.
- A Practical Mixed Precision Algorithm for Post-Training Quantization by Qualcomm AI Research (https://arxiv.org/pdf/2302.05397.pdf). In this paper, authors propose two-phase algorithm to solve the problem of mixed precision quantization in the post-training quantization setting. In the first phase, they create a per-layer sensitivity list by measuring the loss(SQNR) of the entire network with different quantization options for each layer. The second phase of the algorithm starts with the entire network quantized to the highest possible bitwidth, after which based on the sensitivity list created in phase 1, they iteratively flip the least sensitive quantizers to lower bit-width options until the performance budget is met or our accuracy requirement gets violated. The method shows comparable results for various models including CV and NLP.
- LUT-NN: Towards Unified Neural Network Inference by Table Lookup by Microsoft Research, Chinese Universities (https://arxiv.org/abs/2302.03213). Development of the idea of product quantization "multiplications without multiplications" – pre-calculate multiplications of "typical" numbers and in runtime, instead of multiplication and addition they do a lookup in the table. The accuracy is lower than the baseline networks, but way better than in previous methods. Latency-wise, the real speedup of LUT-NN is up to 7x for BERT and 2x for ResNet on CPU.
- Oscillation-free Quantization for Low-bit Vision Transformers by Hong Kong University of Science and Technology and Reality Labs, Meta (https://arxiv.org/pdf/2302.02210.pdf). In this work, authors are aiming at ultra-low-bit quantization of vision transformer models. They propose three techniques to address the problem of weight oscillation when quantizing to low-bits: statistical weight quantization to improve quantization robustness compared to the prevalent learnable-scale-based method; confidence-guided annealing that freeze sthe weights with high confidence and calms the oscillating weights; and query-key reparameterization to resolve the query-key intertwined oscillation and mitigate the resulting gradient misestimation. The method shows state-of-the-art results when quantizing DeiT-T/DeiT-S models to 2 and 4 bits.
- Mixed Precision Post Training Quantization of Neural Networks with Sensitivity Guided Search by University of Notre Dame and Google (https://arxiv.org/pdf/2302.01382.pdf). Authors are aiming at building an optimal bitwidth search algorithm. They conduct an analysis of metrics to of quantization error as well as two sensitivity-guided search algorithms. They found that a combination of Hessian trace + Gready search gives the best results in their setup. Experimental results show latency reductions of up to 27.59% (ResNet50) and 34.31% (BERT).
- Teacher Intervention: Improving Convergence of Quantization Aware Training for Ultra-Low Precision Transformers by Hanyang University and Seoul National Universities (https://arxiv.org/pdf/2302.11812.pdf).One more paper that claims benefits from knowledge distillation between intermediate layers of Transformer models during optimization. In this case, authors apply Quantization-aware Training at ultra-low bit width setup (e.g. ternary quantization). They perform an extensive analysis of KD on the training stability and convergence at multiple settings and do evaluation both on NLP and CV Transformer models.
- POWERQUANT: AUTOMORPHISMSEARCH FOR NONUNIFORM QUANTIZATION by Sorbonne University and Datakalab (https://arxiv.org/pdf/2301.09858.pdf). The paper proposes a non-uniform data-free quantization method that is, essentially, a modification of uniform quantization with exponent parameter alpha that is tuned during the quantization process. The method shows its effectiveness when applying 8 and 4 bits quantization to various types of models including Conv, RNN and Transformer models.
- GPTQ: Accurate Post-Training Quantization for Generative Pre-trained Transformers by IST Austria, ETH Zurich, and Neural Magic (https://arxiv.org/abs/2210.17323). Authors argue that contemporary PTQ methods such as AdaRound, BRECQ, ZeroQuant are too costly to quantize massive-scale LLM. GPTQ is an extension of Hessian-based post-training quantization method, Optimal Brain Quantization(OBQ) to scale up the process efficiently for billion parameters LLM which takes only minutes to quantize weight of 3 billion GPT and 4 hours for OPT-175Bon a single A100 GPU. The papers show that 3-bit weight quantized OPT-175B can be fit into a single 80GB A100 which would otherwise require 5xA100 for FP16,4xA100 for Int8 (SmoothQuant).The optimized model achieves >3X latency improvement with a custom dequantization kernel for FP16 inference. Although the work does not map to Int8 engine, it is a strong indication that mix low-bit weight (<8bit) and8-bit activation could further alleviate the memory footprint and bandwidth bottleneck in LLM by incurring a low-overhead weight dequantization. Code is available at: https://github.com/IST-DASLab/gptq.
Pruning
- SparseGPT: Massive Language Models Can Be Accurately Pruned In One-shot by IST Austria and Neural Magic (https://arxiv.org/abs/2301.00774). The layer-wise pruning decisions are based on series of careful approximations of the inverse Hessian of the data. LLM can be pruned to at least 50% sparsity in one-shot, without any retraining, at minimal loss of accuracy for LLM. SparseGPT generalizes to semi-structured (2:4 and 4:8) patterns and is compatible with weight quantization approaches.
- ZipLM: Hardware-Aware Structured Pruning of Language Models by IST Austria and Neural Magic (https://arxiv.org/pdf/2302.04089.pdf). The idea is to prune gradually based on measured latency for different number of attention heads and FFN shapes. The pruning decisions are based on estimation of the inverse Hessian of the data. Using it they obtain the optimal layer-wise mask and weight update to preserve original intermediate outputs. To recover accuracy after pruning they tune with 2 distillation losses: with teacher outputs and with intermediate token representations across the entire model. 2x faster BERT-large than the Block Movement Pruning algorithm for the same accuracy. ZipLM can match the performance of highly optimized MobileBERT model by simply compressing the baseline BERT architecture. Authors plan to open-source the framework as part of SparseML.
- R-TOSS: A Framework for Real-Time Object Detection using Semi-Structured Pruning by Colorado State University (https://arxiv.org/ftp/arxiv/papers/2303/2303.02191.pdf). A practical study on semi-structured pruning of ConvNets. Authors propose a method that generates a set of sparse patterns for the model and applies them to introduce the sparsity during the training. The same set is passed to the runtime to precompile the sparse kernels. They also propose a way how to spread the same idea to 1x1 Convs that are dominant in contemporary architectures. The method is applied to YOLOv5 and RetinaNet models and its efficiency is evaluated on Jetson TX2 platform.
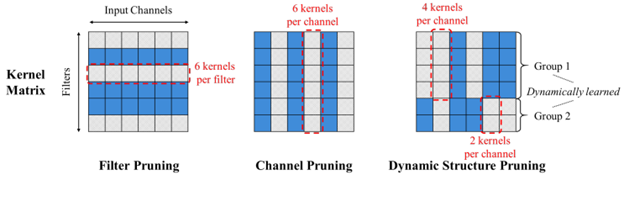
- Dynamic Structure Pruning for Compressing CNNs by Korea University (https://arxiv.org/pdf/2303.09736.pdf). Interesting work on the structured pruning where all the filters of each operation are being split into the groups and each group is pruned independently along the input channel dimension. One can imagine that each operation is being split into several operations and each operates on its own portion of input channels (ala grouped convolution). Authors also propose a differentiable group learning method that can optimize filter groups using gradient-based methods during training. The method shows better efficiency compared to Filter pruning methods. Code is available at https://github.com/irishev/DSP.
- Automatic Attention Pruning: Improving and Automating Model Pruning using Attentions by Arizona State University and Meta (https://arxiv.org/pdf/2201.10520.pdf). Authors propose an iterative, structured pruning approach for finding the “winning ticket” models that are hardware efficient. They also implement an attention-based mechanism for accurately identifying unimportant filters for pruning, which is much more effective than existing methods as well as an adaptive pruning method that can automatically optimize the pruning process according to diverse real-world scenarios. Method shows comparable results for a variety of CV model architectures. Code is at: https://github.com/kaiqi123/Automatic-Attention-Pruning.git.
- Efficient Spatially Sparse Inference for Conditional GANs and Diffusion Models by CMU, MITand Stanford University. Motivated by the high unedited region during interactive image editing that translates to activation sparsity relative to previous generation, the authors propose Sparse Incremental Generative Engine (SIGE). SIGE employs tile-based sparse convolution to compute modified region in input activation and update to the cached output activation of the previous generation. SIGE is intelligently designed with joint Scatter-Gather kernel to avoid memory overheads and fuses element-wise operations. The paper shows superior synthesis fidelity (PSNR,LPIPS, FID) for the task of incremental inpainting as compared to weight pruning at similar MAC reduction ratio. The authors also extensively benchmark latency of SIGE applied to DDIM, PD, GauGan on Nvidia RTXs, Apple M1 Pro and Intel i9 workstation. Speedup can be up to 14X depending on percentage of edited region. Code: https://github.com/lmxyy/sige.
- Token Merging: Your ViT but faster by Georgia Tech and Meta AI (https://arxiv.org/pdf/2210.09461.pdf). As opposed to token pruning, the authors unveil runtime token merging (ToMe) modules inserted between attention and feed forward layer in vision transformer (ViT) which reduce number of tokens successively in every transformer block up to 98% tokens in final block, easily achieve substantial acceleration up to 2X without the need to train. During runtime, ToMe employs bipartite soft matching algorithm to merge similar tokens and is as lightweight as randomly dropping tokens. When accuracy degradation is high, authors devise a training mechanism for ToMe by mapping its backpropagation like average pooling. Its training efficiency improves considerably, 1.5X as compared to learning-based token pruning. The paper shows thorough ablation on design choices of matching algorithm, token merging schedule etc. and a plethora of accuracy-speedup results on off-the-shelf ViT trained with different supervised/self-supervision for image, video, and audio data. The work is featured in Meta Research blog and claimed to accelerate Stable Diffusion’s text-to-image generation by 1.7X without loss of visual quality. Code: https://github.com/facebookresearch/ToMe.
Neural Architecture Search
- Neural Architecture Search: Insights from 1000 Papers by Universities and Abacus AI (https://arxiv.org/pdf/2301.08727.pdf). A big survey of the many recent NAS methods. The document provides a good organization of various approaches and nice illustrations of different techniques.
- Enhancing Once-For-All: A Study on Parallel Blocks, Skip Connections and Early Exits by DEIB, Politecnico di Milano (https://arxiv.org/abs/2302.01888). The authors propose OFAv2, an extension of OFA aimed at improving its performance. The extension to the original OFA includes early exits, parallel blocks and dense skip connections. The training phase is extended with two new phases: Elastic Level and Elastic Height. The authors also include a new Knowledge Distillation technique to handle multi-output networks. The results are quite impressive. In OFAMobileNetV3, OFAv2 reaches up to 12.07% improvement in accuracy compared to the original OFA.
- DDPNAS: Efficient Neural Architecture Search via Dynamic Distribution Pruning by Xiamen University and Tencent(https://link.springer.com/article/10.1007/s11263-023-01753-6). The authors propose a framework, DDPNAS, that is used to dynamically prune the search space, and accelerate the search stage. However, this acceleration requires a more complex training stage, in which to find the optimal probability distribution of possible architectures, the approach samples a set of architectures that are trained and validated, and once the distribution has been updated, the operations with the lowest probability are pruned from these arch space.
- DetOFA: Efficient Training of Once-for-All Networks for Object Detection by Using Pre-trained Supernet and Path Filter by Sony Group Corporation (https://arxiv.org/pdf/2303.13121v1.pdf).The authors propose a new performance predictor called path filter. This predictor can accurately predict the relative performance of models in the same resource bucket. Using the information obtained from path filter, DetOFA prunes the search space and reduce the computational cost of identifying good subnetworks. This approach produces better-performing super-networks for object detection and a reduction in the cost of >30% compared with the vanilla once-for-all approach.
Other
- NarrowBERT: Accelerating Masked Language Model Pretraining and Inference by University of Washington (https://arxiv.org/pdf/2301.04761.pdf). Propose two simple methods to accelerate training/inference of transformers. Utilize the idea that training prediction occurs only for masked tokens, and on inference in many problems, representation is used only for the [CLS] token. In the first approach they calculate the attention (s) on all tokens only at the beginning of the network, and then perform linear layers (f) only for the desired tokens (masked or CLS). In the second - calculate the attention (s) on all tokens only at the beginning of the network, and then generate an attention only for the necessary tokens. Shows 3.5x boost on MNLI inference.
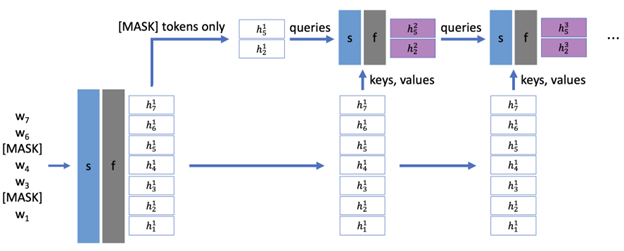
- TAILOR: Altering Skip Connections for Resource-Efficient Inference by UC San Diego, MIT and AMD (https://arxiv.org/abs/2301.07247). Continuation of the ideas of RepVGG - they remove or at least shorten the skip connection for more efficient inference: they do not store intermediate activations and save on memory. The model with the removed skip connections is distilled with a float version of itself to roughly preserve the original accuracy. The optimized hardware designs improve resource utilization by up to34% for BRAMs, 13% for FFs, and 16% for LUTs.
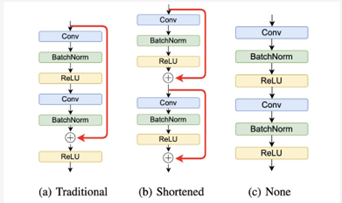
- Offsite-Tuning: Transfer Learning without Full Model by Massachusetts Institute of Technology (https://arxiv.org/pdf/2302.04870v1.pdf). In this paper, authors propose a transfer learning framework that can adapt large foundation models to downstream data without access to the full model. The setup assumes that the model owner sends a lightweight adapter and a lossy compressed emulator to the data owner, who then fine-tunes the adapter on the down stream data with the emulator’s assistance. The fine-tuned adapter is then returned to the model owner, who plugs it into the full model to create an adapted foundation model. The method can achieve comparable accuracy as full model fine-tuning while being privacy-preserving and efficient, achieving 6.5×speedup and 5.6× memory reduction. Code is available at: https://github.com/mit-han-lab/offsite-tuning.
- High-throughput Generative Inference of Large Language Models with a Single GPU by Stanford University, UC Berkeley, ETH Zurich, Yandex, HSE University, Meta, Carnegie Mellon University (https://arxiv.org/pdf/2303.06865.pdf). The paper introduces FlexGen, a high-throughput generation engine for running LLMs with limited GPU memory. It can be flexibly configured under various hardware resource constraints by aggregating memory and computation from the GPU, CPU, and disk. Through a linear programming optimizer, it searches for the best pattern to store and access the tensors, including weights, activations, and attention key/value (KV) cache. FlexGen further compresses both weights and KV cache to 4 bits with negligible accuracy loss. It achieves up to 100× higher throughput compared to state-of-the-art offloading systems. The FlexGen library runs OPT-175B up to 100× faster on a single 16GB GPU. Faster than deepspeed offloading. Code is available here: https://github.com/FMInference/FlexGen